If you’re ever in need of a quick and easy cake decorating idea, do what we did for the family cake for Henri’s 9th birthday and cover it in candy! (Technically “chocolates”, though the Smarties count as both).
Bake your cake(s) and prepare them for decorating with your preferred methods (or follow my tutorial).
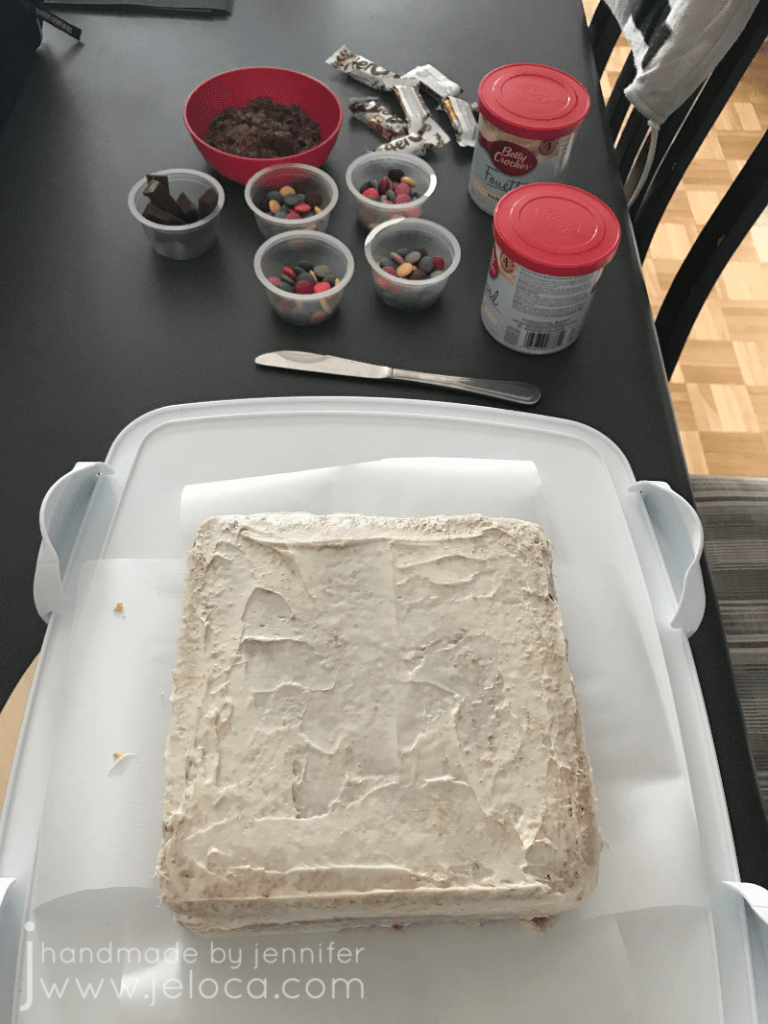
While the crumb coat is setting up, prepare your chosen candies and chocolates. As Henri’s birthday is in January, I used Smarties, Aeros and KitKats left over from Hallowe’en. Unwrap everything and crush up anything you want to use crushed (like my Aeros). You want everything ready and at hand while the next layer of icing is still wet, so it will stick well.
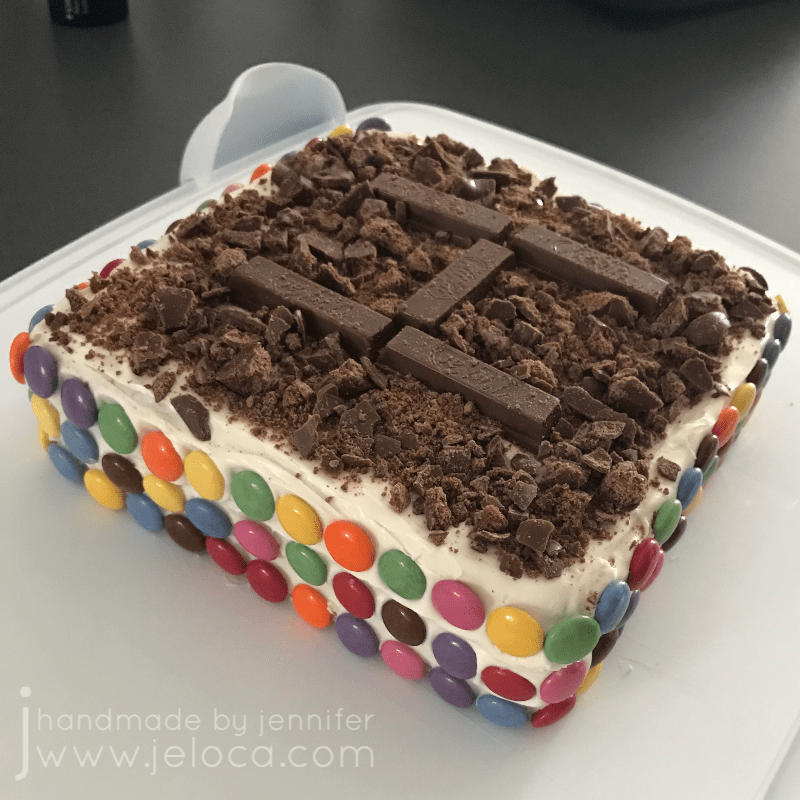
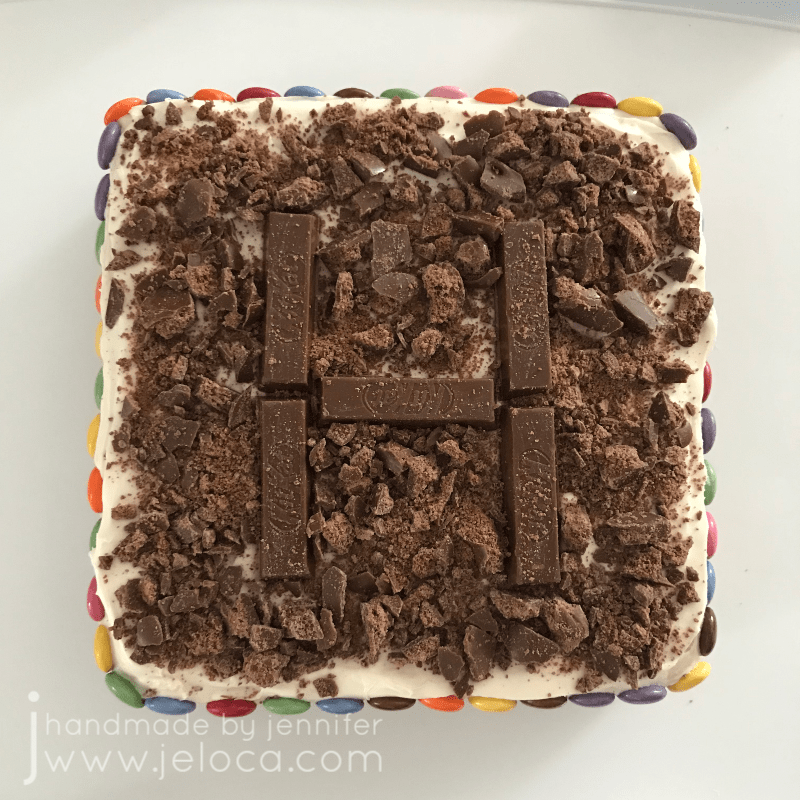
Add a clean layer of icing to the cake on top of your chilled crumb coat, and then stick your candies into place. Lining the edges in Smarties is fun, easy and colorful. You can sort by colors and place in a pattern (as I did here) or you can use them randomly as with this cake (or this example).
Finally, you can decorate the top. Use KitKat bars to spell out an initial or age and fill in the remaining surface with crushed Aeros. Pat down gently with a clean, dry hand to embed the little chocolate bits into the icing well, so they don’t fall off when you move or transport the cake.
Candy and cake make a great combination and the great taste will belie just how easy this is to put together for any holiday or occasion.
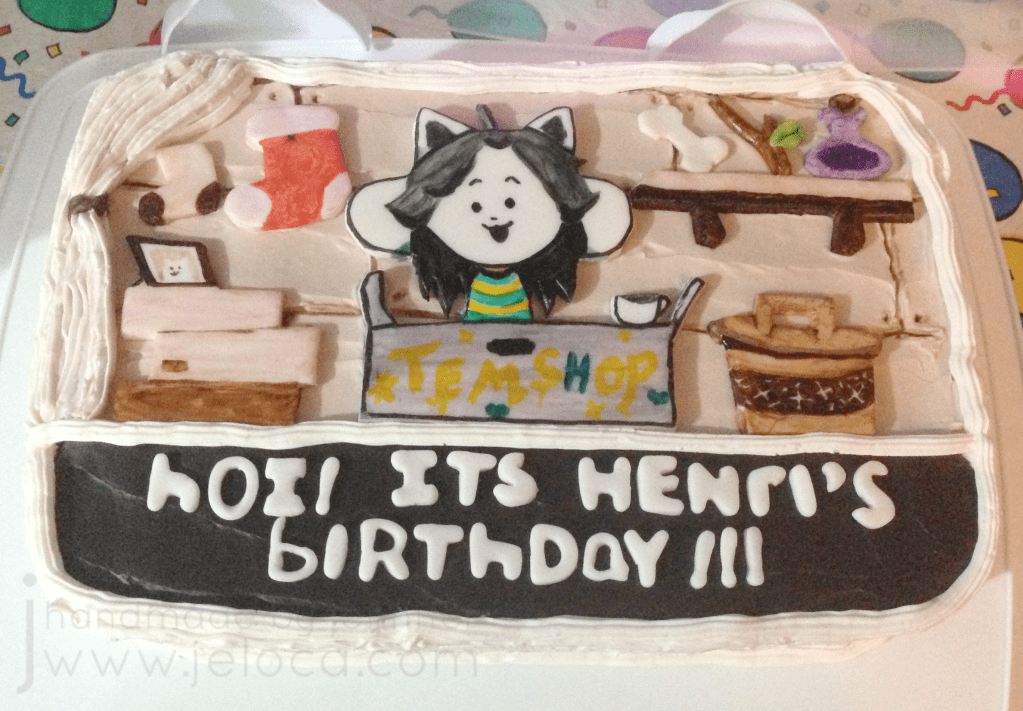
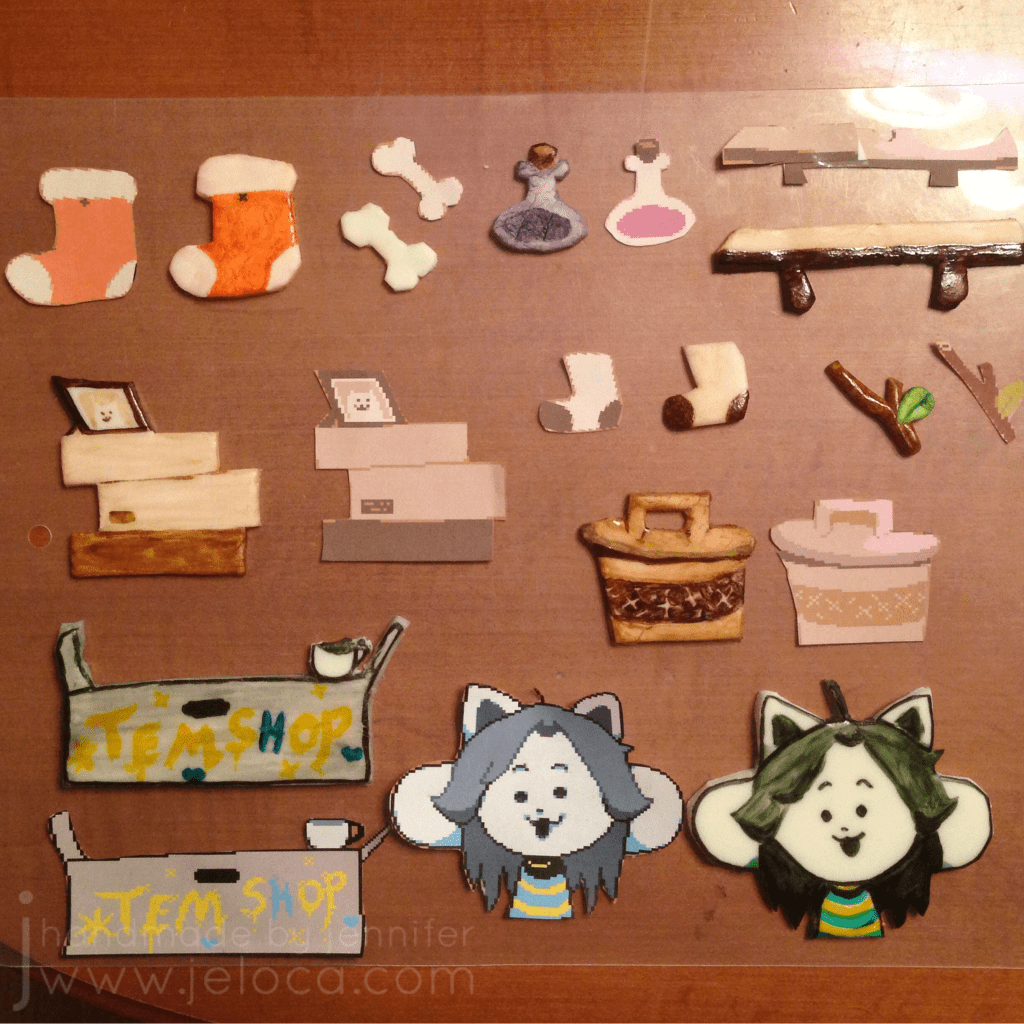
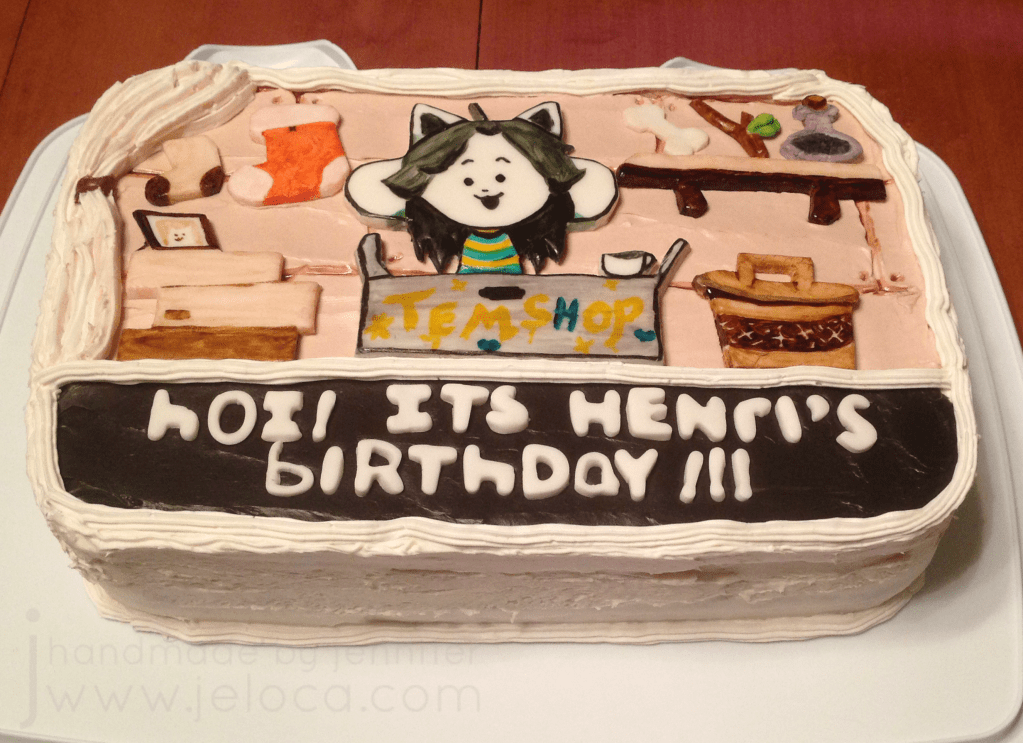
Henri is going to be 13(!!) on Saturday, so between now and then I’m going to share some of his past birthday cakes that haven’t hit the blog yet, with full tutorials for the ones that are possible. First up is this Tem Shop cake from his 8th birthday, back in 2017
The kids (and I, if I’m being honest) were bit hard by the huge phenomena that was Toby Fox’s Undertale. The name “Flowey” instantly evokes a bigger horrorscape than the trippy sequence in Fantasia, we use “determination” in more sentences than appropriate and often have Megalovania and the rest of the incredible soundtrack on repeat. For a while Henri’s favorite character was Temmie and in addition to adding “Hoi!” to nearly everything he said, he was determined to have a Tem Shop birthday cake.
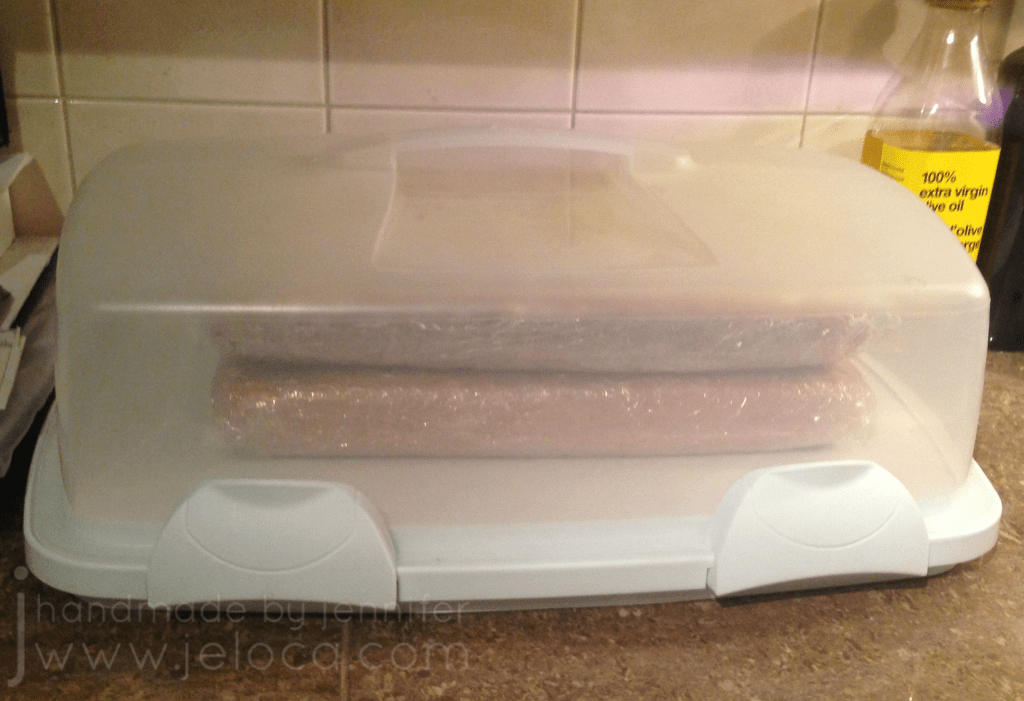
A few days before his party I baked up 2 cakes in my usual way and set them aside so I could work on the fondant toppers.
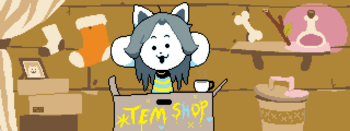
I found a reference image from the game online:
Then I resized it to the scale of my cakes, using the baking dish as a guide.
The bottom third of the cake would be the black text box that’s always present on screen, so I scaled my reference image to fit 2/3 of the cake and printed it out.
I rolled out some white fondant onto my Wilton measuring mat, using my roller with spacers to get an even thickness. Then I used the blade tool from my gum paste tool set to carefully cut out each piece.
I set the pieces aside for a few days, flipping them over about twice per day, so they would harden. The more moisture that gets removed from the fondant prior to painting the better, since painting will add moisture and I don’t want the sugar to melt down.
Anytime I do fondant painting (ex: Minecraft cake, Charlie & Lola cake, Skylanders cookies, Montreal Canadiens cake) I always like to assemble all my supplies within reach. This includes the paintbrushes and palette I use exclusively for food, Wilton and AmeriColor gel colors, a small jar of vodka for diluting icing gels, toothpicks for getting the gels out of the tubs, plus icing sugar for thickening my homemade edible “paints”.
Gel colors dilute super easily, so a tiny dab on a palette is often all you’ll need for beautiful, rich colors.
I painted each piece to match its in-game counterpart. Most are easy enough to eyeball but if ever you’re not sure of dimensions you can sketch lightly over the reference with the tip of a pin and emboss guide lines into the fondant.
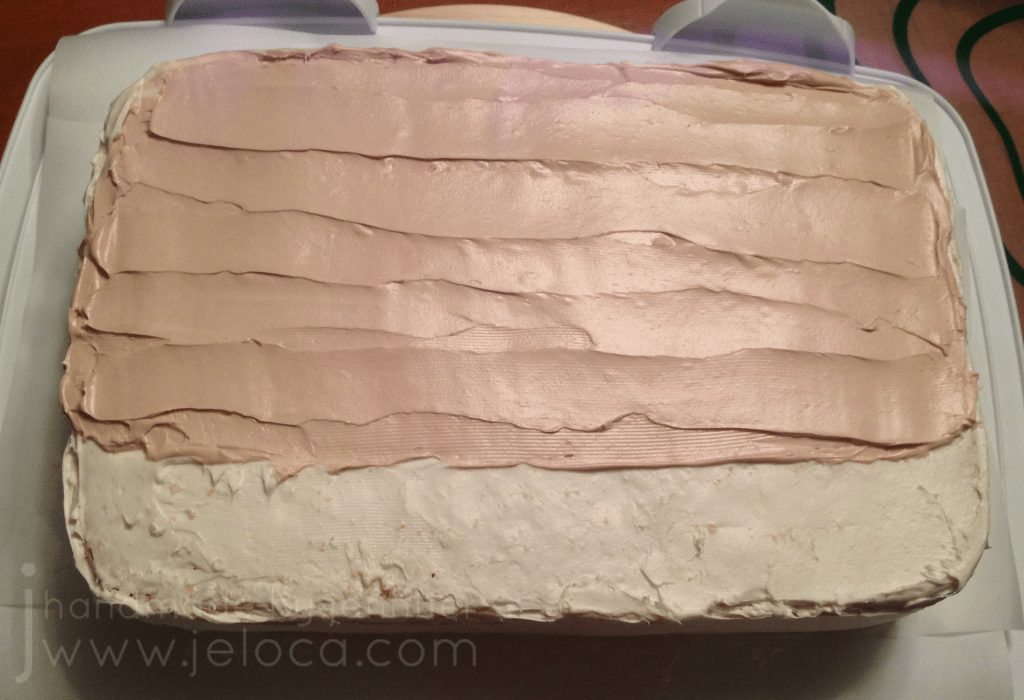
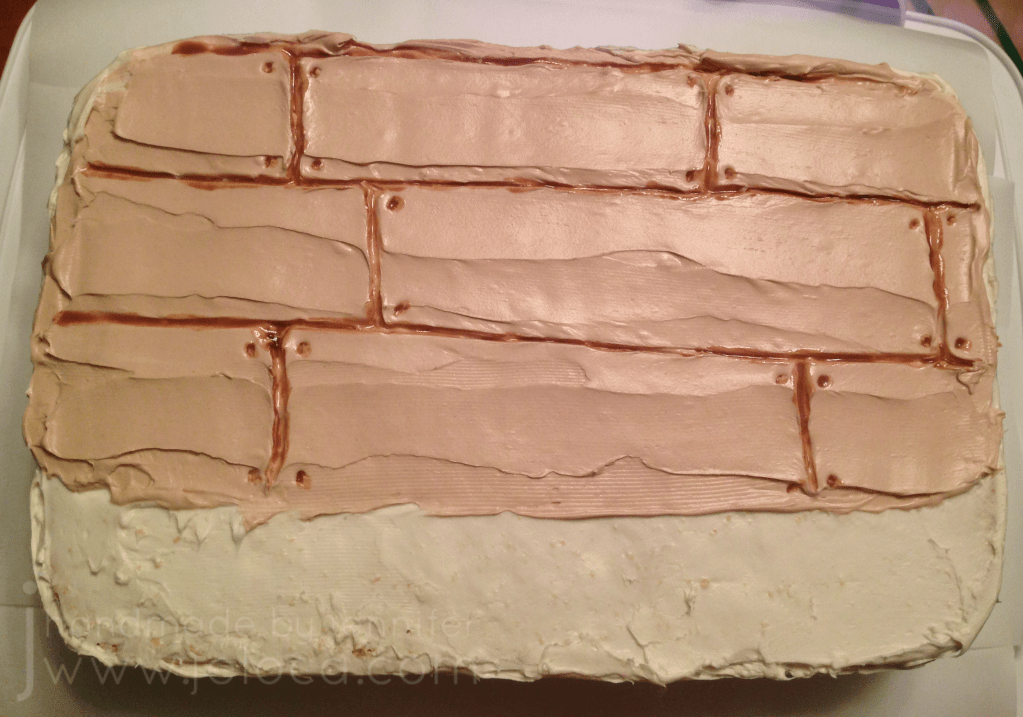
Once the pieces were touch-dry I prepared the cake itself. First I gave it a crumb coat.
Then I tinted some icing to match the wood background of the shop and applied it over the shop section of the cake, making sure to apply it thick enough to lightly carve into without reaching the cake below.
I used a toothpick to score lines for the wood wall then diluted some brown gel color and carefully flooded it into the grooves.
The final touch was to add some nail heads, and the wall portion was done.
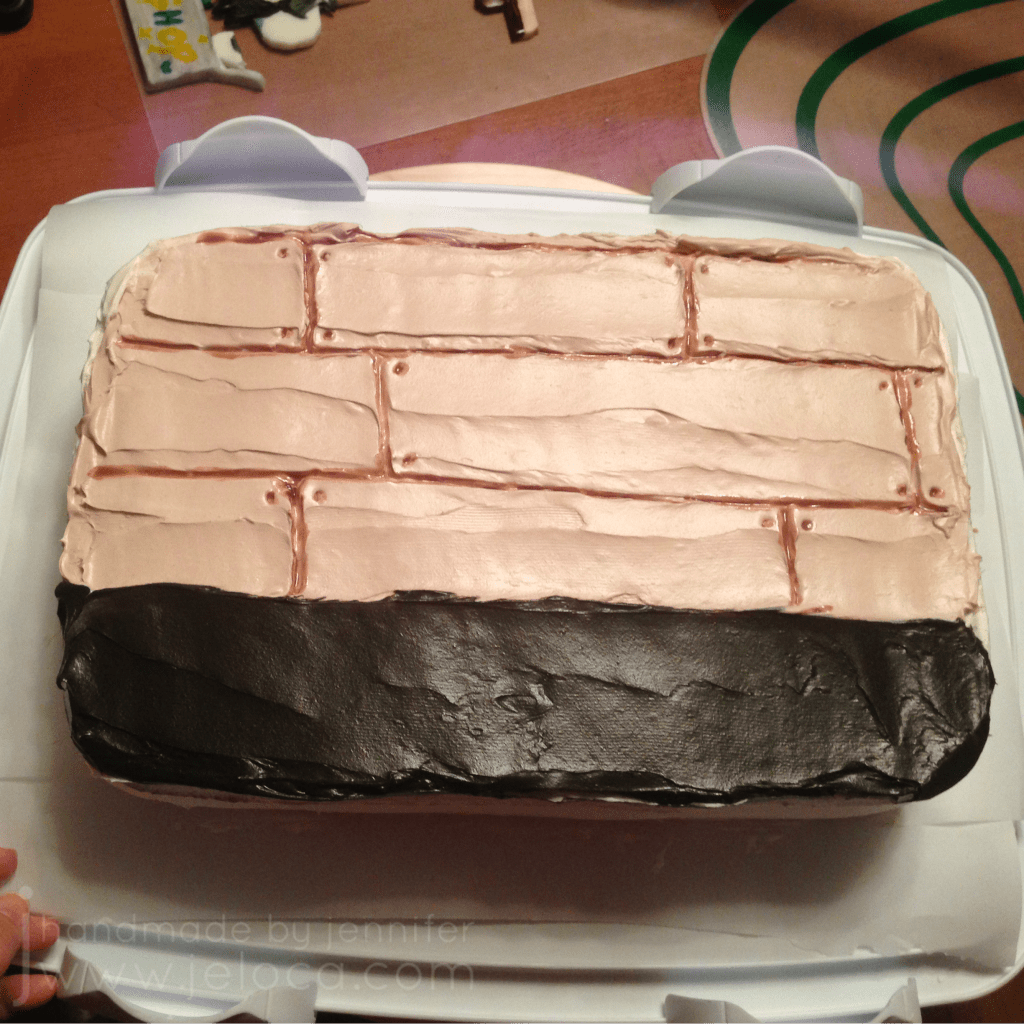
After that I tinted icing black for the text box.
Pro tip: if you start with chocolate icing (instead of white vanilla) you’ll use much less black coloring, which will avoid any bitter taste in the icing.
I covered the remaining part of the cake in black, and then added the figures, and then finished up the outside and edges of the cake with white icing to clean everything up.
If you add the fondant toppers while the icing is still moist, they’ll stick in place without issue. If your icing has already started to crust over then you can paint a little bit of water on the back of the fondant and that will adhere it in place. Try to avoid getting too close to the edges with the water, so it doesn’t leak out around the edges and cause bleeding onto the base icing.
Final step was to use a set of mini alphabet cutters to cut out the message in Temmie’s mixed-caps word style.
Again, for reference, here’s the image of the Tem Shop in the game:
As last mentioned in my plastic canvas wall hangings update, back in 2019 I’d given myself a pretty ambitious resolution: a challenge to turn 19 “works in progress” into “finished objects”. The first project added to my “19 WIP-to-FO Challenge” was my wall of Project Memory Jars
I’ve had a longstanding tradition of keeping a little length of yarn from each knitted and crocheted project I’ve made (later adding plastic canvas projects as my fiber hobbies crew). It started as keeping a bit of yarn in case there was need for repairs, but other than mending some knitted socks, it didn’t really wind up being a useful hoard item. That said, I have a strong visual memory and it was lovely to look back at the various yarns and remember the projects I’d made. The small colorful scraps would often bring up vivid memories of the gift recipient or technique I’d struggled with or laughter with crafty buddies in a workshop.
Originally these remnants were rolled into a ball and tied on one after another. It made them easy to store but impossible to see all the yarns on the inner layers.
My first “solution” was to make them into something tangible. They’d still have the same memory placeholder and all would be visible. Back in 2012 I eagerly cast on for a crochet granny square and made a few large blocks, intending to one day sew them into a large scrappy blanket.
This worked…fine actually. It was a chaotic mess and I knew I’d love the resulting blanket. The problem was that it would never be finished. I’d be storing a bag of 12″ granny squares for decades because even though I work on 50-100 projects yearly, the amount of triple-crochet stitches I’d be able to get from a few yards of leftover yarn was minimal.
So I thought about it and came up with a different idea. A silly little memory wall that makes no sense to anyone but me, but makes me smile and remember all the projects I put my time, effort, energy and care into.
My project memory jars
The shelves and brackets were extras from my previous job, so luckily I had those already on-hand.
Now that the wall was ready it was time to fill the jars. Which meant finally getting around to undoing the granny squares. Since it was the first item on my 19-for-19, it made sense to start with that one first.
1. FO Project Jars
What I said: I need to rip out all the individual lengths of yarn (1-10 yards long, each), match them up with what project they were from, and put the separated yarn into jars designated for each year.
What I did: basically exactly that. Only what took one sentence to type took hours to actually do. Frogging the granny squares was easy work, but before I could start I had to look at the center stitches of each block and figure out what project that was from, so I could put the blocks into a chronological order. (Luckily I take detailed project notes and my Ravelry page is mostly up to date!)
Once I’d figured out which blocks went where time-wise, I ripped them back and rolled them back into one big ball as I went, so the newest yarn was on the inside. Once everything was frogged I was able to start with the oldest scraps and begin to sort.
It was slow work but I moved through the yarn, cutting away the knots and putting a few inches of each yarn into the relevant year’s jar. Since the jars aren’t huge I only kept a bit of each and had a colorful pile of spaghetti left over at the end, which I later separated by length.
Anything that was a yard or more I rolled up and added to my mini ends bin, for use as waste yarn, stitch holders and row counters, or random craft projects.
I only undid knots for the cotton scraps because I had plans to re-use those. Every time I got to cotton yarn I added it to this growing ball, which I later turned into 2 scrappy dishcloths for my kitchen, using my own perfect, lay-flat, knitted diagonal garter dishcloth pattern.
I used about half of the scraps to make a smaller cloth with a hanging bit on the end, and then used up all the rest for the 2nd cloth. (The pattern is knit like a diamond so all you need to do to use up every bit of yarn is to find your center…work half the cloth until you hit the center point and then start the decreases to work the remaining half).
With all the jars filled and the extra bits used up, that officially marked the first of my 19 completed WIP-to-FO projects for my challenge, and now I have a silly bit of wall décor that confuses everyone who comes into my home office. I get to look at it and reminisce about all the people I’ve knit for and all the yarn-related creativity that moved between my fingers.
Here’s looking ahead to 2022 and all the projects it will bring.
Happy New Year!
This post may contain affiliate links. This means I might make a small commission on purchases made through the links, at no cost to you.
Looking for a different way to label your gifts this holiday season?
These personalized plastic canvas gift tags are quick and easy to make and are reusable as charms after the wrapping paper’s been recycled.
You only need a few supplies to get started:
plastic canvas – I used 7-ct but if you have a more complicated design that you want to fit into a small area, you can use 10-ct or 14-ct. (The “count” is how many holes per inch).
plastic lobster hooks – metal will work just as well. You can even cannibalize hardware from broken keychains or charms you already own
yarn – scraps from other projects will work great for this
The first step is to choose your designs so you can create a chart. My example tags were made for a young boy whose name starts with a “B” and was really into Minecraft, and a young girl whose name starts with “K” and was really into Monster High. So I decided to put their initials on one side and something iconic from each theme (Creeper & Skullette) on the other.
I used Excel to create my charts but you can just as easily use graph paper. If using Excel resize your cells into squares and then use the color fill to draw your designs, 8-bit pixel-style.
For the Creeper tag I went with a square shape since most Minecraft mobs have square heads. I then “drew” a capital b in a grid of the same size as the Creeper face. I decided not to do the typical blend of colors for the Creeper since this was just a quick add-on to the birthday party gift we were giving, but you can get as creative as you’d like!
For the Monster High tag I found a free-use Skullette chart and used the size of that chart as a basis for my “K” chart, which I drafted in a font similar to that of the Monster High lettering.
You have freedom to design anything you’d like for your tags! Your only limit is the total size you’d like your tags to be, as the bigger your design, the bigger the results.
The next step is to cut out plastic canvas pieces the sizes required for your tags. Remember that it takes 2 holes on the diagonal to make 1 continental or cross stitch with plastic canvas, so if your grid is 10×10 pixels then you need to cut out a piece of plastic canvas 11 holes x 11 holes, etc.
Stitch your pieces as desired. I used continental stitch (half of a cross-stitch) and did the green background for each piece first, leaving one piece with a tail about 3-4 times as long as the full perimeter. This is optional but by leaving the seaming yarn as your tail it’s one less end to hide later.
After the green I filled in the spaces with black for the “B” and the Creeper’s face.
I followed the same process for the other tag, working from background first to the details last, so the details would remain sharp and not risk getting fuzzy at the edges. First I did the white background (flipping Skullette so the bow would be on the right since the original chart was for Perler beads which get flipped after ironing), then the purple (as I didn’t have pink scraps handy), and finally the black, which I also used to backstitch some shading under the “K”. I didn’t do the tail trick for this one as I wanted to seam it with a different color.
To seam, hold the pieces with wrong-sides together and go from back to front through the first corner 3 times. Next whipstitch around the first side and when you get to the next corner, go through it 3 times again, and continue this process around. When you get to the corner where you’d like to put the hook, do the first corner wrap, then wrap twice while also going through the hook’s jump ring, then go through the corner alone once more.
After all 4 sides are fully seamed you can skim your needle through one side’s wraps and pull the yarn through, for about an inch, then trim the excess as close as you can.
These little tags are under 3″ making them perfect to clip onto a schoolbag or tote.
They really add a personal, handmade touch to a gift without taking too much time or costing the bank.
Have fun creating your own!
This post may contain affiliate links. This means I might make a small commission on purchases made through the links, at no cost to you.
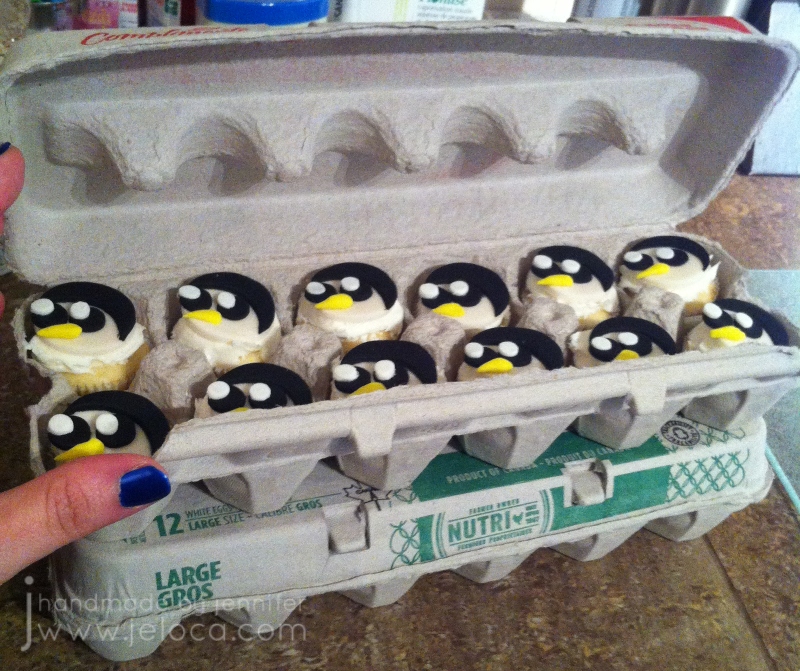
Today, December 15, is one of the many days recognized as “National Cupcake Day”. We’re also halfway to the holidays! In case you’re planning on bringing a little home-baking to your celebrations, here’s a quick and easy little tip to help you out.
Picture it. You’ve baked a dozen (or more) mini cupcakes. They’re all iced and decorated and smelling delicious. But you don’t have a cupcake carrier and your largest Tupperware is already in use! What do you do?
Voila!
I know what you’re thinking. “If this is about cupcakes, why are you showing me egg cartons?”
Ahhh because those aren’t eggs inside!
Surprise!
Ok ok, so I know what you’re thinking now. “Sure, it’s an easy way to get them to wherever I’m going, but how am I going to get them out afterwards? Won’t I squish the cupcakes? If I tug on the fondant toppers won’t they just pop off the icing? And what if I only have icing on top? I can’t very well grab THAT, now can I?”
Ahh don’t worry, I’ve got you covered! It’s as easy as…
…1…
…2…
…3
Poke!
Of course it does take a quick moment of prep, so let’s rewind.
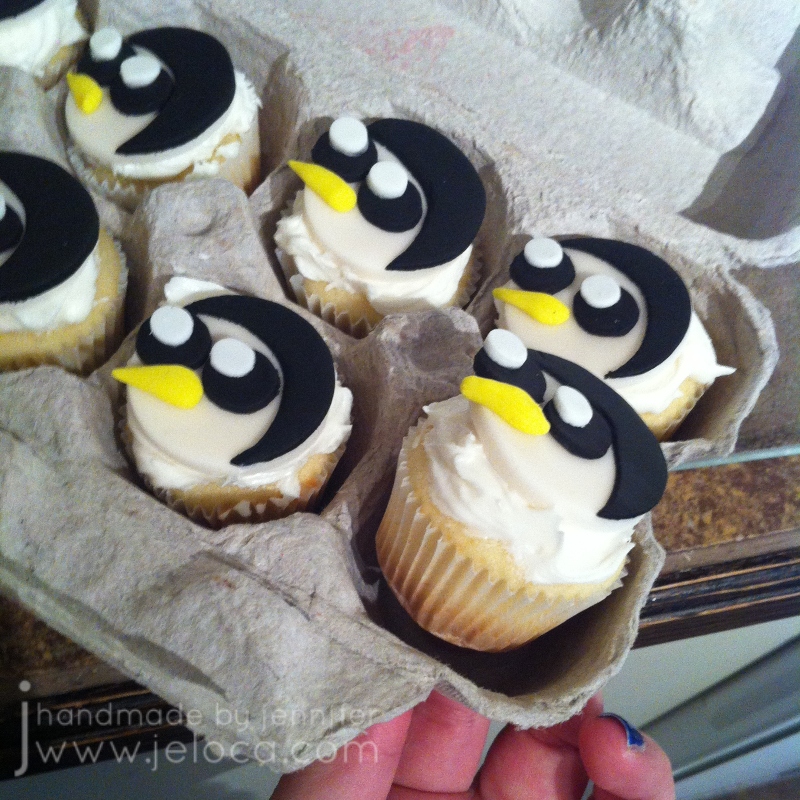
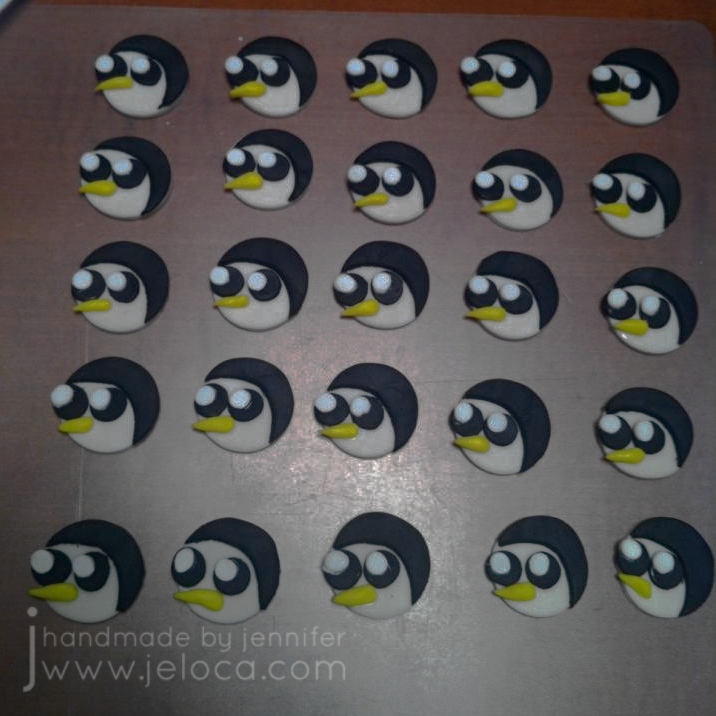
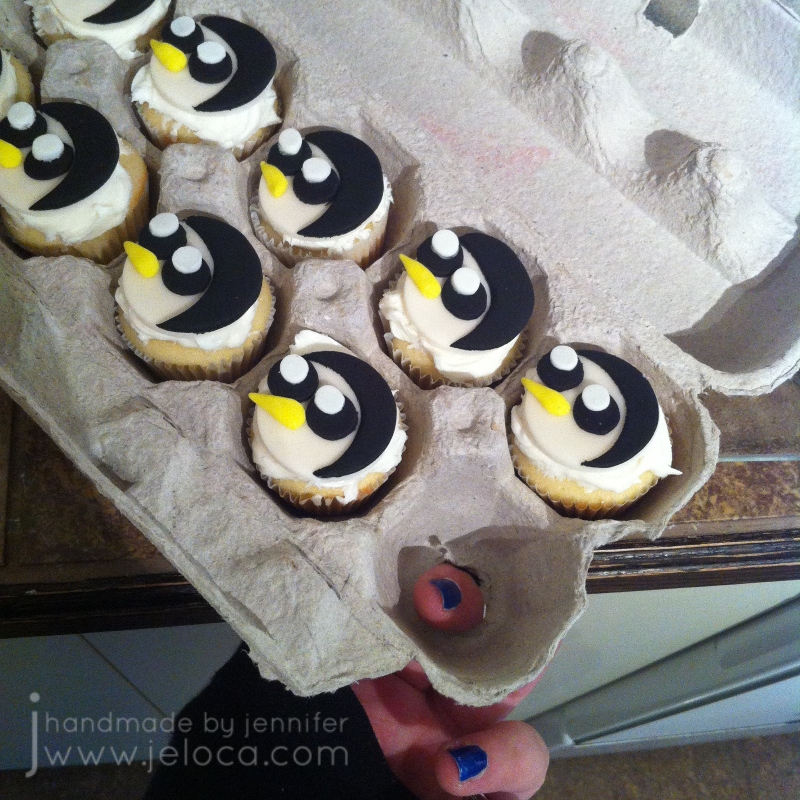
First, make your toppers. These were for Jakob’s 7th birthday, when he was super into Adventure Time. His birthday cakes 2 years in a row were AT-themed, and these cupcakes were a little extra treat to surprise his class at school (back when we were able to do that).
As always when making most toppers (Pitfall cake, Charlie and Lola cake, Minecraft cake, etc) I recommend making them a few days in advance. Not only will this allow the fondant to harden, making placement easier, but it will also help prevent the fondant from absorbing moisture from the icing (or water/fondant glue) and disintegrate on you.
The Gunter toppers are pretty simple to make. Roll out some white fondant and use a circle cutter in your desired size for his face. I went with a cutter the size of the top of my mini cupcakes. I like to use a fondant roller with levelers but you can eyeball it. Roll your white fondant scraps a bit thinner and use your smallest cutter for the eye shine. For my size cupcakes I used a large smoothie straw for the eyes so a regular straw was perfect for the white shiny dots. Set the white circles aside and roll out some black fondant. Use the same cutter as for the head to cut one black circle for each face, and then shift it down a bit and cut away most of it to create a crescent moon-type shape. Use water or fondant glue to attach the black crescent to the white face, and then use the remaining black to cut out his eyes. Attach the eyes to the face and then the eye shine to the eyes. Finally get some yellow fondant (or tint the scraps of your white) and use your fingers to pinch off tiny pieces and roll them into mini cones for his beak. The cutters do the bulk of the work for you and assembly is pretty fast, making this a really simple design.
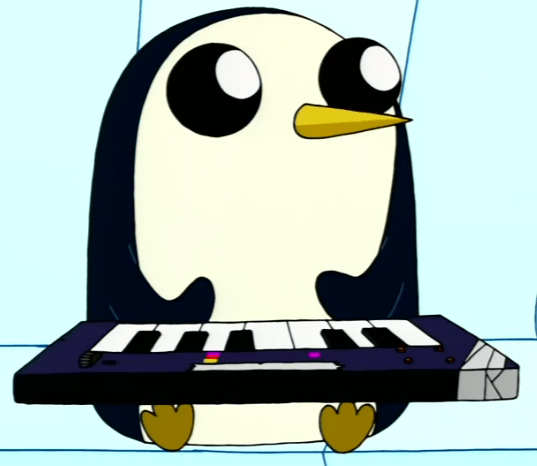
For reference, here’s Gunter in the show:
Next, bake your cupcakes. I didn’t take progress pics of this part but it was a basic vanilla cake recipe and a swirl of store-bought icing.
Bonus tip: empty your icing tub into a bowl and whip it up a bit with a hand or stand mixer. Not only will it be a lovely consistency for piping lush swirls but the air added to the icing will increase the volume, getting you more mileage out of what you’ve got.
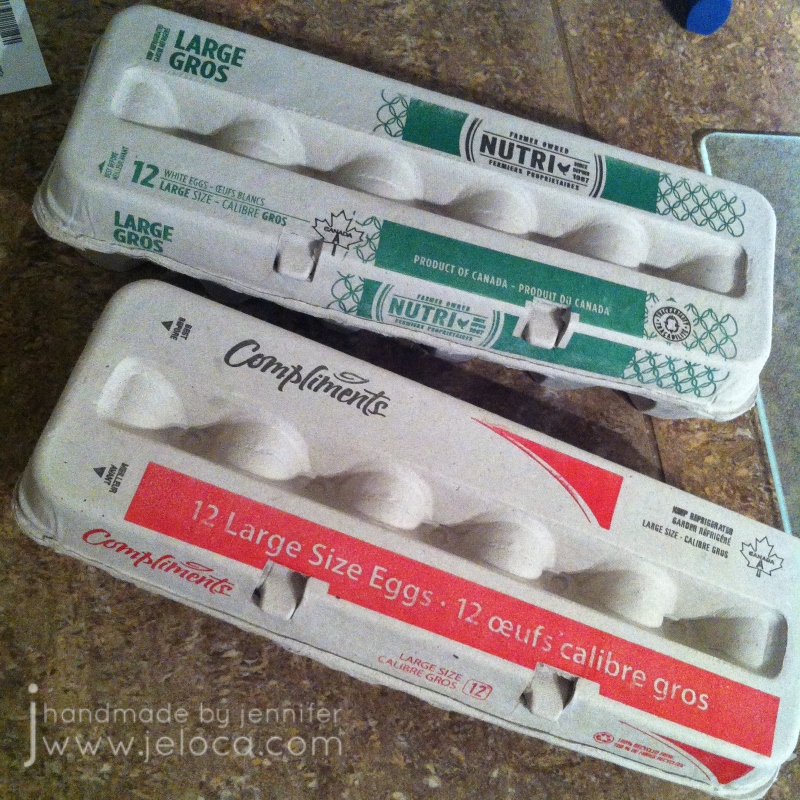
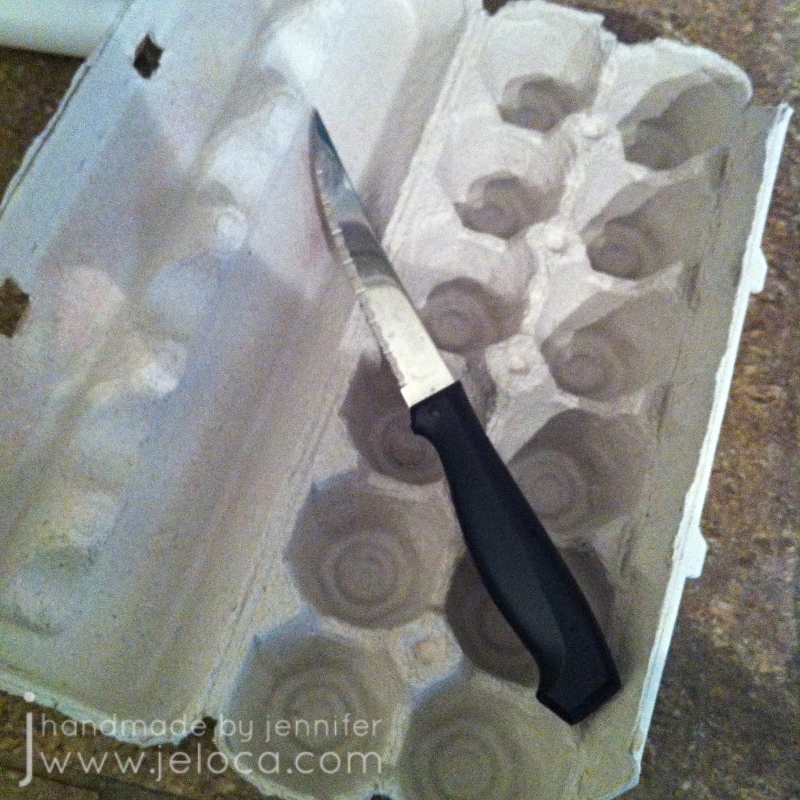
While your cupcakes are cooling you can prepare their carriers. Each egg carton will hold 1 dozen cupcakes (obv) and you’ll need something sharp for cutting out the bottoms. I found a knife/blade worked much better than scissors for this.
The easiest method was to cut around the carton’s own indent. Imagine the circle was a square and insert the knife straight down into 3 of the 4 “sides” of the circle. Then you can tear off the little flap this creates.
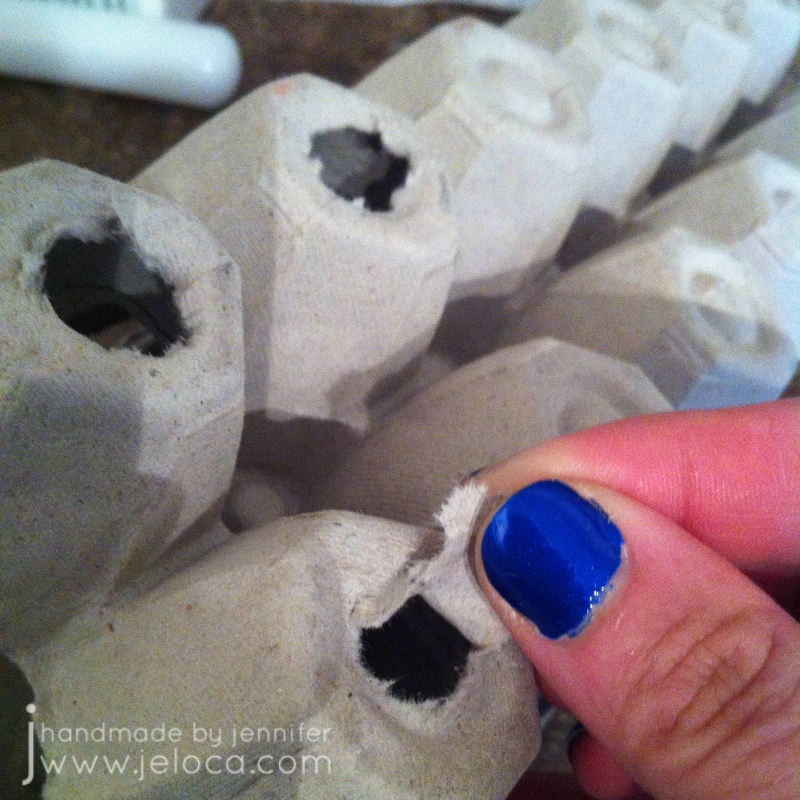
Give a little wiggle to push the cut edges to the inside. This will make it more comfortable for you later, and the raised little bits will also give the cupcake a bit of a shelf so it doesn’t fall too tightly into the hole and get stuck.
And that’s all it takes! Super easy, using something you’ve probably already got on-hand.
This post may contain affiliate links. This means I might make a small commission on purchases made through the links, at no cost to you.
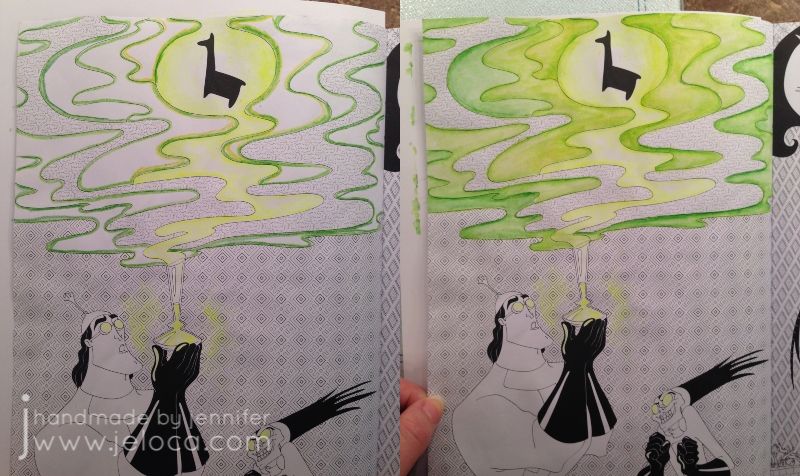
Today’s post is a little tip on how to use gel pens to get a special effect in your coloring book pages. In honor of Walt Disney’s birthday this week* I’ve used a page from my Art of Coloring: Disney Villains coloring book.
This is the original page. It’s slightly warped because on the back is a page I colored fully with my Inktense pencils and it was saturated over and over. While I do keep this book clipped shut (as shown in this post with my hanger tip) I’m still impressed at the thickness of the paper in this book. It’s definitely better than most of my coloring books!
As with many of the coloring books based on movies and tv shows, the scenes in this book are often pulled directly from a still from the original source material. In this case you can see the above image is nearly an exact copy of the second image from the movie, below. It looks like the book artist added a background detail and the mist with the llama above in order to make it more interesting as a coloring page.
While I did use the still as a reference for the characters, I took creative liberties with the color of the potion as I wanted to see if I could achieve a glowing affect and thought the contrast with a yellow glow would stand out more than pink.
This is a super easy effect to achieve, and takes materials you’ve probably already got on-hand! All you really need is a gel pen in your desired bright color! I’ve also used a water brush for convenience, but you can swap in a regular paint brush and small cup of water and get the exact results.
You have to work fast so I wasn’t able to pause and take a step by step. Outline the area you want to have the glow, and then immediately while the gel pen ink is still wet, use a water brush or water-dampened paintbrush to blend out the gel ink.
The glow areas in this image are too large to do all at once as the gel would dry before I could get to it. So I worked in small sections, tracing just inside the lines of the swirl and blending the wet ink inwards. For the glasses and potion bottle I only traced on one side so there wouldn’t be too much ink. I then scribbled some of the ink on a piece of scrap cardstock (the shiny kind like used in consumer packaging) and diluted it with water to make a paint for the glow around the bottle.
That’s it! That gives a really cool glow effect that you can achieve super-simply, in almost any coloring project. To see the glow really pop, let’s finish coloring the page!
Switching to my beloved Inktense, I outlined the misty sections with a few shades of green. I didn’t record my colors but there was definitely #1400 (Apple Green) and I believe some #1520 (Hooker’s Green). If you look in the mist closest to the llama, you can also see some #0100 (Sherbet Lemon) to amplify the glow and pull the yellows into the mist.
With Inktense the rule is always “a little goes a long way” so I only needed the barest of color application to get the light wash you see in the image on the right. To blend out you can use a water brush or regular paintbrush with some water and moisten the drawn lines just like those old coloring pages in kids’ activity books.
Next I did the same for the background behind the mist, first filling it in with a super-light application of #2020 (Indian Ink) and then deepened up the borders with #2200 (Ink Black).
The main background first had a layer of the same Indian Ink followed by #750 (Dark Purple) since purple is the complementary color to green (opposite on the color wheel).
The last step was to finish the characters with a bit of #1800 (Baked Earth) and #1740 (Saddle Brown) for Kronk and #760 (Deep Violet) for Yzma, and #1210 (Dark Aquamarine) for the teal bits.
I love how this page came out! I’m continually impressed at the paper quality of this book. Having now done a fully water-saturated coloring on both sides of this same page, I’m amazed that there is no bleed-through or tearing. I love the bright glow of the gel pen against the ink, and especially the reflected glow in the goggle lenses.
I hope this tip helps you use your gel pens in new ways!
This post may contain affiliate links. This means I might make a small commission on purchases made through the links, at no cost to you.
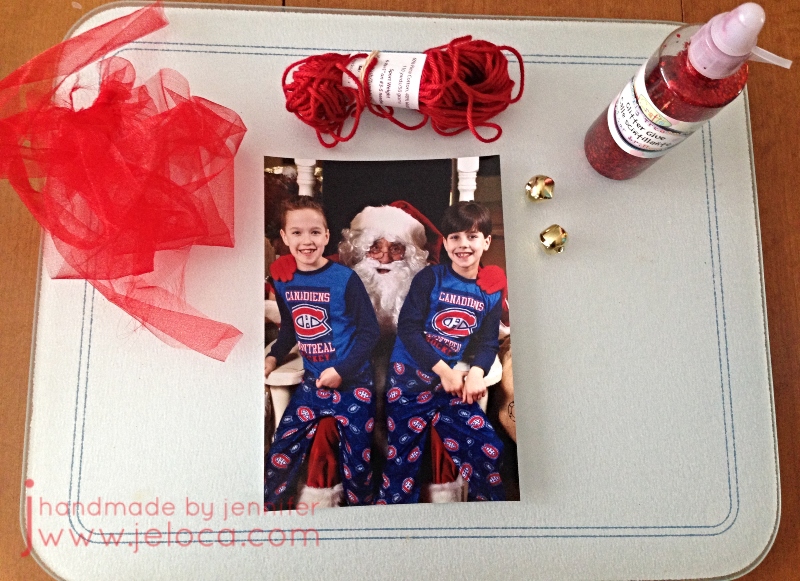
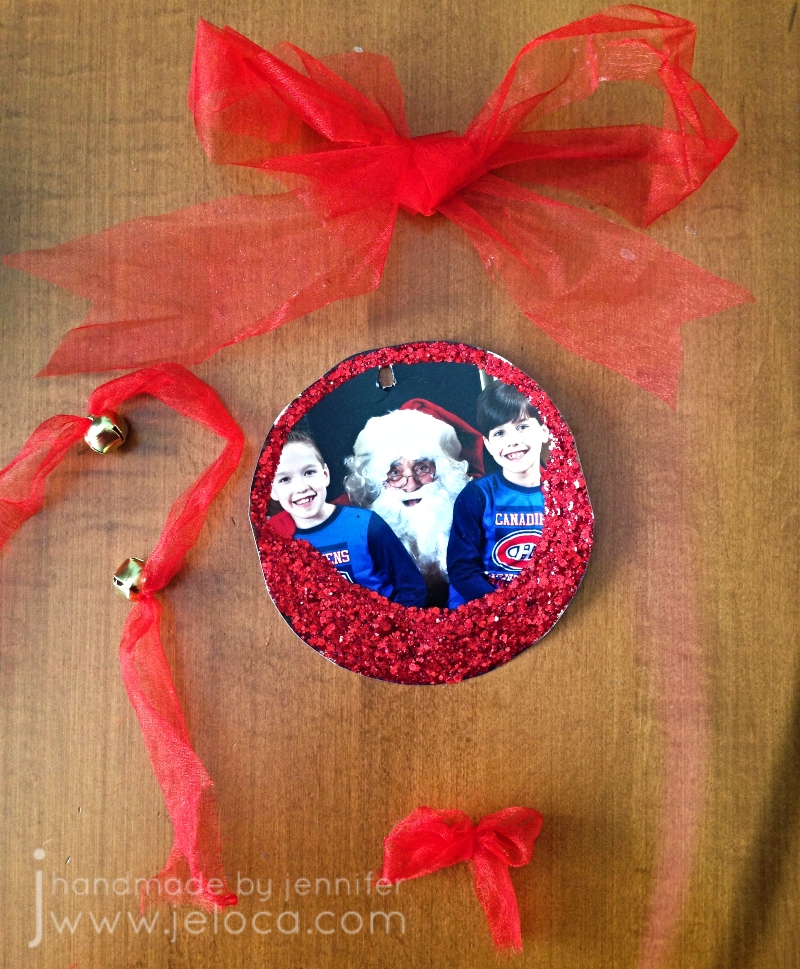
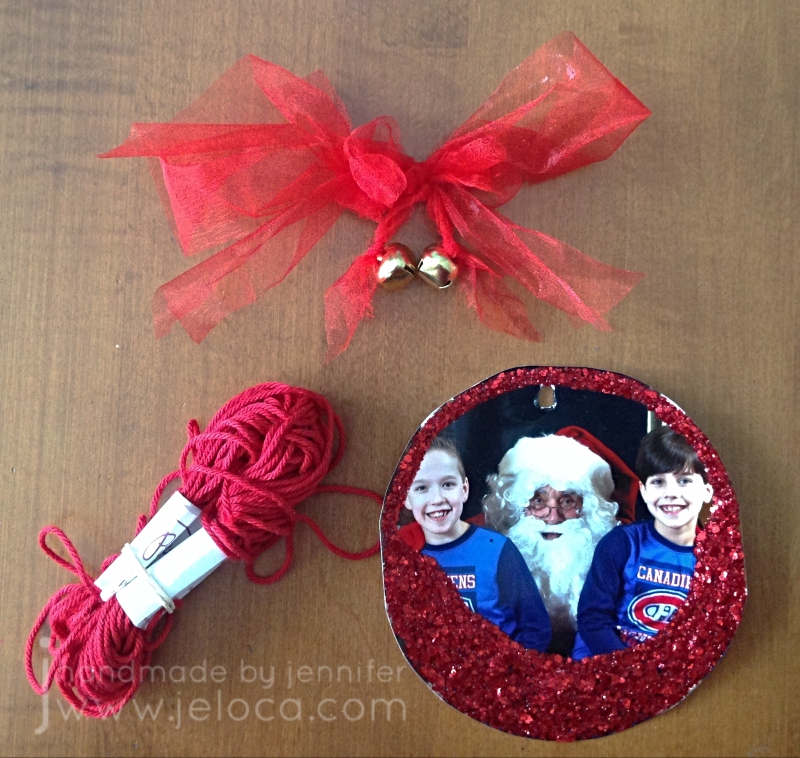
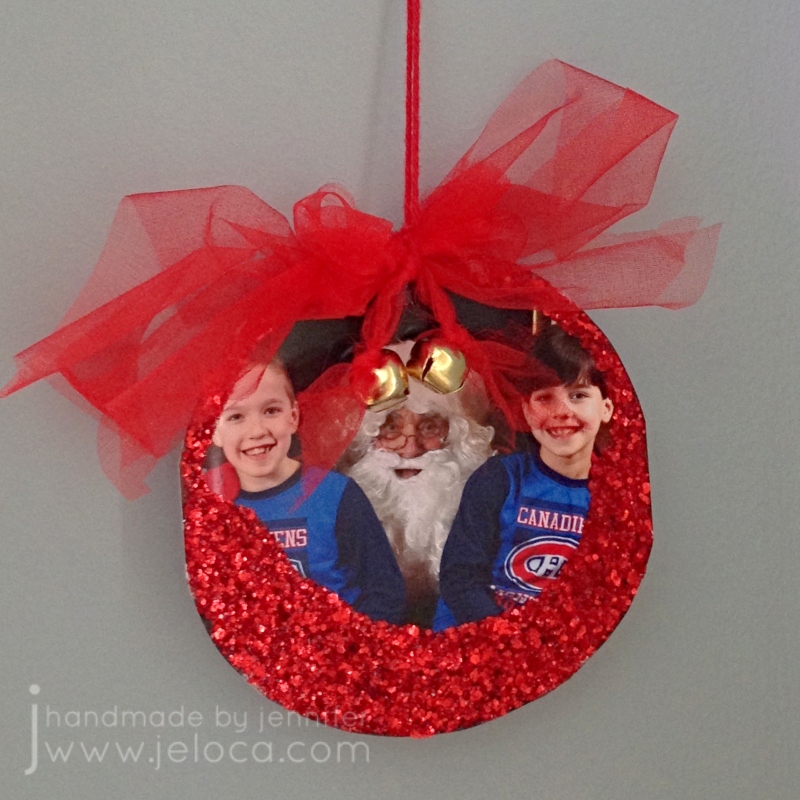
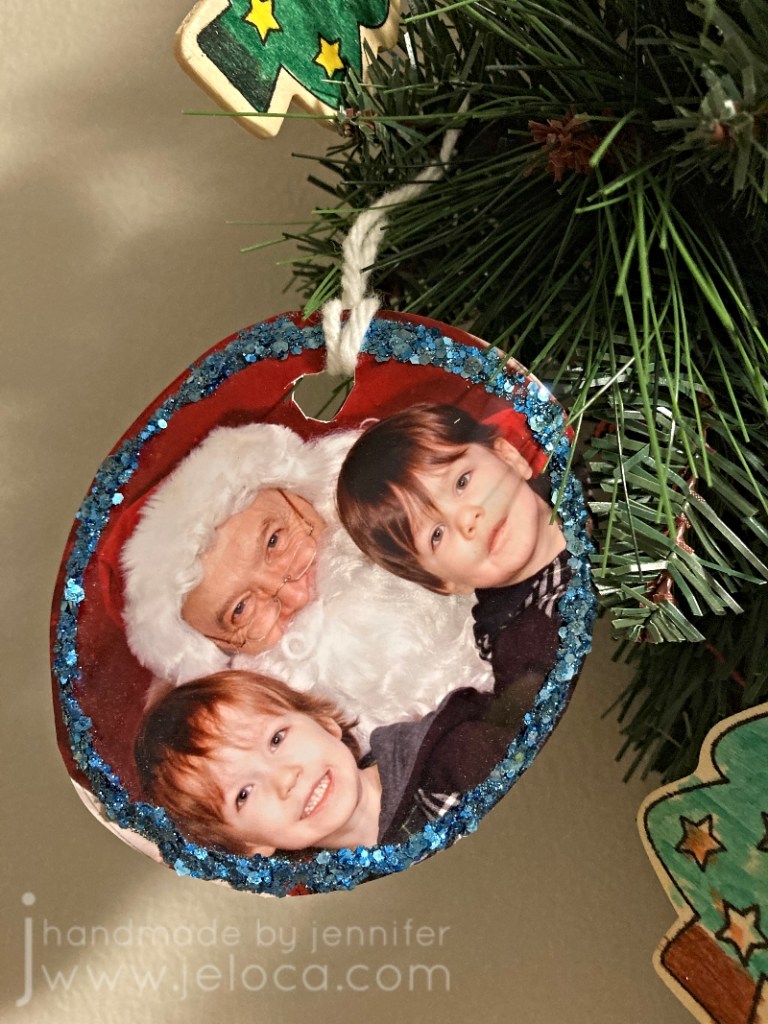
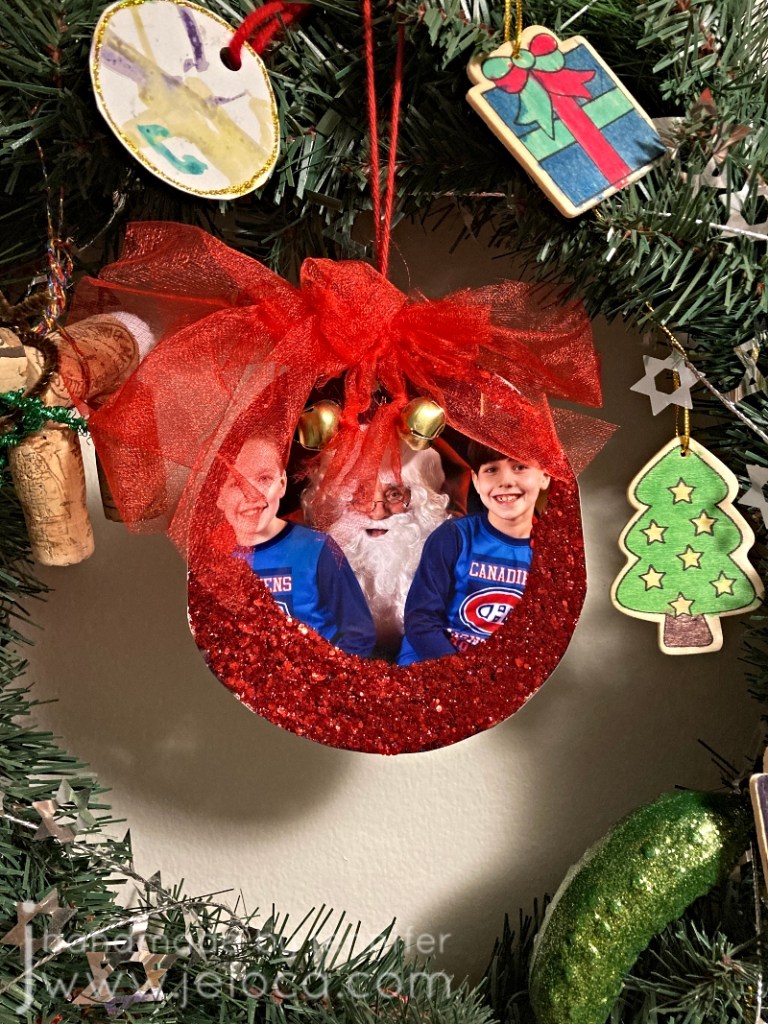
It’s December 1st, and although stores have been in Christmas mode since even before (American) Thanksgiving, we’re now “officially” close to the holidays. Here’s a quick holiday project that’s easy enough for kids to make (with minor supervision). These easy photo ornaments are a great way to share cute images and make great gifts for grandparents. They can even be used as gift tags!
I used extras of my kids’ Santa’s lap pictures, but you can use school photos, family portraits, even pet pics!
All materials as shown were found at my local Dollarama, though I’ve linked Amazon’s versions for delivery convenience.
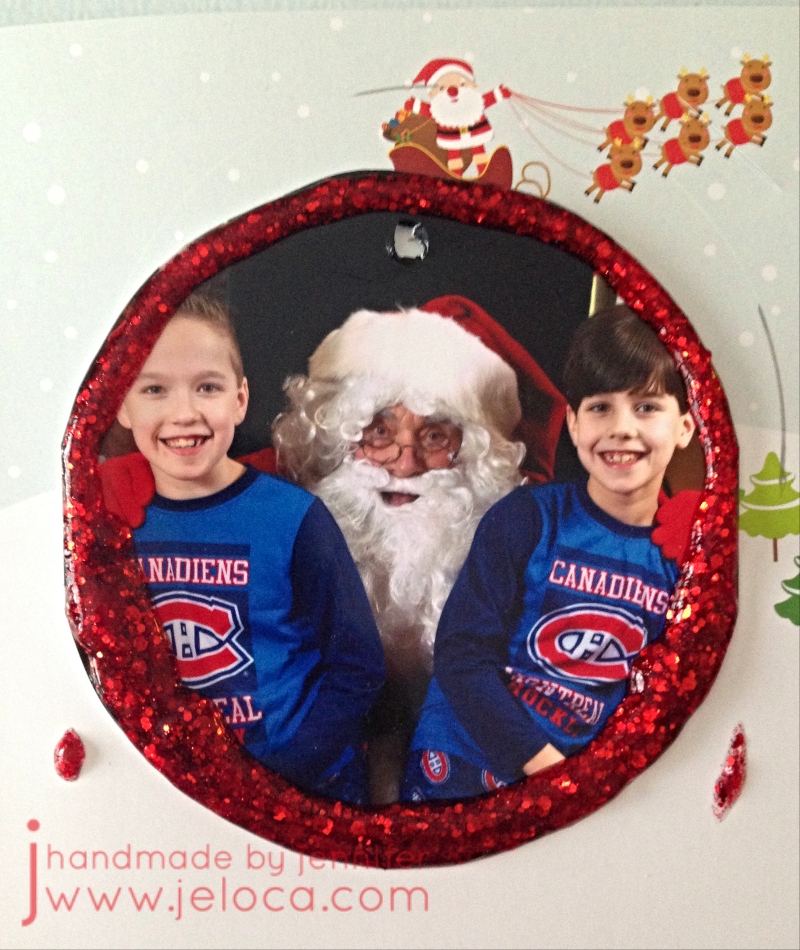
For an ornament style, have draw or trace a circle around the desired part of your image. You aren’t limited to circles, of course, and can draw any shape you like. Cut out your shape and outline it with your choice of glitter glue. You can add other embellishments if desired, can trace only the outline as above or a later pic below, or fill in a part of the image as seen in the following images. Set aside to dry fully – at least a few hours, or overnight.
Prepare your tulle or ribbon as follows: make one large bow, one small one, and then tie two bells onto a 10″ length of tulle/ribbon, leaving about 3.5″ between them. You can trim the tail ends later. If unable to thread the tulle/ribbon through the bell’s loop, a yarn needle can help. You can also use the yarn needle (or the scissors or a hole punch) to make a small hole in the top center of the image.
Stack the small bow on top of the large bow and use the tulle/ribbon with the bells to tie them together, allowing the bells to dangle below. Cut all tails to desired length.
To assemble: Cut a 10″-12″ length of yarn. Loop through the hole in the ornament. You can use the yarn needle to thread the yarn ends through the knot of the large bow, or tie the yarn directly around the center of the bow bundle, between the two bells. Knot the two ends of the yarn together to create a hanging loop.
These hold up pretty well! While the step-by-step images were taken in 2017, the photos from here onward were taken in November 2021. This is an early, more simple version I’d made in about 2015.
The example ornament has the center spot in our wreath and it’s lasted quite well. I’ve written the date and kids’ ages on the back, and they create a nice memory during the holiday season.
Happy holidays!
This post may contain affiliate links. This means I might make a small commission on purchases made through the links, at no cost to you.
Two weeks ago I shared the cake I made for my sister’s bridal shower. As the saying goes, first comes love, then comes marriage, then comes Mommy with the baby carriage.
Sure enough, about a year later I got to make a baby shower cake for my first niece*!
This post isn’t going to be a full walkthrough, but rather a look at the process for designing and making a baby shower cake. As explained in my “how to bake a cake” post, it’s important to do as much prep as you can in advance. Not only do cakes need time to cool fully before you start to decorate, but some decor pieces need time to dry or set up.
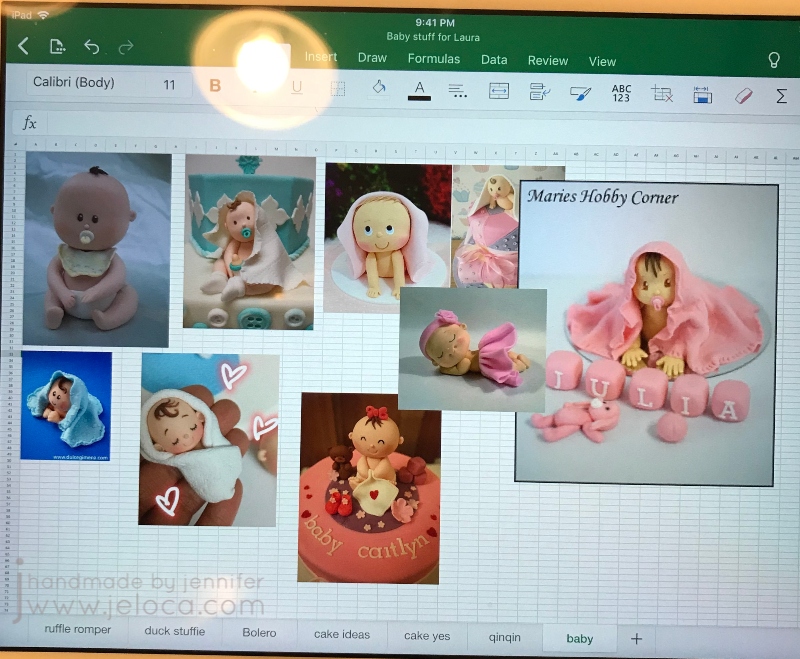
My cakes always start with a sketch and some research. In this case I knew the number of people it would be serving, and that it was for a baby girl, but the rest was up to me. I decided on a layered cake with some kind of topper, and after looking at sample cakes online I vetoed a crib in favor of a baby on top of the cake.
I always make an Excel file with inspiration samples. The goal is not to straight copy anything you find, but to have a sense of what’s possible. At the time I didn’t yet have a baby mold so since I’d be hand-sculpting I collected an assortment of toppers that looked like something I could do.
I’d enjoyed texturing the fondant into ribbons for Laura’s bridal shower cake and so to tie the two cakes together I chose to make a sort of flower shape by flanging out the edges of pre-cut circles. The only thing I had to decide was if I’d color the edges or the centers of the flowers. I also had to make the fondant topper so it would have time to solidify before setting atop the cake.
The baby shower was on a Saturday and I still had residual exhaustion from finishing her last cake at 5am the morning of her party, so I got started early – on Wednesday.
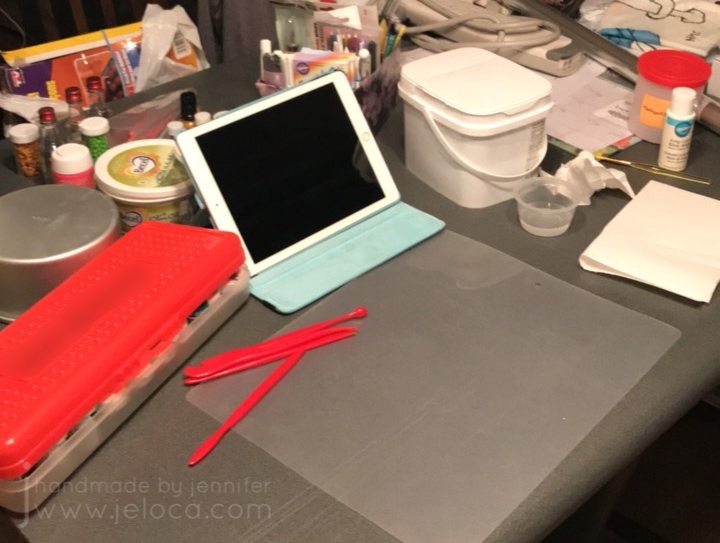
I always like to assemble my supplies before I start. There’s a tub of white fondant, fondant shaping tools, my organized container of tools, paintbrushes and edible markers, my collection of gel colors, water, mini vodka bottles (for fondant painting), paper towels for blotting, and most importantly – the cake tin I’d be using for the top tier (so I could scale my topper appropriately. Plus my iPad for both inspiration and entertainment while working.
To make the flowers I used my fondant roller and silicone mat to roll out some fondant to about 2mm thick. I used a 1.5″ circle cutter to cut out 3 circles for each flower sample and flared out the edges by rolling over them with a ball tool on a foam mat. Using a food-only paintbrush and some pink edible color dust, I brushed the center of 3 of the disks and the edges of the other 3, and then loosely squished each circle with my fingers and pressed them together. I much preferred the pink-center version, so now I was able to make a proper sketch and decide on my topper (as I still wasn’t sure if I wanted a seated figure or the laying-down-with-blanket style.
A sketch really helps to visualize your plans. Once I saw how busy the cake would look with the lower tier covered in flowers I decided the blanket baby would be too much.
Next was to make the baby. In my research I found that the creator of the first baby in my inspo pic had a full YouTube tutorial available. Don’t shy away from tutorials, that’s what they’re there for! I keep up this blog specifically so my tutorials can help others, and to share what I’ve found. Here is the designer’s website with instructions on making the baby boy, and the video I followed for the baby girl:
How could I not recommend it? Look how cute it turned out!
Seriously, I love her!! My only mistake was in laying the head down while I worked on the body. Unfortunately it flattened out and I didn’t want to mess up the face by trying to round it out again. So my figure looks great from the front but her head is clearly a little squished from a side view – oops! I’d recommend perhaps laying the head in a bowl of icing sugar, flour or corn starch to hold it without applying pressure to any of the sides.
On the Thursday night I baked 2 cakes, and prepped them to cool as per my post linked above. Then Friday night was for putting it all together.
First I covered each tier in fondant – white for the flower base and a pink matching the baby diaper for the upper tier.
Knowing how heavy the solid-fondant baby figure was, I inserted a wide straw (ones for slushies are perfect) and cut it to be flush with the top tier. This would provide support and hold the weight of the figure so the cakes wouldn’t compress.
Next was to make more flowers. As for my sample, I rolled out a workable section of fondant, cut a bunch of circles, added some color to the center then squished the sides in. Be careful to not roll out more than you can handle at a time, so they don’t harden before you can flare the edges and squish them into shape. The flowers were applied to the cake with a bit of water on the cake and the adjacent petals. If necessary hold into place for a few seconds until it stays. Cover the entire base.
Remember to look at your cake from different angles. I hadn’t – I remained seated the entire time – and so I didn’t realize until I was looking at it later from above that there was a gap along the edge of the top cake where you could see the unfinished edge. Had I noticed in time I’d have pushed the top edge of petals up higher to fully encircle the top tier.
I had a few extra flowers in the end so I placed them around the baby figure, though that’s completely optional.
And there’s the finished cake! I absolutely love how it turned out. The flowers/petals give a great visual payoff that belies how EASY they are to make. Looks great and easy to customize with your choice of colors – I highly recommend!
And just as for her bridal shower cake, here’s a bonus pic of the mom-to-be with her baby shower cake. ❤
*whose arrival was followed immediately after – as in, less than 24 hours later!! – by my second niece! ❤
This post may contain affiliate links. This means I might make a small commission on purchases made through the links, at no cost to you.
Have you ever done any charity knitting or crochet? There are so many ways to give back to your local community or to help others around the world. I’ve done a lot in the past…through the Montreal Knitting Guild, my local hospital or volunteer Facebook groups, my friends and I have made everything from Teddies for Tragedies to chemo caps to birds’ nests for Australia. Most recently the Warm Hands Knitting club from my local Federation CJA spent last winter making hats, scarves, and slippers to keep our elderly community warm.
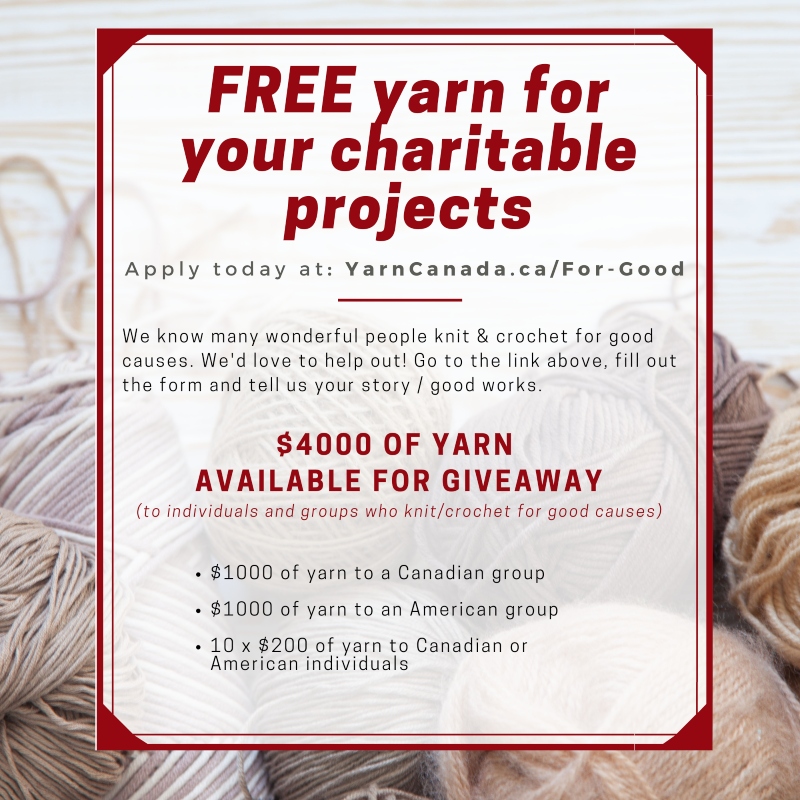
It feels great to give back and YarnCanada.ca is giving you the chance to get the yarn for your projects donated to you, free of charge.
Yes that’s right – they’re giving away yarn for FREE!
They’ve just started their 4th annual event of giving yarn to individuals and groups who knit or crochet for good causes!
In partnership with Bernat and Patons Yarn, they’re giving away $4000 (!!) worth of yarn to 12 different charitable individuals/groups. The hope is that the yarn goes to wherever it can do the most good.
And even better – this opportunity is open to both Canadians and Americans! Yes that’s right – they will ship the free yarn to the US!
To apply all you need to do is click the image above (or click here), fill in the form and tell them your story. Let them know what you will use the yarn for, what impact this or previous projects have had, or anything else important to your story. You can even attach photos to show them past charity projects you’ve done.
You have until January 13th 2022 to apply. Good luck!
Over the last few years I have occasionally been reached out to by YarnCanada.ca and offered yarn to review. Unfortunately life got in the way and my projects and posts were delayed. Here, then, is the first of such reviews.
The yarn I was offered this first time was Noro Kureyon. I was familiar with it, having worked with it in the past when knitting my mom’s Booga Bag as well as for my Tasha Tudor shawl. (Remember when those patterns were huge?? I think EVERY knitting blogger was making them. Both are free patterns, and both are enjoyable knits. Here are the links to the patterns: Booga bag by Julie Anderson – Truly Tasha’s shawl by Nancy Bush.)
I’d knit the bag in 2004 and the shawl in 2005 so I was curious if the yarn was still as good as I’d remembered.
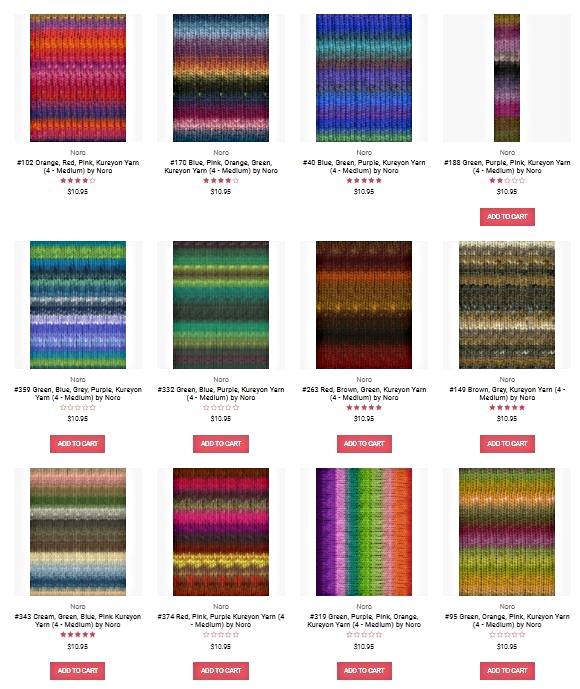
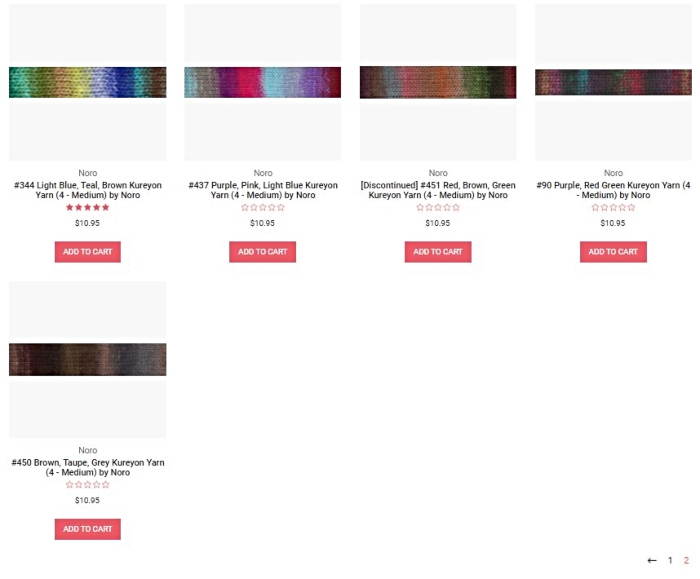
As per YarnCanada’s description, “Noro Kureyon is one of their higher-end, “indie” yarns, known for its artistic colors and hand production process. It’s a hand-dyed, 100% wool that comes in variegated colors that self-stripe as you knit. A wide range of accessories and garments can be knit with this yarn.” I was offered my choice of color, which was a hard decision to make! As you can see below the yarn comes in a TON of beautiful shades, each more gorgeous and interesting than the last.
I wanted to choose a pattern before selecting a yarn, as the colors would be the prominent feature. The yarn colors do sell out fast, and in fact my first choice color at the time had sold out before I was able to decide on a suitable pattern! In the end I chose color 368, and they sent me 3 balls.
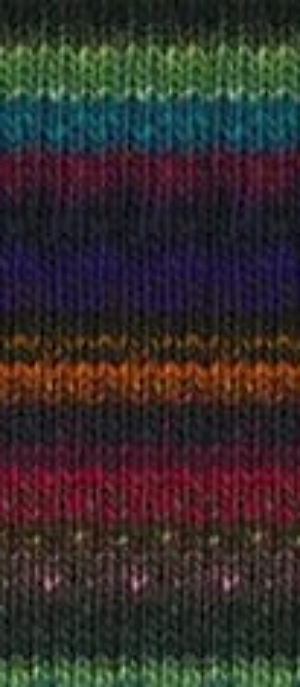
Note: it looks like this color is currently not available on their website. This is what it had looked like at the time:
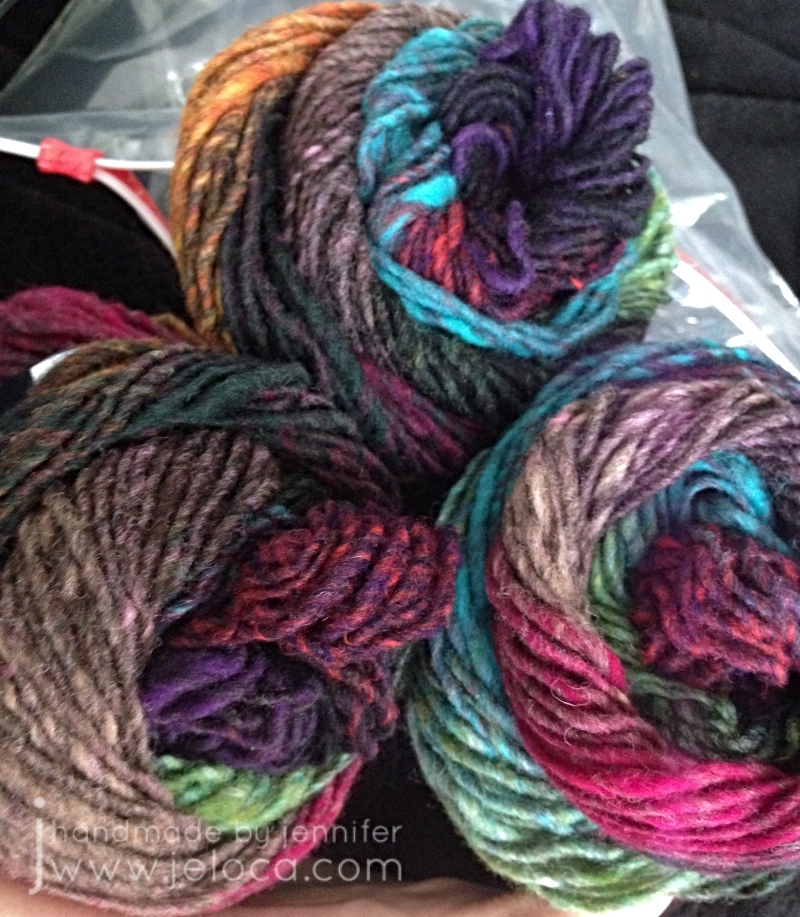
And this is how it looked when it arrived.
Aren’t the colors stunning?? I was swayed by the contrast of the bright blues, greens, pinks and orange against the more muted neutrals.
(Disclaimer – the images in this post from here until the mannequin were taken a few years ago with an old iPhone 4 that had a cracked lens – hence the purple halo in most pics. I cropped out and tweaked what I could, but I can’t go back and account for bad composition or staging, unfortunately).
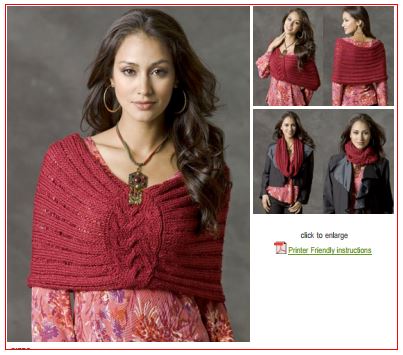
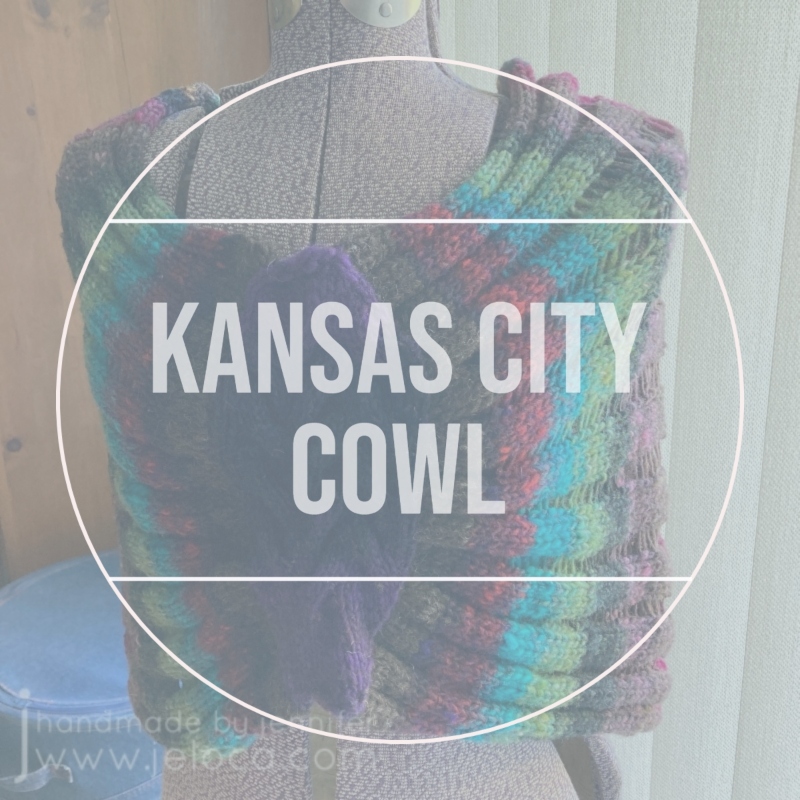
As mentioned, I’d selected a pattern first: the Kansas City Cowl by Kim Guzman. (Free on Ravelry).
I thought it would be really cool to see the colors stripe vertically while the dropped stitches ran horizontally. Being one who gets cold easily, I also liked the idea of having a versatile garment that could be a scarf when on the go but then be pulled down into a shoulder-warming shrug/poncho when necessary.
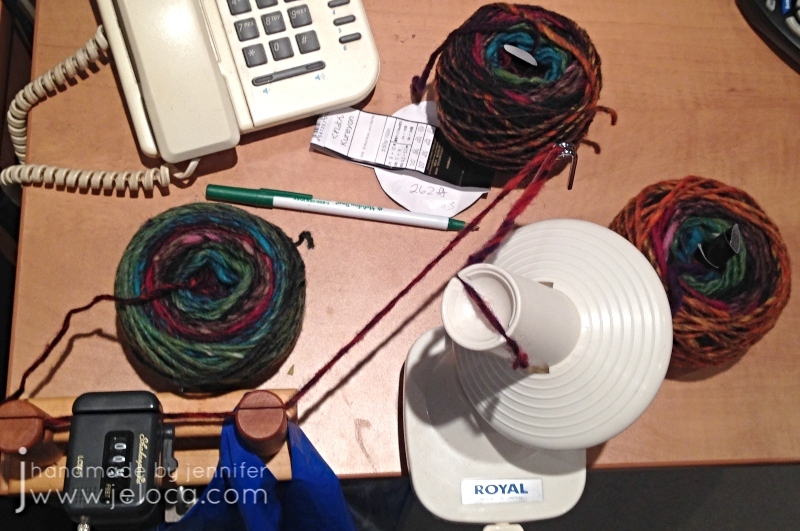
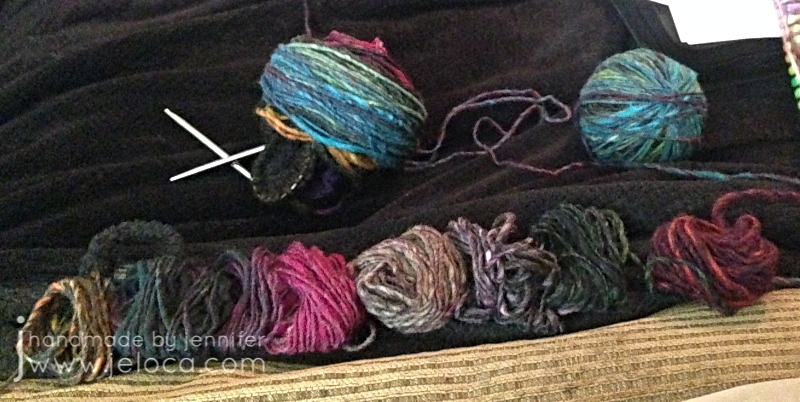
I hadn’t read the pattern details initially so it wasn’t until I went to get started that I realized I wouldn’t have enough yarn. The pattern calls for 338m and the Noro was labeled as “plus or minus” 50g to 100m. I figured I’d knit the middle size and hope I’d have enough, but then common sense took the better of me and I decided to wind the balls up and run them through my yardage meter at the same time so I’d know for sure. I was hoping there would be an extra yard or two in one of the balls and I’d find myself luckily closer to my desired yardage.
To my surprise each ball was excessively short. Each was supposed to be “around” 100m, but I didn’t get anywhere close. I even wound each ball twice – once to wind into a cake and then a second time into a new cake so there wouldn’t be tension causing any issues. When I saw there was a rather large discrepancy, I also weighed the 3 balls.
These were my results:
Ball 1 – 263 ft or 80 m – 50g
Ball 2 – 257 ft or 78 m – 46g
Ball 3 – 262 ft or 80 m – 40g
I have no idea why the last ball was so much lighter than the first one which had the same yardage. The yarn does slightly vary from thick to thin so it’s possible there were more thin sections. (Note: it’s not a slubby yarn… it’s just occasionally not spun as tightly in spots).
Now knowing I was pretty short on the 340 m yardage my desired pattern required, I riffled through my yarn stash buckets and find something that would match. There was some brown wool left over from a Sylvia Olsen workshop that matched in look and color…except it was leftovers, so there wasn’t much. I measured that to be sure and had 88 ft (26.75m). Armed with that, I formulated a plan.
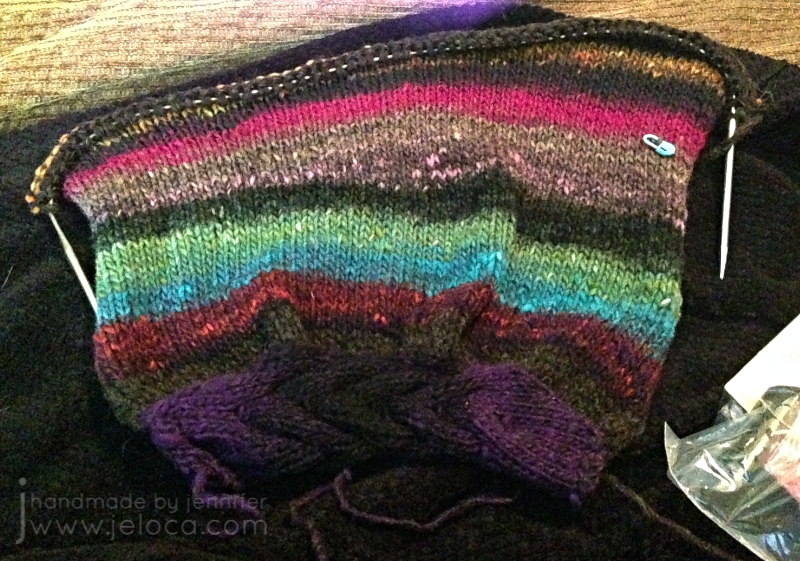
The pattern starts with the cabled center section, and then stitches are picked up from it to work the body. So my loose plan was as follows: pick the ball of yarn that began with the colors I wanted for the cable. Then divide my brown yarn in half, and work as many rows as I could with it, and made a note so at the end I could work the same number of rows with the remaining half so it would create a matching border on either side of the cable. Then, in between, I would work as many rows I could as possible with the Noro.
Happily enough, it worked!
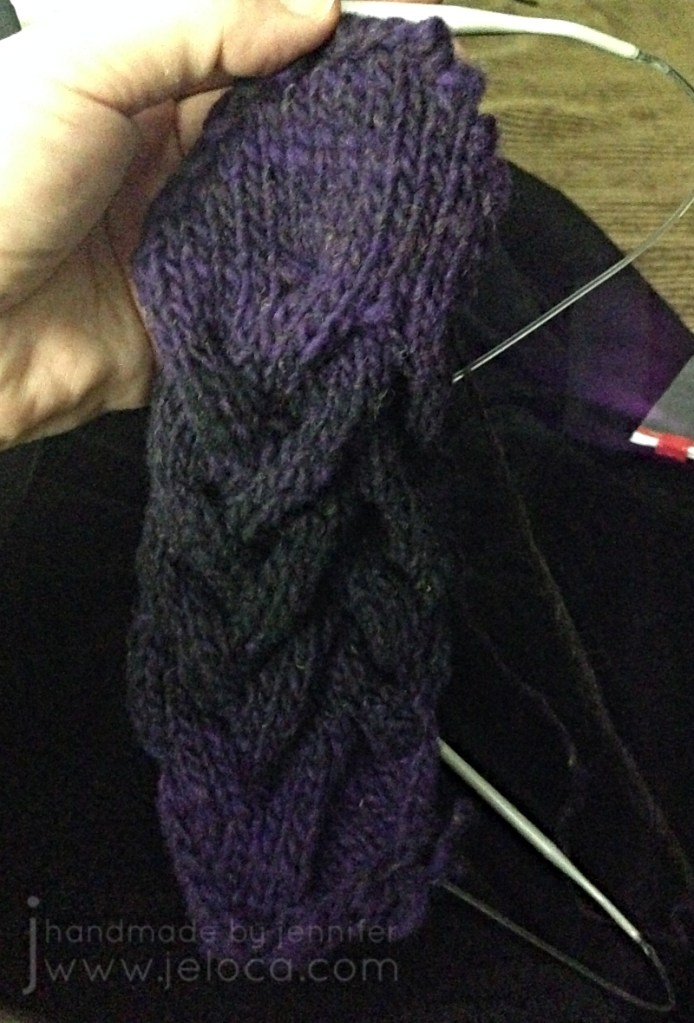
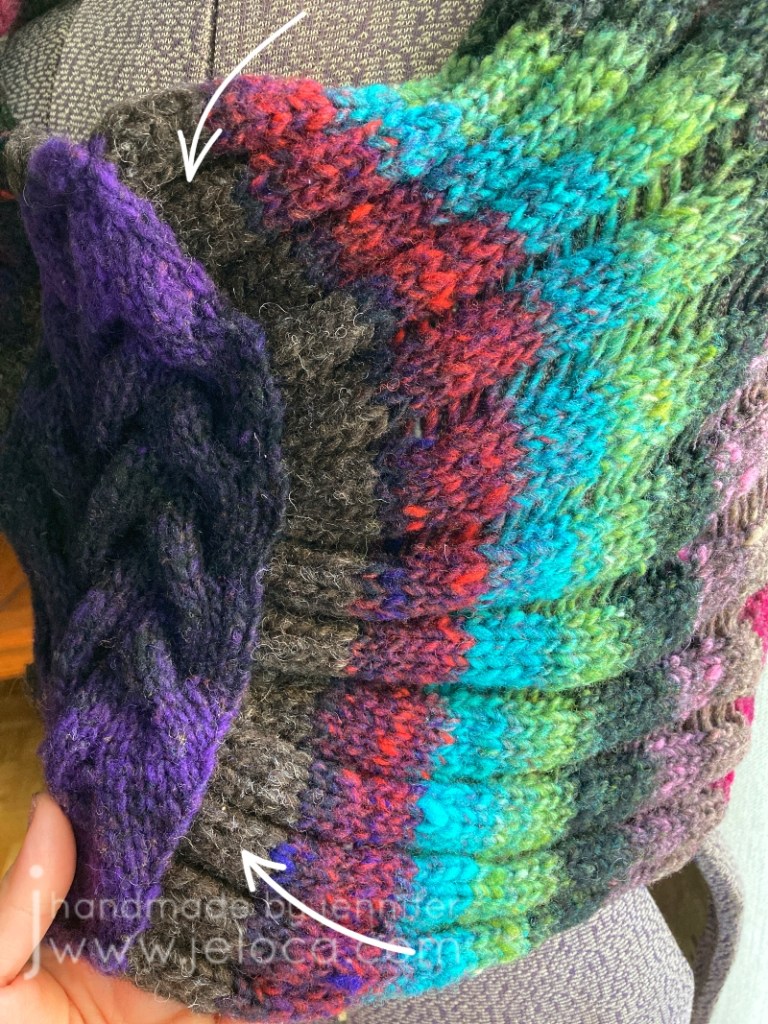
I knit the cable with one skein’s purple-to-black transition and then pulled the same color section from a second ball but reversed it for black-to-purple. As the yarn is 100% wool I split spliced all joins for a seamless knit.
Then I divided my 88ft of brown in half, and used one half to pick up the stitches on one edge of cable, picking up inside the edge stitch for a nice border. I’d marked off the middle of the half of brown, and had originally planned to use a full half on each side but after the pick-up row and 4 more rows it was already pretty wide. I didn’t want 2″ of brown on either side of the cable so chose instead to cut the yarn there, reserving the same amount for the other side, and omitting the rest unless I absolutely needed it.
Next I took the two balls I’d cannibalized the purple/black from and matched up their colors, re-winding one in the opposite direction so that the front would be mirrored. The plan for the third ball was to find its center and reverse half so the entire cowl would look like one long repeat that went from the cable to the center back then reversed to the other side of the cable.
It worked great for the first two balls. I wound them off exactly as described. The one with the working yarn I wound around the cable & needles to keep it neat and out of the way. The other end I wound into a ball starting with the added brown that would be the final bit of knitting, and wound in the reverse direction. These two balls happened to be #1 and #3 and had such similar yardage and colors that it was super easy to wind one from front to back and the other from back to front and get a nearly mirrored result.
The middle, shortest one, wasn’t so easy.
I spit-spliced one end of ball 2 to the free end of each of the 2 wound balls and tugged off a few yards from either the outside or inside of the cake and wound it up onto ball 1 or 3. Looking down into the wound cake of the middle ball I could tell it didn’t have the exact colorway of its brothers, but it seemed to have an even repeat – raspberry to teal then green then the dark blends, then back to raspberry to teal then green then the dark blends. I figured it would be easy enough to split it into two equal repeats then reverse one for the center mid point of the back. I wanted the brighter teal coming first because both wound balls already had dark tones near the joins. It worked… until I got near the middle.
This is the only place, not counting reversing direction or adding in brown, where I’ve played with the colorway as dyed, and I’m telling you this so there are no questions as to why my colors don’t match any skein you might buy (though if this color is discontinued by now this won’t matter). Clearly the colors don’t make a repeat that I can just reverse, so I ended up cutting and spit-splicing to make my own sorta-repeat that I was happy with, that would form the middle of the cowl back.
Planning out the colors was by far the hardest part. Once my yarn was turned into one large frankenskein the project practically flew off the needles.
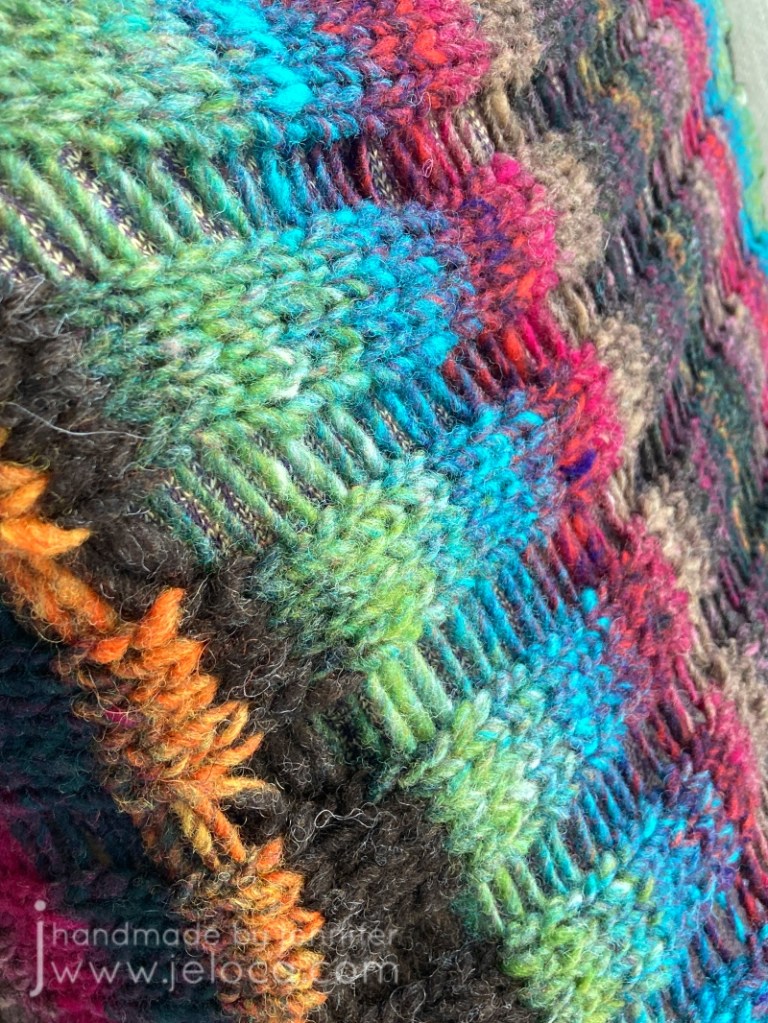
I did stop often to admire the color transitions. Noro yarns truly are gorgeous, and I’m always charmed by the interplay of colors I wouldn’t have thought to pair together.
The cowl is knit in stockinette with stitches dropped at the end before you seam the BO row to the opposite side of the cable. Besides the color play, the only modifications I made were to knit my length based on how much yarn I had left, and to not apply the pattern’s suggestion of slipping the first stitch of every row as I found it made the edge way too tight for my liking.
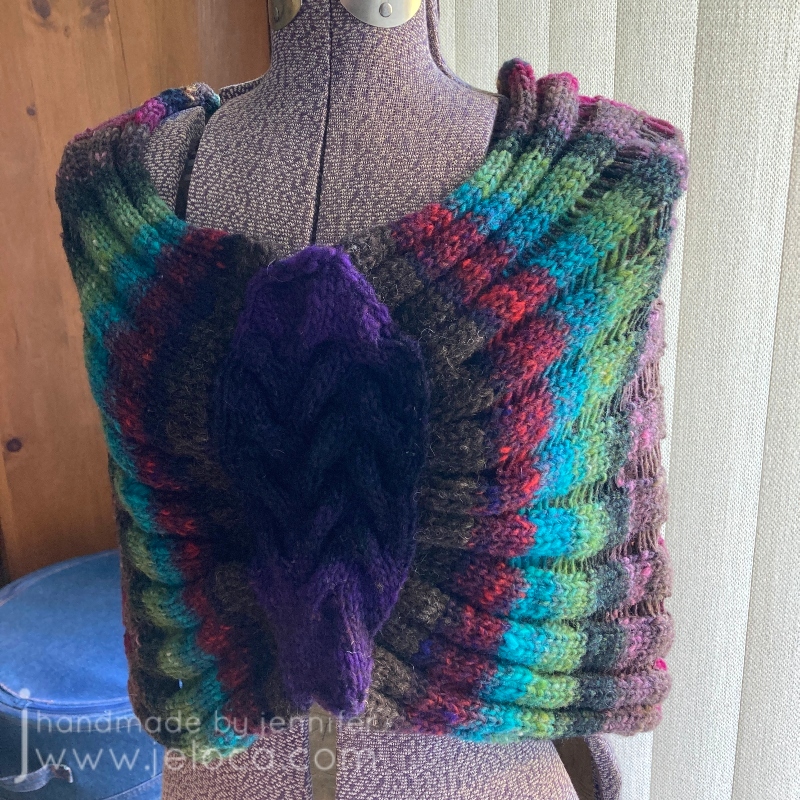
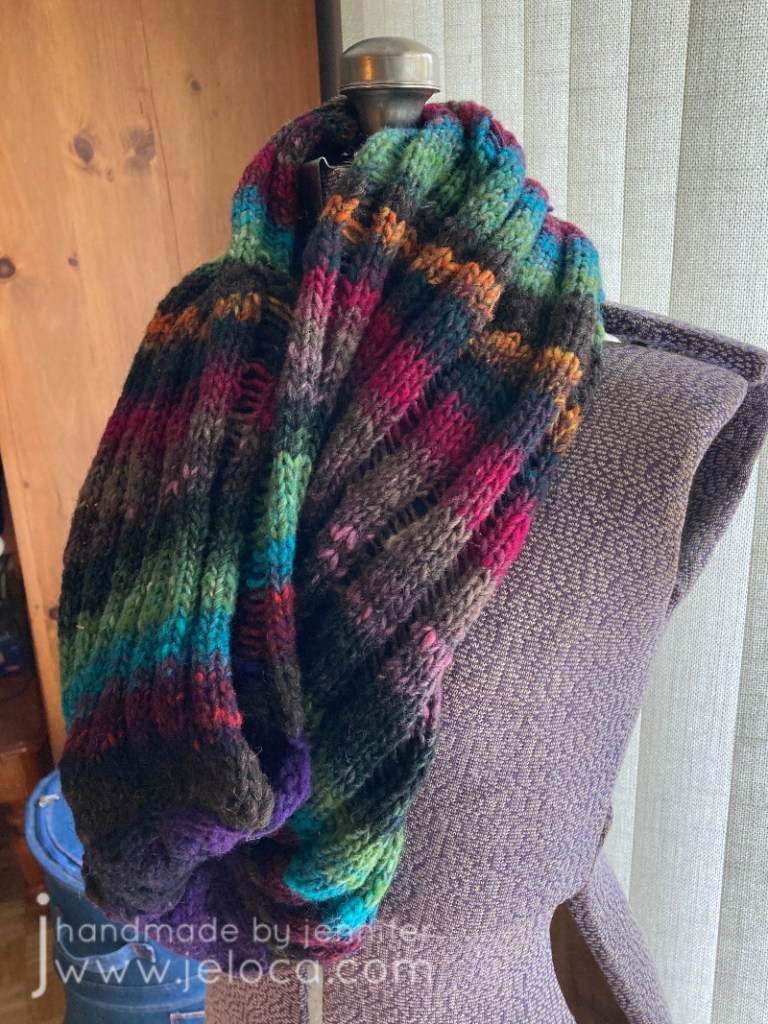
I couldn’t wait to try on the cowl as soon as I’d finished weaving in the ends! You can tell how long ago this pic was taken by the color of my hair at the time 😉
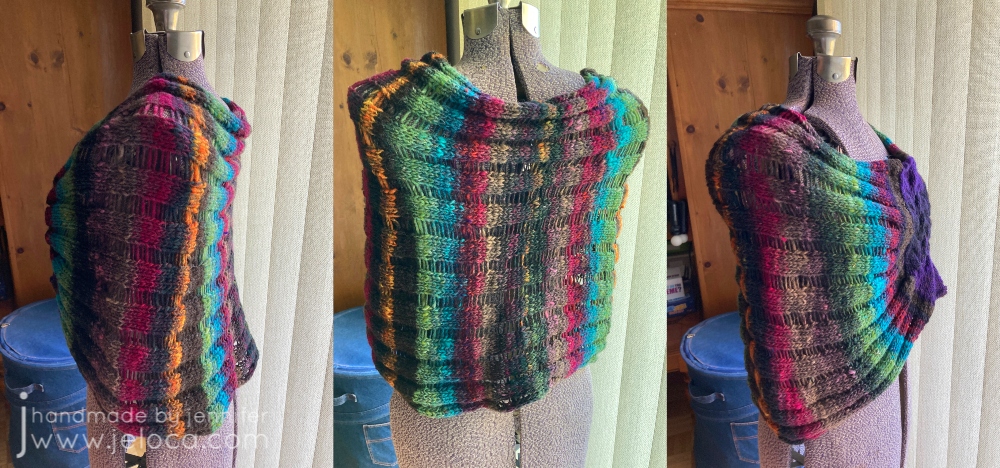
Because of my camera limitations at the time I’ve scrapped my other images and took new ones to do the project and yarn justice.
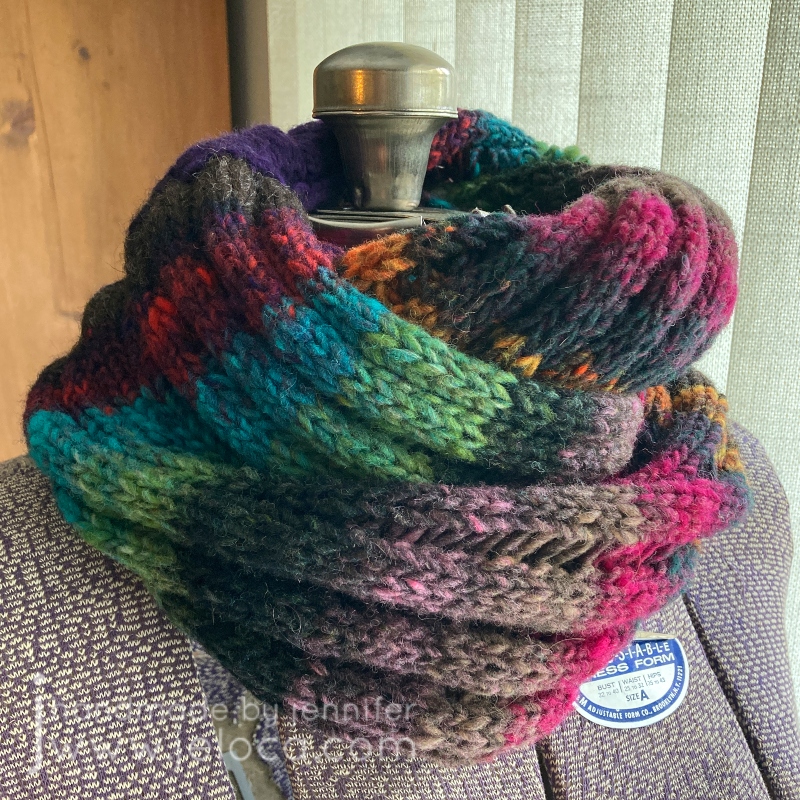
Here is the finished garment. I love the blend of colors so much!
One of the really cool things about Noro Kureyon is that you get these gorgeous color transitions but, because they’re 100% wool, you have the option of changing things up if you want to.
For example, instead of having a mirrored transition like I did here, if color blocking is more your style you could splice the balls together lengthwise, matching up the colors like with like, so as to end up with only one wider section of each color.
I couldn’t resist a detail shot of these vibrant jewel tones. There’s no color editing at play – this is just the yarn in all its glory on a sunny day.
For transparency, as mentioned above this brown section on either side of the cable is the only yarn not part of the Noro Kureyon skeins. It is very similar to a brown that appears within, and is also 100% wool, but is slightly thicker.
I haven’t knit more with Kuryeon over the years. I’m not sure why. Perhaps it was the price factor? At $10.95CAD per ball I simply haven’t had a project that I thought worthy of spending the money on. Not for myself at least, and the gifts that I make typically have had other requirements, like needing 100% cotton for dishcloths or superwash for baby garments that can be thrown into the machine. However knitting it with it again has reminded me just how much I enjoyed it.
Yes it’s 100% wool, but this is not scratchy stuff. It is soft and quite lovely. Sure you can use this for felted bags and slippers as it felts beautifully, but this is one of those few wools that I think is welcomed even against the skin.
I definitely recommend using it for your knitting or crochet projects. The only con would be the short yardage as mentioned above, but as long as you prepare and buy enough for your project, I don’t think it should deter you from trying Noro Kureyon for yourself. Also, this review is based on yarn received in 2017 so it’s possible that this is no longer an issue.
Stay tuned for a huge announcement from YarnCanada.ca coming later this week!
If you would like to pick up some Noro Kureyon for yourself, please visit YarnCanada.ca here. You can also find their full selection of Noro yarn here. All orders ship from Canada to within Canada only(sorry to my US and International followers!), with free shipping on orders over $85.00!
*Note: I received this product for free in exchange for an honest, unbiased review