Citizens of Halloween Town and Christmas Town – I am so so SO very thrilled to announce that today the Tim Burton’s The Nightmare Before Christmas knitting pattern book is out, and that I have a pattern within its colorfully spooky pages!
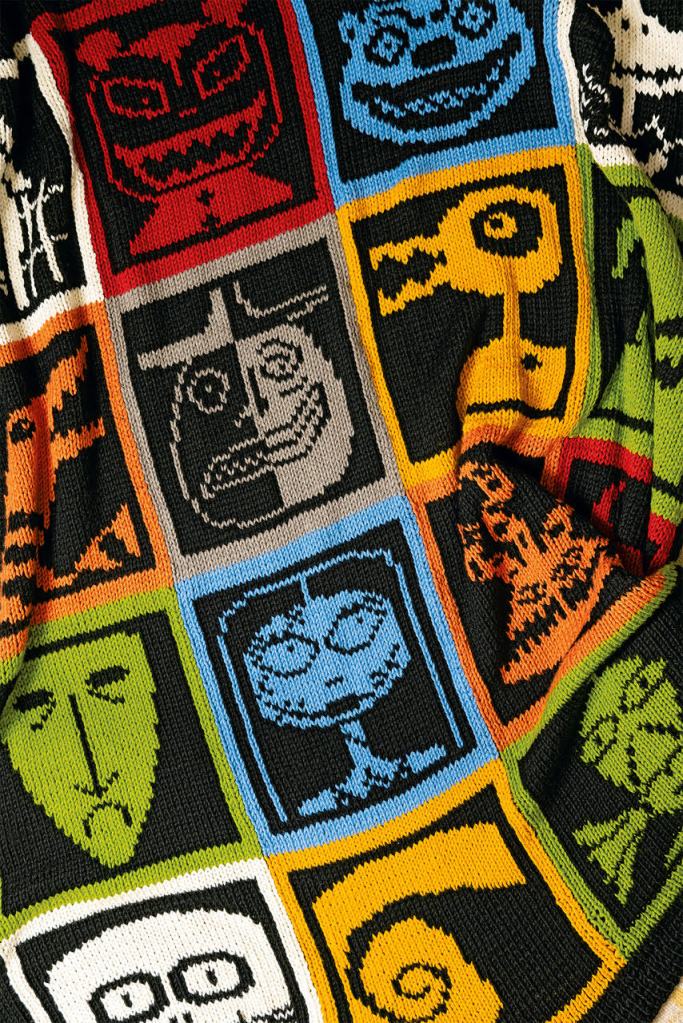
There are so many fantastic designs inside – everything from décor to toys to costume replicas. And amongst the pages is my blanket! I designed this colorful, reversible throw allowing you to snuggle up with Jack, Sally and the rest of the gang.
Sixteen charts represent Jack, the Clown with the Tear-Away Face, the Vampire Teddy, Zero in his doghouse, Oogie Boogie, the Killer Duck, the Mayor, the Striped Snake, Lock, Harlequin, Sally, Shock, Dr. Finkelstein, Undersea Gal, Spiral Hill and Barrel.
This throw is worked in one piece using a combination of double knitting and intarsia to create a fully reversible color-block blanket with the inverse of each character on the back. Slip-stitch edges create a tidy finish on this squishy home décor item.
I truly loved figuring how to represent each character in knitted form and am so honored that I could participate in this incredible book alongside all the other talented designers.
In honor of my province’s provincial holiday today I’m re-sharing the fleur-de-lys pattern I published many, many years ago. The design was intended as a dishcloth or washcloth, but with a simple swap of yarn choice can easily be reworked as a blanket square or even a flag to share your Quebec pride.
The pattern comes with 3 fully charted sizes and can be purchased through Etsy here or through your Ravelry library here.
As last mentioned in my plastic canvas wall hangings update, back in 2019 I’d given myself a pretty ambitious resolution: a challenge to turn 19 “works in progress” into “finished objects”. The first project added to my “19 WIP-to-FO Challenge” was my wall of Project Memory Jars
I’ve had a longstanding tradition of keeping a little length of yarn from each knitted and crocheted project I’ve made (later adding plastic canvas projects as my fiber hobbies crew). It started as keeping a bit of yarn in case there was need for repairs, but other than mending some knitted socks, it didn’t really wind up being a useful hoard item. That said, I have a strong visual memory and it was lovely to look back at the various yarns and remember the projects I’d made. The small colorful scraps would often bring up vivid memories of the gift recipient or technique I’d struggled with or laughter with crafty buddies in a workshop.
Originally these remnants were rolled into a ball and tied on one after another. It made them easy to store but impossible to see all the yarns on the inner layers.
My first “solution” was to make them into something tangible. They’d still have the same memory placeholder and all would be visible. Back in 2012 I eagerly cast on for a crochet granny square and made a few large blocks, intending to one day sew them into a large scrappy blanket.
This worked…fine actually. It was a chaotic mess and I knew I’d love the resulting blanket. The problem was that it would never be finished. I’d be storing a bag of 12″ granny squares for decades because even though I work on 50-100 projects yearly, the amount of triple-crochet stitches I’d be able to get from a few yards of leftover yarn was minimal.
So I thought about it and came up with a different idea. A silly little memory wall that makes no sense to anyone but me, but makes me smile and remember all the projects I put my time, effort, energy and care into.
My project memory jars
The shelves and brackets were extras from my previous job, so luckily I had those already on-hand.
Now that the wall was ready it was time to fill the jars. Which meant finally getting around to undoing the granny squares. Since it was the first item on my 19-for-19, it made sense to start with that one first.
1. FO Project Jars
What I said: I need to rip out all the individual lengths of yarn (1-10 yards long, each), match them up with what project they were from, and put the separated yarn into jars designated for each year.
What I did: basically exactly that. Only what took one sentence to type took hours to actually do. Frogging the granny squares was easy work, but before I could start I had to look at the center stitches of each block and figure out what project that was from, so I could put the blocks into a chronological order. (Luckily I take detailed project notes and my Ravelry page is mostly up to date!)
Once I’d figured out which blocks went where time-wise, I ripped them back and rolled them back into one big ball as I went, so the newest yarn was on the inside. Once everything was frogged I was able to start with the oldest scraps and begin to sort.
It was slow work but I moved through the yarn, cutting away the knots and putting a few inches of each yarn into the relevant year’s jar. Since the jars aren’t huge I only kept a bit of each and had a colorful pile of spaghetti left over at the end, which I later separated by length.
Anything that was a yard or more I rolled up and added to my mini ends bin, for use as waste yarn, stitch holders and row counters, or random craft projects.
I only undid knots for the cotton scraps because I had plans to re-use those. Every time I got to cotton yarn I added it to this growing ball, which I later turned into 2 scrappy dishcloths for my kitchen, using my own perfect, lay-flat, knitted diagonal garter dishcloth pattern.
I used about half of the scraps to make a smaller cloth with a hanging bit on the end, and then used up all the rest for the 2nd cloth. (The pattern is knit like a diamond so all you need to do to use up every bit of yarn is to find your center…work half the cloth until you hit the center point and then start the decreases to work the remaining half).
With all the jars filled and the extra bits used up, that officially marked the first of my 19 completed WIP-to-FO projects for my challenge, and now I have a silly bit of wall décor that confuses everyone who comes into my home office. I get to look at it and reminisce about all the people I’ve knit for and all the yarn-related creativity that moved between my fingers.
Here’s looking ahead to 2022 and all the projects it will bring.
Happy New Year!
This post may contain affiliate links. This means I might make a small commission on purchases made through the links, at no cost to you.
Another year means another roundup of costume-related projects and tutorials! With almost 3 weeks left until Halloween you’ll still have plenty of time to make any of the projects below.
Seventeen years ago, on September 7 2004, I started this blog. Yes, this creative passion project of mine is officially old enough to be in college and donate blood. It began on Blogger in the boom of knitting/craft blogs that fed blogrolls and Yahoo swaps and RAOK groups. We’ve seen the onset of Ravelry and Worldwide Knit In Public Day, and welcomed pattern sources like Knitty, Craftsy, Twist Collective, St Denis Yarns and others before having to say goodbye to some of them.
With YouTube, Instagram and TikTok flooding the internet with video-based creative content, running a blog feels almost antiquated. I’ve been asked by friends and family why I don’t switch to another format but the truth is… I don’t want to. I love video tutorials. I follow a TON of craft-content YouTubers, and have saved a huge amount of “try one day” crafty TikToks to my favorites list too, so it’s not a critique of the other formats. They absolutely have their place, especially for some techniques or tutorials that can really only best be shown in video. That said, I still think there’s a place for blogs and photo-based project/pattern support.
My “blogaversary” this year falls on the first day of Rosh Hashana, which is the Jewish New Year. I think that makes it perfect timing for a long-overdue blog restart. (I know, I know, I’ve said this before. Shhhh!) Coincidentally I was born on was erev (eve) Rosh Hashanna (we won’t say how long ago!) so Happy birthday to the blog, happy sort of birthday to me, and happy Jewish New Year!
To celebrate 17 years in the public craft domain I’ve scoured the site, my notes, folders, and metadata and picked 17 fun, interesting or long-forgotten items from my blogging history.
1-7
Numbers 1-7 are from the archives. These are posts even I forgot about! Some are helpful tips, some are free patterns/tutorials, and all are added to the How To section above.
Even when I don’t post regularly I get a steady stream of visitors (thanks!) and I’m always curious to see what search terms bring people my way. So number 8 is my top referrer keywords from back in my Blogger days. Funny enough it’s a tie between two completely random things that have almost nothing to do with my site: “cute japanese cartoons” & “hangman”. I’m guessing the former is related to the time I knit a Japanese boy band, but the latter? NO idea.
9
Number 9 is the results of my top search terms after migrating the blog to WordPress. Unfortunately/fortunately Google has been encrypting the vast majority of search terms since 2013 so 9771 of my results are “unknown”. Of the list that remains the top three terms are: “Toothless”, “pocketbook slippers”, and “pocket book slippers”, likely linking back to these two projects (Toothless, slippers). Wanna know the lowest search result that brought someone my way? “Long hair cut feet”. I wonder how disappointed the searcher was to find my post was literally about a long hair transformation??
10
Number 10 is a really cool fact- I’ve had visitors from 170 different countries! The majority are, unsurprisingly, from Canada and the United States, but rounding out the top 20 are the UK, Australia, Germany, Brazil, the Netherlands, Mexico, France, Iceland, Spain, Italy, the Philippines, Israel, New Zealand, Poland, South Africa, Argentina, Hungary and Denmark.
11-14
Numbers 11-14 are my the top 4 posts since switching to WordPress. I had a hunch what these were because they keep Pinterest flashing up on my phone. What I didn’t expect was that the top post would outrank second place by more than double!
I’ve spent the last few months poring over my unshared projects and planning out a blog schedule for the year. For number 15 I thought it would be fun to look through my folders and see just how old my oldest unshared project truly is. There was a lot to wade through but I found it! Coming in at over a decade old a crafty hack that you’ll see on the block next year dates all the way back to February 2010!
16
Looking through all those projects was a fun trip down a creative memory lane. As number 16 here’s a little teaser of a post I can’t wait to share in full…
Any guesses?
17
And finally, for making down this far: number 17 is a picture of me at the same age as this blog.
Whether you’ve been here since day 1 or day 6204, thanks for being a part of my creative adventures. I run this blog for me, but I love sharing it with you. ♥
*All search terms and other totals above were accurate as of the date of preparing this post.
Just in time for Back To School, I’m pleased to share my ear savers / mask lanyards! Mask are an important part of life these days, but they can cause more harm than good when you’re constantly fiddling with them to relieve pressure on your ears or keep them from slipping off your nose. And then there’s the issue of where to put it when you take it off to eat (or in class). Enter the ear saver / lanyard / mask buddy / mask mates / mask hooks (and I’m sure another half dozen names for them!)
There are many options and designs available online, from knit to crochet to sewn or 3D-printed. When my kids asked for something custom, I decided to try my hand at designing my own, in a medium I saw ill-represented – my favored plastic canvas. It’s soft, flexible, washable, and I knew would be excellent for this purpose.
Jakob asked for a Creeper, Henri asked for a Boom Slime from Slime Rancher, but I didn’t stop there.
Want something neutral, to match your hair and not stand out? Got it!
Want something bright and colorful? Got it!
Want to rep your favorite team’s logo? Got that too!
There are currently 13 designs, with more being added as custom orders come in.
All hooks are soft, flexible, made with anti-pill yarn and are completely washable.
All the designs are available in my shop page or here on Etsy. Local Montrealers who arrange for pick up (vs shipping) can contact me for a discount code good on any order!
NOTE: For those of you who’d prefer to make your own, I’ll have a PDF coming for that soon! If you’d like to be notified as soon as it’s available, email me or leave a comment down below.
I’ve been waiting so long to share this wonderful project with you, and I’m delighted that I finally can, because the book is officially out today!
Harry Potter: Knitting Magic – The Official Guide to Creating Original Knits Inspired by the Harry Potter Films
Featuring more than 25 projects, the 192-page book includes patterns for clothing, home projects, and keepsakes pulled straight from the movies – and even includes a few iconic costume pieces as seen on-screen.
There are projects designed with the movies’ actual costumes in mind, like the House Scarves:
…and the Beauxbatons students’ capelet:
…as well as projects inspired BY the movies like this gorgeous sweater based on Hermione’s time-turner:
…and this adorable hanger featuring the Sorting Hat and the animals that represent each House:
Even the staging and photography of the book is incredible- I mean COME ON-
This entire Umbrage scene is perfect!!
The book also includes fun facts, original costume sketches, film stills, and other behind-the-scenes treasures.
The book has already gotten really good press reviews (Martha Stewart, The Nerdist, Mental Floss, House Beautiful, Apartment Therapy, among others) and I’m seriously honored that I got to be a part of it, and thrilled to finally present my pattern: The Order of the Phoenix Lace-Knit Throw Blanket.
It’s a circular blanket knit from the center out in alternating strands of a beautiful orange/red hand-dyed yarn that reminded me so much of Dumbledore’s cherished phoenix Fawkes.
The center of the blanket features flames to represent the phoenix’ fire, and is separated from the next section by a jagged dividing line that is actually Harry’s lightning bolt scar.
The middle section proudly proclaims the title of the fifth HP book (and blanket inspiration) in an eyelet font.
Anyone who’s knit my Lullaby blanket pattern can attest that while it might seem daunting, the text charts are really easy to follow and work up pretty fast.
Finally the border section features Fawkes’ feathers, elongating in rows until finally ending in individual feather tips.
I loved every aspect of designing, swatching and knitting this blanket, and I truly hope you enjoy it too.
It’s official! And it’s also OFFICIAL! As in – it’s THE OFFICIAL HARRY POTTER KNITTING PATTERN BOOK, licensed and everything!
And now that it’s in pre-order status, I can finally tell you all (a little) about it!
I’m so excited to be a part of this gorgeous book, and beyond thrilled that my pattern was one of the ones chosen for the cover! There will be 28 patterns in total, 208 pages, and includes costume replicas, projects inspired by the films, film tidbits, behind-the-scenes info and more.
I can’t wait to share more info and pics as it becomes available, but in the meantime here’s the lovely cover.
It will be released on January 28 2020, and for those of you interested in pre-ordering, you can do so here.
Update: see end of post for information about a downloadable pattern pdf
With my upcoming surgery looming in the near future, I decided to make the most of my time and get a head start on this year’s holiday teacher gifts. I still make the Christmas and Hanukkah gifts for my kids’ teachers, lunch ladies and daycare workers, and, not knowing how much I’d be up for a long bout of down-to-the-wire crafting post-op (since I somehow always end up working til 4am the night before the last day of school), I was smart and started early.
I decided to make dish/washcloths again. It’s been a few years since the junior campus staff got regular square washcloths, and I haven’t made them for anyone on senior side yet, so I wasn’t worried about being too repetitive. I dug some favorite Bernat Handicrafter Cotton from my stash and pulled up the most basic, well known, standard dishcloth pattern Ravelry had to offer – a plain old, diagonal-knit garter washcloth.
Plenty of yarn, plenty of time, and a well-worn pattern. This, I thought, would be a breeze. I was even optimistic enough to think I’d have the Xmas gifts ready before November!
Heh.
My troubles started early on. After completing the first washcloth, actually. I had finished it and set it down flat on the table and noticed the lower edge immediately curl upwards. I smoothed it flat but it quickly rolled inwards again. It wasn’t terribly noticeable, and – let’s face it – this is a dishcloth. If used properly it would end up scrunched and rolled and pulled and would sag and ease out of shape quickly. But I was annoyed at how it looked and poked around at it a bit trying to figure out why the top half was fine but the lower half curled in. The top half, by contrast, lay beautifully flat. I couldn’t figure out what I’d done wrong.
Finally I realized it wasn’t my fault – there was an inherent flaw with the pattern. It was the kind where you increase into the second stitch of every row. That type of increase pulls imperceptibly on the outer stitch, eating up the slack between the first two stitches. When this is done at intervals one would hardly notice, but when it is done at the beginning of every row the result was edges that curled inwards. This didn’t occur on the top half of the diamond because that was the decrease half and I wasn’t using any of the previous row’s slack at all.
I could smooth it flat and I could have blocked it but come on… blocking washcloths? No thanks. I’d rather figure out how to knit it without the flaw.
The main thing was to figure out what increase to use. Any increase which went into the prior row, including a standard ‘make 1’, would cause the same inward tugging. Yarn-over increase patterns didn’t have that problem, but I didn’t want eyelets dotting the sides of my washcloth. I wanted these cloths to look less dainty, more ‘rugged’, if that makes sense. I decided to work YO increases but to close them on the subsequent rows by knitting them through the back loop.
Once I was tinkering with the pattern I also added a plain row at the max width point before transitioning into the decreases. Diagonal patterns always seem to have you go from wide to narrow without any plain row in between and I find that the extra row tugs less on those points of the diamond. The result is a lovely garter washcloth which has wonderful drape and lays flat beautifully, and is now my go-to knit washcloth or dishcloth.
I’ve knit 9 of them so far… sadly not anywhere near how many I need, but enough to know I’m really happy with how it works out, and I added it to Ravelry tonight.
The yardage listed is for a dishcloth knit to 41 sts, which results (at my tension) in a 9” x 9” square. You can easily make them larger or smaller. If desired before binding off you can create a strip to fold over and sew down for a hanging loop by either knitting about 4” of garter on those 3 sts or knitting them into a 4” long 3-st i-cord.
This pattern would work equally well for baby blankets or throws, continuing to increase until whatever max diagonal is desired before working the plain row and then beginning the decreases.
Directions
CO 3 sts
row 1- k across
row 2- k1, yo, k to end
inc row– k1, yo, k to previous row’s yo and knit it tbl (to close the hole), k1
Repeat inc row until diagonal of cloth is at desired widest point (I stopped at 41 sts)
Next row- k to previous row’s yo and knit it tbl (to close the hole), k1
dec row– k1, k2tog, k to end of row
Repeat dec row until cloth is back down to its original number of sts
This pattern is provided for free above, but if you’d prefer an easy-to-print version, I have made it available here for a very small fee. The PDF includes the full instructions, an easy to read layout and full color images.
*Updated January 2020
This post may contain affiliate links. This means I might make a small commission on purchases made through the links, at no cost to you.