I’d started this page back in 2017(!!) using the cover of the coloring book itself as a reference.
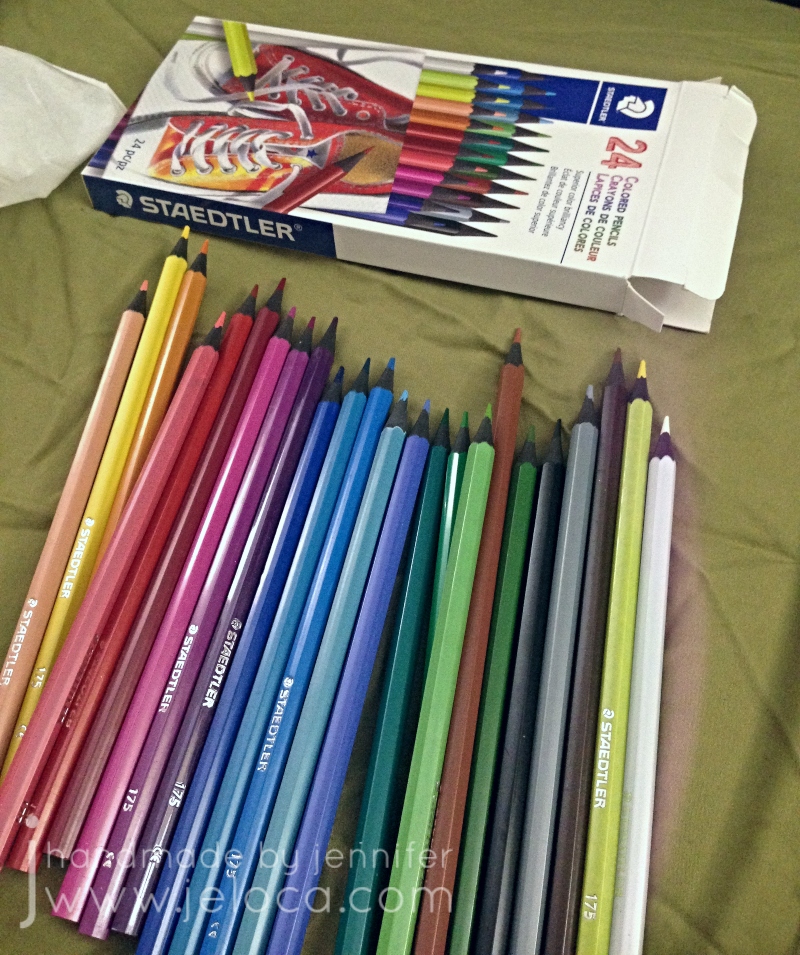
I’d found this 24-pack of Staedtler Colored Pencils at my local dollar store and was curious about how they would compare to more expensive pencils. Would I be able to get good results without paying very much?
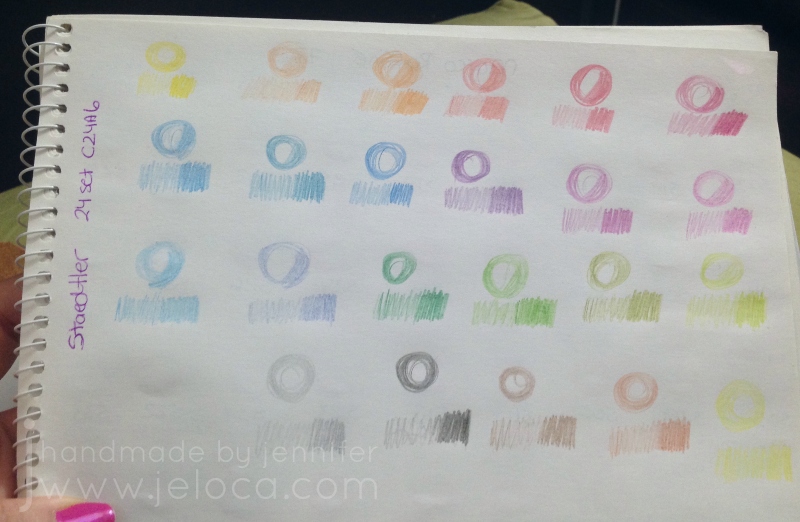
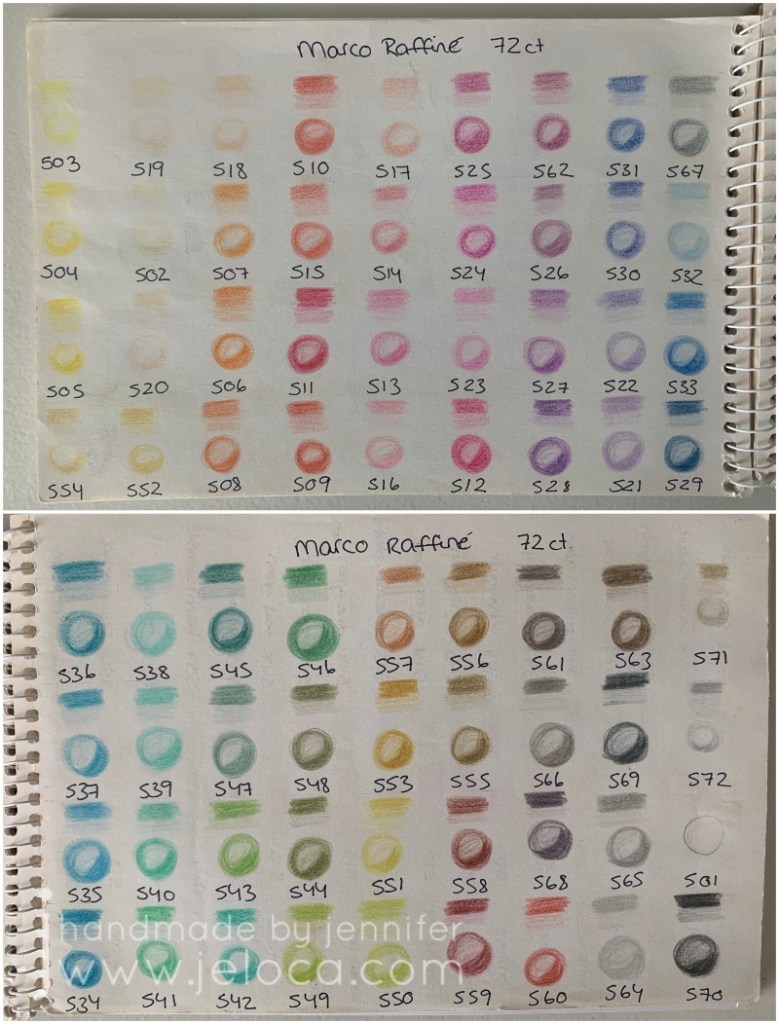
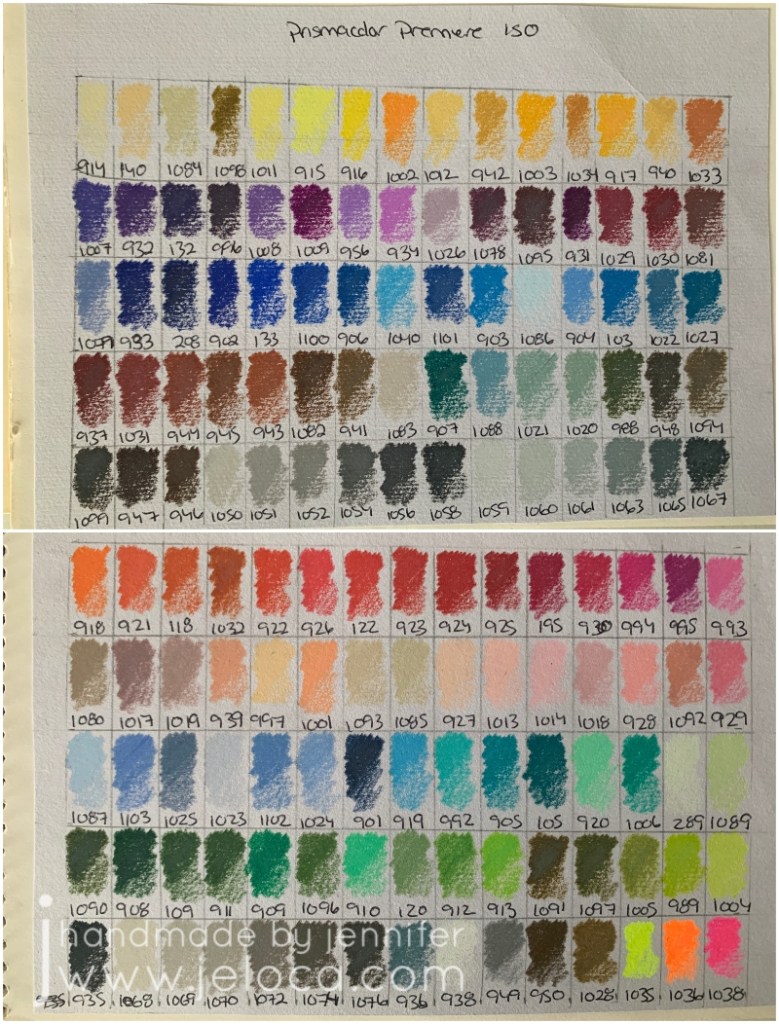
As always I swatched the colors first for my swatch book. They’re very soft and muted, and the swatches remind me a lot of the Marco Raffiné colored pencils I reviewed here.
The pencils have hard cores that hold a point well but the color payoff is not very vivid. Even with a lot of pressure they remain desaturated and soft-looking.
Using light layers I was able to build up some color depth but it wasn’t easy.
What I’d said in my previous challenge post about this page:
As the caption states, I wanted to finish this page primarily so I wouldn’t have to use the pencils any longer.
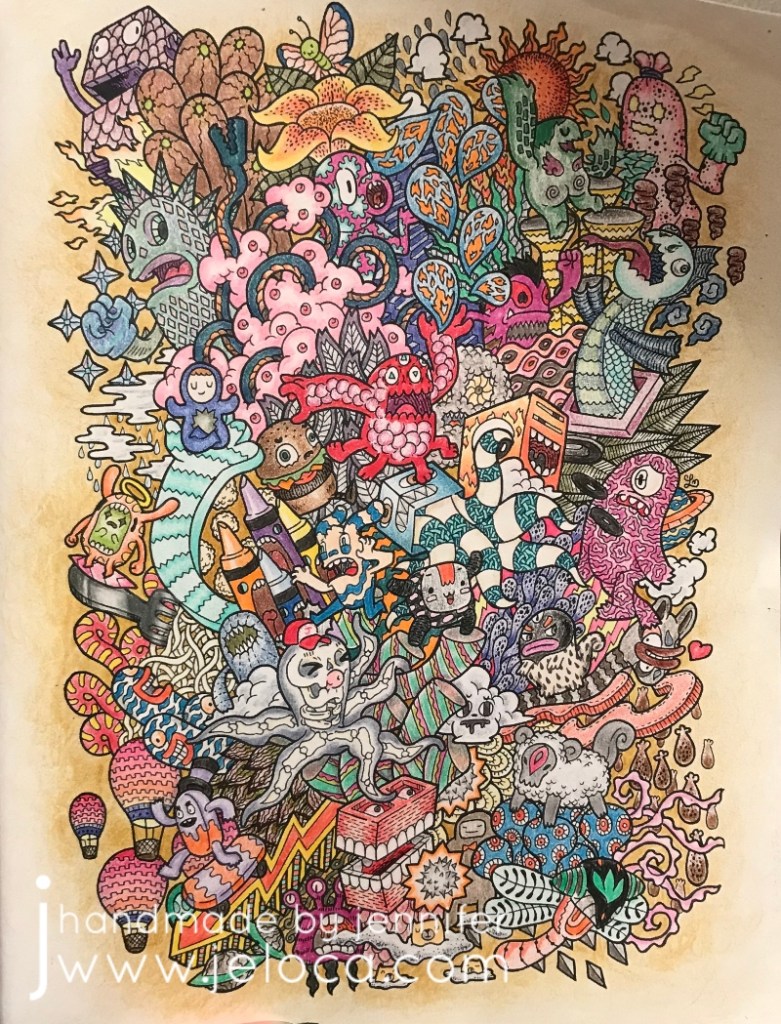
Once the image was complete I found it lacking without a background but didn’t have any inspiration for what to put. In the end I did soft swirls with pink, purple and blue to fill in the white space.
Start date: November 2 2017
Completion date: January 6 2022
Summary: can you get good results with cheap pencils? IMHO, sure. I enjoy using my other pencils more, but if you’re looking for soft colors, hard leads that will hold a point and have a decent assortment of colors, you could do a lot worse than these inexpensive pencils. I wouldn’t recommend them for professional artists but they’d be fine for kids, school or coloring books with small sections that need good points.
This post may contain affiliate links. This means I might make a small commission on purchases made through the links, at no cost to you.
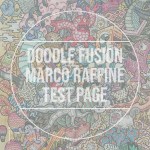
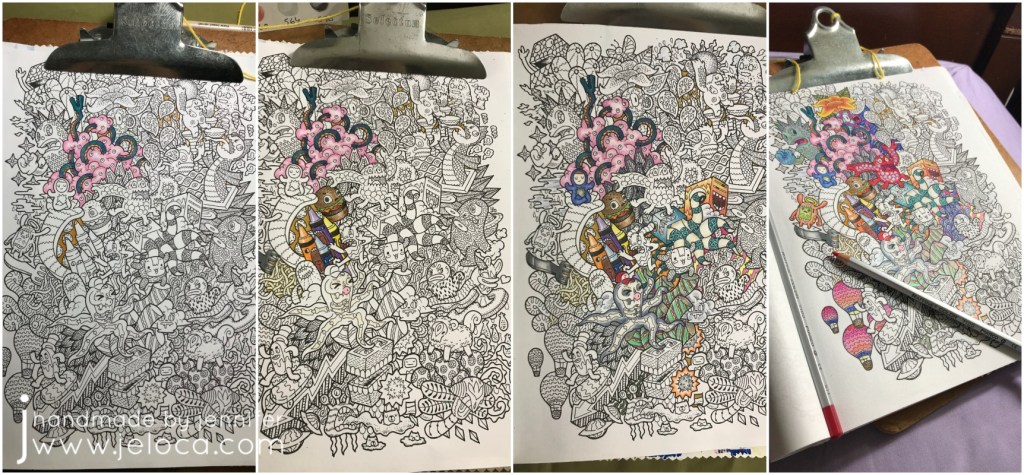
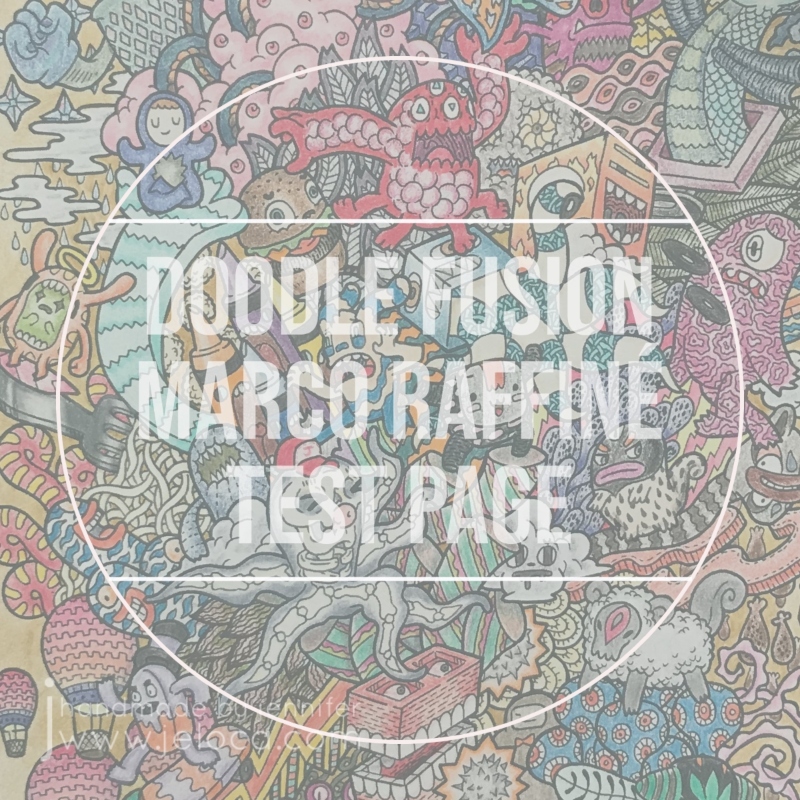
The next 2019 WIP to FO Challenge update (posted a whole 3 years later…sigh) is this page from Doodle Fusion. I love this silly book so much and have completed a bunch of pages from it (unposted), as well as prepped some in my color wash attempts. As they’re all filled with an assortment of wacky monsters it’s hard to come up with a unique name to identify some of the pages so since this one was deliberately done solely with the Marco Raffiné oil-based colored pencils, it’s become known as my test page of such.
I started this Doodle Fusion page on September 8 2019 with the intent of completing an entire page with the Marco Raffinés to really get a feel of how they work and blend.
I really like these pencils! They’re inexpensive (especially compared to the Polychromos or Premiers), and though the different pencils can’t truly be compared as oil-based vs wax-based will give different results and be preferred for different projects by different artists, they have their own unique charm and have been a joy to use. They’re less vibrant than some other brands but are no less pigmented, so while you won’t get neon brights (making them not a good choice for a fun 80s page) they’re great for softer, almost whimsical looks. They’re also slightly water-soluble, as per my tests here.
The first three images below show the lazy progress made over the rest of that month. I’d worked on the page slowly, picking out individual creatures and sections at random depending on my mood at the time.
Posting my WIP-to-FO challenge publicly spurred me to continue working on it, and the fourth picture above was done in January of 2019. I did a bit more work that month and then my attention waned again…
…until October 2020 when I finally picked it back up, determined to finish it once and for all.
I added a fading border to the outer edges in order to test the pencils’ (and my own) shading and fading capabilities. Once that was complete I finished the remaining creatures and doodles.
Overall I think these pencils work wonderfully in this book. It’s a plain-paper coloring book which can make using wet media difficult (although the pictures are one-sided so bleeding won’t be an issue if you protect the subsequent pages with a sheet of cardstock or something. There isn’t a lot of tooth to the page which isn’t the best for colored pencils generally, but these have enough “stick” to really take to the page well. After 2 years the page looks identical to the image above with no bloom (as can happen with wax-based pencils) and no apparent fading.
The only flaw I can see with the Marco Raffinés is the color payout. A number of sections above (ie: the red ball cap, the red 6-legged monster near the middle, the purple creature at the bottom center, the crayon bodies) were colored with maximum pressure to get the darkest, fullest coverage possible. As you can see there are solid, even sections of color but no real “brightness”. To me, all of the colors have a softness to them, even at full strength making them feel almost desaturated. You can see the difference more clearly in my swatches below.
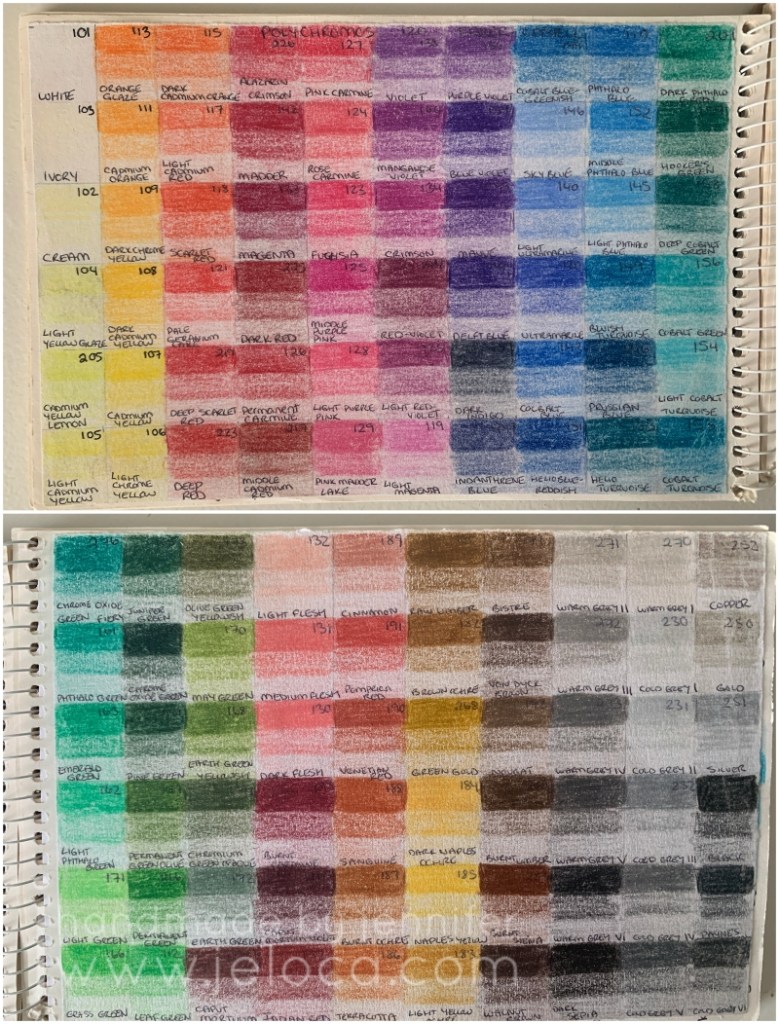
Every time I get new colored pencils I swatch them, labelling the swatches with the color name or number. The oil-based Marco Raffiné pencils (above) are lovely and soft, and very similar in tone to the Faber-Castell Polychromos (below), which are also oil-based.
The Polys have more colors but the feeling of the individual shades is still softer, almost velvety, whereas the wax-based Primsacolor Premier pencils (below) are brighter and more vivid. (Click on any of the swatch images for a better view).
If you’re looking for deep, bright colors then you might be dissatisfied with these…but for anyone else they make a great, inexpensive option to have in your coloring toolkit.
This post may contain affiliate links. This means I might make a small commission on purchases made through the links, at no cost to you.
This past Tuesday (Aug 2nd) was National Coloring Book Day. I’d originally planned to celebrate and post by working on a new page from one of my books but I’m working on a major knitting project that is requiring my time and my hands. Therefore instead I’ll be sharing some completed pages that were part of a previous blog post series of mine – my 2019 19 WIP to FO Challenge.
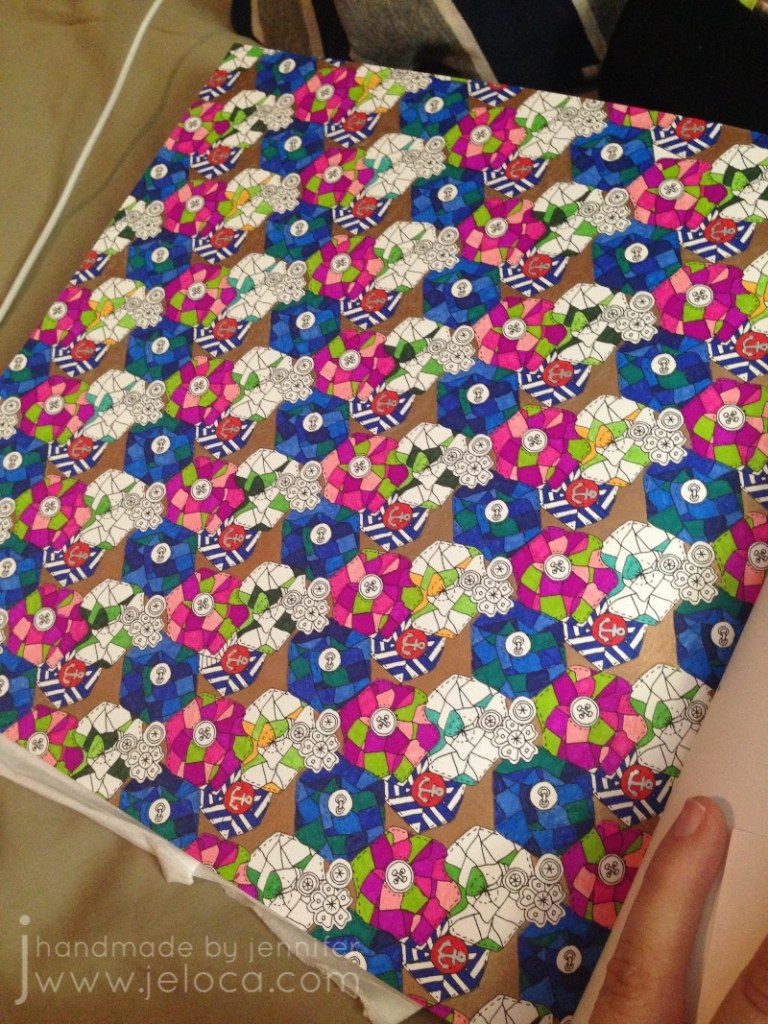
This page took nearly 3 years (!!) to complete, due to nothing but me putting it off forever. I’d started it on June 11 2016 and finally finished it on March 7 2019 making it one of the 19-for-2019 WIPs actually FO’d during 2019.
The small sections and tiny details of the page made it ideal for fineliners. Except for some metallic accents (using my favorite Gel Xtreme pens that have lasted for literal DECADES) the whole page was worked with Stabilo 88s and Staedler Triplus fineliners.
The quilt flower blocks repeat on a diagonal so I chose a different color palette for each row and worked the same 5 colors for each stripe but rotated clockwise once for each repeat. (IE: the color that was at 12 o’clock in the first repeat was used at 1 o’clock in the 2nd, and 2 o’clock in the 3rd, etc). This kept the coloring more interesting than coloring the same thing many, many times over.
And then I stopped with only one set of repeat left to go. No idea why, but as I’d kept the paper with my swatch notes it was easy to pull out the matching colors and get to work finally finishing it up.
I used the same colors for the matching quilt flowers in the main character’s hair on the facing page. I’d had the idea of coloring her the same through the whole book so left her uncolored until I was ready to tackle her on all the pages.
It’s a busy, chaotic mess but it’s finally done!
This post may contain affiliate links. This means I might make a small commission on purchases made through the links, at no cost to you.
As last mentioned in my plastic canvas wall hangings update, back in 2019 I’d given myself a pretty ambitious resolution: a challenge to turn 19 “works in progress” into “finished objects”. The first project added to my “19 WIP-to-FO Challenge” was my wall of Project Memory Jars
I’ve had a longstanding tradition of keeping a little length of yarn from each knitted and crocheted project I’ve made (later adding plastic canvas projects as my fiber hobbies crew). It started as keeping a bit of yarn in case there was need for repairs, but other than mending some knitted socks, it didn’t really wind up being a useful hoard item. That said, I have a strong visual memory and it was lovely to look back at the various yarns and remember the projects I’d made. The small colorful scraps would often bring up vivid memories of the gift recipient or technique I’d struggled with or laughter with crafty buddies in a workshop.
Originally these remnants were rolled into a ball and tied on one after another. It made them easy to store but impossible to see all the yarns on the inner layers.
My first “solution” was to make them into something tangible. They’d still have the same memory placeholder and all would be visible. Back in 2012 I eagerly cast on for a crochet granny square and made a few large blocks, intending to one day sew them into a large scrappy blanket.
This worked…fine actually. It was a chaotic mess and I knew I’d love the resulting blanket. The problem was that it would never be finished. I’d be storing a bag of 12″ granny squares for decades because even though I work on 50-100 projects yearly, the amount of triple-crochet stitches I’d be able to get from a few yards of leftover yarn was minimal.
So I thought about it and came up with a different idea. A silly little memory wall that makes no sense to anyone but me, but makes me smile and remember all the projects I put my time, effort, energy and care into.
My project memory jars
The shelves and brackets were extras from my previous job, so luckily I had those already on-hand.
Now that the wall was ready it was time to fill the jars. Which meant finally getting around to undoing the granny squares. Since it was the first item on my 19-for-19, it made sense to start with that one first.
1. FO Project Jars
What I said: I need to rip out all the individual lengths of yarn (1-10 yards long, each), match them up with what project they were from, and put the separated yarn into jars designated for each year.
What I did: basically exactly that. Only what took one sentence to type took hours to actually do. Frogging the granny squares was easy work, but before I could start I had to look at the center stitches of each block and figure out what project that was from, so I could put the blocks into a chronological order. (Luckily I take detailed project notes and my Ravelry page is mostly up to date!)
Once I’d figured out which blocks went where time-wise, I ripped them back and rolled them back into one big ball as I went, so the newest yarn was on the inside. Once everything was frogged I was able to start with the oldest scraps and begin to sort.
It was slow work but I moved through the yarn, cutting away the knots and putting a few inches of each yarn into the relevant year’s jar. Since the jars aren’t huge I only kept a bit of each and had a colorful pile of spaghetti left over at the end, which I later separated by length.
Anything that was a yard or more I rolled up and added to my mini ends bin, for use as waste yarn, stitch holders and row counters, or random craft projects.
I only undid knots for the cotton scraps because I had plans to re-use those. Every time I got to cotton yarn I added it to this growing ball, which I later turned into 2 scrappy dishcloths for my kitchen, using my own perfect, lay-flat, knitted diagonal garter dishcloth pattern.
I used about half of the scraps to make a smaller cloth with a hanging bit on the end, and then used up all the rest for the 2nd cloth. (The pattern is knit like a diamond so all you need to do to use up every bit of yarn is to find your center…work half the cloth until you hit the center point and then start the decreases to work the remaining half).
With all the jars filled and the extra bits used up, that officially marked the first of my 19 completed WIP-to-FO projects for my challenge, and now I have a silly bit of wall décor that confuses everyone who comes into my home office. I get to look at it and reminisce about all the people I’ve knit for and all the yarn-related creativity that moved between my fingers.
Here’s looking ahead to 2022 and all the projects it will bring.
Happy New Year!
This post may contain affiliate links. This means I might make a small commission on purchases made through the links, at no cost to you.
Back in January 2019 (!) I posted 19 projects I was determined to complete in 2019. Spoiler alert – I failed – but I have made significant progress on about half of the projects on the list. Inspired by the recent Masters of the Universe and Suicide Squad remakes, here’s the current progress on my trio of 80s cartoon girls.
What I said: I’ve never shown these before, except for the odd glimpse in the background of Instagram pics. I started this trio of plastic canvas portraits when I moved in August 2017. While I love how they look in black and white (and blue), I designed them to be in full color and I’d love to see them complete.
What I did: Quite a bit of progress!
I’d never shown them on the blog prior to that post, so here’s a look back at how they got to where they are now.
I’d moved in 2017 and was really excited to be able to fill my space with all the crafty, nerdy little things that make me who I am.
Every shelf and table has some item that references my varied interests, and I’ve even used some previous projects as home décor – see the Minecraft heads from my tutorials peeping from above the kids’ desk, along with an as-yet-unshown secret project hidden among the books – so I was really excited to fill a blank wall space in my dining room with a handmade project.
First I purchased three of the largest plastic canvas sheets I could find. When looking for inspiration for what to stitch on them I really didn’t need to look very far. There are Archie comics in nearly every room in my house, thanks to my kids enjoying them as much as I do. In addition to the coloring book from my last post, I’ve drawn Betty on the blog here before, and Henri had drawn Archie a few years back. (He was even an Archie comics character for Hallowe’en last year, and I’ll be sharing that project here in October.) So clearly, Betty Cooper would be one of my cartoon trio.
Initially I drafted up Betty, Archie and Veronica, and planned out a triptych of the three of them, but the more I thought about it the more I realized it was Betty specifically that I like, and that I didn’t care if I saw Archie and Veronica daily, so I scrapped them and looked around for more inspo. As soon as I had the freedom to look beyond Riverdale I knew Harley Quinn HAD to be one of them. I’ve adored her for decades, and she’s featured in assorted places around my house, including in two different spots on this one shelving unit:
Finally, it wasn’t hard to decide on Teela as my third girl. I grew up watching He-Man and playing with the toy sets along with my younger brothers. I don’t know if it’s that she’s a strong, independant woman or if it was because she often wore a cobra headpiece and had a snake staff, and I’ve always adored snakes… but either way she had to be the one to complete my cartoon trio. I’ve shared Teela and a portion of my 80s toy collection on the blog before, and they’ve now found a home in a cabinet along with other childhood relics:
The hard part done, the next step was to create charts for each character. Instead of doing it the easy way and importing reference images into a stitch software, I decided to go the hard route and chart them myself in Excel. I found reference images for each character, adjusted the Excel cells to be square and marked off an area with the same stitch count as my total canvas size. From there it was just a matter of redrawing each girl, pixel-art style, and tweaking the design until they looked right. I’d originally planned to use continental stitch to save time, but quickly realized the angles would be skewed and that cross-stitch would be best, using one stitch for every pixel/cell in my chart.
I ordered a bunch of yarn from Knit Pics, then got started.
Here you can see the initial stages. I didn’t want to have to refer to the charts throughout the entire stitching process so decided to start with the black outlines first, so I could then later fill them in, coloring-book-style. Plus I didn’t know how long they would take to complete into full color and wanted to be able to hang them on the wall in the meantime. Considering I started these in 2017 and I’m typing this post in 2021, I’m glad I had that foresight!!
After finishing most of Betty I moved on to chart HQ next. I bet you’re wondering why I left Betty mostly done instead of finishing the rest of her border? Took me a moment to remember too lol but it’s because I left myself things to work on that didn’t require concentration, so when I had more time I would work on HQ and follow my charts, and when I had the kids with me or was watching something that required more focus I could work on Betty’s border that didn’t require much thought or any chart reference. Basically it was the cross-stitch equivalent of having knitting or crochet projects of varying difficulty levels.
Once the outlining was all done I worked on each of their eyes, as I thought it would look better on the wall, and truthfully HQ was a bit creepy without them. Then, while I still had the blue out, I added Betty’s shirt. Her top was red in my reference image but blue is my favorite color so I swapped it out, plus I liked having a color that was in each of the 3 images, to help tie them together. The middle pic above is the one posted on the blog back in 2019, and where they sat for basically most of the last 3 years. At some point I filled in their mouths and got started on Betty’s skin, and that’s where I’d stopped and moved on to other projects.
Eventually I started working on them again. I’d always had it in mind to work on equal parts of each, so as they hung on the wall they’d look similar in completion. First Betty had the slow progress on her face and neck…
…and then this past summer Teela got the same treatment, using stash yarn so she wouldn’t have the exact same skin tone as Betty’s.
Technically I should have done Harley’s face next, for them to all match, but these sheets are large and get folded up against my body or resting under my arm as I work. Since Harley’s face is white, and clearly a focal point of the image, I decided to hold it off for last so it wouldn’t get dirty or faded, and work on her costume instead.
At that point I was on a roll! The new Netflix Masters of the Universe had just come out, and it was kinda cool to start working on Teela’s tiara while watching the premiere. In fact, I got so into it that I kept watching until I found I’d binged the whole first season!
Spoiler-free take: ignore the men complaining about the show. It’s awesome to see the old gang again, even Stinkor! (Man I can still remember the smell of that toy!) I love the focus on Teela and magic vs tech. Made me think about Skylanders and my girl Sprocket – guess I’m always drawn to my tech girls! Also, as a big Buffy fan, with Sarah Michelle Gellar as the voice of Teela, it’s fantastic to hear Buffy kicking butt again. ♥
This is where the girls are now. I’ll be working on HQ’s white bib and pompom next, to complete her outfit, and that will put me into the home stretch with only 2 sections left on each girl. At the end I’ll have to do one run of border around each one, as the edges are currently unfinished, and then finally attach rings for hanging them properly, as I’m currently holding them to the wall with thumbtacks.
I know it’s not conventional wall art for an adult woman, but I love them.
It seems like everywhere you look online these days, people are taking stock of 2018 and setting goals for moving forward. The first few days of the new year tend to be all about making resolutions, and to that end- here’s one of mine:
I resolve to turn the following 19 wips (works in progress) into FOs (finished objects) before the end of 2019.
I’ll write at length about each project when I finish (and post) about them, but for now here’s a short blurb for each:
1. FO Project Jars
I need to rip out all the individual lengths of yarn (1-10 yards long, each), match them up with what project they were from, and put the separated yarn into jars designated for each year.
2. Harvest Moon Pullover – crochet
I started this sweater on November 25 2016 as a way to use my adored Noro Silk Garden limited stash on something for myself. Limited yarn + crocheted pattern with big holes = a sweater that might fit… right?
3. Granny Rectangle Blanket – crochet
I started this blanket on August 9 2015 as a way to use up random sock yarns I figured I’d never get around to using for, y’know, socks. Figured out how to make granny squares as rectangles and then alternated with white for… some reason.
4. & 5. Ralph and Black Sheep’s Sweaters – sewing & cross stitch
I started these sweaters for the boys’ favorite stuffed animals a few nights before Christmas 2016. They were intended to be little surprises for them but instead they’ve sat in a bag ever since. Sadly Jakob is no longer as into iHasCupQuake as he used to be, so I’ll need to rip out the stitching on the front of Ralph’s sweater and hope it doesn’t leave gaping holes in the fleece. Then I’ll have to figure out new designs to personalize the fronts, find where I put the sleeve pieces, and sew the little sweaters together.
6. Drops V-Neck Pullover – knitting
I started this deep-v sweater somewhere in 2015 or 2016. It’s slouchy and soft and I want to wear it already.
7. Fluffy Shawl – knitting
I started this shawl on April 6 2015. It’s been sitting untouched in a bag since roughly that Fall. I love how the colors blend together (black Sandes Garn Sisu and purple/green Noro Kureyon Sock) and would like it to be done and hugging my shoulders.
8. Comfy Socks – knitting
According to myself, I started these socks 2 FULL YEARS AGO. They’re supposed to be my ‘take along’ knitting but because I haven’t finished designing the pattern, I never take them with me to work on. I need them done so I can reclaim the needles and portable hanging knitting bag and start being more productive again.
9. Fun Fur Vest – knitting
I started this Bergere de France vest in 2012(!!). My Ravelry projects page has it listed as completed on Feb 10 2015 but clearly it isn’t. No ends are woven in, it might need armhole cuffs, and I think I was debating overdying the entire thing black.
10. Doodle Fusion Marco Raffiné Page – coloring
This page from Doodle Fusion was started last summer (I think) using only my set of Marco Raffiné oil-based colored pencils.
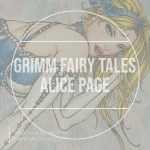
11. Grimm Fairy Tales Alice Page – coloring
This page from Grimm’s Fairy Tales was a test to see if I could get good results using dollar store colored pencils. I’ve since moved the pencils somewhere else and want to finish the image so I don’t need to dig them out any more.
12. Grimm Fairy Tales Little Red Page – coloring
Those of you who follow me on Instagram would have seen this page from Grimm’s Fairy Tales back when I started it in June. I love how it’s turning out and want to see how well I can complete it.
13. Imagimorphia Eagle 2-Page – coloring
This double-page spread from Imagimorphia was started in the Fall of 2016. I loved coloring the tiny rainbows and then lost steam.
I honestly don’t remember when I started this page. Luckily I’d blogged about it!
15. The Time Garden Quilt Page – coloring
I don’t recall when I started working on this page in Daria Song’s The Time Garden either but judging from other posts about it I’d made in April 2016, I’m going to guess it was about that time. I have NO idea, however, why I stopped it so close to being done.
16. The Princess Bride Fred Savage 2-Page – coloring
This page was blogged when I first started it, way back in March 2017. I don’t want to move on to another page in the book until this one is done, though, so I need to make the time to finally get it finished up.
I’ve never shown these before, except for the odd glimpse in the background of Instagram pics. I started this trio of plastic canvas portraits when I moved in August 2017. While I love how they look in black and white (and blue), I designed them to be in full color and I’d love to see them complete.
Think I can do it? Want to play along? Use the tag #19WIPtoFO2019 so I can see how many you get through!
ps: As I’m about to post this I just realized that 19 projects means committing to completing more than one per month. Months that are already pretty busy with Becket, work, kids, commissions and all the new projects I want to work on and might come up over the year… Wish me luck- I’m gonna need it!!
This post may contain affiliate links. This means I might make a small commission on purchases made through the links, at no cost to you.