Leave a comment

Ghost Cupcakes DIY

In today’s post I’m going to show you how to make these fast and easy ghost cupcakes, perfect for Hallowe’en!

The sweet treats can be prepped in advance and top homemade cupcakes or you can pick up store-bought cupcakes and throw the whole thing together last-minute.

I’d seen versions of this style topper on various sites around the internet and put mine together using the features I liked from various ones, plus added my own twist. These and these have fondant over marshmallows but I didn’t like the square look it gave the ghosts. These and these achieve a more rounded look by draping fondant over lollipops, but as my cupcakes were for a party for adults I didn’t think the lollipops would end up eaten. After browsing my local bulk shop I came up with the idea of topping the marshmallows with rounded gumdrop candies.

What you will need for the ghosts:

You can place each ghost in a treat bag and hand out as-is or use them to top homemade or store-bought cake or cupcakes.

Step 1: Assemble your marshmallows, gumdrops and sticks to prepare the ghost bases

Push the lollipop stick up through a marshmallow and halfway into a gumdrop. You can wet the top of the marshmallow first with a thin smear of icing, clear piping gel or light brush of water to help the marshmallow and gumdrop adhere together, however I found that the tackiness on the stick from being shoved through the marshmallow did not make this necessary.

Repeat until you have as many ghost bases as you need, then set them upright by pressing into foam, flower foam, egg cartons, etc…

Roll out your fondant and cut out a circle with your cutter. I topped each gumdrop with a small dollop of icing so the fondant would stick, but you can also use clear piping gel or water. Apply the fondant over the ghost base, centering the circle over the gumdrop and smooth into place. Use your fingers to crease the excess into ghostly folds. Note: don’t apply too much icing/water/gel or the fondant can thin and tear if it gets too wet.

Repeat for each ghost and set them aside in your chosen support so the fondant can set up a bit. If desired prep a cake or cupcakes to be ready for the toppers. I’d baked up some chocolate cupcakes and gave them a thin layer of vanilla icing.

Once the fondant is no longer pliable you can finish off your ghosties by adding black eyes with a black edible marker. You can play around with the eye shape to give them all unique expressions!

Repeat until all your ghosts can see and then set them into your cake/cupcakes (if using). If you are placing them into treat bags to give out as Hallowe’en favors, allow them to air-dry until the fondant sets up.

These were served along with the Paint Nite cake and cookies from my last post, and made for a really fun Hallowe’en party treat table!

This post may contain affiliate links. This means I might make a small commission on purchases made through the links, at no cost to you.


Leave a comment

Cake & Brownie “Sliders” with Cookie “Fries”

In today’s post I’m going to show you the super easy steps to make these yummy cake/brownie mini “sliders” that you can pair with sugar cookie “fries” for this adorable tromp l’oeuil dessert platter. While they’re a fun surprise for any occasion they work especially well for Father’s Day which happens to be tomorrow. Since they can be made with all store-bought supplies they can be whipped up last minute meaning you still have time to make them yourself!

These sweet treats have been around the internet for a LONG time, so this is by no means my idea. I actually got the idea from Bakerella’s blog back in 2009 and made my version pictured here for Father’s Day for my dad in 2014.

Angie’s original post is linked above, and she reissued it here with updated templates for other holidays and occasions including birthdays, Canada Day and the 4th of July.

Foodstuffs you will need:

  • vanilla cupcakes – “buns”
  • brownies – “burgers”
  • sesame seeds
  • sugar cookie mix – “fries”
  • Toppings: (all optional as desired)
    • icing – “ketchup” & “mustard”
    • granulated sugar – “salt”
    • orange starburst (or other taffy-type candy) – “cheese slices”
    • red gummy candy – “tomato slices”
    • green gummy candy – “pickle slices”
    • green candy tape/roll up – “lettuce”
  • Other candies to make any other desired burger toppings

I forgot to take pics of the fries-making process, but you can find the full instructions at the Bakerella blog post. Basically you bake vanilla or sugar cookies (I used Betty Crocker Sugar Cookie mix) and bake the cookies as wide rectangles which you slice into “french fry” strips once baked and then toss in or sprinkle with granulated sugar to simulate salt crystals.

Most versions of the faux sliders start with vanilla cupcakes for the buns and brownies for the burgers.

I baked mine using store-bought box mix but you can go an even easier route and purchase ready-made plain cupcakes and brownies to skip this baking step completely. Slice all cupcakes in half horizontally and then use a cookie cutter that best matches the bun diameter to cut burger “patties” from the brownies.

For the burger toppings I’d basically wandered the aisles at my local bulk store looking for candies that could pull double-duty as other foods.

I tested out a few orange taffy-type candies for the cheese slice and in the end went with orange Starburst. Laffy Taffy, Airheads or any other orange taffy that can be rolled flat would also work well. I found it easiest to squish the candy flat and then roll it out between two sheets of parchment paper. You can also use wax paper if necessary, as I did here for storing the candies and keeping the layers from sticking together.

I used the green portion from rainbow Fruit by the Foot to simulate lettuce by tearing it into jagged strips. If you can find an all-green version that would be even better, though my kids didn’t mind eating the other colors that were left over after I harvested all the green bits!

I used red gummy disks for tomato slices, first cutting them in half widthwise to get thinner discs, then I cut those in half again as a full circle of red candy would be a bit much with all the other candy.

My store didn’t have plain green gummy rounds to use for pickle slices, so I cut up some mint-leaf shaped ones instead.

Once you have all your toppings ready, tint some icing red and yellow to simulate ketchup and mustard, and then assemble your burgers as desired.

Mine had a slice of “cheese” on the lower “bun”, then the patty, and then tomatos, pickles and lettuce, all arranged to slightly overlap the sides so they’d be visible.

A drizzle of “ketchup” and “mustard” was the last step before placing the top half of the “bun” on top.

To really finish the look brush the tops of the cupcakes with a bit of water and then sprinkle on some sesame seeds.

Arrange them on a platter and sprinkle the faux fries around. If desired you can add condiment cups or little puddles of “ketchup” and “mustard” for dipping the fries into. These were as much fun to eat as they were to make and all these years later Henri still keeps asking me to make them again, which is the real testament to how much of a hit these were!

This post may contain affiliate links. This means I might make a small commission on purchases made through the links, at no cost to you.


9 Comments

Mini Cupcake Transport Hack

Today, December 15, is one of the many days recognized as “National Cupcake Day”. We’re also halfway to the holidays! In case you’re planning on bringing a little home-baking to your celebrations, here’s a quick and easy little tip to help you out.

Picture it. You’ve baked a dozen (or more) mini cupcakes. They’re all iced and decorated and smelling delicious. But you don’t have a cupcake carrier and your largest Tupperware is already in use! What do you do?

Voila!

I know what you’re thinking. “If this is about cupcakes, why are you showing me egg cartons?”

Ahhh because those aren’t eggs inside!

Surprise!

Ok ok, so I know what you’re thinking now. “Sure, it’s an easy way to get them to wherever I’m going, but how am I going to get them out afterwards? Won’t I squish the cupcakes? If I tug on the fondant toppers won’t they just pop off the icing? And what if I only have icing on top? I can’t very well grab THAT, now can I?”

Ahh don’t worry, I’ve got you covered! It’s as easy as…

…1…

…2…

…3

Poke!

Of course it does take a quick moment of prep, so let’s rewind.

First, make your toppers. These were for Jakob’s 7th birthday, when he was super into Adventure Time. His birthday cakes 2 years in a row were AT-themed, and these cupcakes were a little extra treat to surprise his class at school (back when we were able to do that).

As always when making most toppers (Pitfall cake, Charlie and Lola cake, Minecraft cake, etc) I recommend making them a few days in advance. Not only will this allow the fondant to harden, making placement easier, but it will also help prevent the fondant from absorbing moisture from the icing (or water/fondant glue) and disintegrate on you.

The Gunter toppers are pretty simple to make. Roll out some white fondant and use a circle cutter in your desired size for his face. I went with a cutter the size of the top of my mini cupcakes. I like to use a fondant roller with levelers but you can eyeball it. Roll your white fondant scraps a bit thinner and use your smallest cutter for the eye shine. For my size cupcakes I used a large smoothie straw for the eyes so a regular straw was perfect for the white shiny dots. Set the white circles aside and roll out some black fondant. Use the same cutter as for the head to cut one black circle for each face, and then shift it down a bit and cut away most of it to create a crescent moon-type shape. Use water or fondant glue to attach the black crescent to the white face, and then use the remaining black to cut out his eyes. Attach the eyes to the face and then the eye shine to the eyes. Finally get some yellow fondant (or tint the scraps of your white) and use your fingers to pinch off tiny pieces and roll them into mini cones for his beak. The cutters do the bulk of the work for you and assembly is pretty fast, making this a really simple design.

For reference, here’s Gunter in the show:

Next, bake your cupcakes. I didn’t take progress pics of this part but it was a basic vanilla cake recipe and a swirl of store-bought icing.

Bonus tip: empty your icing tub into a bowl and whip it up a bit with a hand or stand mixer. Not only will it be a lovely consistency for piping lush swirls but the air added to the icing will increase the volume, getting you more mileage out of what you’ve got.

While your cupcakes are cooling you can prepare their carriers. Each egg carton will hold 1 dozen cupcakes (obv) and you’ll need something sharp for cutting out the bottoms. I found a knife/blade worked much better than scissors for this.

The easiest method was to cut around the carton’s own indent. Imagine the circle was a square and insert the knife straight down into 3 of the 4 “sides” of the circle. Then you can tear off the little flap this creates.

Give a little wiggle to push the cut edges to the inside. This will make it more comfortable for you later, and the raised little bits will also give the cupcake a bit of a shelf so it doesn’t fall too tightly into the hole and get stuck.

And that’s all it takes! Super easy, using something you’ve probably already got on-hand.

This post may contain affiliate links. This means I might make a small commission on purchases made through the links, at no cost to you.


5 Comments

18, 19, birthday too! plus – pirate fondant cupcake & cake tutorial

2009-05-15 18 wks 01a

Mommy with Henri at 18 weeks old.

Week 18  brought Jakob’s birthday and a fun little party at his school, then a fun little party at my parents’ house since they would be out of town on the day of, then a fun little party (with a trip to the pet store to look at the animals) on his actual birthday.  I miss such celebrations for MY birthday!  Thanks to Daycare Disease we were all sick around here, and those of you with husbands know there’s nothing more pitiful than a hubby who is sick.  When Mommy is sick the world doesn’t stop turning, and every little sniffle isn’t cause to down a bottle of Advil Cold & Sinus…I’m just sayin’.  Anyhoo…the colds eased up and just in time, ‘cus week 19 was crazyness around here!

I was busy knitting non-stop for the 2 weeks, but couldn’t show any photos ‘cus my swatches were for submissions to the Winter Twist Collective.  I don’t know if I’ll get accepted, but keep your fingers crossed for me!

Once the submissions were in I got down to work on the plans for Jakob’s party this past weekend.  We were doing a party for his friends (ok, our friends and family with kids the same age) at a local play area, followed by lunch and dessert here at our place for our close family.  That way those without young kids didn’t have to hang around at the kids’ playground, bored.

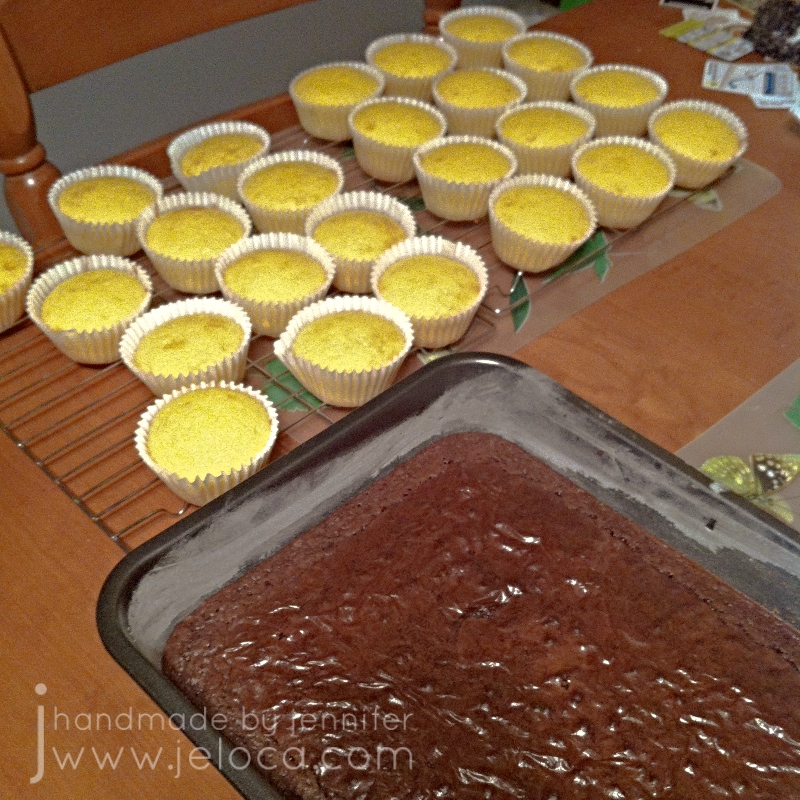
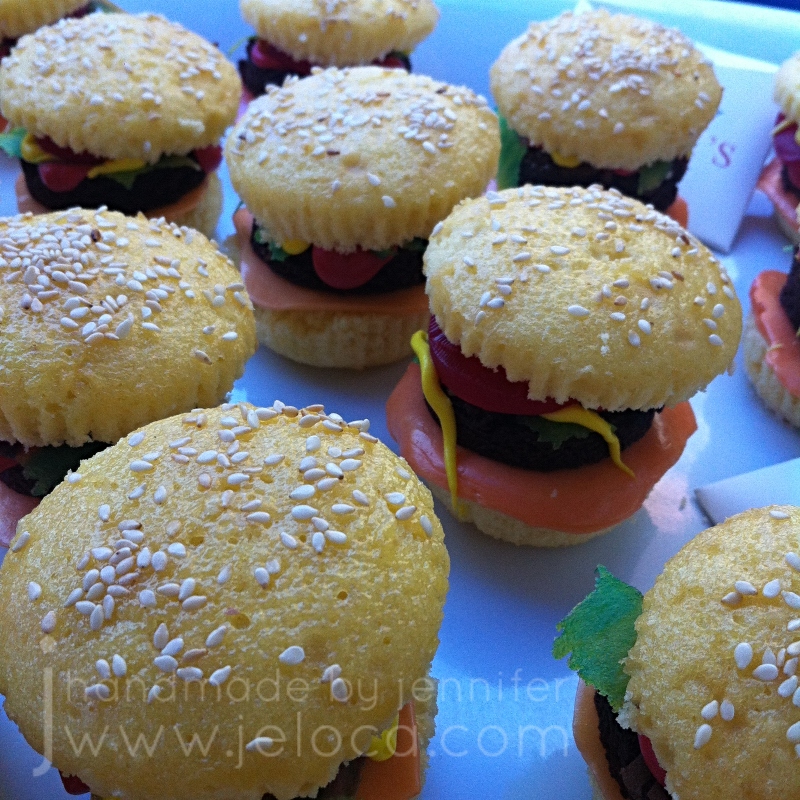
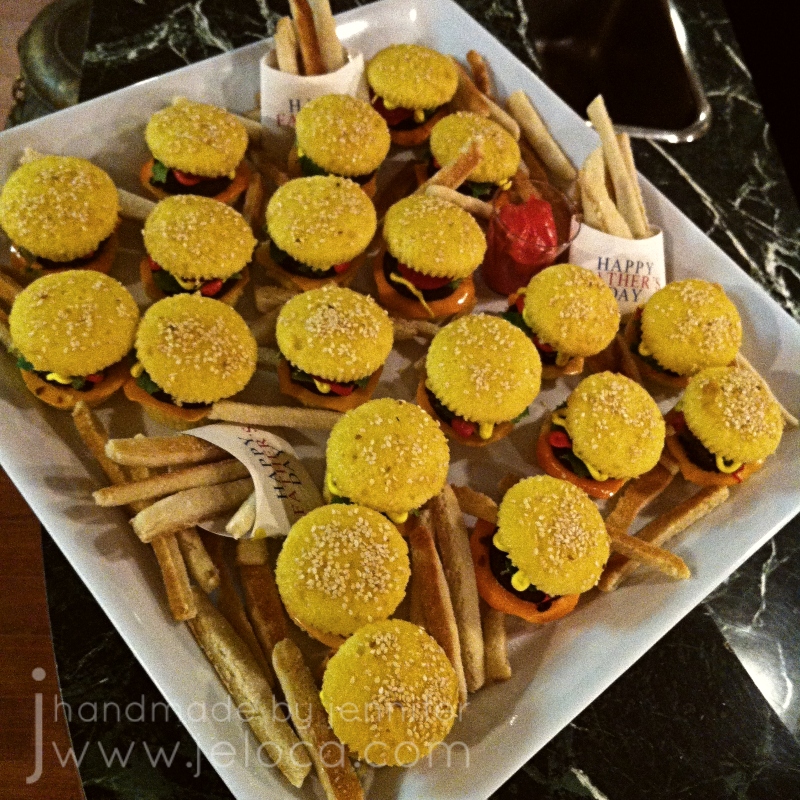
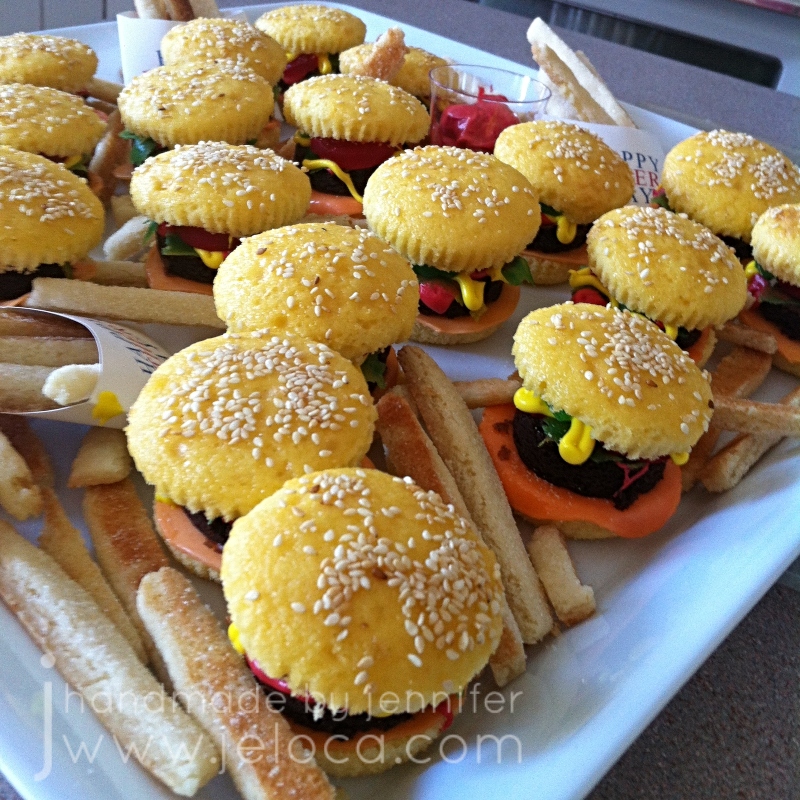
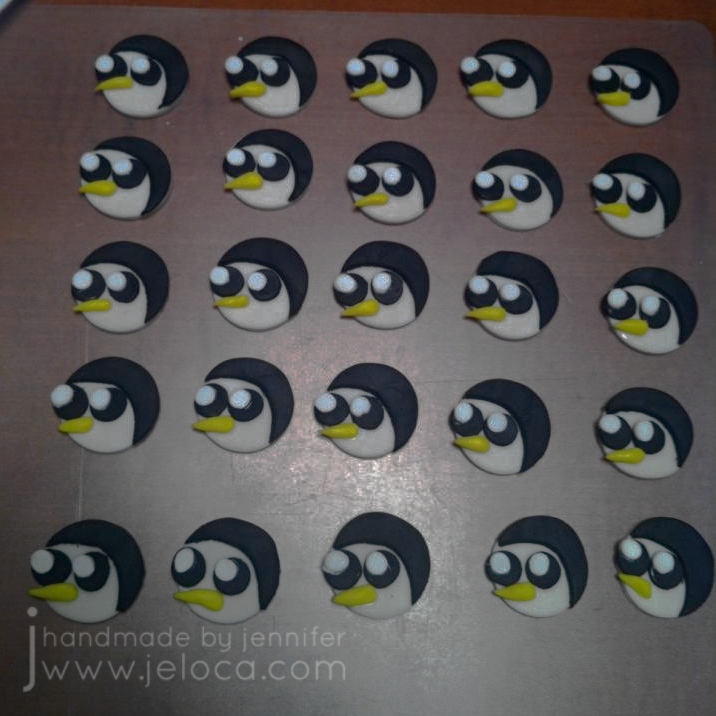
I whipped up a batch of cupcakes and debated how to decorate them.  We’d sent out pirate invitations for Jakob’s party, and my mom had found similarly-themed table cloths, napkins, plates, etc.  I knew I wanted to do pirate cupcakes and for a long time the plan was to ice the cupcakes then put some white icing in a bag and pipe a skull & crossbones onto each one.  Thank god I talked to my friend Jessa who quickly extolled to me the joys and wonders of working with fondant.  I am now a convert!

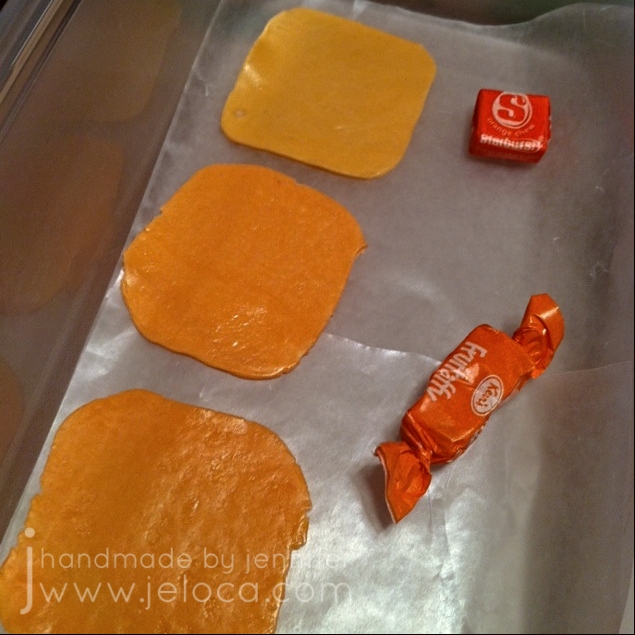
I picked up some supplies at our local bulk/baking store: 1 box of Wilton’s pure white rolled fondant, 1 box of Wilton’s bright colored rolled fondant (contains a pack each of red, yellow, blue and green), some black gel icing tubes, and a tube of sparkly-yellow gel icing.  I took it easy for my first time and stuck with simple techniques.

piratecupcakeshowto

What do you think?

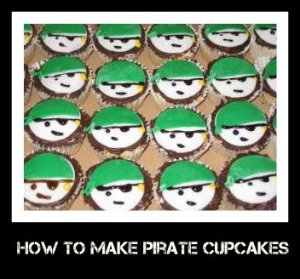
Pirate Fondant Cupcakes

  • First I baked the cupcakes and let them cool, then did a crumb coat of thin icing
  • I iced them properly with chocolate frosting (store bought)
  • I rolled out some white fondant and cut the circles with a cookie cutter.  I placed a white “face” onto each cupcake and smoothed it in place
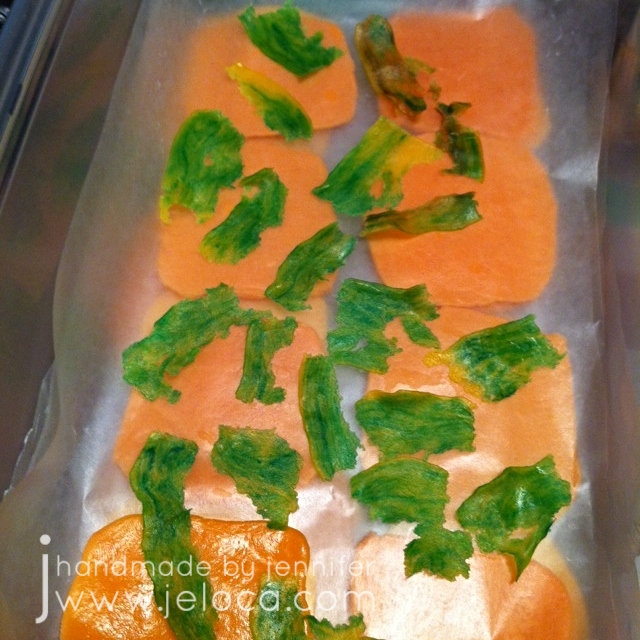
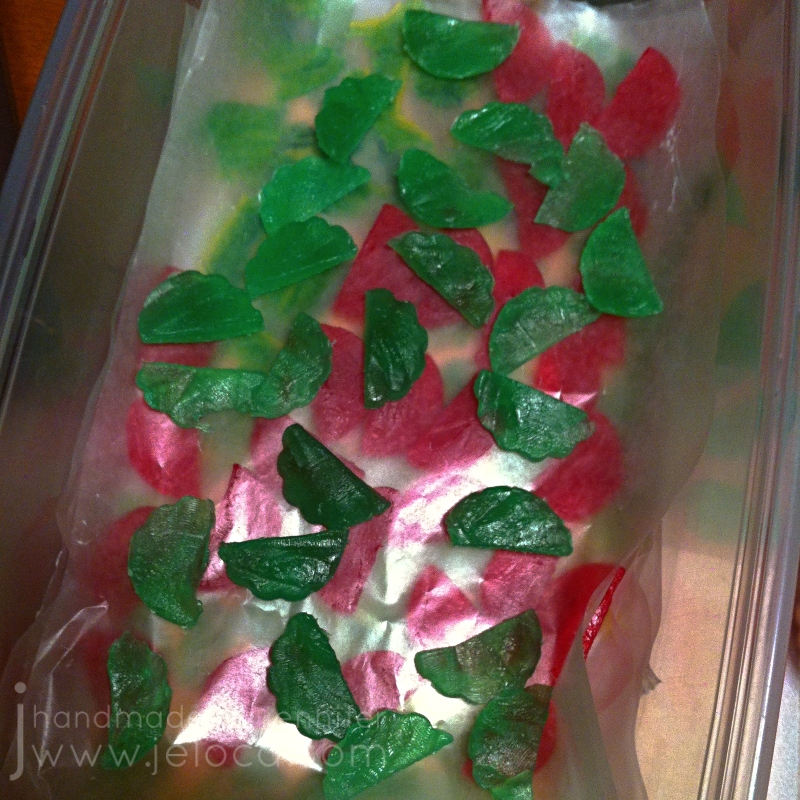
  • next I cut green circles with the same cookie cutter, and cut them in half.  Using a Q-Tip and a glass of water, I put a bit of water on the back of the green semi-circle and stuck it in place for the bandana.  I used the green scraps to make little twists for the bandana ties, held in place with another little dab of water.
  • the face was drawn freehand with the black gel icing, followed by a quick dot of the sparkle yellow for an earring.piratecupcakesfo04

I made 42 of them, and they seemed to be a big hit at the party.

2009-05-24 42a

Jakob really enjoyed chowing down on his first of many desserts that day!  He blew out his candle by himself and polished off the entire cupcake before getting into the other desserts and fruit.

2009-05-24 54a

Henri couldn’t have any dessert so he spent the time hanging out with his uncle Mike.  I love this outfit on him- doesn’t he look like he just got back from a round of golf?  I swear, he does NOT look like a 4-month-old!

2009-05-24 62a

Not our best shot, but here’s one of our little gang.

2009-05-24 67

Mommy with Henri at 19 weeks old.

I’m a few days late for that photo, but we’ll pretend it was taken on Thursday, m’kay?

After the playground we came back to the house to prepare for the onslaught of family (and I mean that in a good way!).  There was much (more) food and laughter and meowing from Sam who was locked in the basement.  When it was time for dessert (again!) I brought out Jakob’s cake.

2009-05-24 70a

I’m so proud of this one!  My first official fondant cake, and I LOVE how it came out!  It was so much fun and so easy to do!  Here’s what I did:

piratecakehowto

Pirate Fondant Cake

  • I baked the cake and let it cool, then did a thin crumbcoat.  I actually left it in the fridge overnight at this point because I did the cupcakes that night (Friday night).  I only decorated the cake on Saturday night (his party was Sunday morning).  Before putting it in the fridge I lifted the edge of the cake (I had baked it in a springform pan, so the bottom pan was still under the cake) and put a big dab of icing.  When I put the cake back down and pressed lightly the icing acted as a glue to hold the cake in the center of the yellow platter.  Once it had been cooled in the fridge over night the cake was going nowhere!
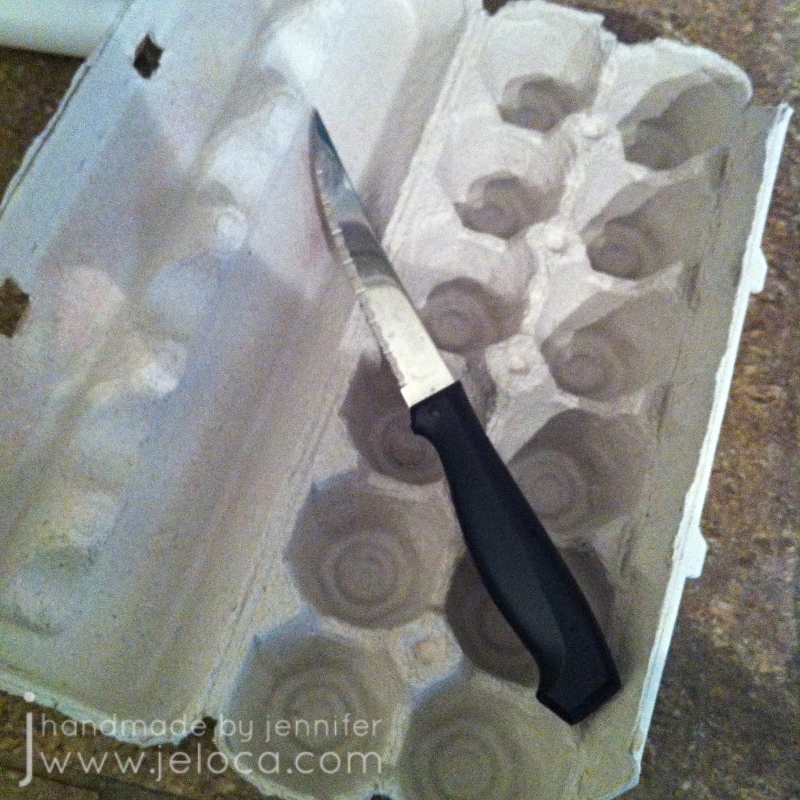
  • I re-iced the cake giving it a generous coat and making it as smooth as possible.  I even used a piece of carton at one point as a smoother.
  • While the icing set (firmed up a bit) I rolled out a big chunk of the white fondant.  My cake was about 9″ in diameter plus 2″ high, so since 9+2+2=13, I rolled out a circle-ish shape about 15″ in each direction.  I centered it on the cake and went around slowly, smoothing it into place and easing it gently around the edges.

piratecakewip02a

  • Next, with a sharp knife, I cut away the excess.  Everything I read online said to use a serrated knife, but I used a regular flat one (like a sharp butterknife) and had no problems.

piratecakewip03a

  • To make the bandana, I did the same think as for the white face, only at just under half the height.  I cut a straight edge with the knife then placed it on the cake, dabbing a few edges with the wet Q-Tip to “glue” it in place.  Once I had it smoothed nicely I cut away the excess.
  • Once I knew where the face would go I used a small ball of white fondant to make the nose by squishing it with my fingers into a triangular shape.  I glued it in place with some water.  I used 2 balls to make the ears and glued them with the water, but since they were raised from the surface of the platter I stuck a small ball of fondant under each ear to support it.
  • I didn’t have any black fondant and didn’t want to use my gel icing to draw a face on.  I ended up making some black fondant by squirting a big dollop of store-bought black icing from a tube into a little ball of white fondant.  I kneaded it a lot to mix it all together.  Ugh- it was the right color, but incredibly gloppy and slimy.  When you work with fondant you use icing sugar instead of flour to flour your surface and rolling pin, so I kept mixing some icing sugar into my black fondant mess until it was a workable texture.  Luckily the icing sugar didn’t cause the black to get pale.
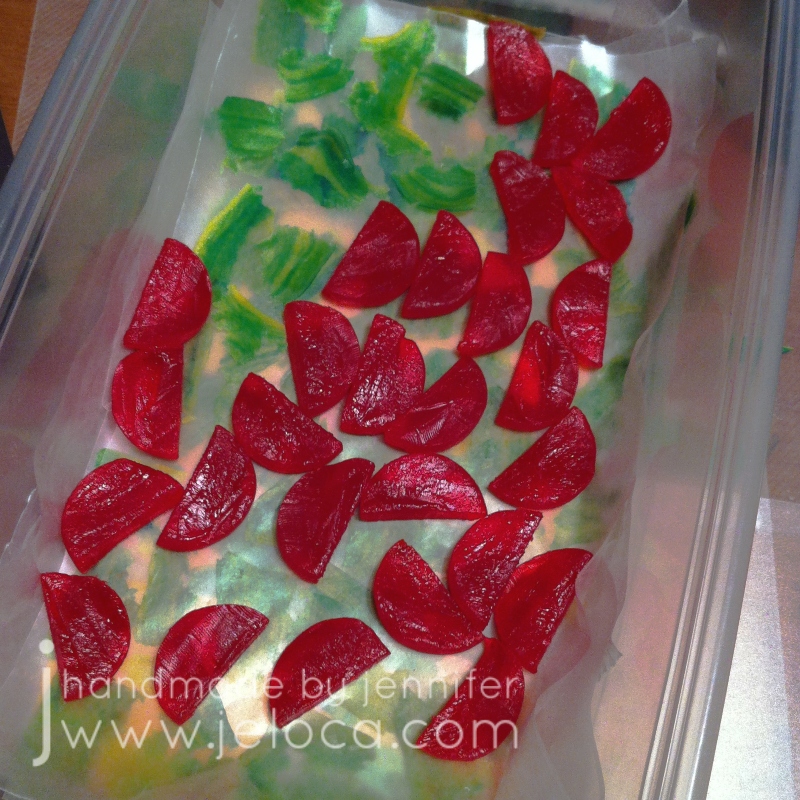
  • I used a cookie cutter for the eyepatch, squashing the top of the circle somewhat to make it flat.  I put it in place first, gluing with water.  Then I rolled out a long, skinny snake and glued that into place for the band.

piratecakewip06a

  • I used the same cookie cutter as for the cupcake faces to cut circles from my leftover green and glued them down with water to decorate the bandana.  The small circles were cut out with a drinking straw.

piratecakewip07a

  • I rolled out a thick rope of the red fondant and made an actual knot with it, then glued it to the side of the bandana, over the ear.  I stuck on a few random bits of green so it would look like an actual fabric.
  • I rolled a thick snake of the yellow fondant and glued it in place around the other ear for an earring.  Once it had set I took some of the sparkle gel icing and smoothed it over the earring to add a sparkly, shiny sheen.  It took a long time to dry and always remained tacky, so I wouldn’t do that on an area that needed more work.

piratecakewip09a

  • Small bits of the black and white were used for the face.

piratecakewip10a

  • I thought I was done, but last-minute I decided to add a skull & crossbones to the eyepatch.  I made 2 small white snakes and used the knife to make a cut in the end of each.  I pushed the cut open and pinched the middle of each “bone” so they could overlap eachother without having a lot of bulk in the center.
  • The skull is just a small ball of white formed with my fingers.  I indented the eye sockets with the dry end of the Q-Tip I was using to “glue”.

piratecakewip12a

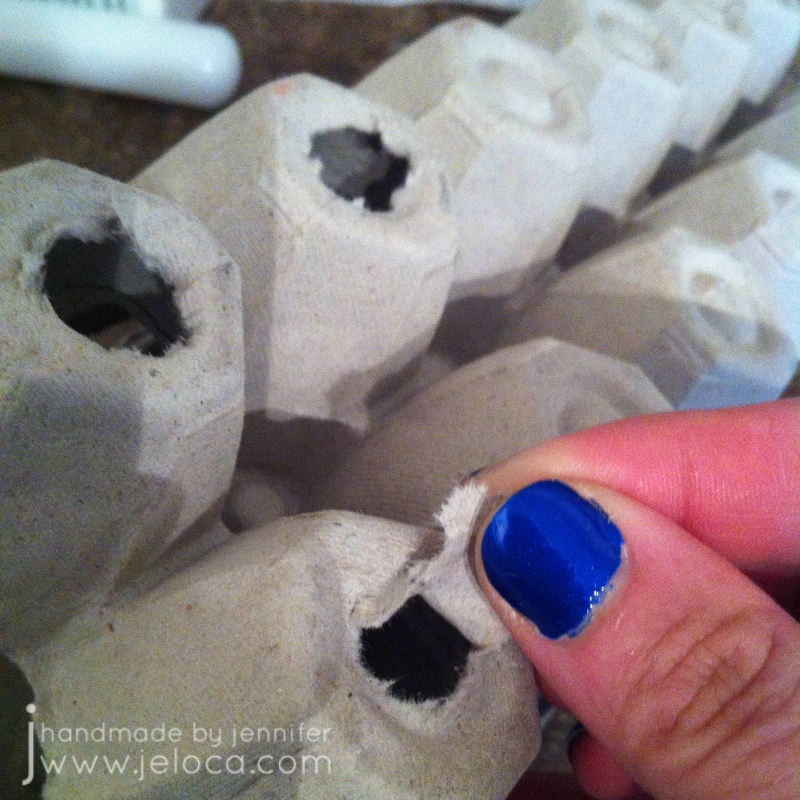
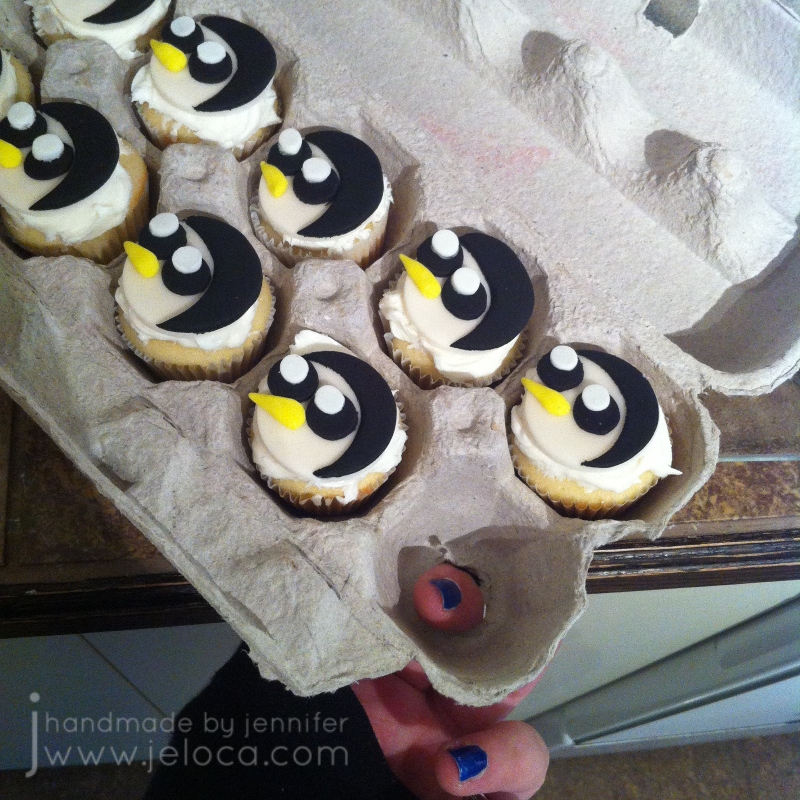
  • Finally I decorated 4 cupcakes to go around the cake.  I didn’t want to stick a candle in the pirate’s face so I made the cupcakes to say “Happy”, “birthday” and “Jakob”, and added a “nd” next to the “2” candle I stuck in the 3rd cupcake.  So all together they said “Happy 2nd birthday Jakob”.

And that’s it!  It took me about 2-3 hours from the second coat of icing on the cake to “gluing” the 4 cupcakes onto the platter with dabs of leftover frosting.  It was totally easy and a very rewarding experience.  Plus a little fondant goes a LONG way, and I have a bunch left over so  I am already planning to make more cakes!

piratecakewip11a

I couldn’t believe Jakob polished off another cupcake, and some fruit, plus a cookie, all after having lunch when we got home after the first party where he’d ALREADY eaten an early lunch and had dessert.  No wonder the kid never napped that day!  He was wound up on a sugar high and exhausted, but we were so proud of both he and Henri.  They were both so well behaved at both parties!  Even though there were over 40 adults and 25 kids running around, neither one freaked out or had a meltdown.  Jakob was polite and didn’t grab at the food or the toys, and even when sleepy later he just lay on the couch next to us commenting excitedly about his new stuff as we opened his gifts with him.  They truly are great kids (ok, I’m biased) and they made us really proud.

2009-05-24 01a

Jakob’s other birthday cakes