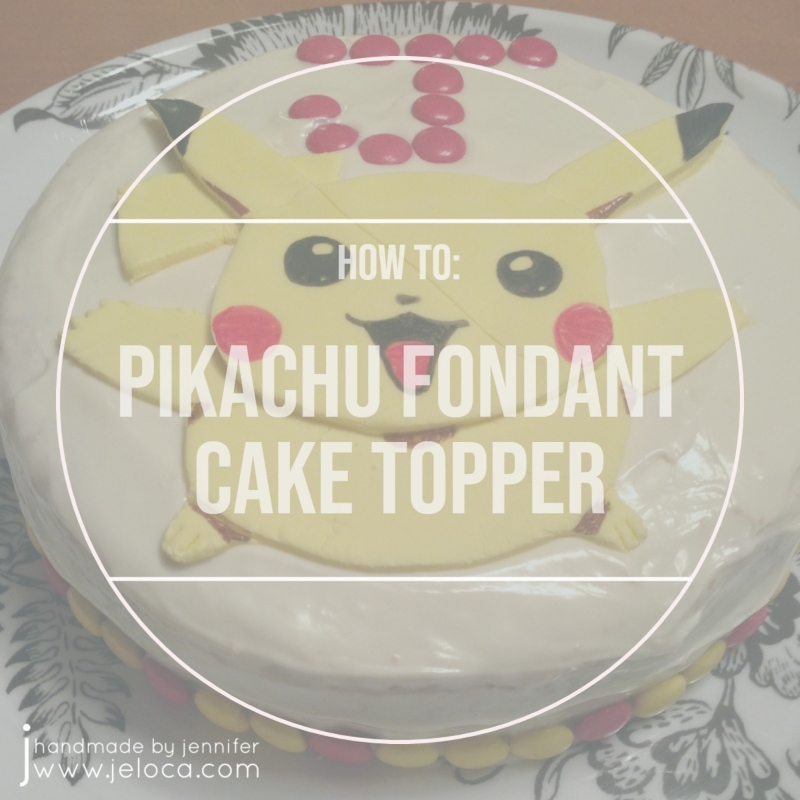
Jakob turned 16 (!!) this week, so I thought it was high time to share another one of his past birthday cakes.
Made for his 9th birthday, this Pikachu fondant cake topper is a quick and easy DIY that you can copy on your own cakes, cupcakes or cookies.
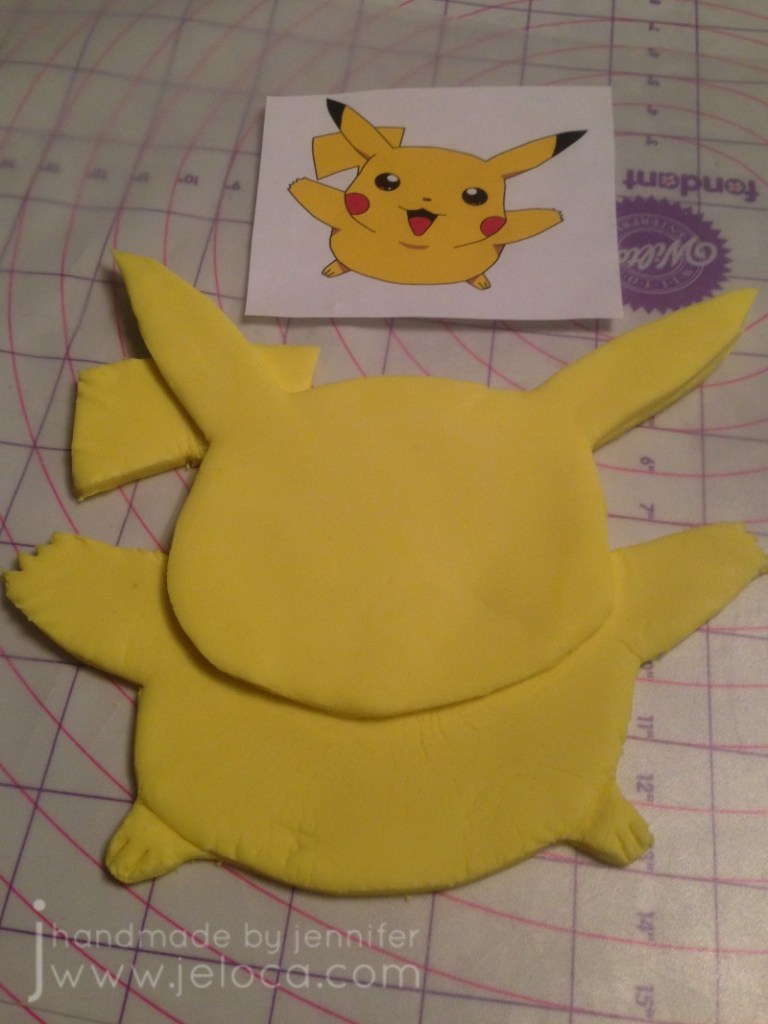
As always when making a topper for a known character I like to start with a template. After measuring my cake pan I resize an image of the character to fit and then print it out. For cartoon characters like Pikachu you can search for coloring pages to find black and white outline-based images.
For this cake I tinted some white fondant with yellow Americolor gel colors to get Pikachu’s signature yellow shade. I rolled it out on a silicon measuring mat using a fondant roller with the medium levels as I wanted to make sure I had enough fondant for a two-layer figure. I usually use the thickest level for fondant toppers and I would suggest that you prep enough fondant so you can do the same – as you’ve probably noticed above my topper was a little thin and wound up cracking.
I started by cutting out the base layer of the full image by tracing the entire template with a fondant cutter.
Then I cut out Pikachu’s head alone so I could layer the pieces similar to a 3D paper decoupage technique.
Carefully stack the head cut out on top of the fondant base using a little bit of water to secure it in place.
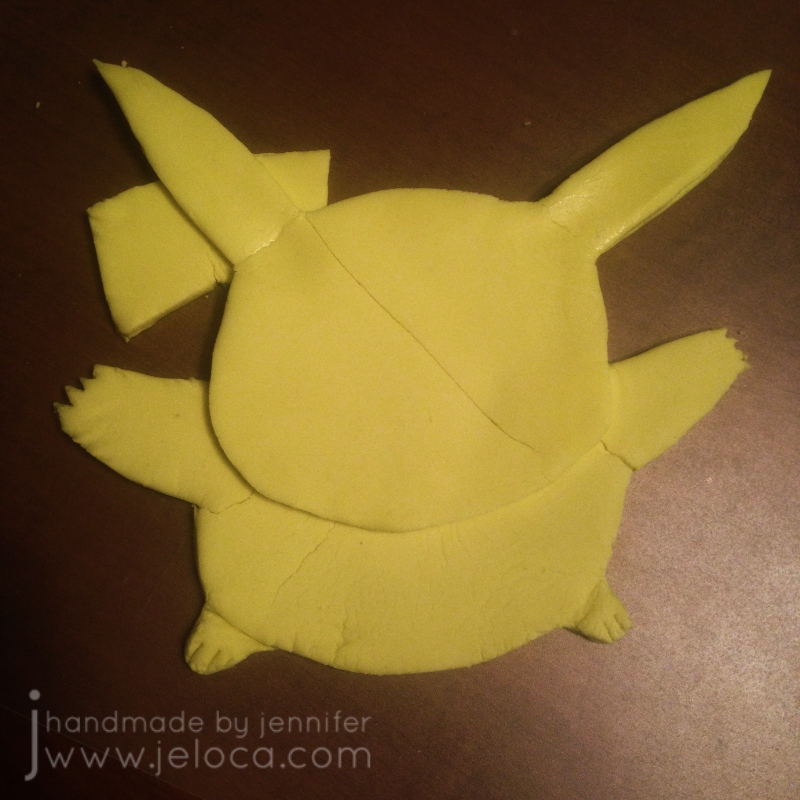
I always like to prepare my toppers in advance so they can dry out for a few days before I begin coloring/painting on them. As mentioned above I’d made Pikachu a bit too thin and he wound up cracking across his face and left arm.
I used edible ink markers to draw on Pikachu’s face and details. I’m glad I had a reference image as I was about to color the tip of his tail black. Have you heard of that Mandela effect? It totally got me!
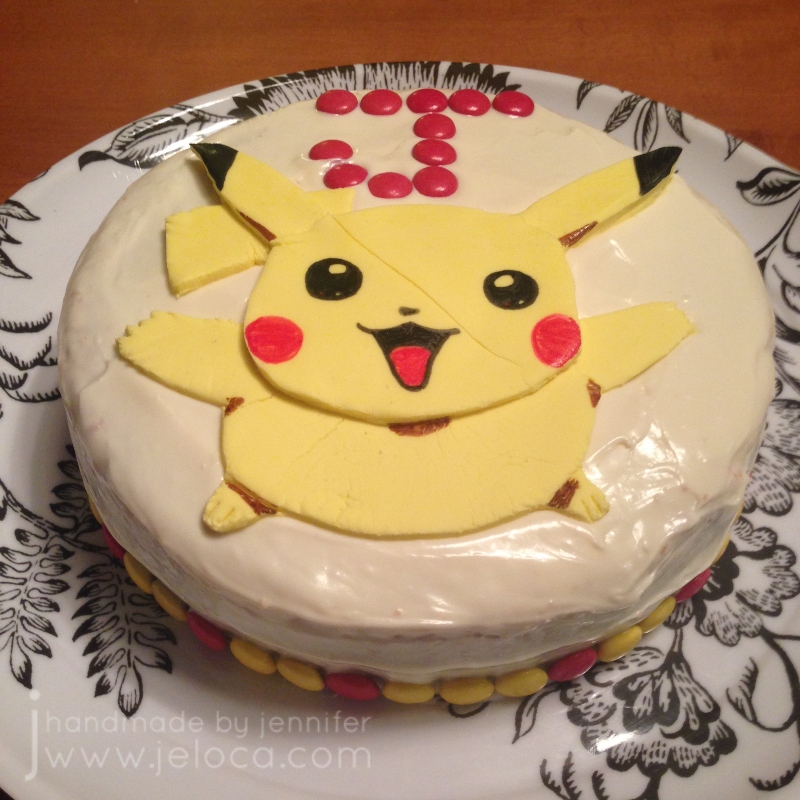
While the fondant was drying I baked a vanilla cake and prepped it as per my “how to bake a cake and prep it for decorating” post. To finish things off I decorated the base with yellow and red Smarties to match the colors of the topper.
This was a really quick and easy DIY that you can use to make your own Pikachu treats!
This post may contain affiliate links. This means I might make a small commission on purchases made through the links, at no cost to you.
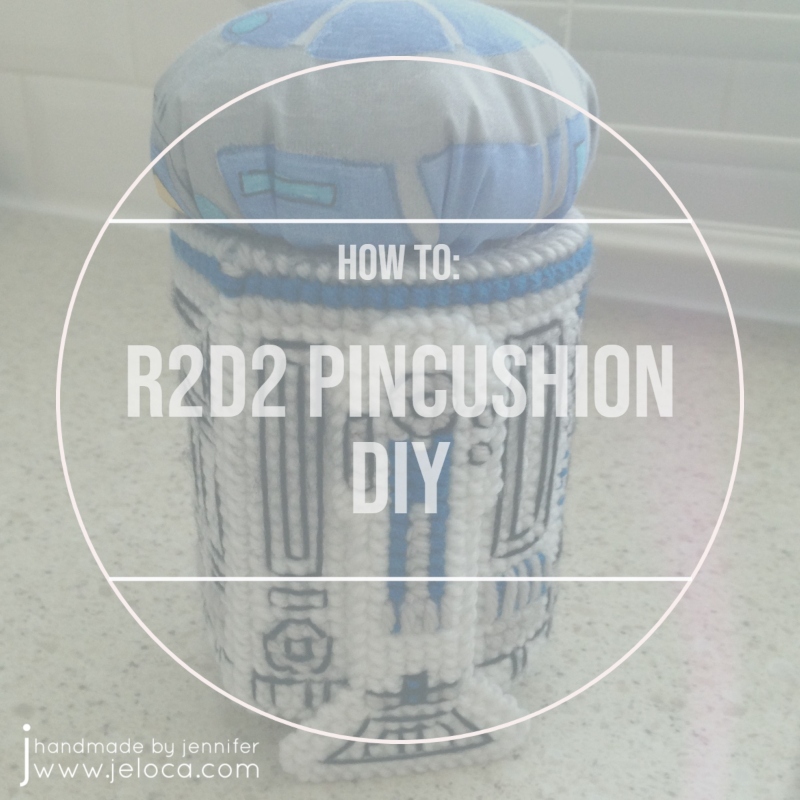
Star Wars Day was a few days ago so it’s completely fitting to share this R2D2 pincushion DIY I made a few years ago.
I was brainstorming ideas for a crafty gift exchange in an online group. My giftee was a big Star Wars fan and her favorite craft was quilting. Around the same time I’d been browsing CraftyPod and had come across Diane’s plastic canvas needle book with built-in pincushion.
The puffy pincushion immediately made me think of R2D2’s top dome and I wondered if I’d be able to do something similar atop a plastic canvas base. It worked but I did one thing wrong so I’ll tell you what to do so you don’t make the same mistake I did!
I started out by making the base, so I could later cut the circle to the proper size. This is easier than making the dome and needing to fit your design for the base into those constraints.
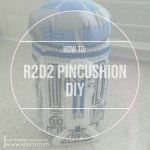
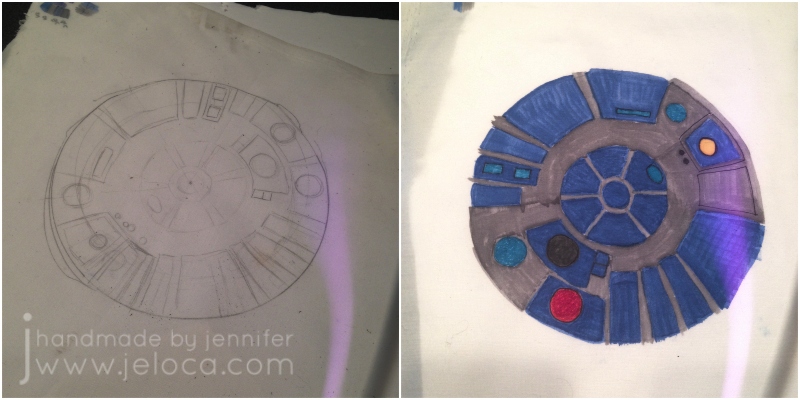
I found some good sample images for R2D2 online and drafted out a cross stitch pattern for his body. If you copy my chart you will need a plastic canvas rectangle that is 26 holes high by 67 holes wide. You can also stitch the body first and cut it out afterwards if you prefer.
Following the chart above, cross stitch the body design onto your plastic canvas. The majority of Artoo is white with some smaller gray areas and some blue.
Once the base stitching is complete separate your yarns into plies and use them single-strand to work backstitch on the outline areas. Black is used for all the main panel shapes and round areas, gray is used on both blue grills and blue is used for the vertical dashes on the front section. Note that the red border is the boundaries of the design and is not stitched.
Using white yarn, whipstitch around the lower edge of the body. Leave the sides and top unstitched as they will be used in seaming later.
I only gave Artoo only two legs in this design as he was standing upright and the third leg would not be seen underneath. I think it would look even better and more authentic if you made him tilted back with all 3 legs visible!
To make his legs stitch the above chart twice onto plastic canvas. When working be sure to mirror the gray segments at the top so the two legs are opposite (see image below).
As before the red designates the boundaries of the design and should not be worked.
Using single strands of black and gray yarn, embroider the outline details on both legs.
Using white yarn, sew the two legs into place on the body, following the placement as shown above. Sew down directly through the two layers of plastic canvas making tacking stitches 1 square high, and following along the sides and top of the legs. Be sure to put the correct leg on the correct side.
Using white yarn, whipstitch the two side edges together. This will join his body into it’s cannister shape. This base structure should be able to stand on its own on the two legs.
Now that you have your base diameter set you can cut out an appropriately-sized ring from your plastic canvas circle.
Lay your plastic canvas circle on top of the body and mark which ring of holes is closest to the top’s diameter. If you don’t have an exact match pick the one that is slightly smaller. I removed the inside of my ring leaving only one hole to stitch, but this proved unnecessary in the end as I did not wind up putting my pincushion through the ring as was done in the inspiration project.
With gray yarn, fill the outside row of holes by stitching up and down through them, then again to fill the alternate holes. You want at least one or two rows of holes filled with gray yarn in case they show later. Also trace your new circle onto a piece of heavy cardstock or foam core and cut it out.
In the image above you can see the size of my original ring and then the one I cut out. You can also see my foam core disk.
Test your alcohol markers on a corner of your white fabric. You want to find the right colors that match your blue yarn while also making sure that your markers won’t feather at the edges. You want a marker that will allow you to draw shapes that will retain crisp edges and not bleed into other sections. With the markers I had on hand and my particular fabric, Spectrum Noir worked best. I liked the color of the Bics better but it bled a little more and I didn’t want to take a chance on ruining my design.
Knowing that the dome would be puffy, I added about 2″ extra to my disk’s diameter and traced out a larger circle. Using a clear image of R2D2’s dome as a reference I sketched out roughly where the various components went, and then colored it all in with my alcohol markers.
Then I cut out the dome. This is where I messed up. I forgot to take into account that gathering the fabric would mean losing at least the outer 0.5″ underneath my foam core disk. I SHOULD have cut out Artoo’s dome leaving a good 1″ minimum of white around the edges. You can leave this outer ring white or alternately you could extend the colors that touch the edges outwards for at least 0.5″.
To create your pincushion you’ll want to thread your sewing needle with thread and pass a running stitch all the way around the circumference of the dome. As you can see in the top right image, when you start to pull on the thread it will gather your dome into a cup shape. Unfortunately mine gathers part of Artoo’s details and they get hidden underneath. You’ll want to arrange your gathers so that it is the excess white fabric that gets gathered underneath and the full dome pattern is visible above.
Once you’ve stitched your running stitch turn the dome over and add your stuffing. Place your cardstock or foam core on top to give your dome a solid, flat base. Then gather your threads tightly and secure in place. You can run extra threads across from side to side if desired.
The last step for assembly is to attach the dome to the base. Use your same sewing thread and needle to secure the plastic canvas ring to the underside of the dome. Then use gray yarn and your yarn needle to whipstitch the two plastic canvas pieces together. You might need to ease in some stitches if you don’t have a direct 1-to-1 line up. It can help to pin the dome in place with locking stitch markers, marking each quarter so that you know the dome is in the correct position. (Be sure that he’s facing the right way!)
With that, your R2D2 pincushion is done! Yours will look better than mine because his whole head will be showing. Still- I’m happy with him and best of all the recipient loved him and sent me a pic later of him put to good use holding her pins.
Happy (belated) Star Wars Day!
This post may contain affiliate links. This means I might make a small commission on purchases made through the links, at no cost to you.
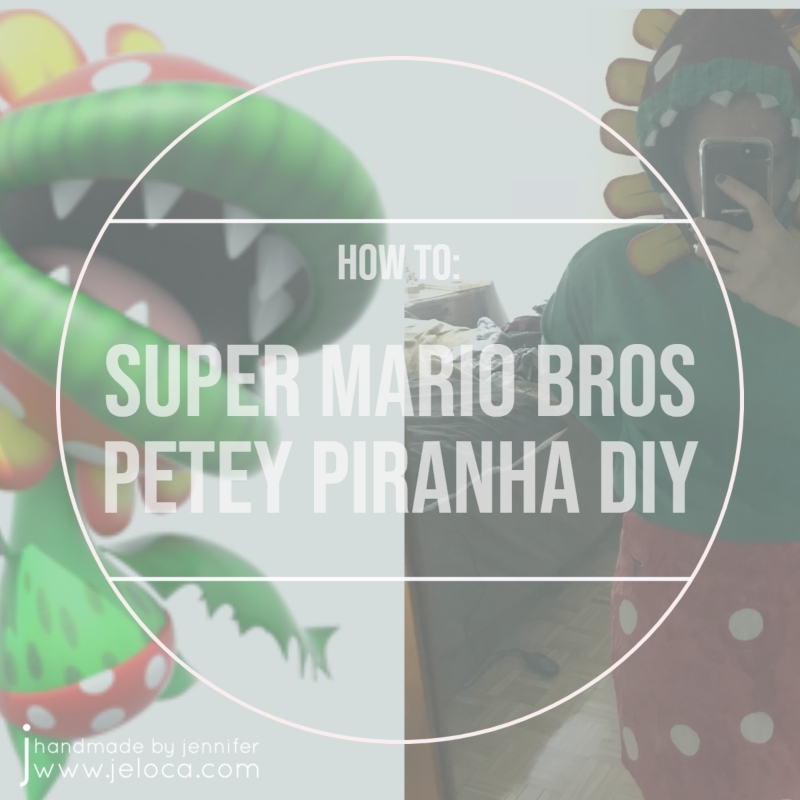
Mario Month 2023’s third DIY is a tutorial for a costume/cosplay for Petey Piranha,
This fabulous fellah is Petey Piranha. He made his debut in Super Mario Sunshine and is confirmed to be the leader of the Piranha Plants. While he’s not as common a Mario villain as Bowser or some of the others, our skit had eight dancers and needed a fourth “bad guy” to oppose our four “good guys”. I’ve already shown how we made the costumes and props for Mario, Luigi, Toad and Peach, as well as Wario and Waluigi. We already had a Bowser, and so Petey here made a great final baddie for our little cast.
I started this costume challenge with a visit to our local thrift shop where I was really lucky and found a solid green hoodie to be the basis of the top, as well as a white skirt as bottoms for our female Petey player.
The first thing I did was to mark off circles on the hood to be Petey’s…uh… face spots…? Mouth dots? I’m going to go with “face”. I used an appropriately-sized candle as a template and traced it out with a white colored pencil. It’s difficult to see in the first image (left side) but I also used a regular pencil to loosely mark off a border around the hood opening.
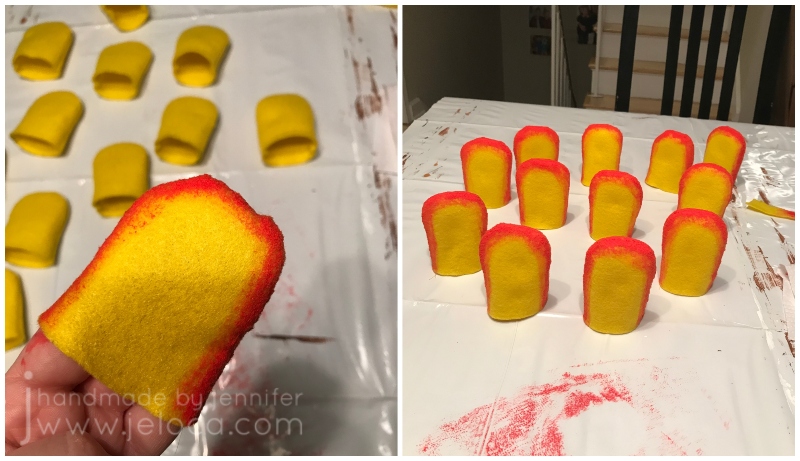
I used a measuring tape to loosely eyeball how high Petey’s yellow petals should be, based on the proportions of the character. I sketched half of the petal shape on a folded piece of scrap paper and trimmed it out until I had a nice, even petal shape of the right size for my hoodie.
The leftover yellow felt from my Wario costume DIY was perfect for Petey’s petals, and so I used my paper template to trace out 24 halves (to make a total of 12 petals)
I used sewing pins to tack two pieces together so they wouldn’t shift around and then with a regular needle and sewing thread I worked a tiny running stitch all around the sides and rounded top of the petal, leaving the flat bottom unsewn.
You can see in the image (below left) how the petal will look once it is turned inside out. Happy with the results, I continued until all 12 petals were stitched.
I turned them inside out and set them aside.
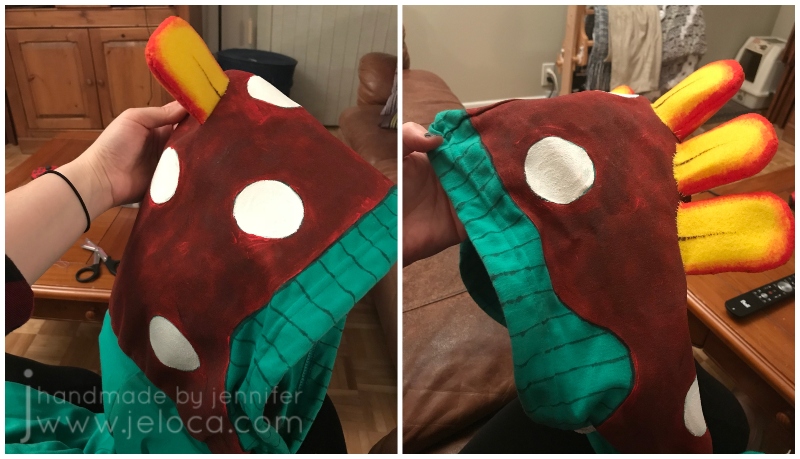
From there it was time to work on Petey’s face. I didn’t have any fabric paint so used regular acrylic paint for this DIY. I didn’t want the paint to bleed through the hoodie so I prepped it by stuffing it with a plastic bag, which in turn was stuffed with assorted packing materials. This also had the benefit of filling out the hood so I had a flat surface to work on. I also protected as much of the rest of the hoodie as I could by wrapping it in an additional plastic bag.
Using red paint I filled in the entire hood surface EXCEPT for those dots I’d traced earlier, and the lip area I’d marked off. The first image is the result after one coat. The second image was after a second coat of red and also after painting the face spots with white.
A cardboard box worked great as a support to hold the hood in a way that wouldn’t disturb the paint as it dried.
While I had the red paint out I drybrushed a bit around the edges of each petal. To drybrush simply dab off most of the paint onto a paper towel or other scrap surface before working on the felt. This will allow you to get the faded color around the inner edge and give the illusion of a blend.
Continuing to work with the red paint, I set to work on the skirt. After tracing out the spots with the same candle as for the face I painted the rest of the skirt, leaving the spots white. This would have been easier had I found a red skirt – I’d only have had to paint white spots. As it goes with thrift shops, however, you get what you get. (“…and you don’t get upset” as my kids’ daycare used to say!)
The final touch for the petals was to use a tiny bit of brown paint and a very thin, very dry paintbrush and give the centers their subtle center shading.
Before leaving things to dry I gave the skirt a second coat of red paint. I noticed the paint was bleeding into the white spot areas (as shown in the bottom center spot on the left) and so I went over each spot with white paint for a more crisp edge.
Once the paint had fully dried I was able to do the final touches. Petey has distinctive lip stripes, similar to those on a watermelon. Instead of doing detail shading with paint I went the easy route and drew stripes with an alcohol marker.
I used more of the yellow sewing thread to sew each petal into place around the hood. Instead of pressing the petals flat and sewing the one edge down I actually whipstitched the full oval of each petal opening down into the hoodie. This kept the petals open ensured they wouldn’t flop around on stage. Remember – just like all the other Mario-themed costumes and props, this outfit had to be durable enough to endure two weeks of quick-change performances, plus dress and tech rehearsals.
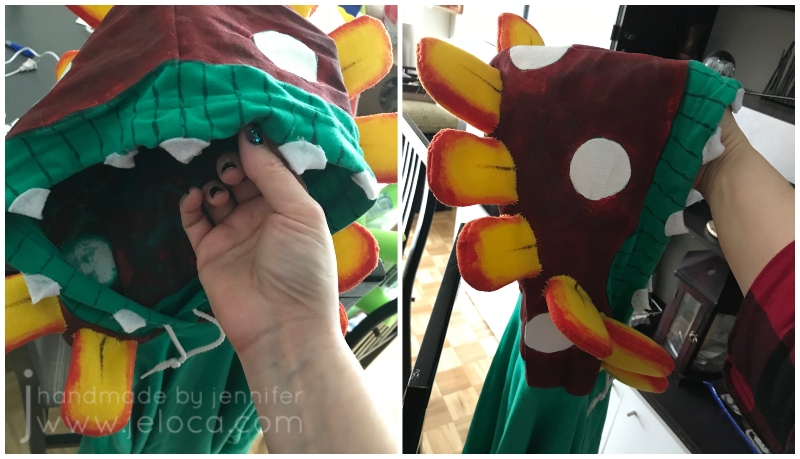
The final step to complete Petey’s face was to add his fangs. After figuring out a paper template to give me a rounded cone shape I traced a small paint bottle enough times for each fang and cut the pieces out from white felt scraps. Each circle was then cut into the flat shape that would fold into a cone.
The cones were then sewn into place around the hood opening. Petey’s fangs are actually more inset into his lips but I wanted to be sure the fangs would be visible from the audience so moved them outwards a touch.
Here’s the final costume.
And here it is next to Petey himself. I wasn’t quite sure in the beginning how I’d pull this one off, but in the end he made a great villain in our little dance number and the costume held up throughout without any issues.
For my second post in this year’s Mario Month I’m going to demonstrate an easy DIY for Toad’s hat. I know – it’s been officially confirmed by Nintendo that it’s actually Toad’s HEAD and not a hat…but most people still refer to the white and red bulb as his hat so I’ll be calling it such in this post.
This is Toad:
A costume for a Toad is pretty simple as almost any colored vest, white pants and dark shoes will get the gist across. The main feature of all Toads and Toadettes is their big, pouffy toadstool-esque hat. Whether you call it a head or a hat there’s no doubt that it’s a needed part of any Toad cosplay and here’s how you can make your own!
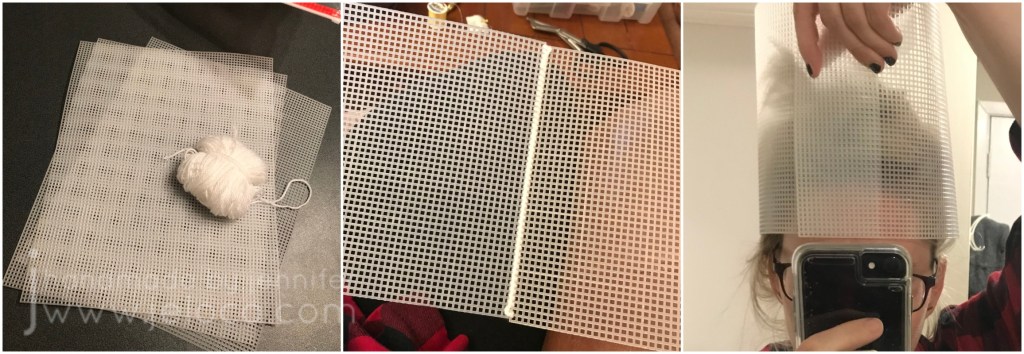
NOTE: As with the rest of my Mario costumes & props this hat was needed for a stage show which meant it had to be durable enough to last for a number of rehearsals, dress rehearsals and then stage performances. As such while you can use cardboard to do these first few steps I chose to use plastic canvas for extra strength. The plastic might bend but it would be unlikely to tear or break making it more reliable for quick changes where the hat would get tossed around backstage.
The hat needs structure to support its height so I started by aligning two sheets of plastic canvas vertically and whipstitching the side edges together. I repeated this with a third sheet and then tested the fit around my own head as the wearer would be another adult. I marked the appropriate row, cut away the excess and then whipstitched the final seam to create a tube.
I measured the diameter of the tube and traced out a circle of a matching size on a fourth sheet of plastic canvas, then cut it out. I could have whipstitched around the edge here as well but didn’t want to risk mis-aligning the pieces so for an easier option I used some of the white yarn to tie the disk to the tube in one spot with a knot. I then made another knot directly opposite the first so the disk was centered. I then knotted at the halfway point of each side so the quarters were each tied in place. This ensured the circle was evenly placed on top of the tube. Then I continued, knotting in pairs on opposite sides, until the disk was fully attached.
Try on the hat at this point. The tube will sink down so the disk rests on top of the wearer’s head. For the best result the lower edge should fall just above the wearer’s eyebrows, so if your tube is too long trim the bottom edge accordingly.
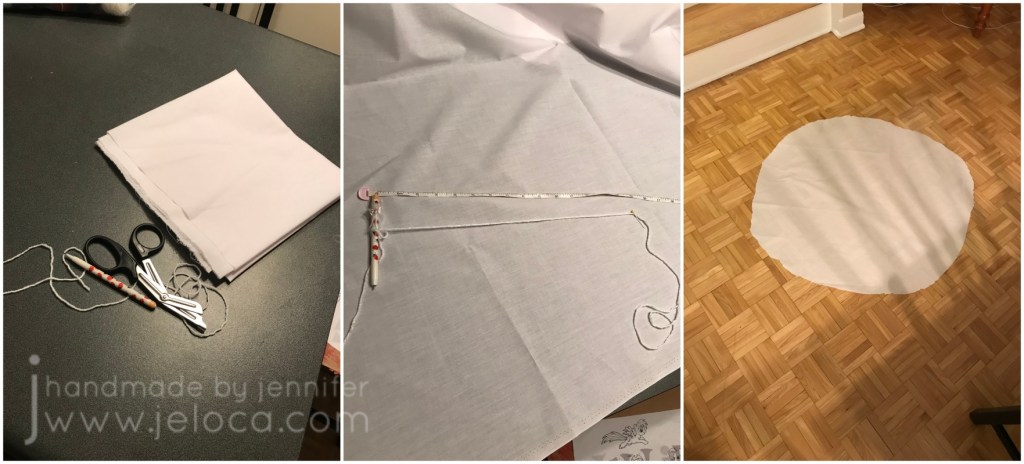
For the white outer shell of the hat measure the height up one side of your tube, across the top disk, and then down the other side. Add 2 inches for a generous seam allowance (1″ on either side). This will give you the diameter of the circle you will need to cut from your fabric. I didn’t trust myself to freehand an even circle so I divided this measurement by 2 to get the radius and tied a pencil and sewing pin the radius’ length apart on a length of yarn. I pinned the pin into the center of my fabric and swung the pencil around, keeping the yarn taut, to trace out the shape.
I cut a length of white sewing thread about 1.5 times as long as the outer perimeter of my circle and then sewed a running stitch all the way around, about 1/2″ in from the edge. When I got back to the beginning of the circle I snugged up the ends doing my best to keep the gathers even all around.
I inserted the plastic canvas tube into the bonnet-like white fabric and stuffed all around the sides. Don’t forget to stuff below the tube too so the top of the hat gets its round, puffy shape.
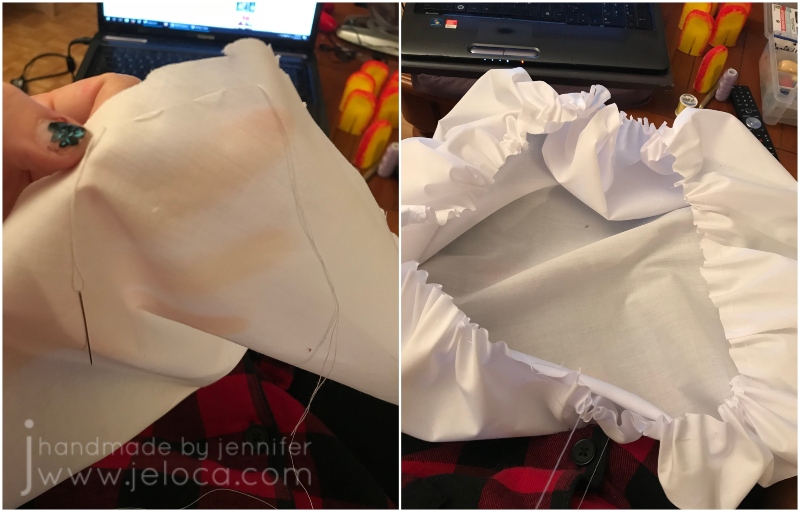
To join the fabric to the plastic canvas tube I switched to white yarn for strength and stitched around the open edge of the tube, through the white fabric. It’s a good idea to keep checking the look of the hat as you go, adjusting the gathers or adding more stuffing if necessary.
Here’s the finished puffy tube. I could probably have added more stuffing but I’d ran out.
Toad’s hat has 5 colored spots. I found a bowl that was a good size for the appropriate scale and traced it out 5 times on some red felt. You can sew the spots in place if you like but I chose to hot glue them instead.
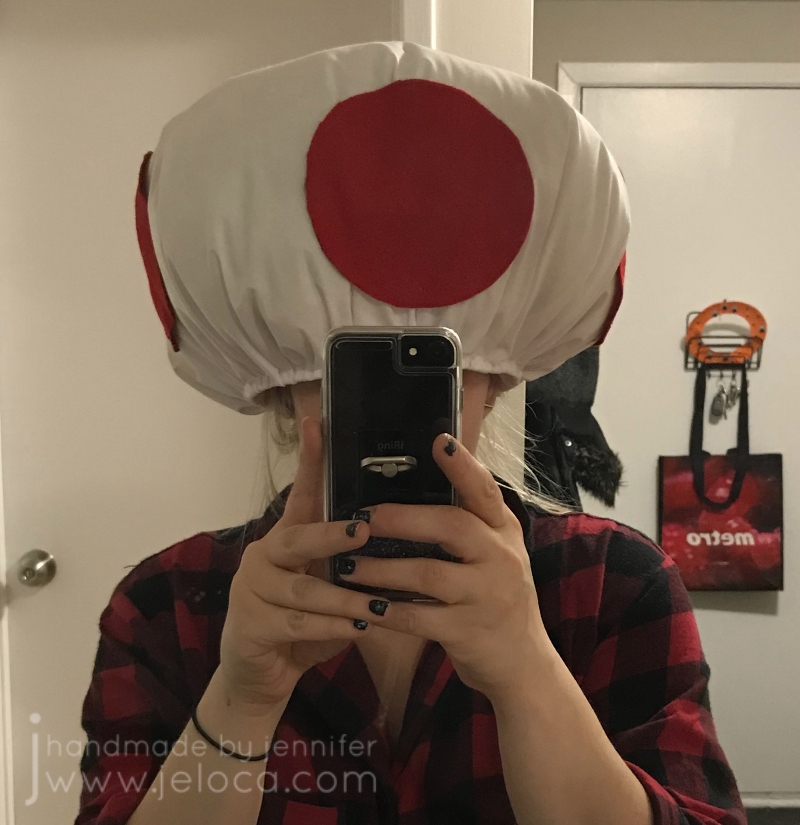
Voila! Your very own Toad hat/head.
The hat can be worn as-is or you can add a chin elastic if needed to secure it in place on the wearer.
It fit our Toad cast member perfectly and just like all the other props and costume parts, lasted through all rehearsals and performances without any signs of wear or damage.
Even through vigorous dance routines and quick changes between numbers!
Can you believe it’s March already? It’s the 2nd annual Mario Month here on the blog and this year’s first post of the Super-Mario-themed collection is a DIY for a star wand you can carry as part of a Princess Peach costume.
I’d been asked to make the accessories for a Mario Bros skit and was given the above example of the desired wand for our Princess Peach character. Easy-peasy! Most of the needed supplies can be found at the dollar store or you might even have them on hand already.
Other supplies that I used for the plastic canvas insert step but are not necessary if you use heavy cardstock and/or don’t need your wand to last as long as we did:
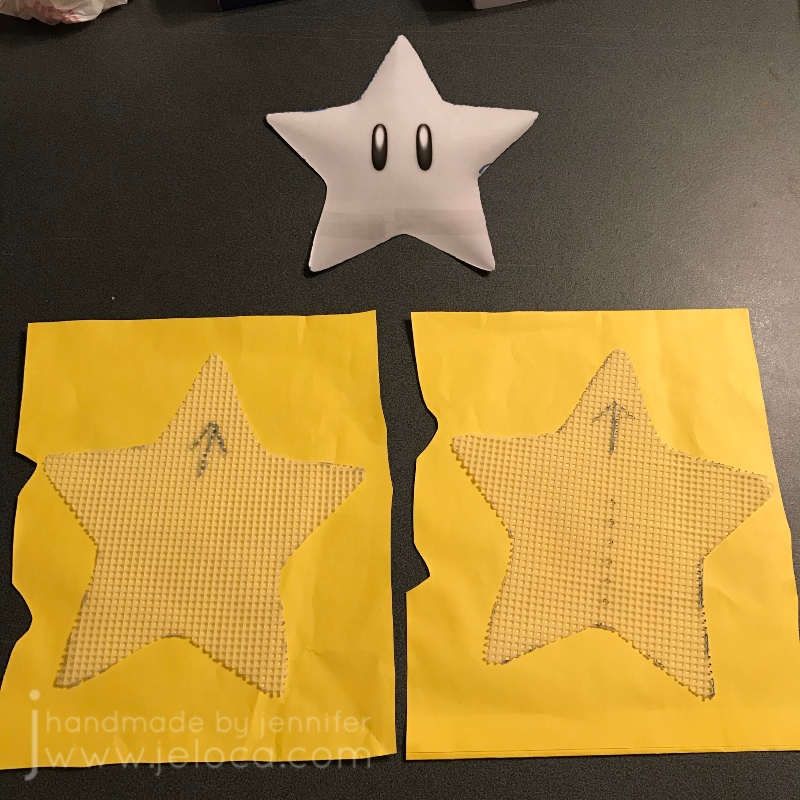
Start by scaling an image of the Starman to the proper size for your wand and cut it out of regular paper. (Alternatively you can draw a star shape freehand but I ALWAYS mess those up!). If using heavy cardstock for your star you can jump to the next step. My bag was the perfect color but a bit flimsy, and this prop had to last for at least 6 shows and a dozen or so rehearsals, so I chose to reinforce mine with plastic canvas inserts. If you would like to do the same trace your star template onto plastic canvas. It’s a good idea to mark which direction is “up” so your stars will be sure to align.
NOTE: I should have made my plastic canvas inserts SMALLER than the Starman template. As you’ll see below, I ended up trimming them down so the yellow stars could meet evenly at the edges. To avoid this mistake trace a second line about 1/4″ inside your original edge and cut out on that line.
Wrap your dowel evenly with yellow electrical tape. You can paint the dowel yellow instead but for our purposes the electrical tape was more durable and waterproof. It also allowed me to even out areas where the bamboo was uneven by wrapping more (or less) in those spots. Then wrap again with the silver ribbon, spacing out the wraps to create diagonal stripes. You can secure the ends with regular scotch tape or more of the yellow electrical tape – neither end will be visible once the wand is complete so use whatever you’d like.
Cover the bottom end of the dowel with black tape. I used my fist as a rough guide for how long I wanted the handgrip to be and then wrapped more black tape, padding out the bottom edge slightly for a comfortable hold.
Optional: I debated hot-gluing the plastic canvas to the dowel but was worried it would break or separate during rehearsals (we were a rowdy bunch lol) so needed something permanent and secure. I decided to use the holes in the plastic canvas to my advantage and sew through the dowel to keep it in place. I marked holes on the dowel using the plastic canvas as a template for placement and then drilled directly through the bamboo dowel with my Dremel. I have a Dremel drill press which makes this step super easy but it’s 100% NOT necessary.
Now it’s time to trace your Starman template onto your yellow paper/cardstock.
I used carbon paper to trace onto both pieces at once to be sure both stars would be the identical size/shape, but this is totally optional. Just be sure to trace on the reverse side so in case you leave any pencil showing it will be on the inside of your finished star. I tested the plastic canvas inserts and realized I hadn’t left any clearance so had to trim down both of my stars to ensure the paper pieces would be able to touch. As mentioned above – if you do this be sure to cut your plastic stars smaller to start.
To attach the stars to the dowel I sandwiched them on either side of the bamboo and sewed a running stitch from one side to the other, then up to the next hole, and back to the first side…repeating this until I’d worked through all the holes. I was able to fit my yellow yarn but you can use doubled thread if your yarn is too thick. This will work best if you pre-mark your hole locations onto both pieces of plastic canvas first, to ensure you’ve sewn both stars to the same height and equally centered.
Use yarn to whipstitch the edges of the star closed.
I used the carbon paper again to trace Starman’s eyes and then colored them in with black Sharpie and a white POSCA paint marker.
Cut out both sides of your Starman. As one final layer of stage/rehearsal protection I sealed the paper’s surface with a layer of clear packing tape on both sides. This would ensure that the paper couldn’t accidentally rip or tear.
The final step is to sandwich the yellow star layers on either side of the plastic insert. Place the face side (with the eyes) in front of you and lay a few strips of packing tape evenly across, leaving a few inches of extra tape all around. Carefully pick up the taped piece and turn it over so the sticky side is facing up. Put the wand/plastic piece in place and then lay the back of the star down, yellow-side out, being very careful to line up both stars perfectly. Apply more strips of packing tape so the sticky sides meet and lock the stars together. **It’s a bit awkward to keep the back star aligned while laying the strips of tape which is why I do the face side first.
If not using a plastic insert then before placing the second side use extra packing tape to tape the dowel to the inside of the first side.
Press the tape together really well all along the edges of the star to really seal the front and back together, and then cut around the star leaving a thin strip of taped edge. It won’t show much (especially from the stage) but it guarantees you don’t trim too close to the paper and create a gap between the pieces.
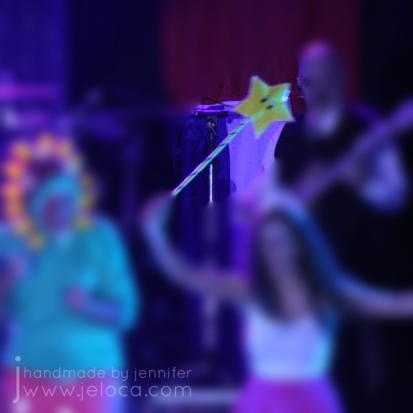
Enjoy your star wand!
Ours worked great – lasting well through all rehearsals, tech week, and performances!
You may have noticed that when possible I like to tie my posts to something topical. Today is National Cherry Pie Day and amazingly enough I do have a cherry pie-related craft to share!
It all began with a craft exchange in an online group. Members would fill in a little questionnaire to summarize their favorite colors and fandoms and the like and then were paired with others in the same geographical area (for shipping considerations) and would make them something related to their faves. One year I was matched with someone who included Firefly, Star Wars, Star Trek and Supernatural in hers. I relate hard to that list and wondered if there was a way I could create something that would incorporate more than just one of the fandoms.
The result was these reversible keychains.
Made from plastic canvas and yarn, these were a quick project but SO MUCH FUN to make! I started by thinking about an iconic symbol from each show. For Firefly it was immediately Jayne’s hat, and then I wondered what would be the same shape/size. R2D2 fit perfectly and I love how it looks like he’s got a pompom on his head. For Star Trek I thought a Tribble would be funny but what round shape would work from Supernatural? I was hesitant to make any kind of pentagram or devil’s trap because it might offend the recipient. Of course there was another perfect round answer – Dean’s fave – good ol’ cherry pie!
I drafted out each shape in Excel to get the sizing down and make sure I had enough room for the designs. I then cut out each shape twice from plastic canvas and cross-stitched them with yarn from my stash. To create the lattice top for the pie I did 6 crochet chain lengths and used the tails at either end to secure them into place.
Once each shape was complete I held them back-to-back and used black yarn to whipstitch around the outside edges to sew them together (in progress in the lower pics above). This hid all the messy ends on the inside as well as gave each item a defined outline. I also used the edge stitching as an opportunity to add a jump ring, stitching a few times around the ring to secure it in place. This allowed me to attach a claw hook (lobster) keychain ring to each grouping so the recipient could hang these fandom charms from her keys or bag if she liked.
Final steps were to make and attach the pompom and use a craft needle to tease out any trapped ends of the fun fur yarn to make the tribble as fluffy as possible.
This project was so much fun to make and gift and I was thrilled that the recipient loved them and immediately attached them to her Tae Kwon Do gear bag and backpack. For both gifter and giftee this one was a hit!
This post may contain affiliate links. This means I might make a small commission on purchases made through the links, at no cost to you.
Most popular during the height of the pandemic, Among Us is back in the spotlight again thanks to one of the opening scenes in Glass Onion – the fantastic sequel to 2019’s Knives Out. Even Game Theory is “amongst thou”* with the trend so I thought it was the perfect time to share this easy fondant DIY on how to make your own set of colorful crewmates.
As I’ve said so often before I love to start with a template. It’s best to know exactly what size you’re working with so I measured the diameter of my cupcake tin and made sure to fit my crewmate sketch into the available space.
The crewmates are distinguished by their distinct colors so this is a great opportunity to use up leftover bits of tinted fondant from previous projects! With the exception of black which I’d purchased pre-tinted, all my other colors started as white fondant and were tinted with either Wilton gel pots or Americolor squeeze gel colors.
Each piece was cut out with my fondant knife, making sure to flip the template halfway through so some crewmates would be facing the other way.
Yes- you can cut them all the same way and then flip some later. I find that there’s a slight bevel on the cut edge whereas the table-side edge is usually more sharp. Both edges are equally good as the “up” side and so I wanted to be able to use either, depending on how they looked once dried.
After cutting out all the crewmates I made a second template for the visor and cut out one for each little guy. I also cut out a little yellow Post-It to copy one of the game’s “hats”.
After the fondant pieces had air-dried for a day or so I traced the outlines with an edible-ink black marker.
This is how they all looked once traced. I let the ink dry down for a few hours so it wouldn’t smear during handling and then assembled the crewmates using a bit of water and a food-use-only paintbrush as “glue”.
Here’s how they looked complete with my hand for scale.
The little guys are now ready to go on a cake, on cupcakes, or anywhere you’d like! Henri’s 12th birthday was during the pandemic so I went the cupcake route for easy, non-shareable portions for a lunch with our family bubble at the time.
I prefer to add my toppers after the icing has crusted slightly so they won’t leech color from the fondant and risk bleeding edges. If you find the toppers won’t stay put a drop of water in the center will do the trick!
Today’s post will walk you through step-by-step on how to make this cake featuring the Master Sword from The Legend of Zelda video game series.
I’m a huge Zelda fan and the love for the series has been passed down to Henri with a vengeance! In addition to dressing as Link on Halloween and poring over game art collections he plays all the games from Link’s Awakening on my old Gameboy Color straight through to Breath of the Wild on the Switch. It’s on the BotW Master Sword specifically that he requested I use as the theme for his 11th birthday cake.
This is the Master Sword:
And this is the sword in the game:
I decided to use this image as the inspiration for my cake. The sword itself would be sculpted out of fondant and I’d expand the stone base so there would be enough cake for his birthday guests.
The cake took a total of 3 days to make. On Day 1 I sculpted the sword so it could have time to dry out to lessen the chances of the fondant dissolving under paint application. On Day 2 I baked the cakes for the base and set them aside using the methods I outline in my How to Bake a Cake and Prepare it for Decorating post. On Day 3 I painted the sword and the base. Note: you can absolutely merge Days 1 and 2 into one evening if you’d like.
Keep the excess scrap as you’ll need it to sculpt the details.
As a long, skinny piece of fondant this size would be fragile I used a clean, splinter-free wooden dowel as a support, leaving enough at the base to secure it into the cake.
Then I used the excess fondant and began blocking in the sword’s details. As you saw in the finished cake it would remain flat so I only had to sculpt the front half.
I used the template for the basic shapes and then referred to a clear online image to get the details right.
At this point I set the sword aside to air-dry.
Here’s how it looked the next day.
Here it is alongside the template. It did grow a bit as I sculpted additively but I knew the slight size increase wouldn’t matter with the final cake.
Pleased with it, and deciding it didn’t need any adjustments, I let it continue to harden and baked the confetti cakes Henri had asked for.
On Day 3 it was time to assemble and decorate!
I had 2 8″ square cake layers to work with. To achieve the triangular base I cut the first layer into two triangles by removing the center strip, ensuring that one triangle was slightly shorter than the other. I repeated the process with the second cake making each subsequent triangle shorter than the previous one. This design does leave extra cake that you can eat or make into cake balls with any leftover icing.
Note: always check your transport method! In my case I couldn’t simply cut the first square diagonally to achieve my largest pieces as the resulting triangle would have been too high to fit into my cake carrier!
I used a bit of icing to “glue” the cake to the carry board and then began to stack the cakes horizontally, icing in between to keep the layers together.
Yes- that IS Betty Crocker icing in the background. And yup- this is totally a Betty Crocker Rainbow Chip box cake. There is zero reason why a box cake can’t be done up the same way scratch cakes can. Whether you’re short on time, find the mixes cheaper or easier, or if you’re simply baking for a bunch of 11yo boys who won’t know or care about the difference then by all means go for it! I do generally doctor my cakes so the cake mix winds up more as an ingredient vs the main staple, but that’s absolutely not necessary to get great-tasting, great-looking results.
Once stacked I protected the board surface with parchment paper strips and dirty iced the cake, then covered it with more white fondant. Then came the fun part- poking, scratching and dinging it with an assortment of knives and sculpting tools to give it the texture of an old weather-beaten rock.
I put some wax paper strips down to protect the board again and then painted the “rock” with custom icing gel colors. I have a large collection of Wilton gel pots and a kit of Americolor icing colors and I like them both equally as they fill in color shades I don’t have in the other. The gel pots of the Wilton kind are great for dipping in a toothpick for a really tiny amount, while the Americolor ones are in squeeze bottles that make adding precise drops really easy – perfect for when you need to replicate a color you’d already mixed up.
I used an assortment of browns and yellow thinned with vodka for the main color, adding darker touches for shadows and age. I also dry brushed green shades around the base and edge as if grass or moss had started to encroach similar to how I indicated forest-y age on the fondant bricks in the Pitfall: the Lost Expedition cake.
Bringing up another reference on my iPad, I used the same supplies to paint the sword, adding in a bit of silver luster dust for the metallic portion.
The luster dust mixes nicely with a bit of vodka to become a metallic “paint” that dries down well once the vodka evaporates.
I used gold pearl dust in a similar manner for the gold accents and completed the rest with blues and green gel colors.
The last bit of prep is to cut out a small bit of the fondant so the sword fits nicely into place and then the cake is done!
Here’s a closeup of the cake “rock”. I love how the texture came out!
My only regret is not having smoothed the underlying cake surface better, as you can see the ridges of where the fondant curves around the cake layers…but the kids sure didn’t mind. It was a huge hit for the birthday boy and his friends.
In my last post I shared my second Angry Birds cake, where Red was applied as a fondant topper (unlike the first one where the cake itself was carved and iced into his distinct shape). This style of fondant cake topper is one of my go-to methods of easy cake DIY. This demo is using Red as an example but you can use this method to create almost any basic character.
You’ll want to start by printing an image of your character to use as your template. I resize my image so it is scaled appropriately for my cake and then print it in grayscale to save on color ink. In this example I also included a mini version to use as a color reference.
Starting with my main color, which was red, I rolled out some white fondant I’d tinted with gel colors. The levels that come with my fondant rolling pin ensure that each piece will be the same thickness so in the final image every layer will have the same height and the silicon mat guarantees that the fondant won’t stick to my work surface. Tip: if you find your fondant mat slides around, dampen a few spots underneath with a bit of water and it will “stick” to your table or countertop. Make sure the piece you roll out is large enough for the area you want to cut out.
Lay your template directly onto the fondant. If your fondant is really sticky you can lightly grease the back of your paper with shortening but I always let my fondant rest for a few minutes to make it easier to cut, and so have never needed to do this. Trace the image by poking little dots at regular intervals right through the paper and into the fondant.
Note: you’ll need to take a moment and figure out if your finished piece will be flat or multilayered. For mine I decided that the face portion (eyebrows, eyes, and beak) and the red gem would be a raised layer, whereas the body, belly and crown would be the bottom layer. Finally, his pupils would be a third layer. You can see in the image above that I traced the red body right around the white belly, ignoring the beak. If you wanted to make only one layer you would have traced the red around the beak, eyes and brows.
You can use anything with a small, fine point for this step. I used the needle tool that came in my fondant/gum paste starter tool set but have also used sewing pins or the end of a clean paperclip.
Next, cut out your shape using the dotted line as a cutting guide. I used the knife blade that’s on the other side of my needle tool linked above, but you can use a regular kitchen knife.
Here you can see that the piece of fondant is exactly the same size as the template.
I like to transfer the fondant to a stiff transparent sheet before setting it aside. I’m a huge fan of flexible clear cutting boards like these and use them in almost every cake I make. They’re fantastic for toppers like these because you can lay your work in progress right over the template and repeatedly check that things are fitting as they should.
I repeated the same steps to cut the crown and beak out of yellow-tinted fondant, and then the eyes and belly out of white. The cut side edges of the fondant should be moist enough for it to stick together (like when insetting the crown, above) but if not you can lightly dampen them with a bit of water on a brush or cotton swab.
Repeat the process for all required pieces to make up your character. For King Red that meant the red body and gem, white belly and eyes, yellow crown and beak, black brows and pupils, and a maroon-ish inner beak area. I assembled each layer as I went, consistently checking that everything was aligning correctly by placing the clear board over my template.
Depending on your character you could be done at this point. To give mine a finished cartoon look and to fully match my sample image I used edible markers to outline the shapes and detail the crown.
My last step was to use leftover red fondant for the birthday boy’s name. I always make these toppers in advance and so was able to set them aside for a few days so they could air dry.
A great thing about using the pin technique (vs cutting up and tracing your template) is that the template is reusable. You can either re-dot in the same holes or simply press your paper onto the fondant and transfer the hole marks that are already there. Because I let my fondant set up slightly before piercing I had no transfer of fondant or tint onto my paper.
You now have a custom fondant topper ready to use for any decorative purpose! I like to prep a cake using my tutorial and then finish it with this style topper. You can also make mini versions for cupcakes using the same method.
This post may contain affiliate links. This means I might make a small commission on purchases made through the links, at no cost to you.
Over the years I’ve made a couple Angry Birds-themed cakes. Two of them were for members of the same family, and even though they were made years apart I wanted them to each feel unique. For this first one I used minimal fondant and worked with an iced base.
Cakes like this are pretty easy to do, and while I don’t have full step-by-step pics I’ll outline the process.
The top layer also started as a 9″x13″ cake which was cut into the shape needed. As for most of my shaped cakes I started with a paper template scaled to the proper size on my computer.
The template serves two purposes. First I used it to trace out fondant pieces for the eyes, brows and beak. As I didn’t want to cut into the template I used a straight pin (that I keep for food use only) to pierce the shapes’ outlines into rolled fondant. The resulted dotted line is easy to cut out with a knife or fondant cutter and the individual pieces can be attached to each other with a bit of water or fondant glue. The eyebrows and pupils were cut from pre-tinted black fondant, the beak was cut from white fondant tinted yellow with icing gels, and the eyes were cut from white fondant later outlined with a black food marker. Before putting away my fondant supplies I also cut out the birthday boy’s name from red-tinted fondant with alphabet-shaped cookie cutters.
Then I used the same paper template on top of the cooled cake and cut around it to cut the cake itself to the proper shape. (You can do these steps in the reverse order but sometimes cake will stick to the underside of the paper and that can discolor your fondant. Another option is to trace the cake shape onto wax paper or parchment paper which won’t stick as easily)
The second cake was then iced with red and white icing to match Red’s proportions and finally the fondant topper was added.
The fondant pieces give the cake a polished look while requiring minimal shaping or sculpting ability, making this a great way for beginners to try out fondant for the first time.
This post may contain affiliate links. This means I might make a small commission on purchases made through the links, at no cost to you.