Jakob was obsessed, in particular, with the Creeper. This unassuming green dude looks real cute until he shows up and blows up.
I decided to take inspiration for the inside of the cake from the Creeper’s multitude of green shades, and to theme the outside on the tshirts the boys would be wearing to the party, with the following image:
While I own a round checkerboard pan kit, I don’t have anything similar for square cakes so I had to get creative. I ended up coming up with a way to get the checkerboard look without requiring ANY special tools, and you can do it too if you follow the steps below.
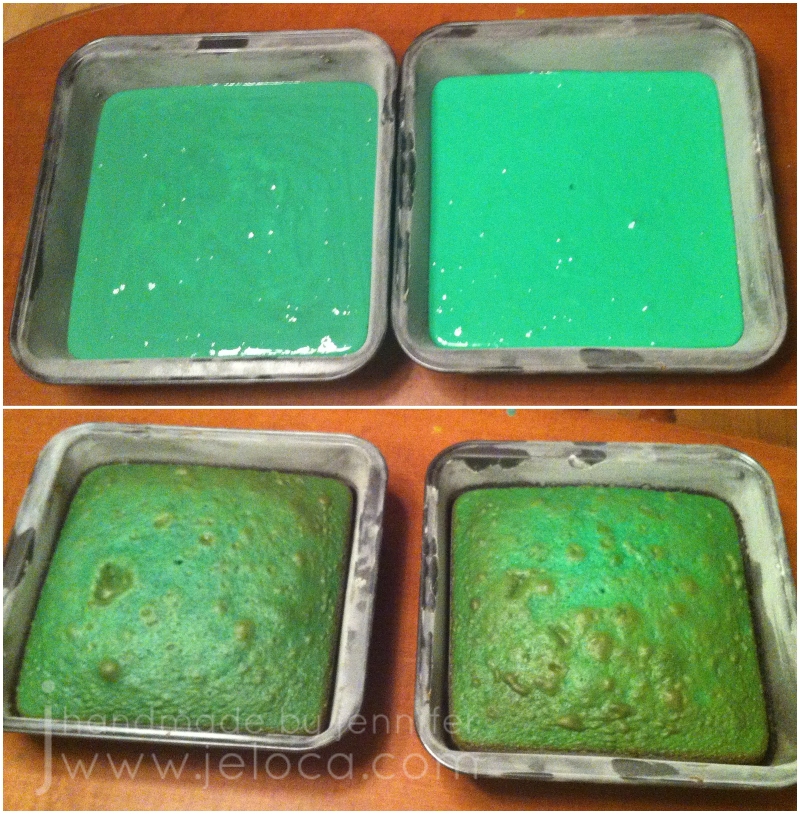
Step 1 is to bake 4 cake layers, each tinted a different shade of green I used 8″ square cake pans and tinted my batter with gel coloring to get 4 different shades.
These are the colors I went with. You can choose to use more colors and more layers if you like – to copy the actual Creeper would require 8 layers for an 8×8 grid. If you want to match the colors exactly I provide the hex codes for all 8 colors in my Minecraft Steve & Creeper DIY costume head tutorial.
I only own 2 8″ square pans so I baked my cakes 2 at a time.
The cakes will turn golden on top as they bake so my icing swatches came in handy to remember which cakes were which later on.
Unfortunately I don’t have pics of the next steps but they’re very simple to follow-
Trim the golden top and sides off each cake
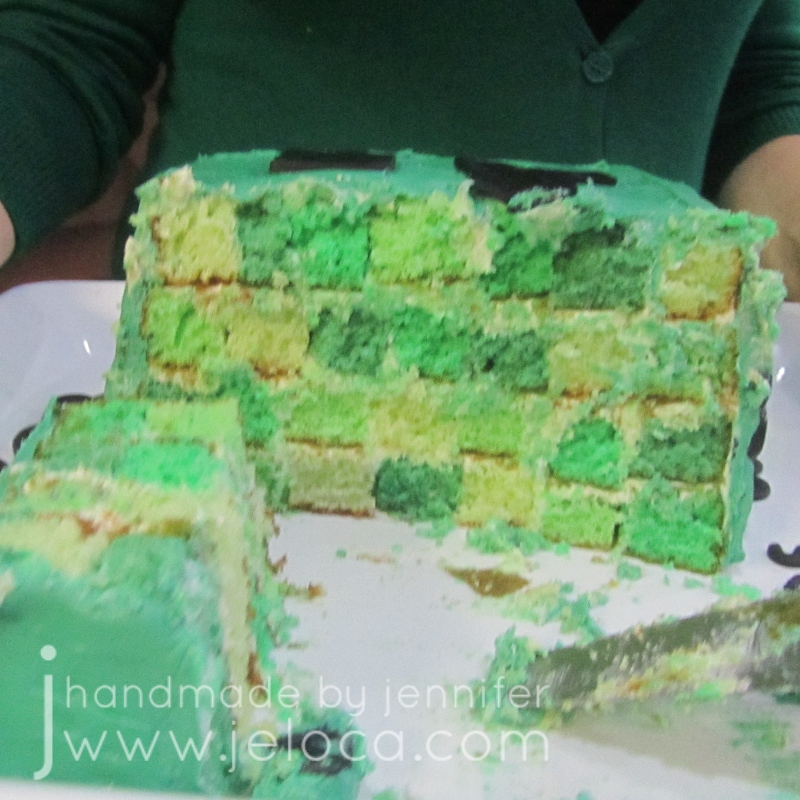
Cut each cake into even strips. Be sure to cut each cake into an identical number of strips. If you look at the cut section of my cake below, you can see I cut mine into 7 strips.
Place a bit of icing on your serving tray (to anchor the bottom pieces) and place 7 strips of assorted colors side by side to form the first layer. (Replace “7” with the number of strips you have in your cake). Once your color placement is to your liking, add a thin layer of icing between the sides of each strip to secure them to each other
Add a thin layer of icing across the entire top surface of layer 1
Repeat the last 2 steps 3 more times to add layers 2, 3 and 4. This will have used up all your cake strips
TIP: when cut vertically from the end, the cake will have a gridded/pixel look. You can use the same technique to create any pixel art desired
The key thing is to remember which direction your strips run. When you cut the cake you will want to cut horizontally ACROSS all the colors, to get the checkerboard look. If you cut horizontally WITH the strips, your cake will look like long rectangles of color.
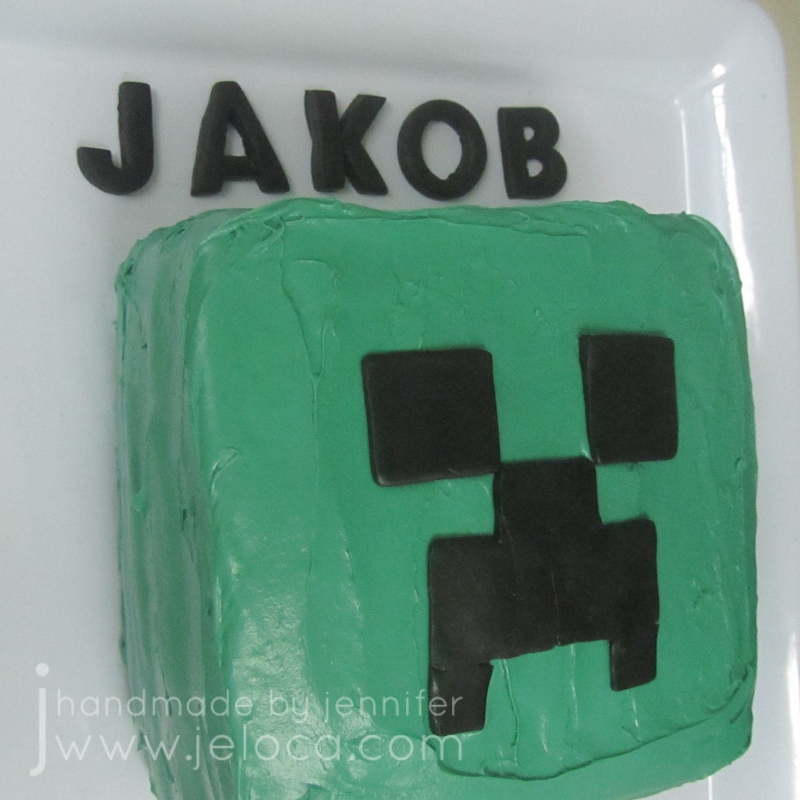
To finish the cake simply ice and decorate the outside as desired. I covered mine with solid green icing and a fondant Creeper face, then added fondant lettering to match the boys’ shirts and Jakob’s name and age.
I used the placement of the face as my reminder which way to cut the cake later.
As you can see from the cross-section, the inside worked out perfectly! It looks just like the Creeper and Jakob was thrilled.
Looking for a different way to label your gifts this holiday season?
These personalized plastic canvas gift tags are quick and easy to make and are reusable as charms after the wrapping paper’s been recycled.
You only need a few supplies to get started:
plastic canvas – I used 7-ct but if you have a more complicated design that you want to fit into a small area, you can use 10-ct or 14-ct. (The “count” is how many holes per inch).
plastic lobster hooks – metal will work just as well. You can even cannibalize hardware from broken keychains or charms you already own
yarn – scraps from other projects will work great for this
The first step is to choose your designs so you can create a chart. My example tags were made for a young boy whose name starts with a “B” and was really into Minecraft, and a young girl whose name starts with “K” and was really into Monster High. So I decided to put their initials on one side and something iconic from each theme (Creeper & Skullette) on the other.
I used Excel to create my charts but you can just as easily use graph paper. If using Excel resize your cells into squares and then use the color fill to draw your designs, 8-bit pixel-style.
For the Creeper tag I went with a square shape since most Minecraft mobs have square heads. I then “drew” a capital b in a grid of the same size as the Creeper face. I decided not to do the typical blend of colors for the Creeper since this was just a quick add-on to the birthday party gift we were giving, but you can get as creative as you’d like!
For the Monster High tag I found a free-use Skullette chart and used the size of that chart as a basis for my “K” chart, which I drafted in a font similar to that of the Monster High lettering.
You have freedom to design anything you’d like for your tags! Your only limit is the total size you’d like your tags to be, as the bigger your design, the bigger the results.
The next step is to cut out plastic canvas pieces the sizes required for your tags. Remember that it takes 2 holes on the diagonal to make 1 continental or cross stitch with plastic canvas, so if your grid is 10×10 pixels then you need to cut out a piece of plastic canvas 11 holes x 11 holes, etc.
Stitch your pieces as desired. I used continental stitch (half of a cross-stitch) and did the green background for each piece first, leaving one piece with a tail about 3-4 times as long as the full perimeter. This is optional but by leaving the seaming yarn as your tail it’s one less end to hide later.
After the green I filled in the spaces with black for the “B” and the Creeper’s face.
I followed the same process for the other tag, working from background first to the details last, so the details would remain sharp and not risk getting fuzzy at the edges. First I did the white background (flipping Skullette so the bow would be on the right since the original chart was for Perler beads which get flipped after ironing), then the purple (as I didn’t have pink scraps handy), and finally the black, which I also used to backstitch some shading under the “K”. I didn’t do the tail trick for this one as I wanted to seam it with a different color.
To seam, hold the pieces with wrong-sides together and go from back to front through the first corner 3 times. Next whipstitch around the first side and when you get to the next corner, go through it 3 times again, and continue this process around. When you get to the corner where you’d like to put the hook, do the first corner wrap, then wrap twice while also going through the hook’s jump ring, then go through the corner alone once more.
After all 4 sides are fully seamed you can skim your needle through one side’s wraps and pull the yarn through, for about an inch, then trim the excess as close as you can.
These little tags are under 3″ making them perfect to clip onto a schoolbag or tote.
They really add a personal, handmade touch to a gift without taking too much time or costing the bank.
Have fun creating your own!
This post may contain affiliate links. This means I might make a small commission on purchases made through the links, at no cost to you.
Another year means another roundup of costume-related projects and tutorials! With almost 3 weeks left until Halloween you’ll still have plenty of time to make any of the projects below.
First came the Minecraft lootbags, then the Minecraft fondant toppers, and then the Minecraft cake. Now’s where it all came together – the final Minecraft birthday party.
Once again, this was Henri’s 6th birthday party, from back in January. Jakob just had his own Minecraft party but I didn’t change much except for the cake, and that will get its own post shortly.
There are a lot of ways you can incorporate Minecraft ‘foods’ into your own party. A quick look through Google images or Pinterest will show idea after idea, I pulled some of them out and added my own to get what worked for the small group of kids we had. If you’re having a larger party, or its for a gaggle of teens, you can really go all out with some creative food arrangements. I’ve seen everything from pretzel-grid trap doors to a soda maker doubling as a brewing station!
I didn’t go quite so elaborate. Only 10 kids, a few lingering adults, and I knew the children would be rushing through the food to get back to playing video games (we were at an arcade). The place provided pizza, so I added a quick veggie side dish to the table.
Clear enough? 🙂
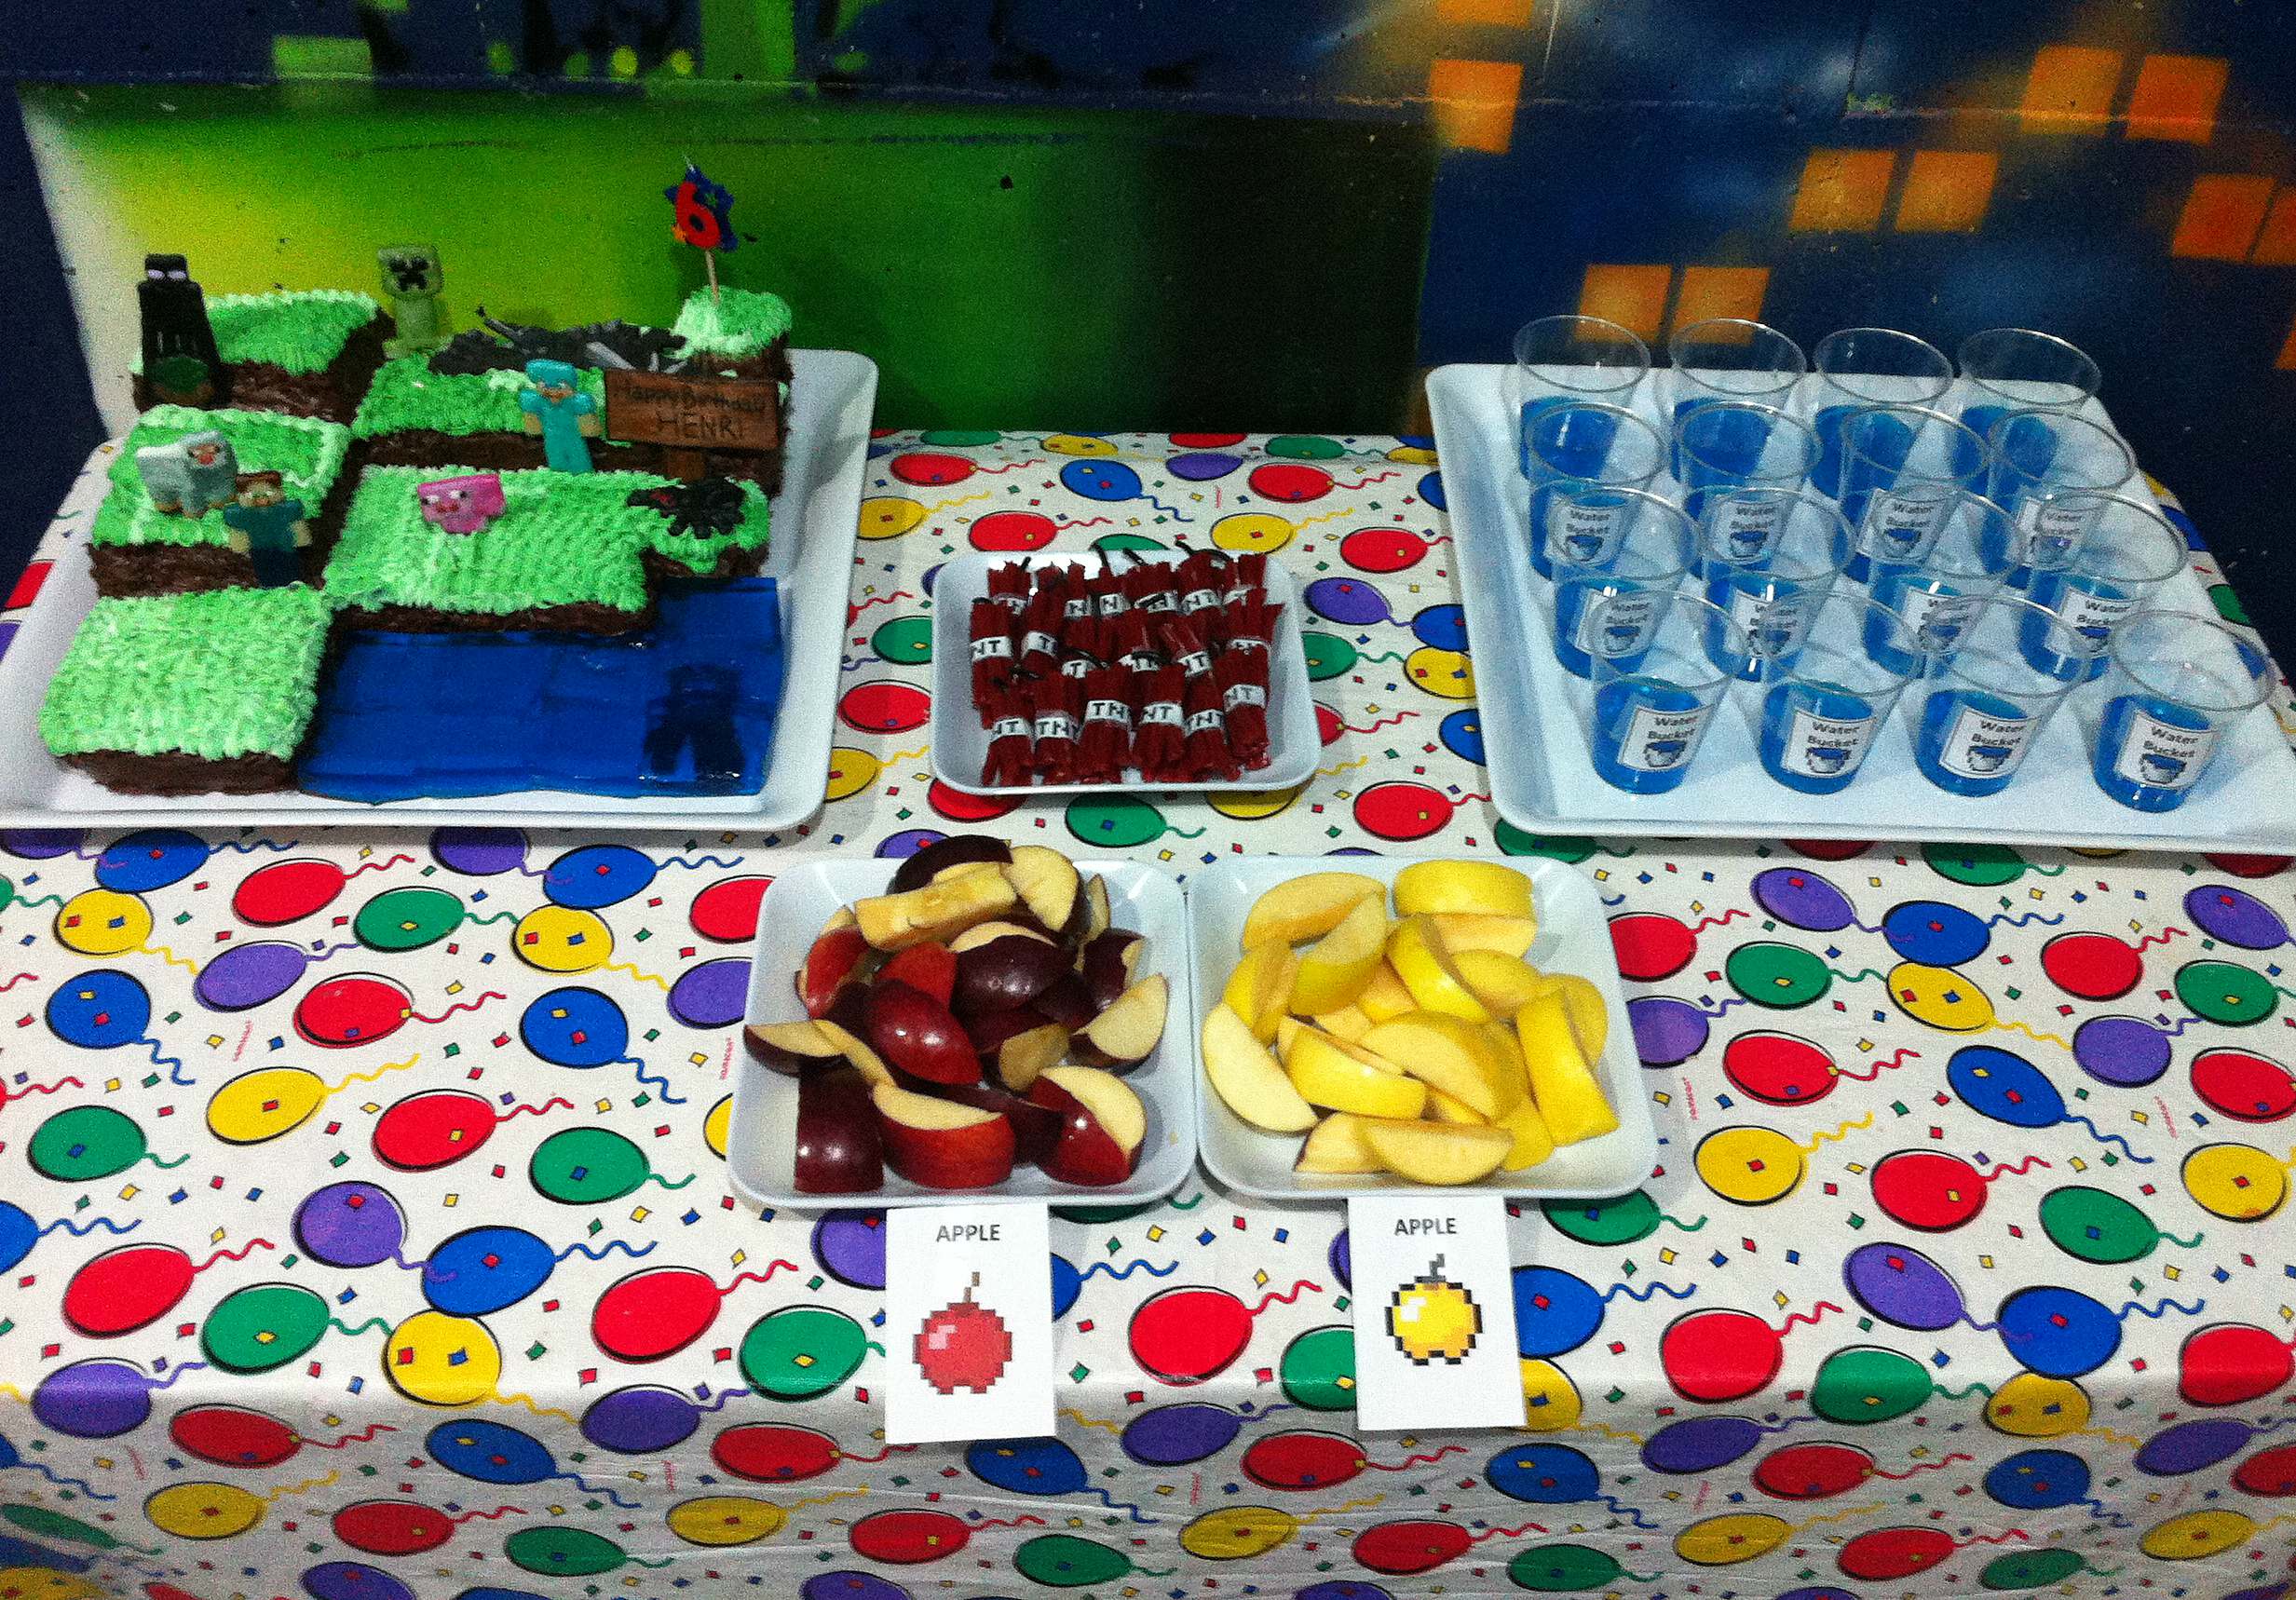
I had a little more fun preparing the dessert table…
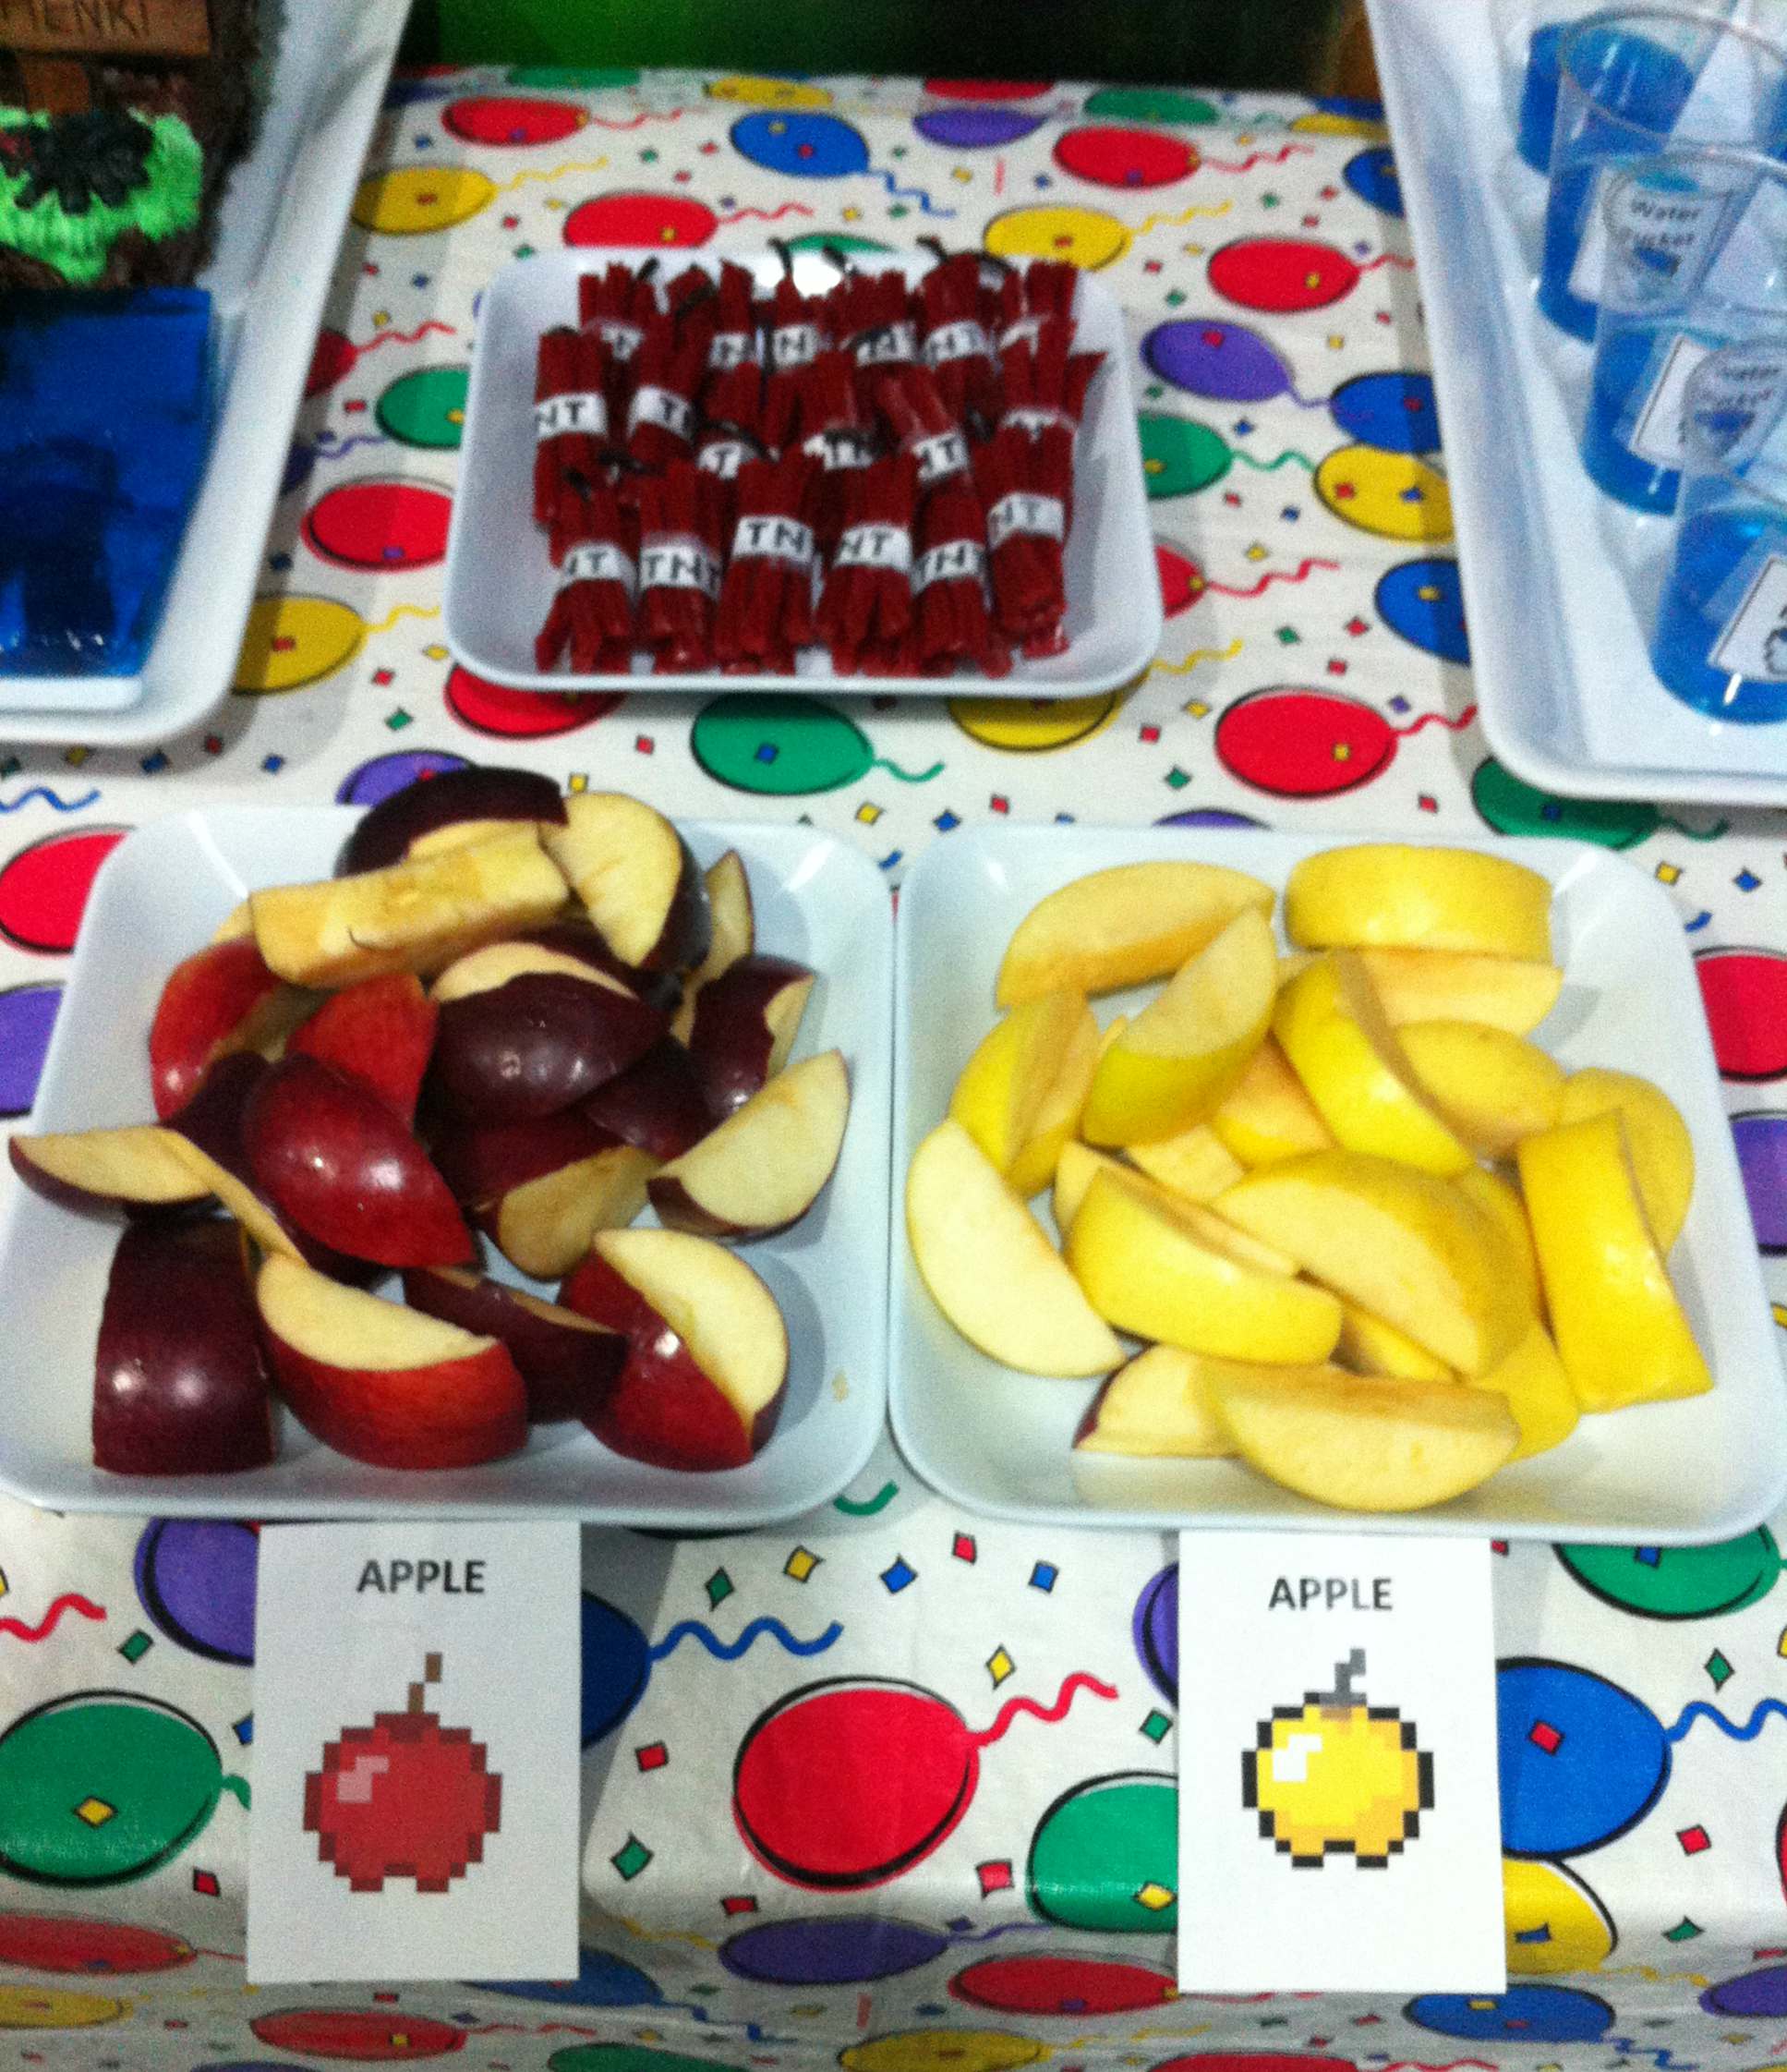
Regular and Golden Apples…
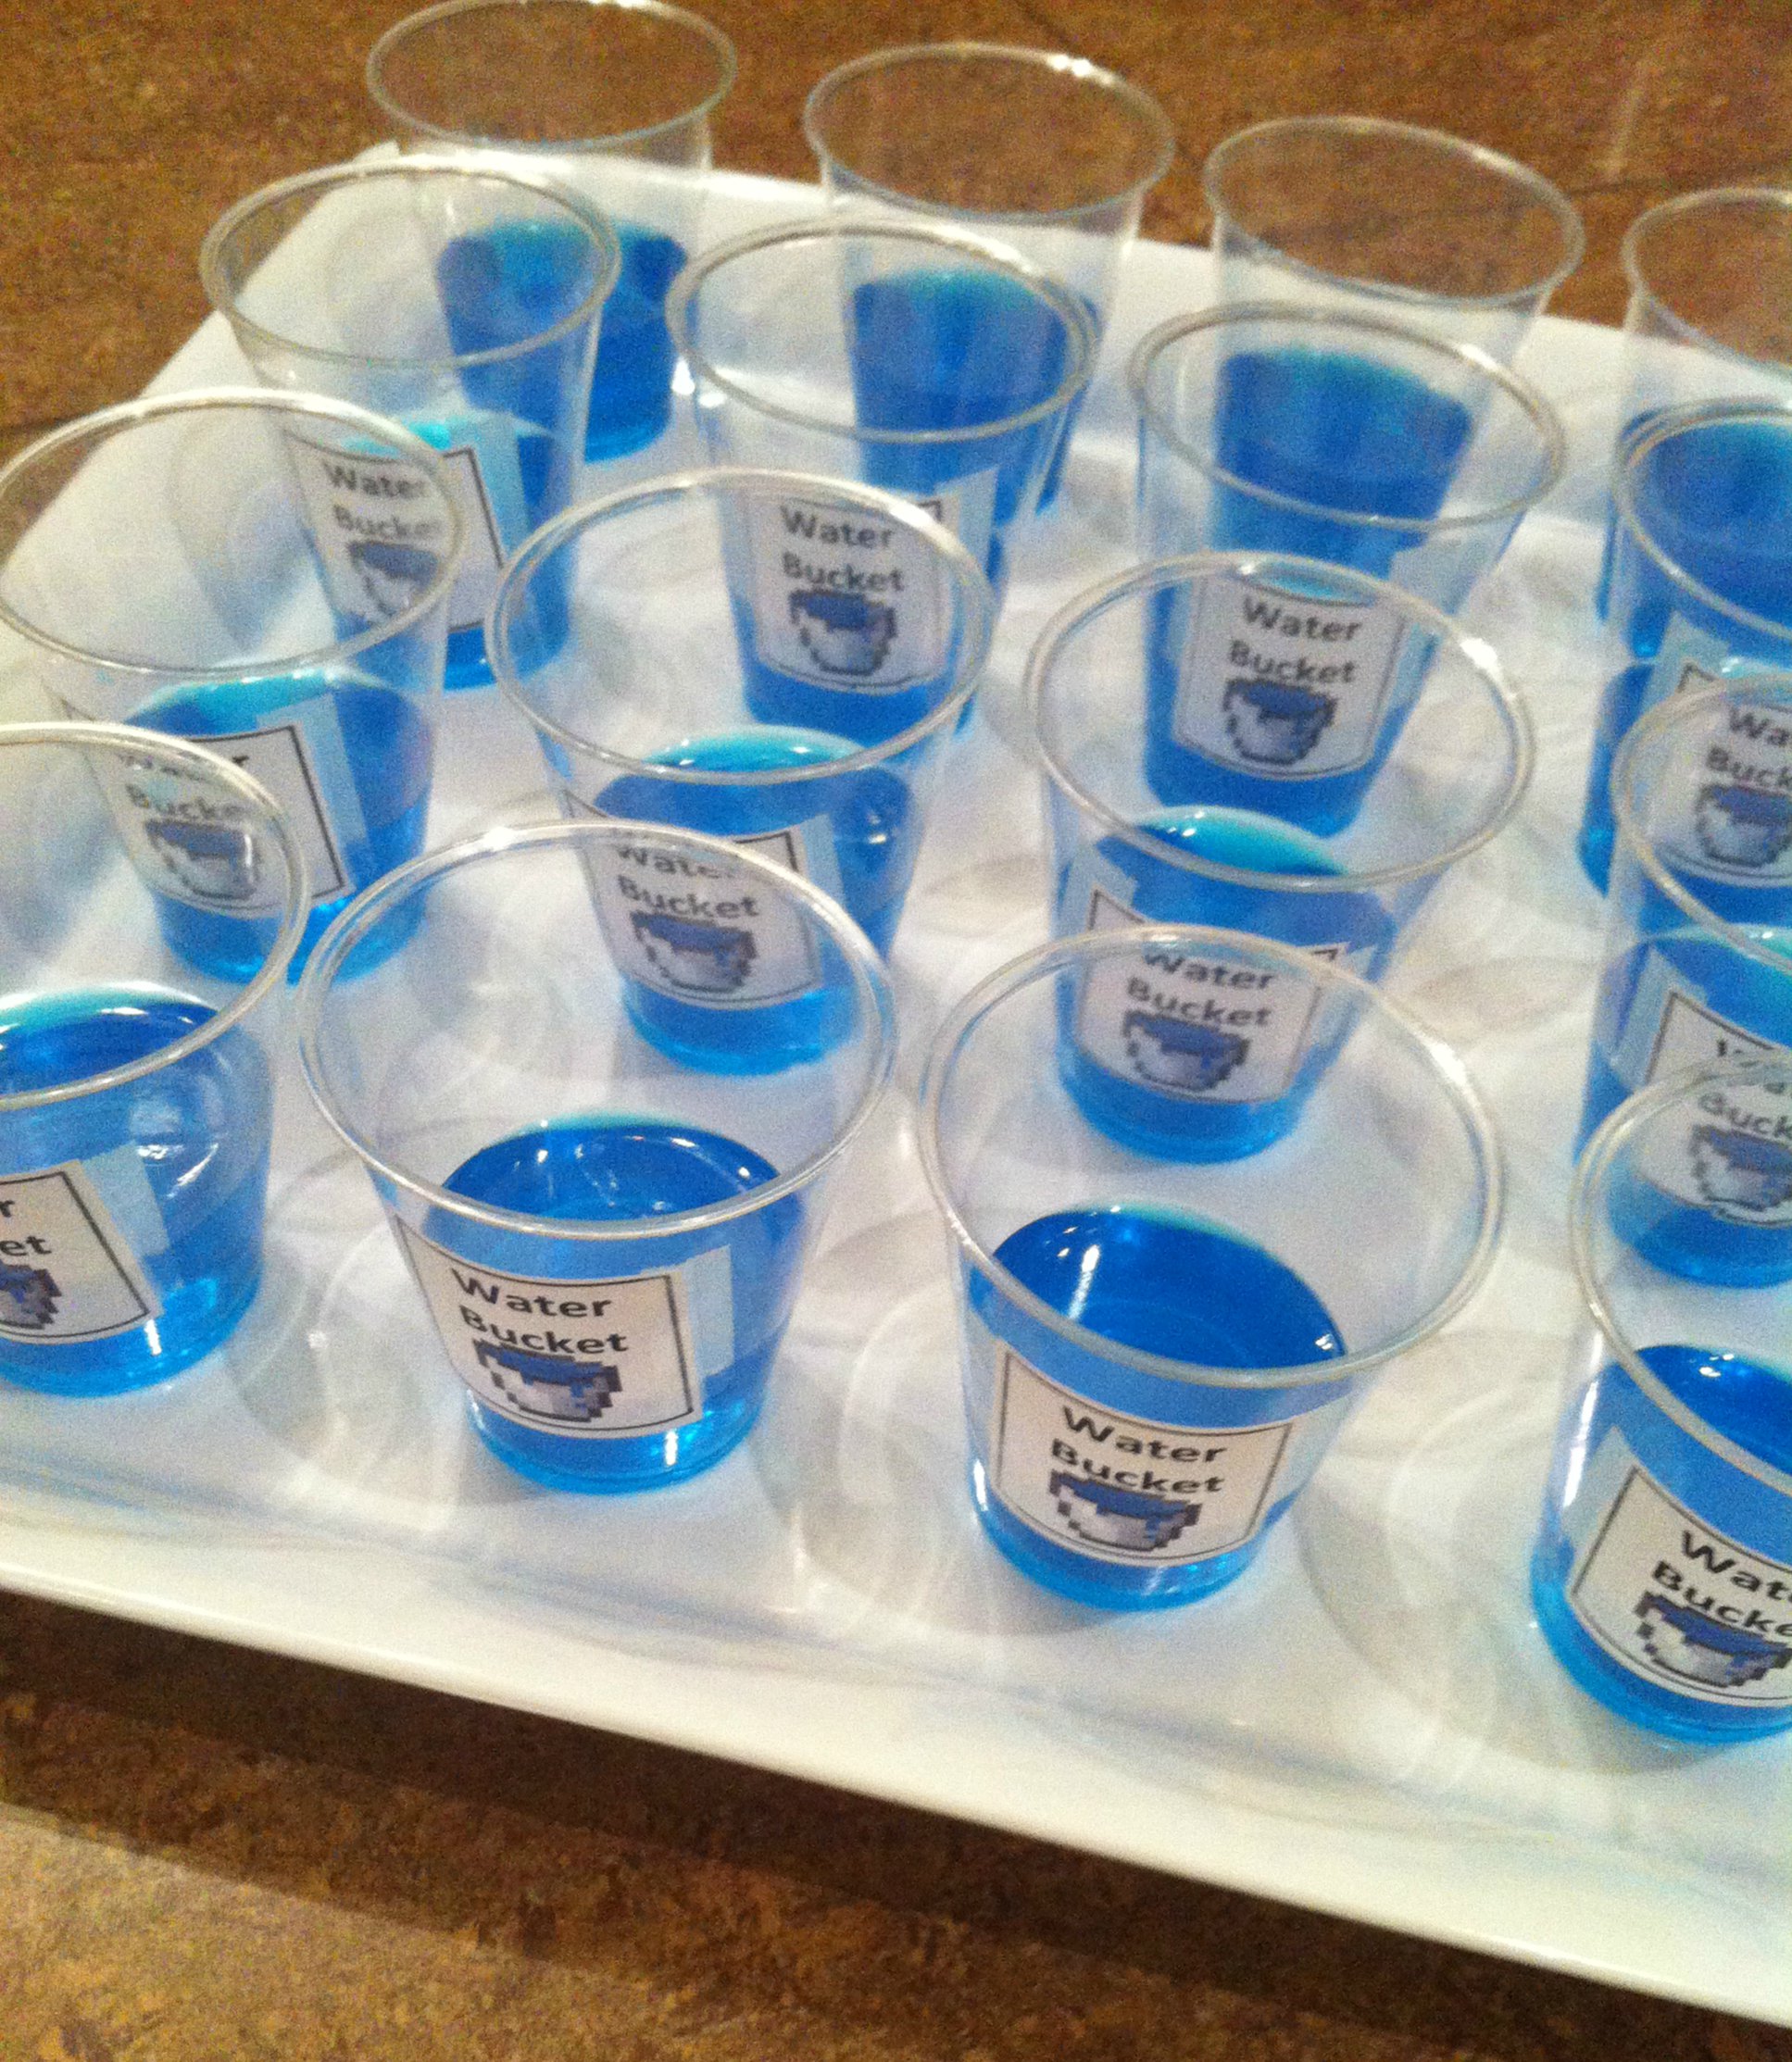
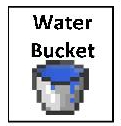
…Water Buckets… (blue raspberry Jell-O… would have been cuter in plastic shot glasses if I’d thought about buying some in time)…
…and TNT (red licorice bundles with black licorice whip wicks).
Combine these with the Minecraft lootbags the kids got when they left, and it made for a party they could all dig. (Get it?) 😉
Can I just say that I love the dollar store square dishes and platters? Love them.
Henri really enjoyed his 6th birthday party, and I had a lot of fun putting everything together for it.
–
You can download and print the images below to make your own Minecraft party. I copy/pasted a bunch onto an Excel spreadsheet so I could fit as many to a page as I needed. The TNT strips were sized at 3″ tall by 5″ wide (the block of 10 strips), the water bucket graphic is 1.75″ wide by 2″ high, and the apples and carrots were 2.25″ by 3″.
With Jakob’s 8th birthday coming up, and likely another Minecraft-themed event, I realized I never posted any of the pics I took from Henri’s 6th birthday, also Minecraft-themed, back in January. I hadn’t returned to blogging then, so they obviously weren’t here, but I also never posted them on my Facebook, Instagram or Twitter accounts, which all link to each other.
I figured it would be fitting for an inaugural post to break in the ‘new’ blog, as well as officially link everything all together.
–
So. When Henri had told me he wanted a Minecraft party I a) wasn’t surprised, because my house is ALL about Minecraft (I play too, my mansion has a giant working waterslide, thankyouverymuch), and b) wanted to go a little beyond just making a cake. I generally try to tie in the invitations and the lootbags, for example, a pirate-themed party had eye patches and gold hoop earrings and spyglasses. So I went looking around online.
I wasn’t completely sure what I wanted to do for the cake yet, and Henri kept wavering on if he wanted a giant Creeper, or an Ender Dragon, or a giant Creeper covered in smaller Creepers… so I put the cake off until it got closer to actually having to bake it. I decided to start with the loot bags and get them ready and set aside.
There are a LOT of great ideas online. I took a look at them, and went to a few stores to see what was available to me. I ended up getting stuff at my local Dollarama, a grocery store, and Papillon (a Bulk Barn-type store), because 2 of those 3 are in the same mall and I had limited time/desire to run around. I found graphics of the Minecraft inventory items online and knocked them together in Word, putting a frame around them only so I would cut them all out the same size. I have included the graphics at the end of this post, feel free to download them and use them for your own projects!
Putting everything together, here’s what I came up with:
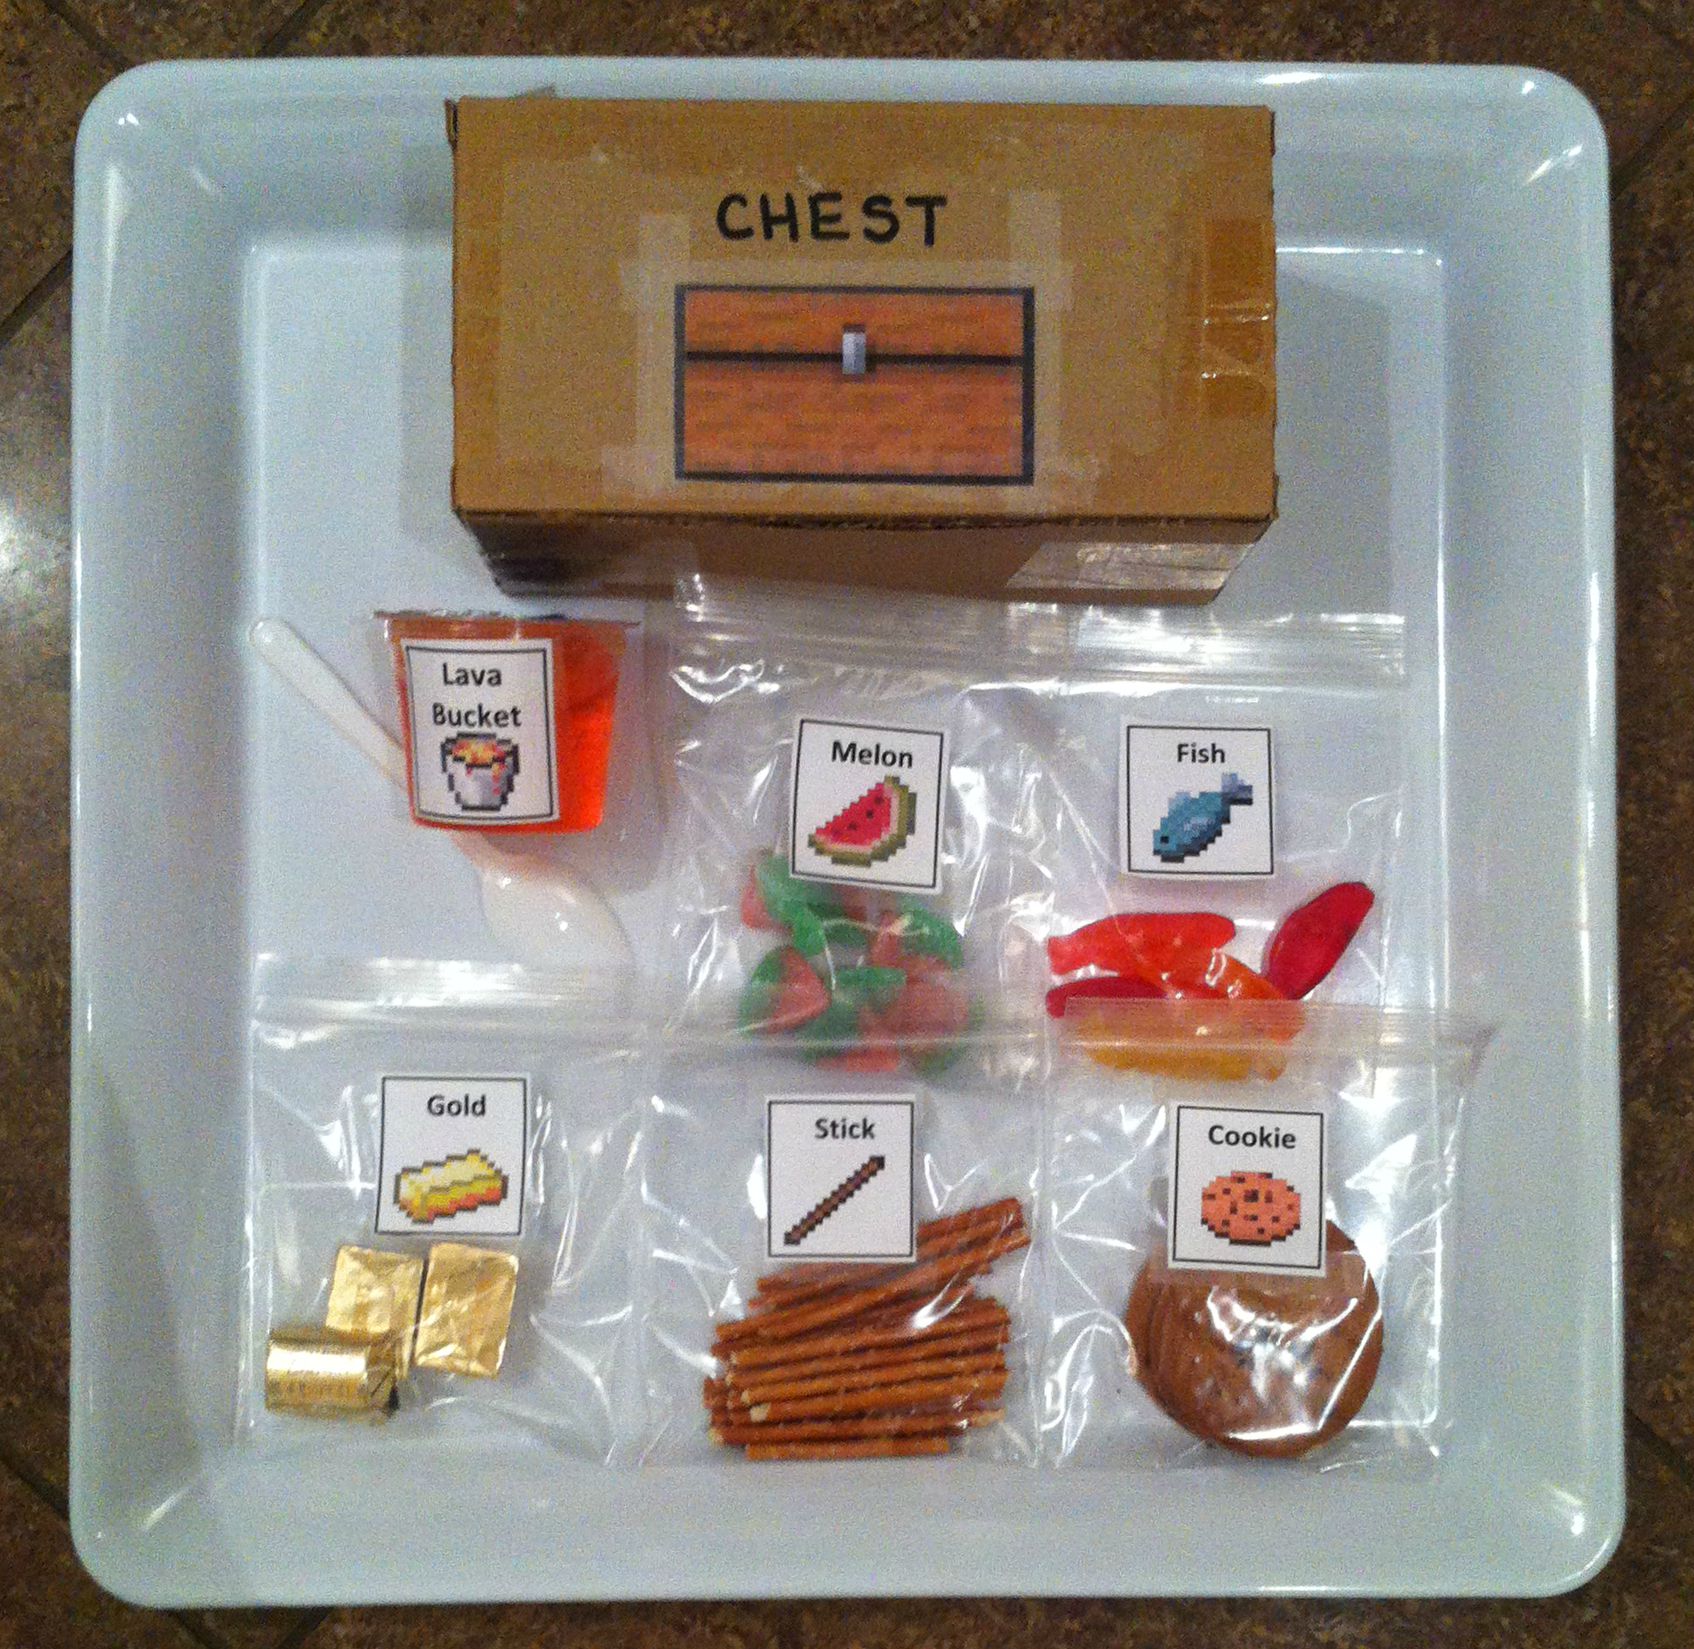
The lava buckets had me running around to a few stores. My local Dollarama had a mixed-pack of mini Jell-O knock-offs, but only half the pack was orange or red. I was really hoping to find red/orange (for lava buckets) and blue raspberry (for water buckets… which I had printed and managed to salvage at a later point). In the end I found Jell-O cups at my grocery store, and used those.
The small plastic zip-top bags that the rest of the treats are in are craft bags from the dollar store too, and even the tape used to affix the images was from there. Gotta love when you can find supplies as inexpensively as possible! 😀
The melon slices are sour gummies from the bulk store.
The fish gummies are also from the bulk store. For all the inexpensive candies I just grabbed a few handfuls and portioned them out evenly once I got home.
The ‘gold bars’ are Hershey’s Gold Nuggets. They’re a little more expensive so I counted those out. (Plus, um, 2 for quality control… in my mouth).
The sticks are pretzel sticks. Surprisingly my dollar store didn’t have any, so I bought them at the bulk place and eyeballed ‘even’ amounts.
I’d been planning to get the cookies at the bulk store, they have the Voortman’s ones that you can buy individually, but I found a pack of chocolate chip cookies at the dollar store so that turned out to be cheaper, and each kid got 2 (only because there weren’t enough for each to get 3 in the pack).Initially I wasn’t certain how to package everything together. Then I remembered these boxes we’d had laying around at work. They’re supposed to open the other way- the short ends. So I ripped the glued sides open and re-taped them up with packing tape (ALSO from the dollar store) so they opened like a chest would. If I’d planned that in advance I’d have made the chest graphic large enough to cover the whole side, and printed the word “chest” for the top. But, in a pinch, this worked.
Everything fit nicely inside and I heard the kids loved their “inventory packs”. If you try this yourself and can’t get ahold of boxes, brown paper lunch bags would be fine, or if you wanted to go EXTRA fancy you could get each child their own actual chest from the dollar store.
You can download and print the above images to make your own. I copy/pasted a bunch onto an Excel spreadsheet so I could fit as many to a page as I needed. The bag graphics were sized at 2″ tall by 1.75″ wide, and the chests were 2.25″ by 3.25″.