Today’s post for Mario Month is a really fast and easy DIY for making Mario, Luigi, Wario or Waluigi’s iconic mustaches. You can also adapt the same technique to make any other style of costume/cosplay/dress up mustache you’d like.
The first thing you’ll want to do is find a reference image of the look you’re going for. I found this clear picture showing all 4 character’s faces from straight-on.
You can freehand your desired shape onto scrap paper if you like. In my case, I cropped out the mustache portion of each image, scaled it for an adult-sized head (with the same proportions as on the characters) and printed it out.
Once you have your template drawn or printed, cut it out and trace it onto your cardstock. This will be sandwiched between two layers of felt to give the mustache stability. For Mario and Luigi it’s not as important, but Wario’s and Waluigi’s need a stronger construction to keep them from falling flat and limp.
Next, trace your template again, this time onto your felt (image 1, below).
Important- you want to cut out your shape BIGGER than the template (image 2, below). You can freehand this when cutting or trace around your outline and then cut along that new line.
Trace the felt cutout a second time (image 3, above). Then stack your two pieces of felt to be sure they are identical, trimming or adjusting if necessary (image 4, above).
Place your first felt piece with the front (public) side facing down. Place your template on top. Make sure your second felt piece is oriented correctly and then sew the middle of a strip of elastic to the center. The ends will be knotted and trimmed later, though if you prefer you can cut yours to length now and sew the two ends together here for an unbroken loop.
Using the same thread color as your felt, sew the two halves of the mustache together with the piece of cardstock in between. You can use a running stitch, backstitch or whip-stitch the edges. Alternatively, you could hot-glue the two layers together.
The two larger mustaches (Wario and Waluigi) need a bit of extra support to remain upright and angled as in the reference images. (You can see how it pulls away from the face on the right side of the upper image). Try on the mustache and mark the spot where the elastic and mustache should meet (as I am doing on the left side of the upper image). Note: it is important to mark these points while WEARING the accessory due to the elastic’s stretch. Once your spots are marked, sew the inner felt piece to the elastic on each side of center.
Here you can see the final Wario result! The two ends are standing up perfectly and the extra two stitches keep the mustache conformed to the face instead of free-floating. They also help hide the elastic when the accessory is viewed from the front.
The process is exactly the same for the remaining characters.
Here you can see all 4. Wario and Waluigi have the extra stitches on the elastic. Mario and Luigi do not and I think they would have benefited from it.
In all, this was a really quick and easy add-on to these costumes. They held up through 6 full performances and many rehearsals, including rushed quick-changes between numbers.
Continuing Mario Month, today I’m going to show you how to make really easy character hats for Mario, Luigi, Wario and Waluigi.
I’d looked at a lot of online DIYs when planning my Wario costume for our Super Mario Bros skit, and I liked bits and pieces of each. In the end I compiled suggestions and ideas from a few different patterns and am sharing it as a tutorial so you can use it to make your own costume or cosplay pieces!
For reference, here’s Wario and his hat.
While it’s very similar to the other 3, his is unique in having the white circle cut off by the brim, and by having his initial oversized. As such I decided to make his first, and then focus on the 3 remaining hats for my castmates.
You will need:
paper
pencil
scissors
felt – each hat will require enough felt of one color to cut circle A twice. Circle C and square D require minimal amounts in contrasting colors.
The first thing you want to do is draw a template on paper you can cut out. If you have bowls of the appropriate size then you can trace them, otherwise you can use a compass and ruler.
To save paper, draw your circles within each other. In my original template (above) I didn’t have a bowl with the diameter I wanted, so I traced my largest bowl then manually sketched in another circle about an inch wider, so there’s an extra circle showing. Also my pencil marks aren’t as easy to see so here’s a clean template with dimensions:
These dimensions are for an adult-sized hat but it’s easily customizable to make any size you’d like.
Cut out all pieces from your template. The easiest way to do this is to cut out your largest circle (A) and then cut circles B and C from within A. You can cut square D out from circle C after using it, or out of a scrap of paper (so you can keep all 4 pieces of your template for future use).
If you’re planning to make numerous hats you can preserve your template by laminating it with packing tape as I did for the Warp Pipe. You can also cut it from cardstock instead of plain paper for added durability.
Circle “A” is cut twice. One “A” will be left whole and will be the top of the hat. The second “A” will be the lower half. Circle “B” is cut from inside the second circle “A”. It should be centered evenly and then shifted down a bit to leave one section a bit deeper. (In the image below, you can see the hole is a bit higher and to the right vs centered, leaving more yellow on the lower left side).
If you are making Mario, Luigi or Waluigi hats, you can continue to the brim. Wario’s hat is the only one with a two-toned brim, so I traced half of template “B” onto white felt – “(B)” above.
All 4 characters have a white circle on their hats, so you can cut circle “C” from white felt.
Take circle “A” with the hole in it and position so the deeper section is upwards. This is where the details will go.
Position circle “C” into place (noting for Wario that his is the only hat whose circle is more obviously cut off by the brim) and then use matching thread to sew it into place. (You can also use hot glue, as I did for the other hats later in this post).
The other 3 characters’ initials will be cut from square “D”. Wario is the only one with an exaggeratedly large initial on his hat. Cut the “W” from felt and sew (or glue) it into place.
For Wario’s brim, first I lined up the white half on top of the yellow circle “B” and then cut off the excess. Then I sewed the half-circle edge together, leaving the straight edge open. Next I flipped it inside out and smoothed it flat, and then stitched the flat edge shut.
To easily center the brim, fold it in half and mark the center lightly. Do the same on the yellow circle. Line up the two marks, and keeping them aligned, sew the flat edge of the brim to the hat under the initial.
Place this completed lower hat piece upside down on the whole circle “A”. In the first image I had pinned them together, and the second image is after the stitching is complete.
Flip the hat inside-out and you’re done!
If you find the head-hole too small you can cut it larger, but you want to err on a more snug fit as felt will stretch over time. I used the 6″ diameter for all 4 hats and they fit perfectly, staying in place during 6 performances and multiple rehearsals!
The remaining character hats are all identical (except for color and initial) so I did them all assembly-line style. First cut out all template pieces.
Cut the initials from square “D”. I used scraps from cutting out the largest circle. I also switched to a glue gun for the details as it works really well on felt (though since the hats would be getting a lot of rough usage I stuck to sewing for the main construction).
Glue the details into place…
…fold the brims in half and sew them shut…
…then sew the brims into place. After that just sew the two large circles together and flip.
A final, optional step is to iron the edges to help keep them crisp and flat.
Each hat takes under 30 minutes to complete, making this a really quick and easy DIY.
They make a great addition to any Super Mario Bros costume or cosplay and would also be wonderful party favors for gaming-themed celebrations.
It’s Mario month! March 10th is Mario Day (get it? MAR-10 looks like Mario!) but I’ve decided to make it an entire Mario month here on the blog by sharing a bunch of Super Mario-themed DIY projects. This assortment of costume and set pieces were made for a Mario Bros skit we did in Becket a few years back, but they would work just as well for Hallowe’en, cosplay, photoshoots or even birthday party decor and favors.
The first of the bunch is a set piece, specifically the Super Mario Bros warp pipe:
If you look closely at the warp pipe you’ll see there are two distinct repeats.
Ignoring the black outline for now, the top section has two unique horizontal stripes followed by a repeat that runs the rest of the shorter section (the vertical sections and checkerboard). The bottom section of the warp pipe has a horizontal black shadow followed by a similar, but narrower, vertical stripe/checkerboard repeat.
You’ll want to scale the pipe to your desired width. For the base of my set pieces I used a roll of recycled paper that was 36″ wide, so that was my max width. The paper would later be mounted onto plywood with an angled brace on the back to keep it standing on stage.
A design like the warp pipe is pretty linear and easy to plot out freehand, but I wanted to make sure I had everything scaled properly so I cropped out both repeats highlighted above and resized them to be 36″ wide. I then taped my printouts together to get an accurate slice of each pipe section.
This is the roll of recycled paper I used. The split sections were cut for the matching stage runners and then I cut a piece about 4.5′ long for the warp pipe itself.
This entire project was done with inexpensive materials, including the acrylic paint.
Start by painting the entire surface the pipe’s base green. I didn’t cut the pipe shape at this point because I would be using the side edges to line up my pattern.
Once dry, draft the pattern onto your surface. You can measure it out if you like but I found it easier to use carbon paper to trace the top pipe pattern, and then used a ruler to measure out and repeat the checkered grid 6 times. By tracing the top with carbon paper I had the exact placement of the vertical lines and was able to easily use a ruler and continue them down to where the lower section began.
For the lower pipe section I repeated the process, tracing the top of the lower pipe and the first checkerboard repeat. I then moved the template down to the bottom edge and traced the vertical lines again. I didn’t trace the horizontal lines as I wanted to measure out the checkboard squares themselves, but by tracing the vertical lines I was able to connect them to the ones higher up and ensure my lines were straight. It really helps to use the longest ruler you’ve got! I use this adjustable t-square for drafting and as a cutting edge and love it.
I boosted the contrast on this image to try and show all the pencil lines. I wasn’t terribly concerned about them showing through the paint as this is a stage prop and wouldn’t be seen from close up, but if you are concerned about that you can sketch lightly or erase your lines slightly to soften them (though that might require paint touch-ups later).
Now that the guide lines were in place I used a craft knife and my ruler’s edge to trim the side for the warp pipe’s shape. I then painted the lighter green color. You can also do this in reverse – do your base layer in the lighter shade and then add the darker details later. You can also sketch right onto your untouched paper and paint both colors later, if desired.
Do as many coats of the green as required for it to be opaque. Once the greens are dry, add a black border and shadow under the top section.
You could stop at this point but since mine was for a set piece that would be carried on and off stage for at least 6 shows and a handful of rehearsals, I wanted to make sure it would be durable. I knew it would be glued to wood but didn’t want the paper to tear or have paint flake off. So I decided to use my favorite cheap & easy lamination method – clear packing tape!
Start by adding one strip of tape that overhangs your piece on both ends to secure it to your cutting surface. (My cutting surface is my dining room table, which has many cuts from previous projects. Don’t be like me LOL).
You’ll want the tape running either vertically or horizontally, but for the best look you want it running in nice, straight lines. I used the edge of the black border to line up my first strip.
I deliberately DIDN’T line up to the edge of the pipe, even though I was confident my edge was straight. This is because I wanted my edge piece of tape to be centered half on, and half off the edge, so I could fold it over the edge for protection.
Continue taping, doing your best to keep the tape smooth and flat, without wrinkles. Large air bubbles can be popped with a pin and smoothed out but an even application will help avoid them. If you look closely at the top left of the pipe in the image above, you can see the tape overhanging the side of the top of the pipe, about to be folded to the back.
And here it is in the show! For reference, that’s me as Wario, and I’m 5’4″. It made a great bit of stage decor and a convenient hiding place for some skit props we hid behind it!
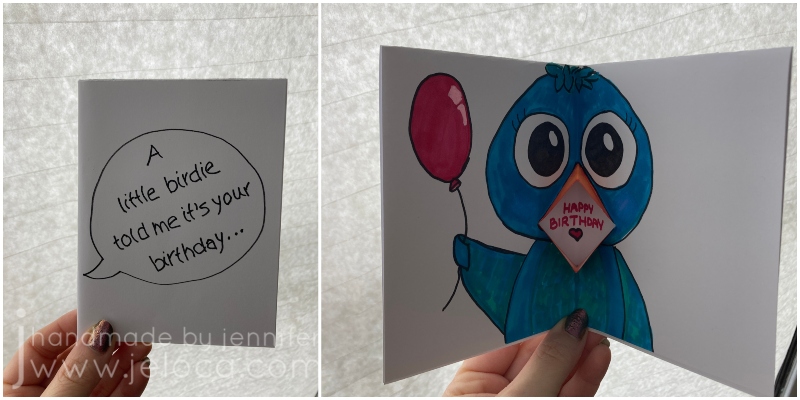
Did you know that February 21st is “Card Reading Day”? According to Checkiday.com this is a day for reading and enjoying cards that you’ve received over the years, that you’ve held on to for sentimental reasons. Here’s a quick and easy card project you can make with your kids to give others something they can hold on to and re-read on future Card Reading days.
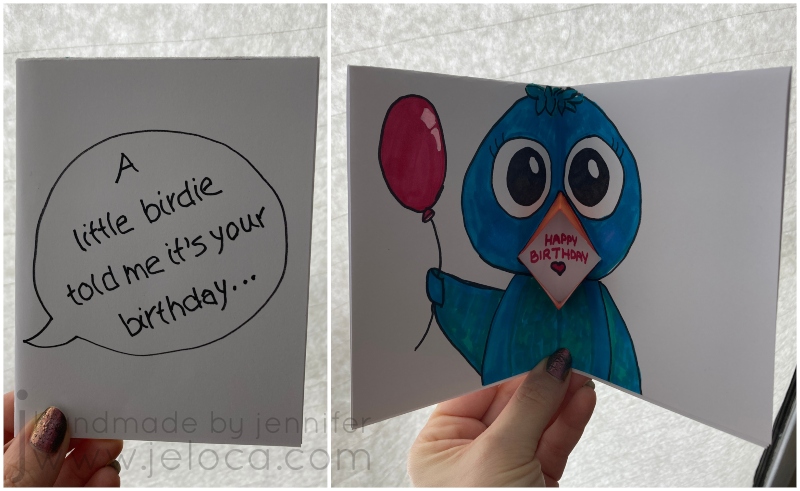
To make a talking greeting card you will need:
paper or cardstock
scissors (plain or with a creative edge)
bone folder (optional)
pencil
supplies of choice for decorating (markers, colored pencil, construction paper, glue, etc)
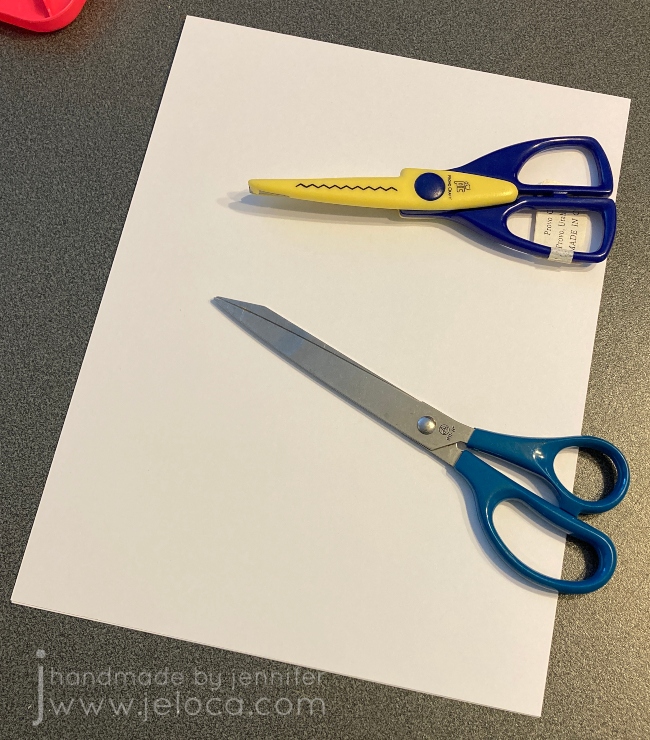
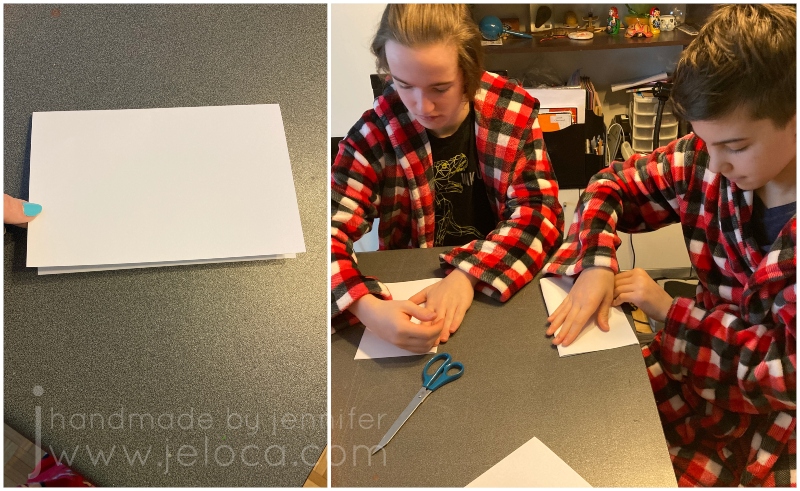
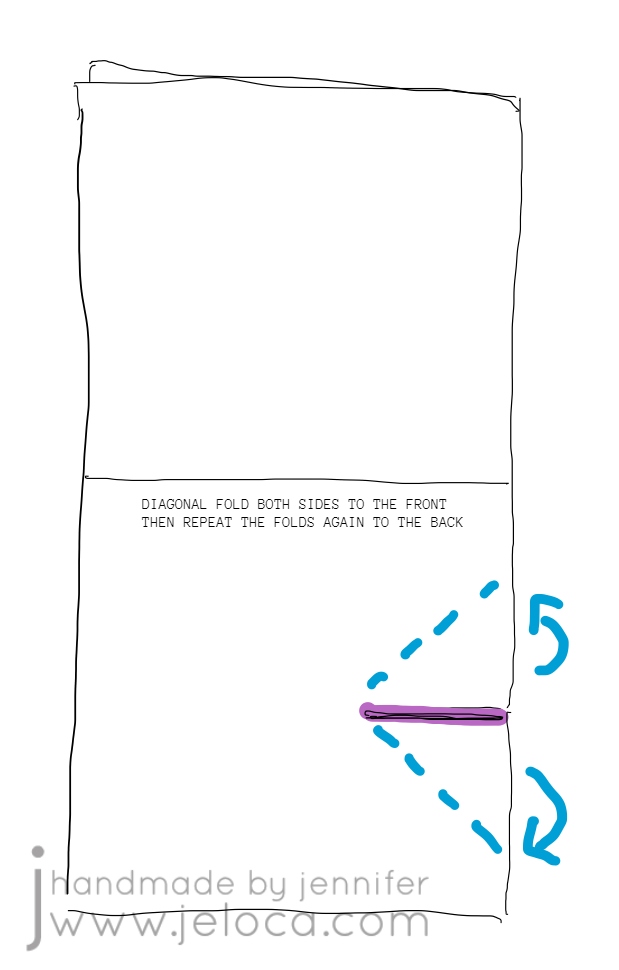
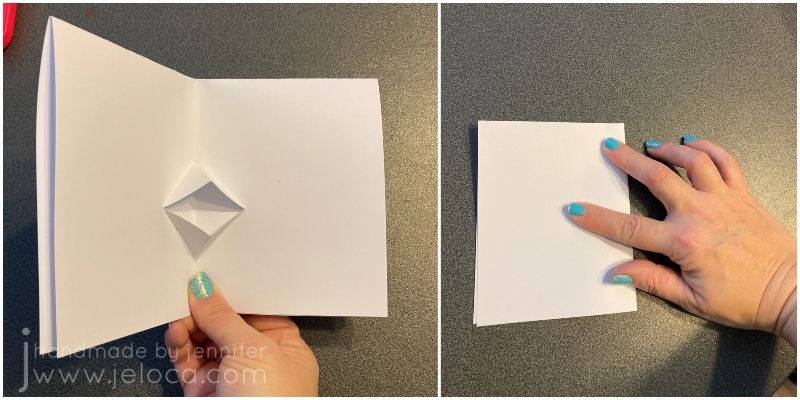
STEP 1- with your paper placed vertically in front of you (taller than wider), fold the top edge down to meet the bottom edge, then press fold flat
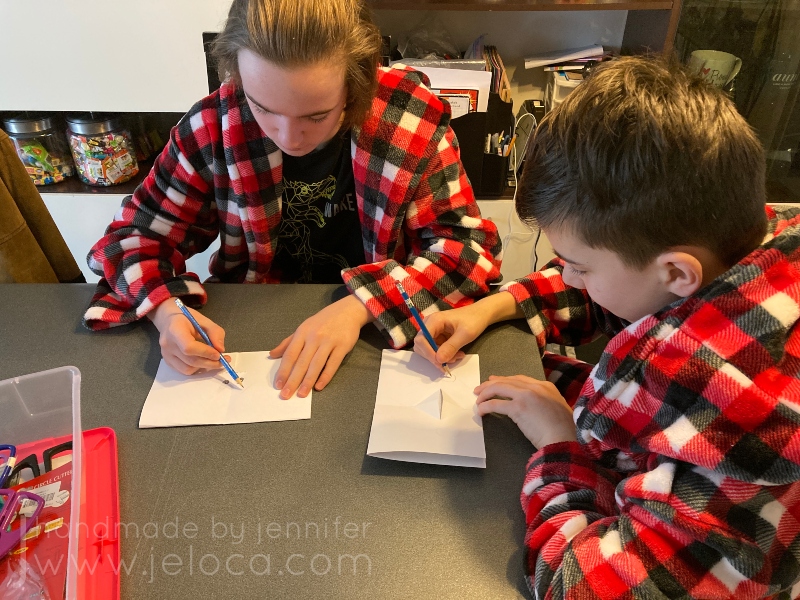
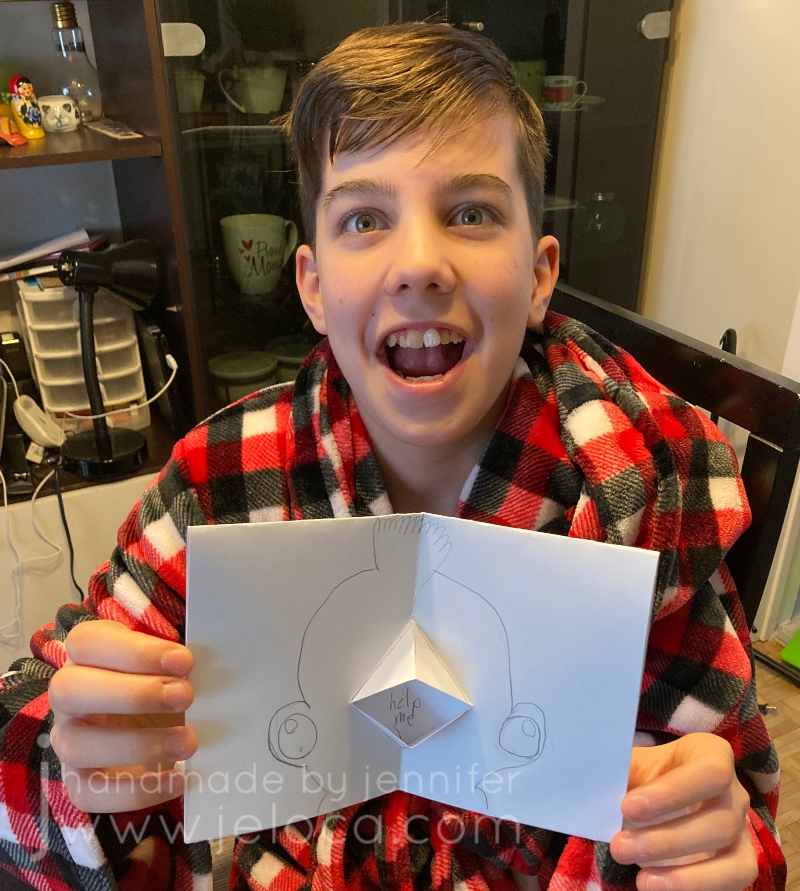
My kids decided to try out this project, so I talked them through it while making my sample and let them have full creative control over their own.
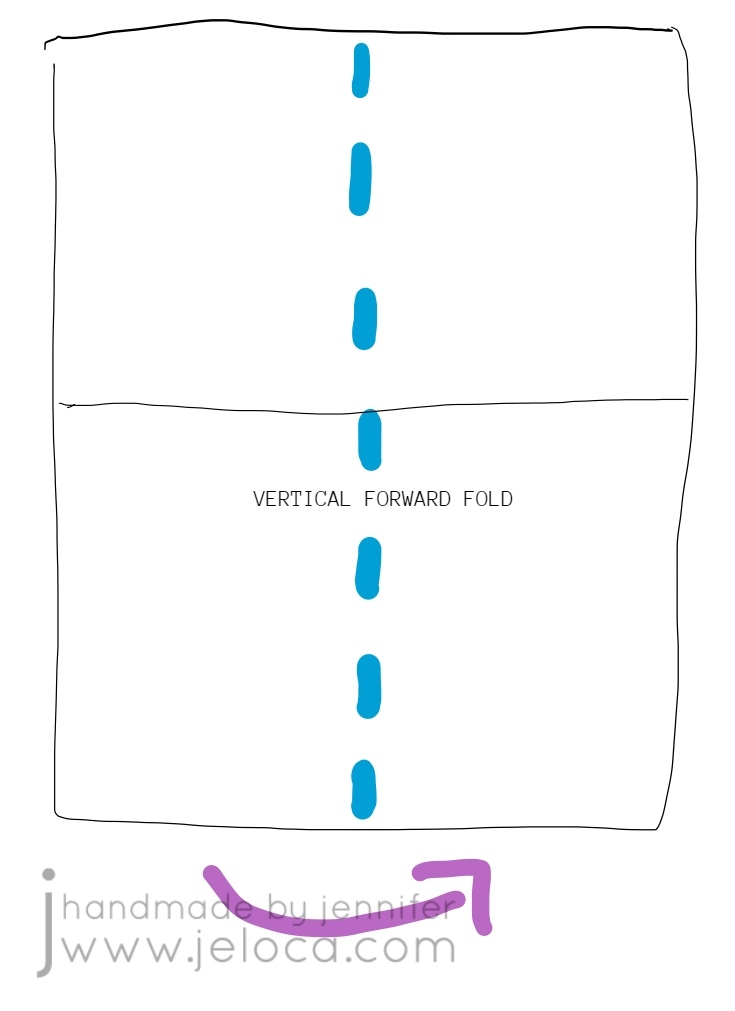
STEP 2- unfold your paper and this time fold it vertically, so the left edge goes behind and under the right edge.
I’d first learned this card at an art class when I was a bit younger than my boys are now, so it was cool to be teaching it to them now, and passing it on.
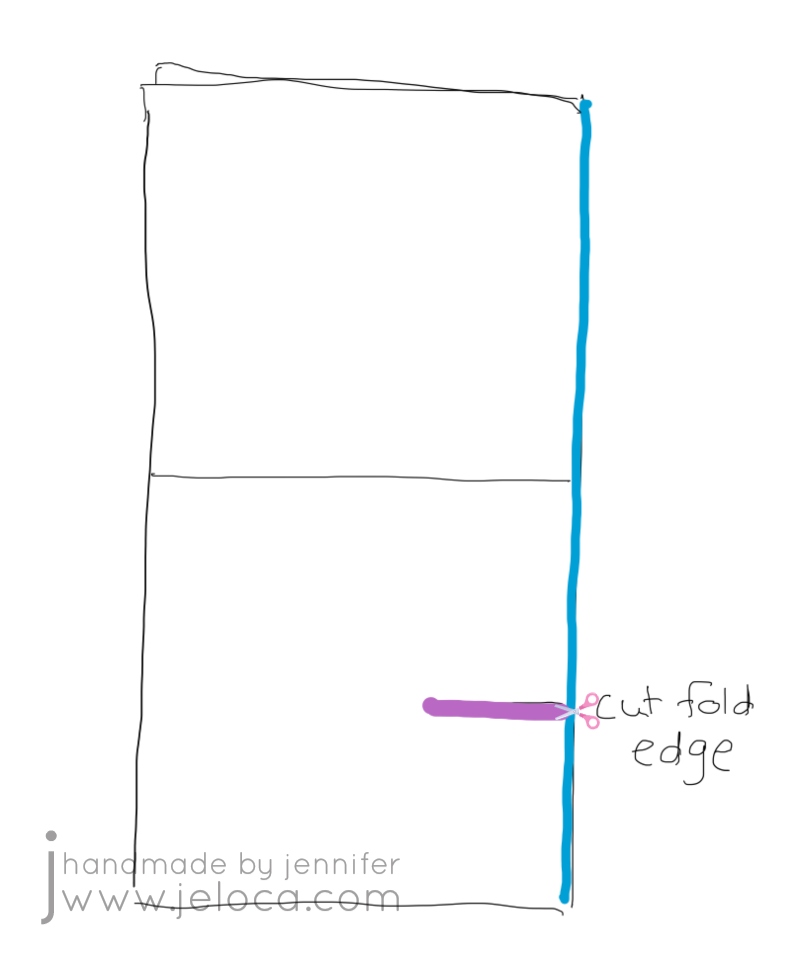
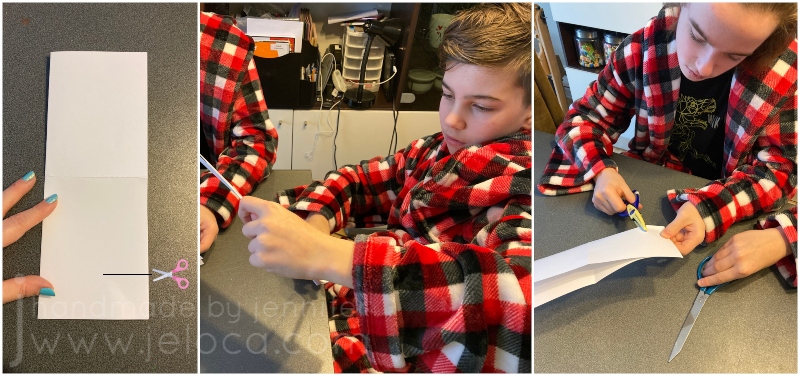
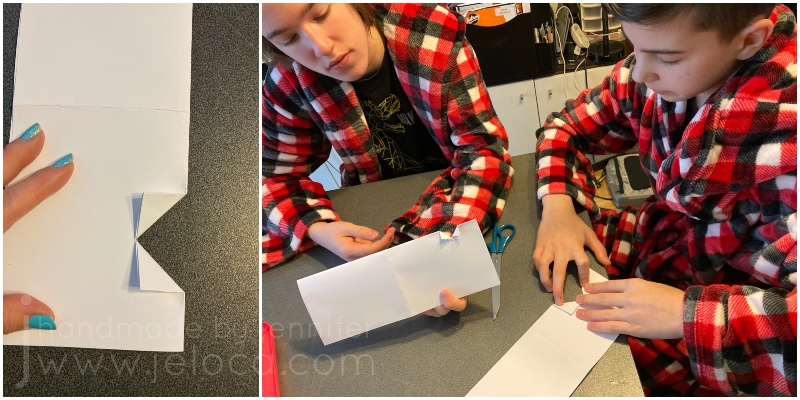
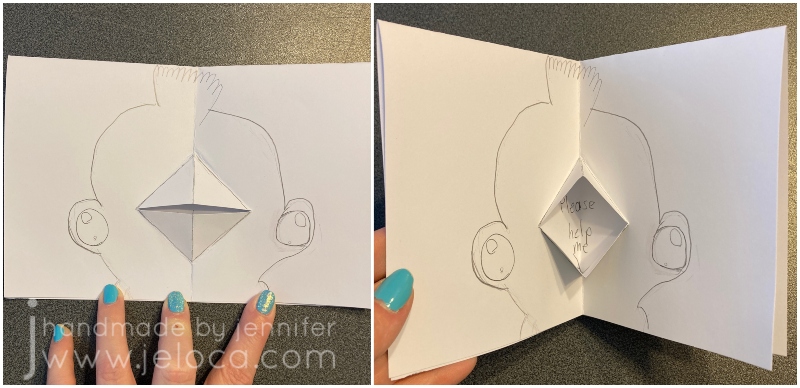
STEP 3- orient the card so the fold is on the right. Figure out where you want the mouth to be and make a straight cut.
Your mouth can be as high or low on the card as you would like, but remember that you will be folding the edges on the diagonal, so if you want to place it closer to the upper or lower edges, you will need to make your cut shorter. (So you don’t surpass the upper or lower edge of the inner card face – this will become clearer after the next step).
Henri and I used regular scissors for a straight cut, and Jakob chose ones with a pinking blade to get a zigzag edge to his mouth.
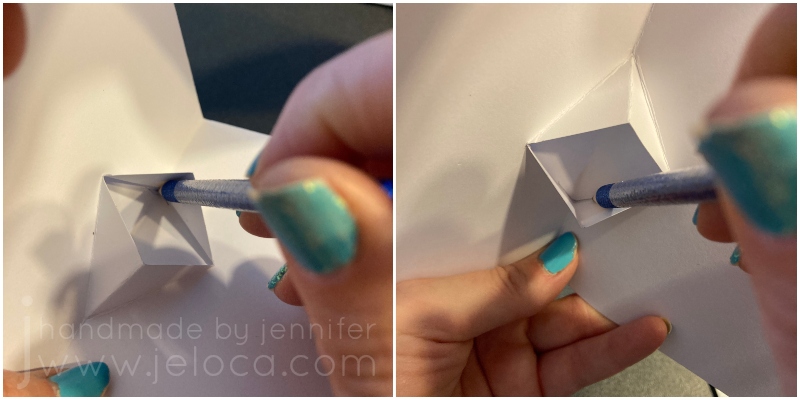
STEP 4- fold either side of the cut edges up, and press firmly. Repeat the same folds to the other side. If you think of the mouth as a bird’s beak, you are folding at the beak’s outer edges.
Our examples are shown with the folds at roughly 45 degrees but you can get creative with this. With a shorter cut you can fold at 45 degrees for a smaller mouth or you can fold at a narrower angle for a bigger mouth (with a small opening).
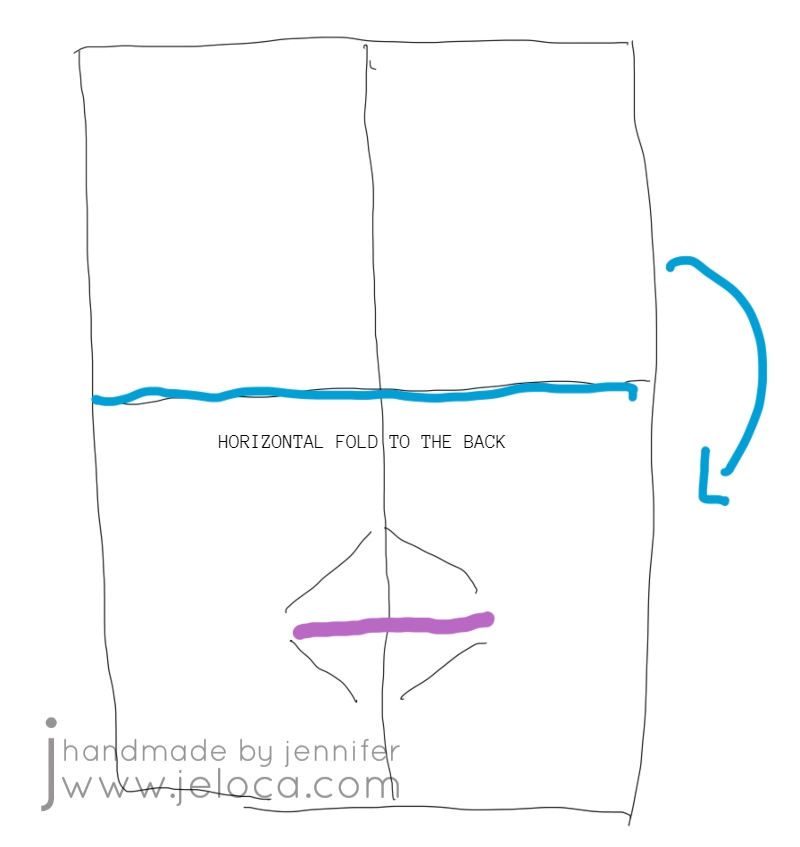
STEP 5- once you have folded the cut edges to both sides of the card, smooth them flat then fold the top half of the card down to the back.
This puts the 2 solid faces on the outside for the front and back of the card and the mouth on the inside.
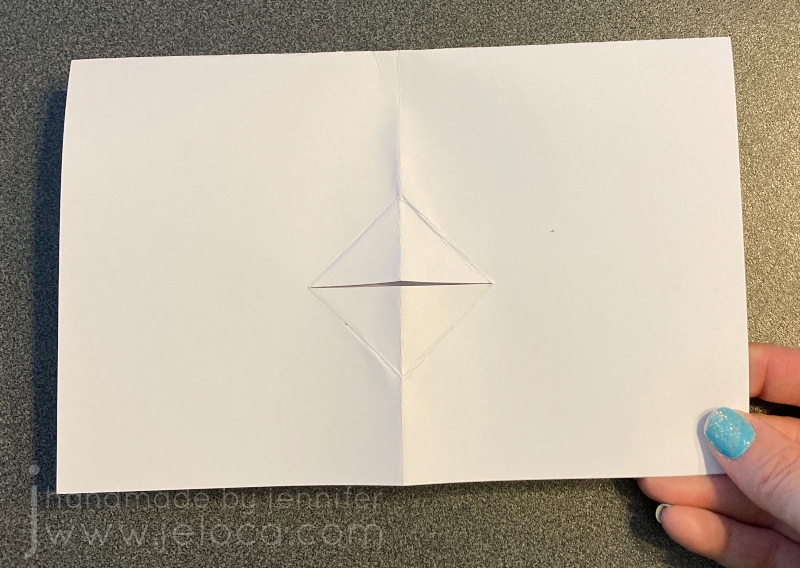
STEP 6- use your fingers to tuck the mouth/beak folds outwards while keeping the card folding inwards. Then press the card flat and smooth over it a few times, to “set” that fold.
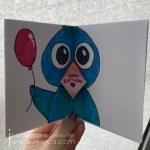
This is the mouth that will open and close as you open and close the card, making it look like your card is “talking”!
STEP 7- the final step is to use a pencil to lightly trace the inside mouth corners to mark off the boundaries of where you can put your “spoken” message.
You want to use a pencil for two reasons: 1) a pen or marker might bleed through your paper to the outside faces of the card, and 2) you can erase the border after creating your message, for a cleaner look.
From this point on you can decorate the card however you like!
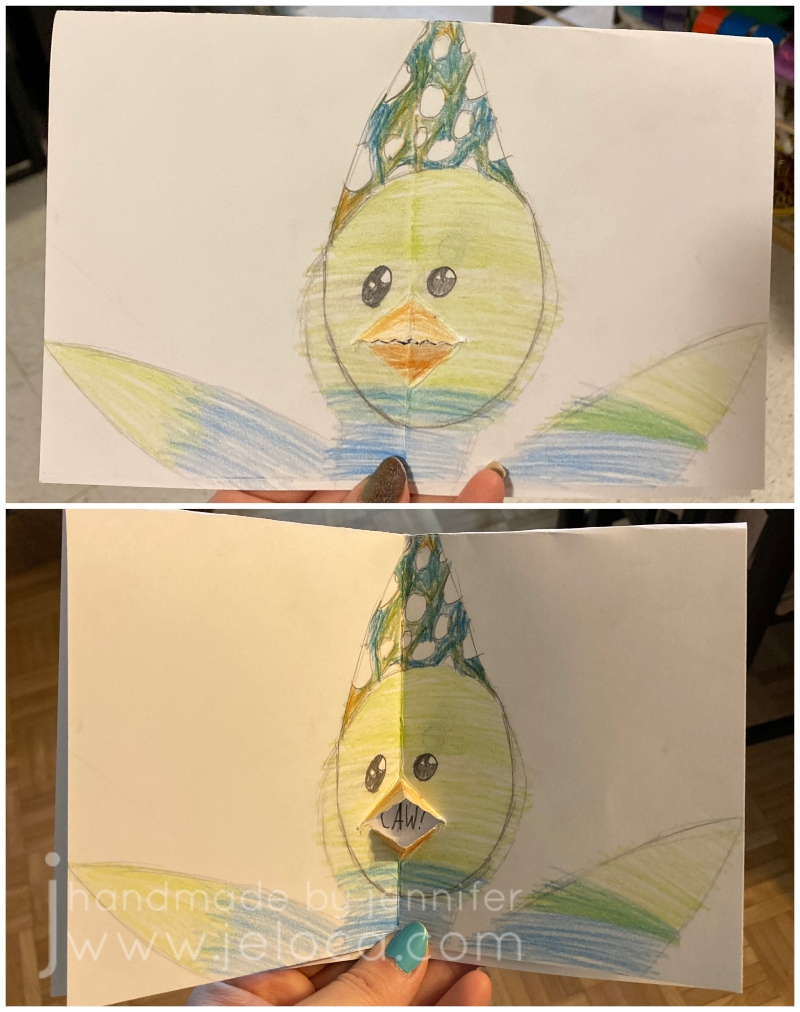
We all ended up taking inspiration from the mouth looking like a beak, and created bird-themed cards.
Jakob and I went for sweet birthday messages…
…while Henri went a bit rogue!
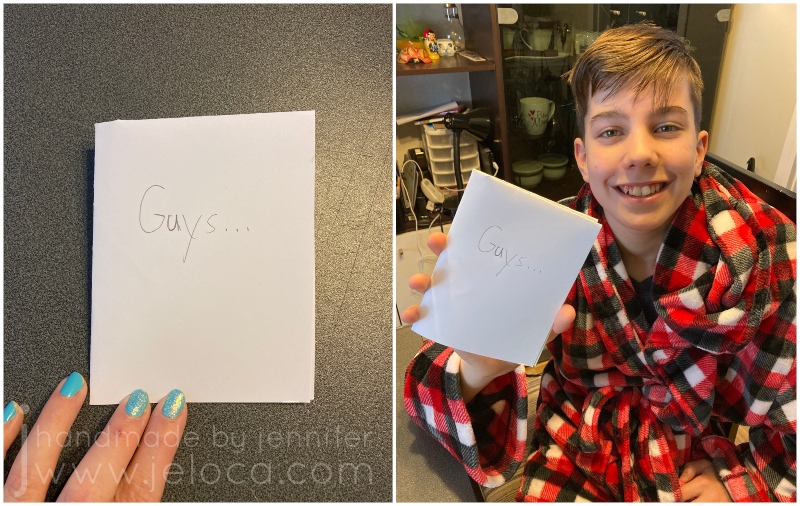
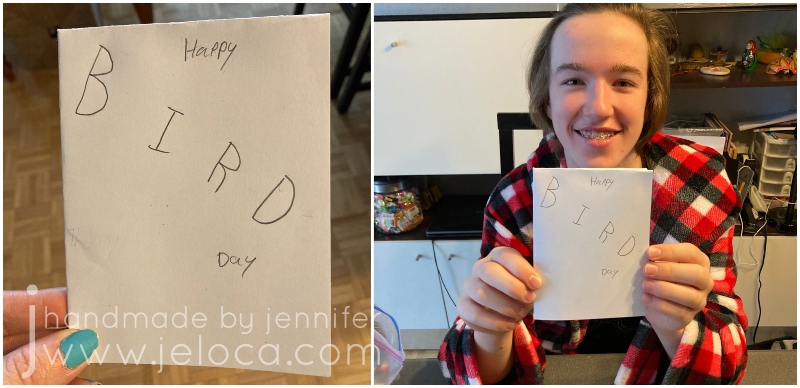
Reinforcing how well he takes after his punny mom, Jakob made a cute BIRD-day card.
I think it’s really TWEET!
He was so proud he just had to CROW about it. (Ok I’ll stop)
I went for a similar theme with mine.
Because the inside of the card isn’t visible (except for where the message is) you can use alcohol markers or other media that might bleed through your paper. You can avoid the message area or glue in a clean bit of white paper after decorating the rest of the card, enabling you to get as creative as you’d like and not be limited to dry media.
I’m so glad I got to pass on this easy card-making method. I hope you (or your kids) make some cute, creative cards that can be someone’s sentimental memory to look at fondly in the future. ❤
It’s Super Bowl Sunday, and everyone knows the best parts of any Super Bowl are the snacks and the commercials, right? (No? Just me?)
It’s been 24 years (!!!) since Ali Landry famously tossed 3D Doritos into a laundromat dryer in an ad during Super Bowl XXXII, and 1 year since she showed she’s still got the same moves for snacking. I had to recreate this vintage snack a few years ago as a prop for a skit that took place in the 90s, and today I’m going to show you how you can make your own. Whether it’s for a play, a costume accessory, or simply nostalgic feels, it’s a quick and easy DIY that doesn’t require many supplies to make.
Note: 3D Doritos were relaunched in 2021 and got Matthew McConaughey’s “FlatMatthew” ad during Super Bowl LV, but they redesigned the bag so we’re going to focus on the original.
Besides access to a printer, you’ll need a few other supplies:
paper
I used full-page sticker paper, but you can use regular printer paper as well. If using sticker paper make sure it’s white and matte.
Start with your bag of Doritos. Empty the bag (into a bowl… or your mouth… no judgements here) and then carefully wash the inside and outside with soapy water. You want to make sure there is no food left inside that could mold over time, as well as remove any greasy or oily fingerprints from the outside that could interfere with your glue/tape.
3D Doritos have a red background so I used a bag of regular nacho flavor Doritos as my base so the back of the bag would match the altered front. Allow your bag to dry thoroughly before attaching your image.
Find a source image online and print it to scale with your bag. There are a number of great image resources out there, so you can use your favorite. Just be sure to choose a the highest image quality you can find, for the best results when printing.
If your printer quality is lackluster, like mine, you can retouch your printout with markers or colored pencils. I needed my prop to be highly visible from stage to an audience of 200-300 people, so I chose to deepen some of the sections for higher contrast.
In the image on the left, you can see the difference in the retouched red (to the left of my marker) vs unretouched (the right side, which I’d already outlined with the marker). In the middle image you can see the yellow marker inside the D, and in the last image you can see the contrast between the first half of each word vs the paler second half.
Once you’re happy with your retouching, cover the entire image with clear packing tape.
Try to be as smooth as possible but if you get a few wrinkles (like I did) it isn’t the end of the world as we will be crumpling the bag later. The wrinkles won’t show from the audience so don’t stress over them.
Here you can see the vivid difference between the retouched, taped good copy and my first print that was slightly too small.
The final image is bolder and more vibrant, with higher contrast. It also more closely resembles the shiny foil of an actual bag of chips vs a printed piece of paper.
Trim your image to the size of your bag. If using sticker paper, peel off your backing and apply your sticker. If using regular paper, cover the back with stick glue then set it in place.
Use more packing tape to seal all 4 edges so your new chip bag front is fully secure.
Continue around the back, and fully cover the back, bottom seam, and open edges with packing tape as well. Foil bags tear easily and the packing tape will keep your prop from falling apart when handled.
We needed an open bag that an actor could pretend to eat from, but you could just as easily stuff the bag lightly with crumped paper and tape the bag shut, to recreate a brand-new, unopened bag of chips.
The final step after taping is to crumple the bag like crazy. For real! Squish it, scrunch it, really work creases into that tape! Real bags will fold and crease easily and stiff, straight surfaces will spoil the illusion so don’t be afraid to crumple it up into a little ball and squeeze well.
Dig in!
This post may contain affiliate links. This means I might make a small commission on purchases made through the links, at no cost to you.
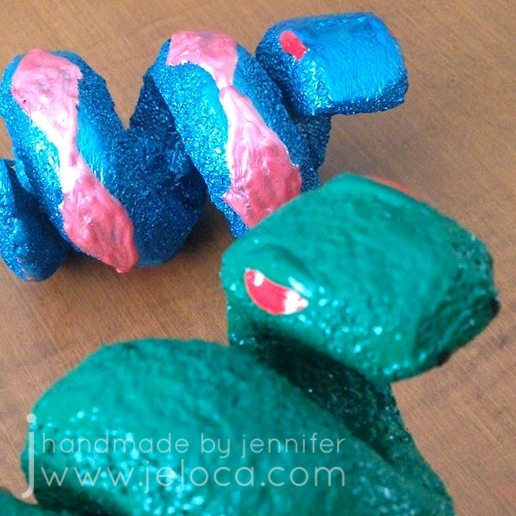
Today Lunar New Year 2022! It’s also National Serpent Day! While today starts the Year of the Tiger, my Chinese sign is the Snake, so I think that makes this a perfect day to share this snake-themed DIY from my backlog of never-before-posted projects.
I’ve always loved snakes and Jakob inherited that affinity from me at an early age.
In fact, here’s him at about 3 years old proudly showing off a live snake around his neck!
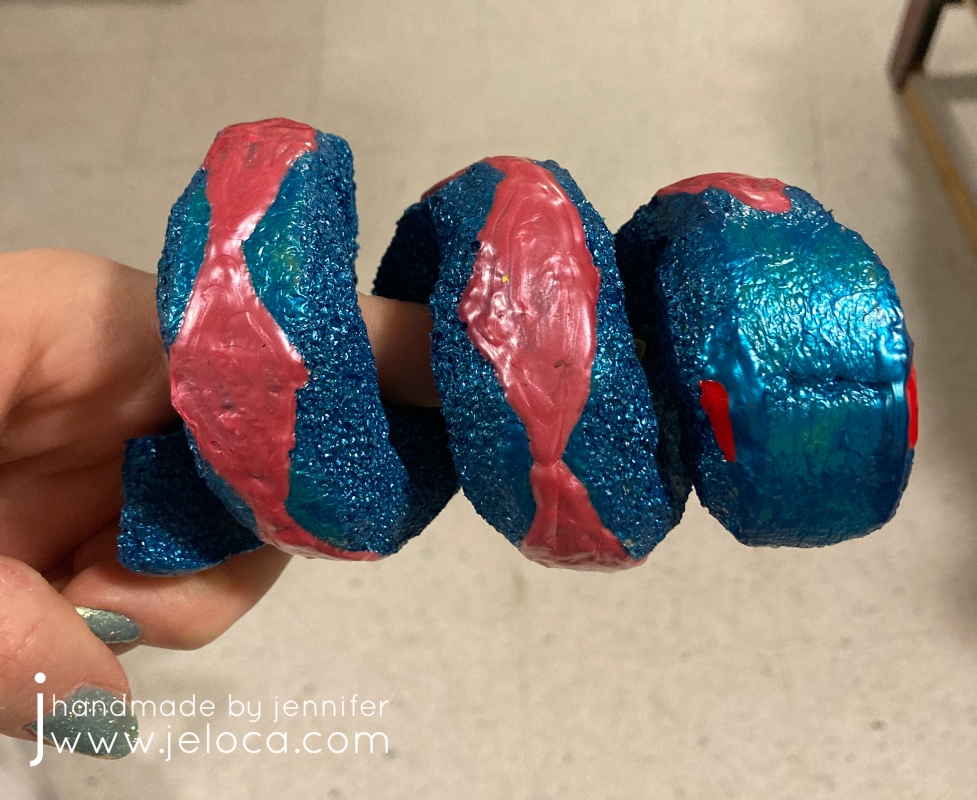
Back in 2016 I was doing the Christmas gift prep and realized I was short on a stocking stuffer for him. I’d been on a squishy-making kick, having made an assortment of faux food for Henri’s robo-hamster, and decided to try and see if I could figure out how to make a snake for Jakob.
It worked perfectly, and here’s how you can make your own:
You will need:
pool noodle(s)
You can get multiple from one noodle, though can make them as long as you wish. I’m not going to put an Amazon link – you can get them much cheaper at your local dollar store!
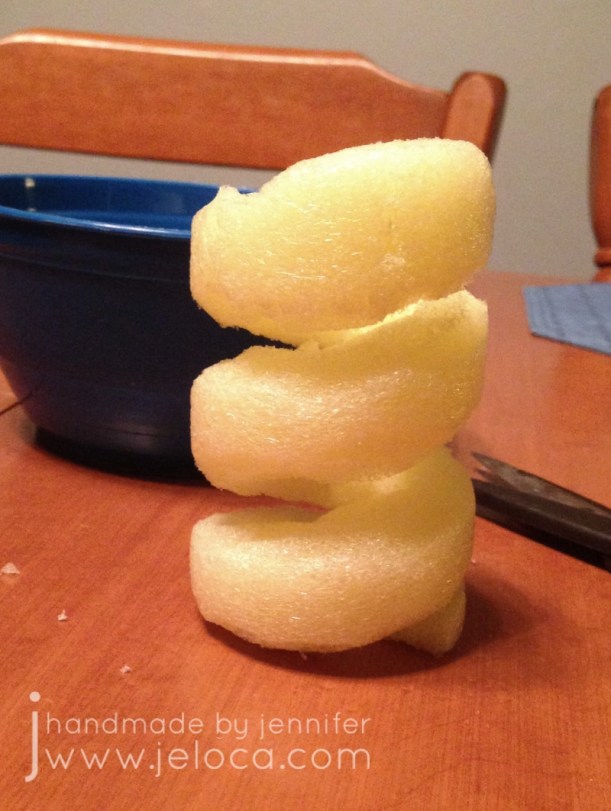
Start by cutting the pool noodle to your desired length.
You can use scissors for this but I find it easier to get a flat cut with a knife, and slicing halfway through then rotating and slicing the other half to match.
Draw a diagonal line around your noodle tube. This will mark the divisions where your snake is coiled up.
You can score the line with the tip of your pencil or knife/scissors to make it more visible and easier to follow.
Starting at one end, cut through your tube to the hole in the center and then cut along the line you’ve scored. Try to keep your line straight though it’s ok if it’s a bit messy at this point – it will get cleaned up in the next step.
Remember that one end is the tail and the other is the head, so start your cut on the diagonal as in the image above, to create the point of the snake’s tail. Stop your cut short at the other end and then cut vertically to leave a wider, flat edge which will become the snake’s head.
Once your basic shape is established, you can clean it up. Use your scissors to take small snips on the diagonal of each edge to round out the snake’s body. Shape the head, and you can carve in any other details you’d like, like eyes or scales.
If you want to make sure your snake will stand on its own, make sure one edge is flat.
Don’t forget to make sure that there is enough room between the coils to keep them from sticking to each other as you are painting.
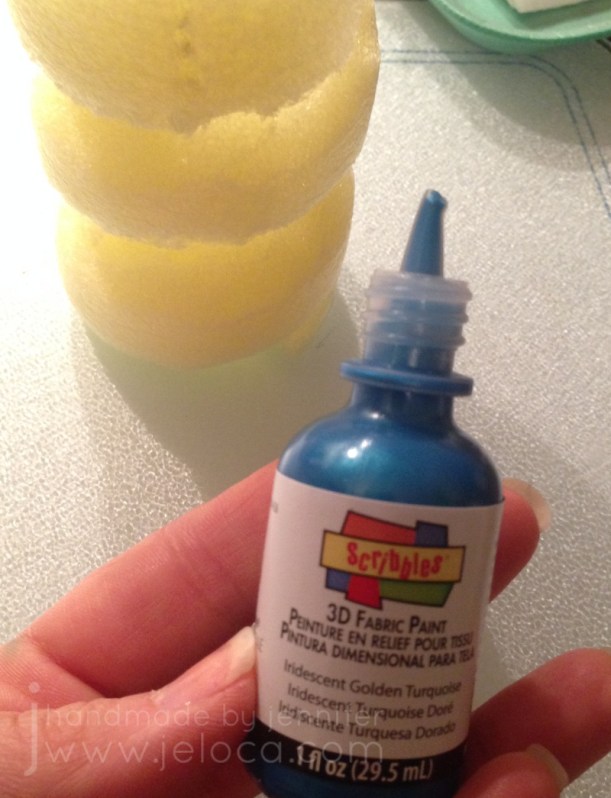
Then you get to paint! You want to use puffy/fabric paint in opaque colors. If you use colors that are too translucent you will need to do many more coats. If that is the case I would suggest a base layer of an opaque white first.
Note: Do not use acrylic/craft paint! If you do, the first time you squish your toy the paint will crack and flake off, which would be a shame after your hard work. With fabric/puffy paint your toy can last for many years.
(Here’s a pic I took as I’m typing this in 2021. Looks brand new!)
Don’t try to use a paintbrush! Squeeze some paint onto your squishy then spread it out with a craft stick. Repeat this process everywhere you want the current color, remembering to leave one side or base unpainted so you have somewhere to set it down while the paint dries.
Continue in this manner, adding more paint in your desired colors. Allow each coat to dry thoroughly between layers. When the body is dry, you can paint the base with the same number of layers.
When the final layer is dry you can add further details like eyes or scale patterns.
Not only are these little guys easy to make, but they make ASMR-like sounds when squished.
(Sound on!)
I hope you enjoy making your own!
This post may contain affiliate links. This means I might make a small commission on purchases made through the links, at no cost to you.
It’s International LEGO Day today, so to celebrate here’s a really easy DIY you can do to turn any dollhouse/playset with flat surfaces into a LEGO playset!
That’s right – with just a few simple household tools we’re going to turn this:
into this:
What you’ll need:
dollhouse/playset with flat surfaces
I used this unfinished ArtMinds Wood Castle Dollhouse from Michael’s, (US / Can)
damp sponge or paper towels (to wipe off sanding dust)
For this project I used this ArtMinds Wood Castle (linked above).
Jakob had received this castle as a Hanukkah gift from my parents and I wanted to surprise him by turning it into a LEGO playset since he never really played with action figures but was completely obsessed with LEGO.
If working with an unfinished product like this castle, you’ll want to sand it before you begin. Some of the edges are unfinished or rough and could cause splinters. The wood is soft, though, so it’s easy work to bring it outside and give the exposed edges and surfaces a quick sanding. This will also help make sure your surfaces are flat.
If using something like a plastic play house, you will want to sand any of the surfaces where you plan to attach LEGO plates to help ensure they stick well.
After sanding, wipe all surfaces with a damp sponge or paper towel. You want to remove the fine sanding dust so it doesn’t interfere with your glue later.
We’ll be using a craft knife to score the LEGO baseplate and LEGO bricks to give us a good edge to cut and snap from.
In my case, every surface in the castle had the same depth, so I wanted to start by cutting my baseplate into strips that were the proper depth. Then later I could cut them into individual pieces for each section.
Set the corner of your baseplate into the corner of one of your sections and use a separate LEGO brick to mark the edge line. We don’t want to cut the studs in half so if necessary err for pieces that are slightly too short instead of ones that would stick out beyond the edge of your playset.
Once you know your depth, use additional LEGO bricks to continue the line all the way from edge to edge. Do not use flat bricks for this as the thickness of the standard bricks will help keep your blade from slipping. Be sure to press the bricks securely as any gaps where they’re not properly seated onto the plate could allow your blade to catch.
NOTE: use a cutting mat or cut on a protective surface. I use my table as a craft table so I cut directly on it. Don’t be like me!
Run the blade of your craft knife down the edge of bricks once or twice, then snap your baseplate away from the cut edge. If you use enough pressure when scoring it should snap cleanly.
If the baseplate doesn’t snap clean off, you can slide your craft knife down the cut edge and the two pieces will separate easily.
Here’s a video for those who find it easier to see the process:
As you can see, with proper pressure the piece will snap cleanly off with a neat, straight edge.
Now that you have strips that are the proper depth, use the same brick-marking method to mark off the width for each section you want to cover. Do each section one-at-a-time.
Here’s the first baseplate flooring cut to size and inserted in place.
NOTE: They are not glued into place. I merely like to place them where they’ll go to help me keep track of what I have left to do, and to make it easy to know where they will go later.
Repeat this process until you have cut baseplates for every surface you’d like to cover. I did all floor surfaces, as well as the stairs. After this image was taken I also cut pieces for the windowsills and doorframes.
When all your pieces are cut, lightly roughen the backs of each with your sandpaper. You want to remove the plastic’s shine and roughen up the surface to help the glue better adhere. At this point you can plug in your glue gun so it can start warming up. I like to keep my glue gun on a silicone mat or scrap tin foil to protect my surface from glue drips.
Apply glue to the back of each piece and hold in place for a moment, pressing firmly. Once all the sections were glued I set it aside overnight so the glue could harden fully.
That’s all it takes! One baseplate was enough to cover all the surfaces shown plus have some extra left over.
The studs on the floors and stairs allow your Minifigs to be posed nearly anywhere, and the ones on the windowsills are really cute to put flowers and plants. Plus you can build off the plates, creating LEGO furniture for your playset.
I couldn’t resist staging a few characters for Jakob to find when he got home from school.
The “renovation” was a big hit, and while it only took a bit of time over one evening to do, it has held up since 2018 and is still going strong. I hope you enjoy this DIY and that it gives you inspiration on how to convert existing toys that might not be getting much love into ones that will be played with for many more years.
Happy International LEGO Day!
This post may contain affiliate links. This means I might make a small commission on purchases made through the links, at no cost to you.
Seventeen years ago, on September 7 2004, I started this blog. Yes, this creative passion project of mine is officially old enough to be in college and donate blood. It began on Blogger in the boom of knitting/craft blogs that fed blogrolls and Yahoo swaps and RAOK groups. We’ve seen the onset of Ravelry and Worldwide Knit In Public Day, and welcomed pattern sources like Knitty, Craftsy, Twist Collective, St Denis Yarns and others before having to say goodbye to some of them.
With YouTube, Instagram and TikTok flooding the internet with video-based creative content, running a blog feels almost antiquated. I’ve been asked by friends and family why I don’t switch to another format but the truth is… I don’t want to. I love video tutorials. I follow a TON of craft-content YouTubers, and have saved a huge amount of “try one day” crafty TikToks to my favorites list too, so it’s not a critique of the other formats. They absolutely have their place, especially for some techniques or tutorials that can really only best be shown in video. That said, I still think there’s a place for blogs and photo-based project/pattern support.
My “blogaversary” this year falls on the first day of Rosh Hashana, which is the Jewish New Year. I think that makes it perfect timing for a long-overdue blog restart. (I know, I know, I’ve said this before. Shhhh!) Coincidentally I was born on was erev (eve) Rosh Hashanna (we won’t say how long ago!) so Happy birthday to the blog, happy sort of birthday to me, and happy Jewish New Year!
To celebrate 17 years in the public craft domain I’ve scoured the site, my notes, folders, and metadata and picked 17 fun, interesting or long-forgotten items from my blogging history.
1-7
Numbers 1-7 are from the archives. These are posts even I forgot about! Some are helpful tips, some are free patterns/tutorials, and all are added to the How To section above.
Even when I don’t post regularly I get a steady stream of visitors (thanks!) and I’m always curious to see what search terms bring people my way. So number 8 is my top referrer keywords from back in my Blogger days. Funny enough it’s a tie between two completely random things that have almost nothing to do with my site: “cute japanese cartoons” & “hangman”. I’m guessing the former is related to the time I knit a Japanese boy band, but the latter? NO idea.
9
Number 9 is the results of my top search terms after migrating the blog to WordPress. Unfortunately/fortunately Google has been encrypting the vast majority of search terms since 2013 so 9771 of my results are “unknown”. Of the list that remains the top three terms are: “Toothless”, “pocketbook slippers”, and “pocket book slippers”, likely linking back to these two projects (Toothless, slippers). Wanna know the lowest search result that brought someone my way? “Long hair cut feet”. I wonder how disappointed the searcher was to find my post was literally about a long hair transformation??
10
Number 10 is a really cool fact- I’ve had visitors from 170 different countries! The majority are, unsurprisingly, from Canada and the United States, but rounding out the top 20 are the UK, Australia, Germany, Brazil, the Netherlands, Mexico, France, Iceland, Spain, Italy, the Philippines, Israel, New Zealand, Poland, South Africa, Argentina, Hungary and Denmark.
11-14
Numbers 11-14 are my the top 4 posts since switching to WordPress. I had a hunch what these were because they keep Pinterest flashing up on my phone. What I didn’t expect was that the top post would outrank second place by more than double!
I’ve spent the last few months poring over my unshared projects and planning out a blog schedule for the year. For number 15 I thought it would be fun to look through my folders and see just how old my oldest unshared project truly is. There was a lot to wade through but I found it! Coming in at over a decade old a crafty hack that you’ll see on the block next year dates all the way back to February 2010!
16
Looking through all those projects was a fun trip down a creative memory lane. As number 16 here’s a little teaser of a post I can’t wait to share in full…
Any guesses?
17
And finally, for making down this far: number 17 is a picture of me at the same age as this blog.
Whether you’ve been here since day 1 or day 6204, thanks for being a part of my creative adventures. I run this blog for me, but I love sharing it with you. ♥
*All search terms and other totals above were accurate as of the date of preparing this post.
All month Henri has been telling me he planned to wear his Creeper costume for Halloween this year. He’s brought it up many times and even pulled the head out of the dress-up bin in our den to try it on and be sure it still fit. And then this past Friday his class went to circus school for the day and he came home like this:
and then told me he wanted to be Pikachu for Halloween.
This guy:
Um. Okay. We had nothing at home I could use to make a physical costume, but I knew we’d be going to Walmart the next day so I told him if we found a set of face paint, I’d buy it and would paint his face like Pikachu.
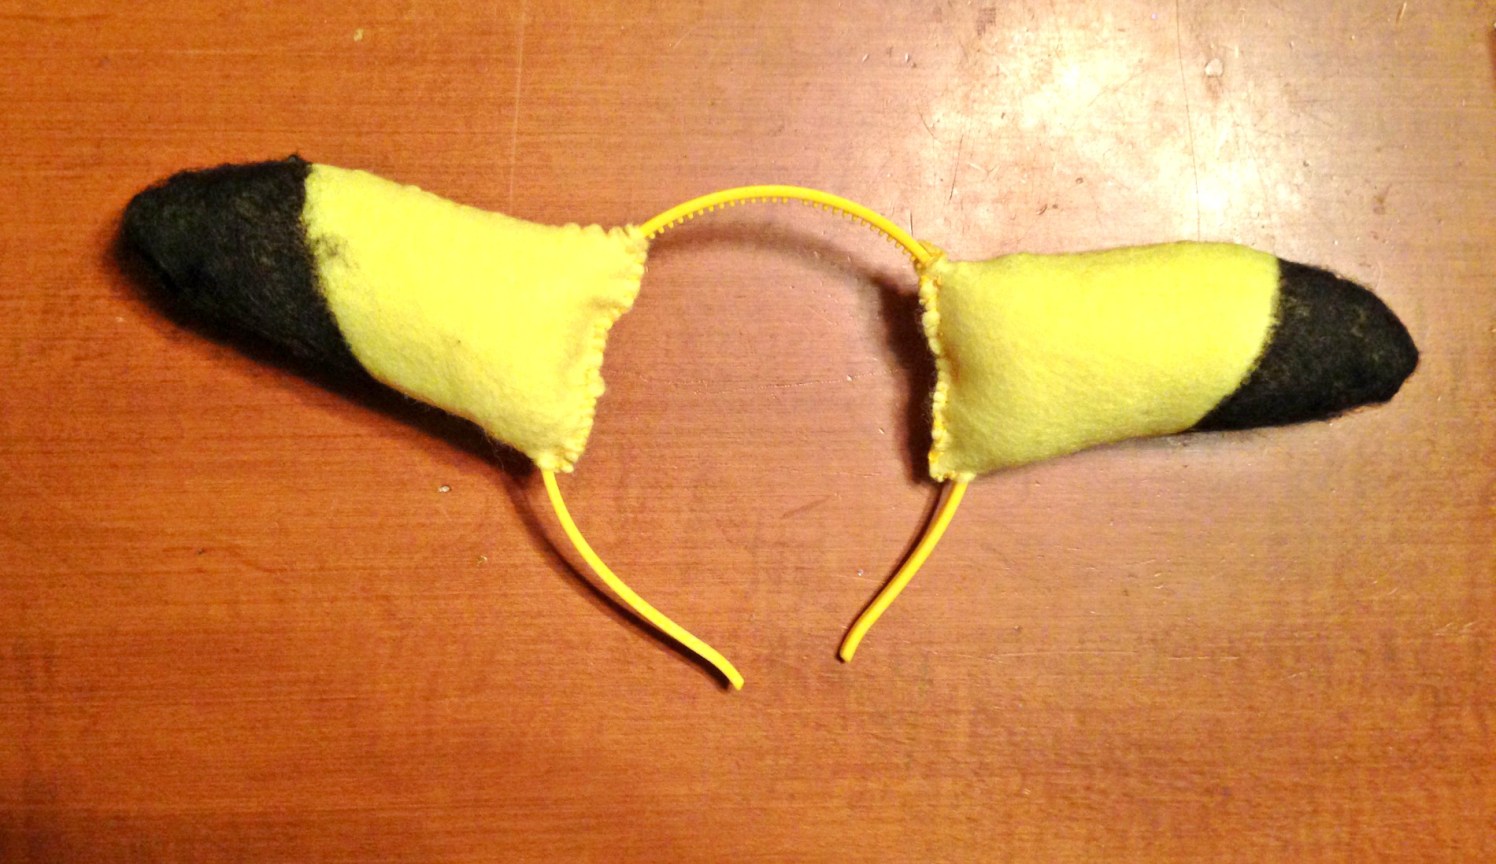
Saturday we were at Walmart and found some inexpensive face paint, but then he started complaining that he didn’t have Pikachu’s ears. I thought about it a little and told him we’d be going to the dollar store next; if he found a headband that fit him I’d buy some yellow felt and make him some ears. He found a girl’s one with a plastic bow attached, but it was yellow and fit him, and they had a pack of felt with yellow in it so we brought it home and I set it aside.
Yesterday I was at my parents’ house for dinner and Henri made a comment about being excited to wear his Pikachu costume to school the next day and I realized – oh crap, Halloween is tomorrow!
Ahem. Forgive me, my brain has been a little foggy lately.
We got the kids home and to bed and then I sat down and made Henri’s costume. It was quick, and it was easy, and it used either dollar store supplies or things you may already have on hand, so if you’re stuck for a last-minute costume, here’s how you can whip this up in plenty of time to go trick or treating tonight. Grab a friend who’s dressed like a Pokemon Trainer and you can be your very own live Pokemon Go team. 🙂
The first thing I did was carefully cut off the plastic flower on the head band, then I put it on Henri’s head and marked off where the ears should sit. As it happens we have a large Pikachu doll that was the right size to trace for the ear shape, but you can just freehand it.
After the ear shape was drawn, I drew a second line about a quarter inch outside it, for a seam allowance. Then I cut out the shape through all 4 layers of yellow felt.
The next step is to sew the ears together. I used yellow thread and a simple running stitch since the ears wouldn’t really be under any tension. I left the open end edges unsewn for about a quarter inch so I had enough fabric open to gather over the heandband. If you don’t want to sew, you could also glue the sides shut, but if you do make sure to put the ear side that you drew on on the inside to hide the pen markings.
Next I colored the ear tips with a black sharpie. The mess you see on the right is the transfer of ink from one side when I flipped it over to color the other side. I’m showing you this so you can be prepared and cover your work surface.
Once the tips were colored I stuffed each ear with some loose batting then sewed them over the sides of the headband where I’d previously marked. I used a blanket stitch to close the open edge but you can use any stitch you like, or glue them shut as well.
Here are the finished ears. They look silly off but are kind of cute on.
(Yes I had to try them).
While I was working on the ears I kept glancing over at the tail on our stuffed Pikachu and realized it wouldn’t take that much more effort to make one too, and surprise Henri.
To start I took some cardboard from our recycling bin and sandwiched it between two sheets of white cardstock with a regular glue stick. To make sure it dried well I placed it flat on the table and set some heavy books on it. Once the ears were done the cardboard had fully dried and I was able to trace Pikachu’s tail onto it.
Then I cut out the tail. I brainstormed a few different ways to attach it to Henri. I don’t like the idea of sending a 7yo to school with a safety pin on his butt, so I came up with a belt method. To make it work I carefully pried back about an inch of the tail section and folded the cardstock on each side outwards.
I used my Spectrum Noir markers to color the yellow of the tail and then colored the lower edge with a black Sharpie, completely overlooking the fact that it’s supposed to be brown, because I was working in dim lighting. D’oh. You can use any permanent markers, and do the proper colors. 🙂
To make the belt section, I first cut two holes into each side flap. I then threaded three strands of yellow yarn through each side, made a knot to secure them near the top, and then braided them into belts which I could then slide through the belt loops on his jeans and tie at the front. I made them longer than needed because I didn’t have his waist with me to try them on, and had planned to cut the excess this morning but we ended up just tucking the ends into his jeans.
And there you have it! Add in some yellow face paint, bright red cheek circles and a black triangular nose and poof-
You’ve got one happy Pikachu.
Have a happy and safe Halloween!
—-
Looking for more Halloween costume ideas? Check out here.
This post may contain affiliate links. This means I might make a small commission on purchases made through the links, at no cost to you.
When my boys were little, they wanted to be pirates. Henri especially – it was either a Viking or a pirate, depending on the day. Inspired by Jake & the Neverland Pirates they drew treasure maps with large scrawled Xs and hid their toys and told me it was their secret booty.
I wanted to give them some real toys to play with, but all the pirate-themed sets I could find weren’t safe for my rambunctious 3-year-old. I needed something childproof, and ideally inexpensive. Finally, after catching him trying to use his sippy cup as a spyglass just like the Backyardigans had on one of their pirate-themed adventures, I had an idea. One trip to the dollar store and some recycling-bin scrounging later, these fast, easy, and inexpensive toys were born.
I used items found locally, but the links above would work just as well 🙂
First up – the binoculars. (Btw…yes I know pirates didn’t use binoculars. But I couldn’t be certain my kids would use the spyglass as such, and not a makeshift sword, so I wanted to give them another sight-related option. Feel free to leave this one out, or use it for a different play idea. Perhaps an adventurer, bird-watcher or a fun game of I-spy?) For the binoculars you will need 2 clean toilet paper rolls, one cube from a dollar store packet of wooden craft shapes (about the size of a sugar cube), and a roll of electrical tape. At my dollar store this tape comes in a set of 4 colors all packaged together. You can use Washi or other decorative tapes on the outside, but I would not use them for the support structure. If you want to use them, apply them at the end, for decoration.
Step one is to cover the tubes in tape. I had done these first, and only later realized I should have covered the exposed edges FIRST, THEN wrapped the sides. When I get to the spyglass you’ll see I fixed that. If you want to be smarter than me, fold little pieces of tape over the exposed edges first. Be careful to not place the inside edge deeper than the width of the tape itself so you can cover it later. I have enough tubes for 3 sets shown because my neighbor’s young son was also really into pirates and I wanted to surprise him with a set of his own.
Step two is to cover 4 of the sides of the cube in tape. Place the tape on one edge of the cube and just keep wrapping around the other 3 sides until you reach the beginning again. You’ll be left with 2 exposed edges that are opposite of each other. Don’t worry about covering them, as they will be against the tube rolls and won’t show.
Step three is to connect the rolls to the cube. Place it a bit in from one edge so it looks like the bridge on a pair of binoculars. Be sure to place the raw, exposed edge against the tape so the covered sides are what is shown. Secure well with more tape.
This is what it looks like when you have three rolls done. I’d run out of tape, and had to go buy more to get more blue… d’oh.
This is when I covered the edges and realized I should have done it first. Oh well. If you’re like me, and goofed, place short strips around the exposed edges. This is for aesthetics as well as durability – no open edges means it’s less likely the toy will tear or fray after some hard toddler use. Be sure to not place the inside edge deeper than the width of the tape itself (see: left roll). Once you’ve covered the edge completely, cut a length of tape to fit on the INSIDE of the roll, and place it around, as close to the edge as possible, to cover and secure all the short edges (see: right roll).
Then you can use another length to go around the outside, covering those short pieces too. (This step is unnecessary if you covered the edges first).
Here’s a completed pair of binoculars. The new blue tape I’d bought was darker than the original, so it gave a nice finished look, almost like adjustable lenses. Even though they’re ‘only’ toilet paper rolls, the rubbery tape gives them a surprising amount of durability. Don’t get them wet, however, as the inside paper is still exposed.
Next I made the spyglasses out of paper towel rolls (though you can cut down wrapping paper tubes too). As you can see, for these I was smart enough to cover the ends FIRST, THEN wrapped the tubes. It’s easier to see on the white than the blue, but when you wrap, ease the tape slightly sideways so you can move along the tube/roll. Because the tapes are rubbery, they’ll stretch to where you want them to go, instead of tearing.
Finish covering the tubes by wrapping a piece of tape around the inside of the open edges to cover the short pieces. Because you did them first here, you won’t have to add more tape on the outside.
(This picture makes me laugh because it’s such a typical scene in my house – the dining room table covered with mom’s crafty projects, the kids’ placemats and a bag from the latest dollar store run for supplies. *chuckles* Plus seeing the boys’ bibs reminds me just how long ago I’d made these. Those are their “I ❤ Dic Ann’s” bibs. *grins*)
Once the spyglasses have been covered with tape, use glitter glue (from the dollar store) to paint on whatever decorative touches you’d like. I went with gold grip handles on mine. Set them aside to dry overnight, using drinking glasses or other supports to avoid messing up the wet glue.
For the treasure chests you’ll need some kind of chest-like container. I was lucky that my dollar store had these little wooden chests, but you can use any container or box you have on-hand, even an old Tupperware. I bought strips of glitter gem tape to decorate mine, but you can use sticker letters, nail gems, paint, or anything you like. (Oooh they would look INCREDIBLE painted to look like real, aged chests!)
Finally, you’ll need some pirate booty. I got these acrylic diamonds from my dollar store, as well as the strands of ‘Mardi Gras’ beads. I would have loved to include gold coins, but couldn’t find any on that visit. This set I found on Amazon has both gems and gold coins together, and would have been a great addition.
Decorate the chests. My kids picked their favorite colors of these jewel strips and I cut them to fit along the top edges, but you can do whatever you like to the outside of the chests.
To secure the booty inside, we’ll be using a high-tack craft glue. If you have older kids you can omit this step and leave the treasures removable, but since two of my recipients were 3 years old and some of the jeweled edges were sharp or choking hazards, I elected to make my treasures permanent. Plus this would ensure there was always booty ready to be discovered. Place a thick layer of glue in the bottom of the case, a little more than you think you’ll need because the wood absorbs some. Begin placing your chains and jewels down into the glue so that they look like they were piled in haphazardly. Use more glue as needed to secure any loose bits. Feel around to make sure any sharp edges are embedded in the glue vs sticking out. Every now and then hold up or shake the box to see if any bits move or shift, and keep adding glue into every nook and cranny. I went crazy on the glue because I know my toddler will find any loose edge to play with. Don’t worry about the white glue showing as it will dry clear. Finally, once you think your treasures are secure, set it aside to dry at least overnight. I dried mine overnight then held it upside down and shook it around, then added more glue to any of the bits that moved. One of the chests was going to be a gift for a toddler and I didn’t want to worry about any accidents on account of it.
Here’s how my collection turned out. They made fun play accessories for around the house and costume day at school, and were surprisingly long-lasting. The boys didn’t manage to get the gems and beads out of the boxes for at least a year and a half, and the chests, the spyglasses and even the binoculars are all still intact in our dress-up bin all these years later.
If you make any of these I hope they give your toddler/child just as much fun as my kids had with them. 🙂
This post may contain affiliate links. This means I might make a small commission on purchases made through the links, at no cost to you.