Another year means another roundup of costume-related projects and tutorials! With almost 3 weeks left until Halloween you’ll still have plenty of time to make any of the projects below.
Seventeen years ago, on September 7 2004, I started this blog. Yes, this creative passion project of mine is officially old enough to be in college and donate blood. It began on Blogger in the boom of knitting/craft blogs that fed blogrolls and Yahoo swaps and RAOK groups. We’ve seen the onset of Ravelry and Worldwide Knit In Public Day, and welcomed pattern sources like Knitty, Craftsy, Twist Collective, St Denis Yarns and others before having to say goodbye to some of them.
With YouTube, Instagram and TikTok flooding the internet with video-based creative content, running a blog feels almost antiquated. I’ve been asked by friends and family why I don’t switch to another format but the truth is… I don’t want to. I love video tutorials. I follow a TON of craft-content YouTubers, and have saved a huge amount of “try one day” crafty TikToks to my favorites list too, so it’s not a critique of the other formats. They absolutely have their place, especially for some techniques or tutorials that can really only best be shown in video. That said, I still think there’s a place for blogs and photo-based project/pattern support.
My “blogaversary” this year falls on the first day of Rosh Hashana, which is the Jewish New Year. I think that makes it perfect timing for a long-overdue blog restart. (I know, I know, I’ve said this before. Shhhh!) Coincidentally I was born on was erev (eve) Rosh Hashanna (we won’t say how long ago!) so Happy birthday to the blog, happy sort of birthday to me, and happy Jewish New Year!
To celebrate 17 years in the public craft domain I’ve scoured the site, my notes, folders, and metadata and picked 17 fun, interesting or long-forgotten items from my blogging history.
1-7
Numbers 1-7 are from the archives. These are posts even I forgot about! Some are helpful tips, some are free patterns/tutorials, and all are added to the How To section above.
Even when I don’t post regularly I get a steady stream of visitors (thanks!) and I’m always curious to see what search terms bring people my way. So number 8 is my top referrer keywords from back in my Blogger days. Funny enough it’s a tie between two completely random things that have almost nothing to do with my site: “cute japanese cartoons” & “hangman”. I’m guessing the former is related to the time I knit a Japanese boy band, but the latter? NO idea.
9
Number 9 is the results of my top search terms after migrating the blog to WordPress. Unfortunately/fortunately Google has been encrypting the vast majority of search terms since 2013 so 9771 of my results are “unknown”. Of the list that remains the top three terms are: “Toothless”, “pocketbook slippers”, and “pocket book slippers”, likely linking back to these two projects (Toothless, slippers). Wanna know the lowest search result that brought someone my way? “Long hair cut feet”. I wonder how disappointed the searcher was to find my post was literally about a long hair transformation??
10
Number 10 is a really cool fact- I’ve had visitors from 170 different countries! The majority are, unsurprisingly, from Canada and the United States, but rounding out the top 20 are the UK, Australia, Germany, Brazil, the Netherlands, Mexico, France, Iceland, Spain, Italy, the Philippines, Israel, New Zealand, Poland, South Africa, Argentina, Hungary and Denmark.
11-14
Numbers 11-14 are my the top 4 posts since switching to WordPress. I had a hunch what these were because they keep Pinterest flashing up on my phone. What I didn’t expect was that the top post would outrank second place by more than double!
I’ve spent the last few months poring over my unshared projects and planning out a blog schedule for the year. For number 15 I thought it would be fun to look through my folders and see just how old my oldest unshared project truly is. There was a lot to wade through but I found it! Coming in at over a decade old a crafty hack that you’ll see on the block next year dates all the way back to February 2010!
16
Looking through all those projects was a fun trip down a creative memory lane. As number 16 here’s a little teaser of a post I can’t wait to share in full…
Any guesses?
17
And finally, for making down this far: number 17 is a picture of me at the same age as this blog.
Whether you’ve been here since day 1 or day 6204, thanks for being a part of my creative adventures. I run this blog for me, but I love sharing it with you. ♥
*All search terms and other totals above were accurate as of the date of preparing this post.
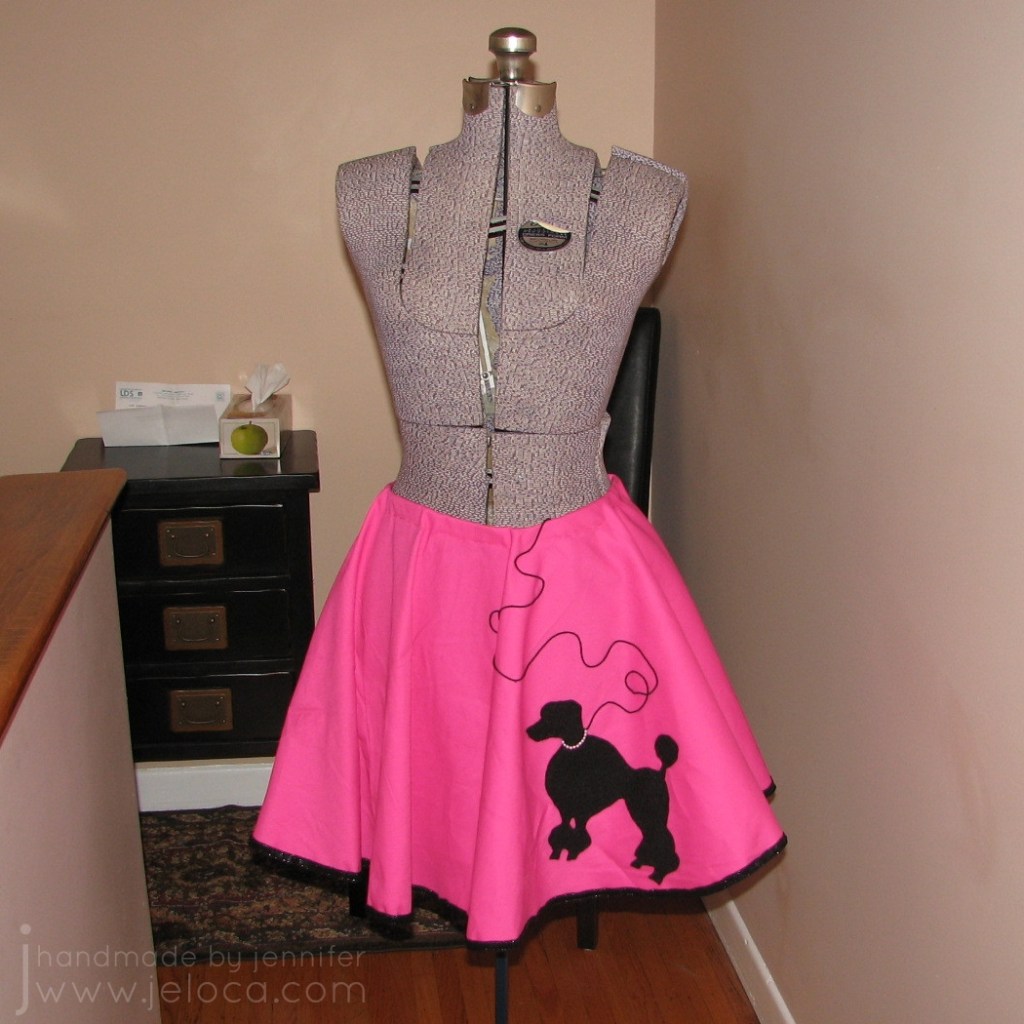
On Tuesday afternoon, my sister Laura called me up out of the blue and asked if I could make her a poodle skirt. No rush or anything…she only needed it by Thursday morning. Being the wonderful, amazing, loving, insane sister I am, I agreed.
The total cost for this project is minimal, about $8 CAD plus the cost of your fabric. I was lucky and happened to be at my cousin Robyn’s place Tuesday night, and she had a huge bolt of pink fabric and I bought some off of her (to be paid for as soon as she tells me how much she wants for it). Your costs may vary depending on the fabric you buy, but the other supplies were cheap. If you already have them at home, it will be even cheaper.
All sewing was done by hand, and the total time for this project was 3 hours.
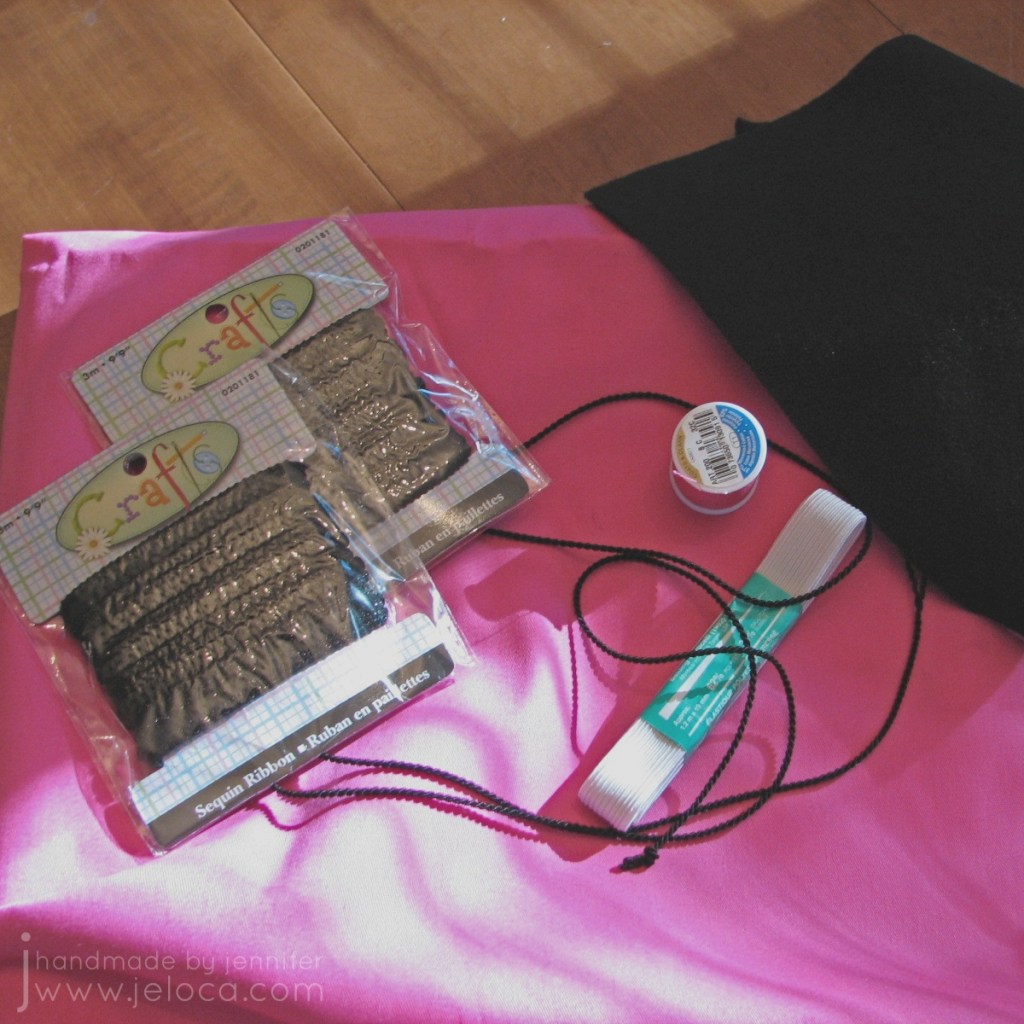
MATERIALS
1. Fabric. I like the pink poodle skirts with a black poodle, but you can choose whatever color pleases you. White with blue is a nice combination too. The width of your fabric (not the length) will be the diameter of your skirt. Cost- variable. (Here’s something similar on Amazon).
2. Felt. The felt is for the poodle. Choose a piece that is at least as big as the size of the poodle you would like to make. Cost for 1 piece of felt- $0.25 at Dollarama, or get bulk packs
3. Trim. This is for the edging. You can choose whatever kind of ribbon you want, but the wider it is, the easier it will be to apply (it will be used to hide the cut edges of the fabric). The one I chose is slightly elastic, with sequins. It was perfect. You need to buy enough to outline the outside edge of the skirt. To figure out how much ribbon you need, do this formula: measure the diameter of your skirt. Mine was 56″ wide. Multiply this number by pi, or 3.14. I get 175.84″. Convert this amount (inches) into meters or yards, depending on how your ribbon is sold, plus a little extra for insurance. I needed something like 5.6 yards, and my ribbon is sold in packs of 3 yards each, so I bought 2 packs. Cost for 2 packs of trim- $2.00 at Dollarama, or get by the spool
4. Elastic. This is for the waist band. I didn’t buy the really skinny kinds of elastic because I didn’t want the waist band to flip. Buy whatever kind you like, long enough to go around the intended wearer’s waist. Cost for the elastic- $1.99 at BouClair, or get by the spool
5. Thread. For sewing the waist band. I didn’t buy black because I already had, but I didn’t have a pink to match the fabric. Cost for the thread- $1.78 at BouClair or buy an assortment
6. Cord. This is for the leash. You can find all sorts of funky cords at fabric and notions stores. I chose a cord that is actually two thinner cords twisted around each other like a rope. Cost for the cord- $0.39 at BouClair or get a collection of colors
7. Beads (not shown). I chose to make a beaded collar for the poodle, because I have a stash of beads already. Cost for the beads- n/a but if you don’t have any on hand, you can get started with a beading kit
DIRECTIONS
Step 1- Get a Square: Lay out the fabric and find a square. To do this, fold one corner of the fabric up against the other side in a triangle. Cut away any excess fabric, and you will be left with a perfect square (as perfect as the fabric is, anyways).
Step 2- Find the Center: Fold the square back into a triangle, and in half (as a triangle) again. Find the corner where all the folds have in common. With your scissors, make a very small snip off the end of this corner. When you open up your square again there will be a hole in the center of it. This will help you make your circles centered.
Step 3- Trace your Circles: Using 2 pencils and some string, make a homemade compass to trace your circles on the fabric. There are plenty of tutorials on how to do this (here’s one) but long story short is to tie the string to the ends of both pencils, put one on the center hole, and, keeping the string taut, use the other to draw a big circle on your fabric. You want the length of the string to be the length of the radius for your skirt.
For example, my fabric square was 56″ across, so my skirt could have a radius of a maximum of 28″. You can check the length by swinging the pencil around and making sure it doesn’t go off the fabric anywhere. If it does, shorten the string a bit. Once your length is good, draw your outside edge circle. It helps to have someone help you by holding the center pencil in place while you draw.
Repeat this process for the waist band circle. The intended wearer has a 27″ waist (color me jealous) so I calculated what the diameter would be of a circle that was 28″ around (28/3.14=8.917). I added an inch because I wanted the waist band to have a gather. If I would have had wider fabric, I would have added more than an inch so it would hang in nice folds. Anyways, once I knew that my diameter was roughly 9″, I shortened the string to 4.5″ (the radius, or half of the diameter) and drew another circle in the center. At this stage my fabric looked like this:
Step 4- Cut it Out: Using your scissors, cut out both circles. You will be left with a doughnut of fabric.
Step 5- Sew on Trim: I used black sewing thread, and used a simple running stitch to attach the trim around the outside edge of the skirt. This worked great because I didn’t have to hem the edge. All I did was, working on an inch or so at a time, was line up the ribbon over the edge of the fabric with the ribbon centered over the edge. By centering it, even if the edge flipped up a little, no one would see the jagged cut edge of the pink fabric. Don’t worry if your edge is uneven, causing your ribbon to not make a perfect circle around the edge. No one will ever know. Mine wasn’t even at all, and you really can’t tell.
Step 6- The Waist Band: I cut and sewed my elastic into a 28″ circle. I folded the edge of the inner circle over it and sewed it down with the pink thread. I made perpendicular cuts into the fabric at 2″ intervals to give me some slack in turning the fabric back to sew it over the elastic. It gets tight at the end, but simply gather the fabric away from where you are sewing and it will work fine. Once the band is sewn in, adjust the gathers so they are even around the skirt.
Step 7- Poodle: Find a poodle shape that you like, and adjust it to the correct size on the computer. Print the poodle and cut it out. Use a contrasting color (I used an orange colored pencil) and trace the poodle onto your felt. Cut out the poodle from the felt. Find a nice area of the skirt to place the poodle. I used the black thread and a running stitch again to sew down the poodle. I didn’t pin or baste it down first, but you can if you are afraid it will move. I made sure to tuck the end of the cord under the neck first for where I wanted the leash to attach. This hides the end under the poodle.
Step 8- The Leash: There is no set pattern for how to place your leash. You can make it as curvy or as straight as you like. I laid out the cord in a pattern I found pleasing. I used tiny stitches to catch the cord at various spots to hold it in place.
Step 9-The Collar: The collar can be as fanciful as you like. There can be no collar. If you have glitter pens, you can use them for both the collar and the leash, if you like. I had spare beads so I made a beaded collar the width of the poodle’s neck, and sewed that in place.
Et voila- the finished skirt. You can jazz it up with some music notes if you like, and can wear a crinoline underneath it too. For the complete look, wear your poodle skirt with the following:
-white t-shirt, preferably with a collar -short white socks -tennis sneakers -black wide belt over the skirt and t-shirt -ponytail (you can use some of the excess skirt fabric for a hair bow) -light pink lipstick -pale or no eyeshadow option: tie a short scarf around your neck
Have fun rockin’ around the clock at your next sock hop!
This post may contain affiliate links. This means I might make a small commission on purchases made through the links, at no cost to you.


