There are 4 more sleeps until Halloween, and that’s plenty of time to make most of the costume and prop tutorials I’ve been sharing over the last few weeks. Today’s post is so quick and easy that you can make it in under an hour and probably have all the materials you need already!
Back in 2019 Henri couldn’t wear his actual Halloween costume to school because the Neighbor outfit (from Hello Neighbor) had a mask. It didn’t take any time to come up with a school-safe alternate idea for my little brunette food-machine – Jughead! Henri’s a voracious Archie comics reader and we joke that his favorite food is “food” so combining the two was a no-brainer.
The costume is really simple because you can wear any school-appropriate outfit that a teenager would wear. The main key to get the look is Juggie’s trademark hat, and then as a bonus you can include a burger to really sell it.
We went with the comics version, not the Cole Sprouse version from Riverdale, mostly because I didn’t feel like knitting the whoopie cap.
Step 1: A burger. If we’d had a toy or squishy burger I’d have used that, but since we didn’t I went with an easy thought bubble because Mr Jones is always daydreaming of his favorite food.
You can find free clipart online and prepare the image in any software that will allow you to manipulate images. My preference is Excel but you can also use Word, BeFunky, Photoshop, etc. You can also draw the image digitally in something like Procreate or draw it outright on cardstock and color it in with any art supplies you have already. You want to scale your final image to fit as large as possible on a single sheet of paper (if printing it) or can go as large as you like if drawing it on something larger like a Bristol board.
I’ve included the image I used here as a free download. For best results print directly onto cardstock or print onto computer paper and then glue it onto cardstock or cardboard. A panel from an old cereal box or shipping box from the recycling bin is perfect.
To finish the prop and protect it, laminate it with packing tape! I like to cut the image out first so when I laminate I can have a thin edge of tape just past the paper, so no moisture can get in. Cut out your image and lay strips of packing tape evenly across the front of the image, smoothing down any bubbles as you go. Next, flip the image over and repeat the process. Use your fingers to make sure the seal around the edges of the image is tight, and then trim away the excess tape. Finally, tape a stick of some kind to the back. I used a wooden chopstick from takeout sushi that I covered with white electrical tape.
Step 2: The whoopie cap. If there’s ANY key piece for a Jughead cosplay, it’s his unique hat. Cut a strip of cardboard the height of the cap, and long enough to go around the wearer’s head with about an inch of overlap. If you want to paint it gray do that now, though we didn’t bother. Cut the top into points and then try it on the wearer again to make sure it fits and that the points line up where the seam will be.
Draw or paint on the iconic buttons Juggie always has. I used permanent markers and White-Out. Finally, staple or tape the edges together.
That’s all there is to it! So quick and easy it can be ready for school the next day without keeping you up into the late hours of the night.
Another year means another roundup of costume-related projects and tutorials! With almost 3 weeks left until Halloween you’ll still have plenty of time to make any of the projects below.
Halloween is in two weeks, so you know what that means- time to start scrambling for (not quite) last-minute costume ideas! To help out, here are some costume-related projects from my archives that are short enough to get done before the 31st. 🙂
All month Henri has been telling me he planned to wear his Creeper costume for Halloween this year. He’s brought it up many times and even pulled the head out of the dress-up bin in our den to try it on and be sure it still fit. And then this past Friday his class went to circus school for the day and he came home like this:
and then told me he wanted to be Pikachu for Halloween.
This guy:
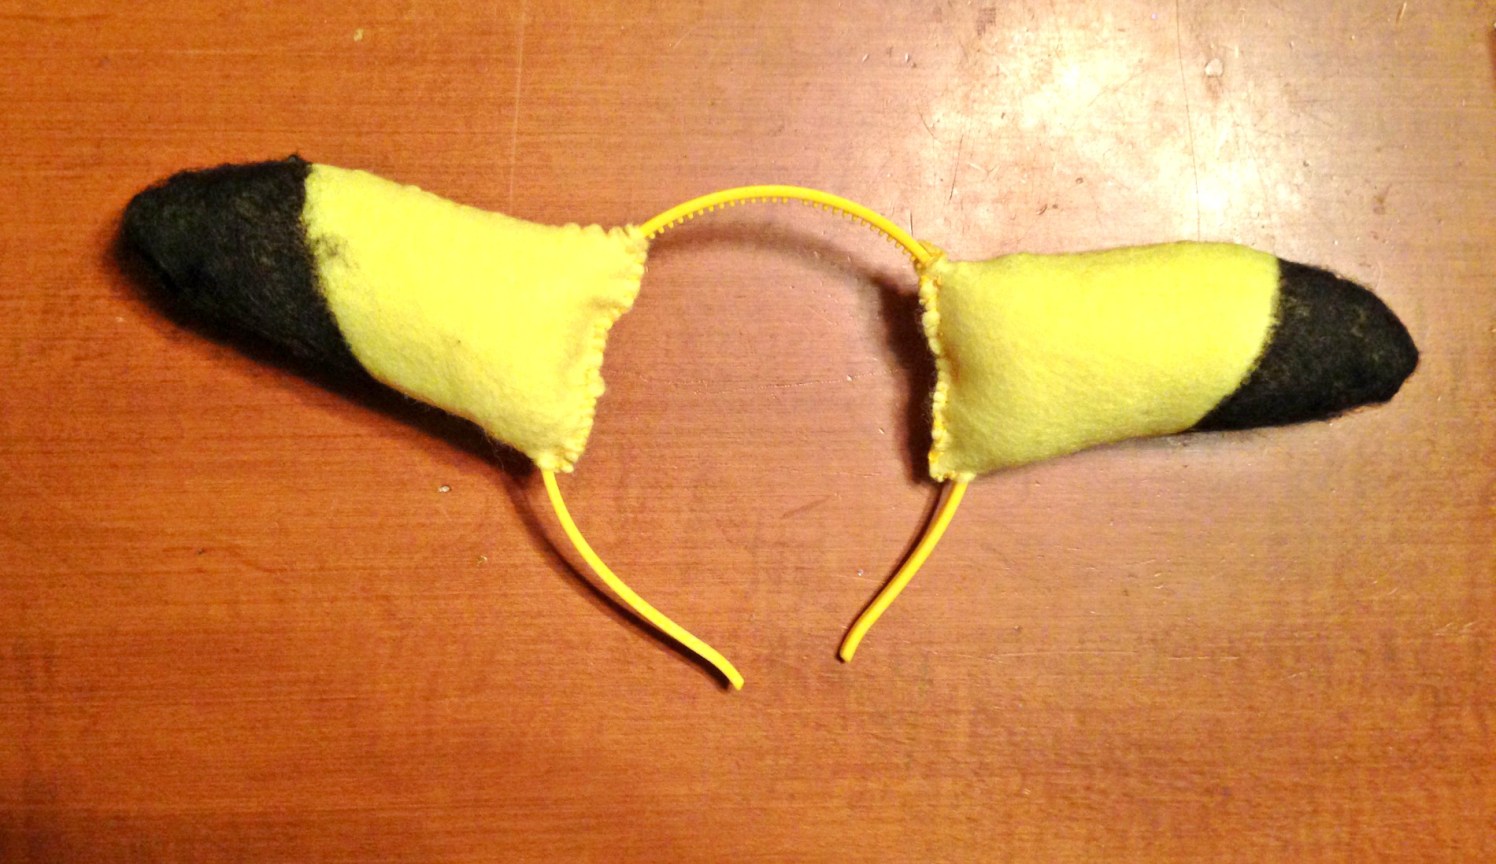
Um. Okay. We had nothing at home I could use to make a physical costume, but I knew we’d be going to Walmart the next day so I told him if we found a set of face paint, I’d buy it and would paint his face like Pikachu.
Saturday we were at Walmart and found some inexpensive face paint, but then he started complaining that he didn’t have Pikachu’s ears. I thought about it a little and told him we’d be going to the dollar store next; if he found a headband that fit him I’d buy some yellow felt and make him some ears. He found a girl’s one with a plastic bow attached, but it was yellow and fit him, and they had a pack of felt with yellow in it so we brought it home and I set it aside.
Yesterday I was at my parents’ house for dinner and Henri made a comment about being excited to wear his Pikachu costume to school the next day and I realized – oh crap, Halloween is tomorrow!
Ahem. Forgive me, my brain has been a little foggy lately.
We got the kids home and to bed and then I sat down and made Henri’s costume. It was quick, and it was easy, and it used either dollar store supplies or things you may already have on hand, so if you’re stuck for a last-minute costume, here’s how you can whip this up in plenty of time to go trick or treating tonight. Grab a friend who’s dressed like a Pokemon Trainer and you can be your very own live Pokemon Go team. 🙂
The first thing I did was carefully cut off the plastic flower on the head band, then I put it on Henri’s head and marked off where the ears should sit. As it happens we have a large Pikachu doll that was the right size to trace for the ear shape, but you can just freehand it.
After the ear shape was drawn, I drew a second line about a quarter inch outside it, for a seam allowance. Then I cut out the shape through all 4 layers of yellow felt.
The next step is to sew the ears together. I used yellow thread and a simple running stitch since the ears wouldn’t really be under any tension. I left the open end edges unsewn for about a quarter inch so I had enough fabric open to gather over the heandband. If you don’t want to sew, you could also glue the sides shut, but if you do make sure to put the ear side that you drew on on the inside to hide the pen markings.
Next I colored the ear tips with a black sharpie. The mess you see on the right is the transfer of ink from one side when I flipped it over to color the other side. I’m showing you this so you can be prepared and cover your work surface.
Once the tips were colored I stuffed each ear with some loose batting then sewed them over the sides of the headband where I’d previously marked. I used a blanket stitch to close the open edge but you can use any stitch you like, or glue them shut as well.
Here are the finished ears. They look silly off but are kind of cute on.
(Yes I had to try them).
While I was working on the ears I kept glancing over at the tail on our stuffed Pikachu and realized it wouldn’t take that much more effort to make one too, and surprise Henri.
To start I took some cardboard from our recycling bin and sandwiched it between two sheets of white cardstock with a regular glue stick. To make sure it dried well I placed it flat on the table and set some heavy books on it. Once the ears were done the cardboard had fully dried and I was able to trace Pikachu’s tail onto it.
Then I cut out the tail. I brainstormed a few different ways to attach it to Henri. I don’t like the idea of sending a 7yo to school with a safety pin on his butt, so I came up with a belt method. To make it work I carefully pried back about an inch of the tail section and folded the cardstock on each side outwards.
I used my Spectrum Noir markers to color the yellow of the tail and then colored the lower edge with a black Sharpie, completely overlooking the fact that it’s supposed to be brown, because I was working in dim lighting. D’oh. You can use any permanent markers, and do the proper colors. 🙂
To make the belt section, I first cut two holes into each side flap. I then threaded three strands of yellow yarn through each side, made a knot to secure them near the top, and then braided them into belts which I could then slide through the belt loops on his jeans and tie at the front. I made them longer than needed because I didn’t have his waist with me to try them on, and had planned to cut the excess this morning but we ended up just tucking the ends into his jeans.
And there you have it! Add in some yellow face paint, bright red cheek circles and a black triangular nose and poof-
You’ve got one happy Pikachu.
Have a happy and safe Halloween!
—-
Looking for more Halloween costume ideas? Check out here.
This post may contain affiliate links. This means I might make a small commission on purchases made through the links, at no cost to you.
Update: This tutorial is now also available as a downloadable PDF here. More details at bottom of this post.
It’s October! That means it’s okay to start talking about Halloween, right?
It is according to Henri- when I woke him up for school this morning he gazed up at me sleepily and grinned “It’s October 1st.” When I asked why that mattered he smiled even more adorably and said “Because now it’s almost Halloween.”
‘Almost’ is relative. (He clearly gets his awareness of time from his father). However his mention of it reminded me that I never showed last year’s costume. So. Now, with plenty of time to get ready for this year’s holiday… here’s how I made the boys Minecraft Steve and creeper heads, and how you can too!
The boys decided for Halloween they wanted to dress up as their favorite Minecraft characters. They do sell ready-made cardboard heads in stores but they are expensive, and there are a ton of tutorials online. I looked at a few, then worked things out with what I had on hand, and what I was able to find at the dollar store.
What you’ll need:
square boxes (large enough to fit over the wearer’s head)
1. Yannick came home with 2 small boxes he’d found somewhere. Grocery stores often have ones you can ask for, or as a last resort you can buy boxes.
2. I used two-sided tape to tape the outer flaps to the inner ones (not shown) so the inner flaps wouldn’t drop down onto the kids’ heads. Then I used masking tape to fully tape over the top seam, both to securely close one end of the box, and to make the seams less visible once they were painted.
3. I cut the lower flaps off the boxes and then used the same masking tape to cover the exposed edges. It would gave a cleaner look, vs the rough look of cut corrugated cardboard, plus was less likely to catch and tear, which could potentially pull off the paint.
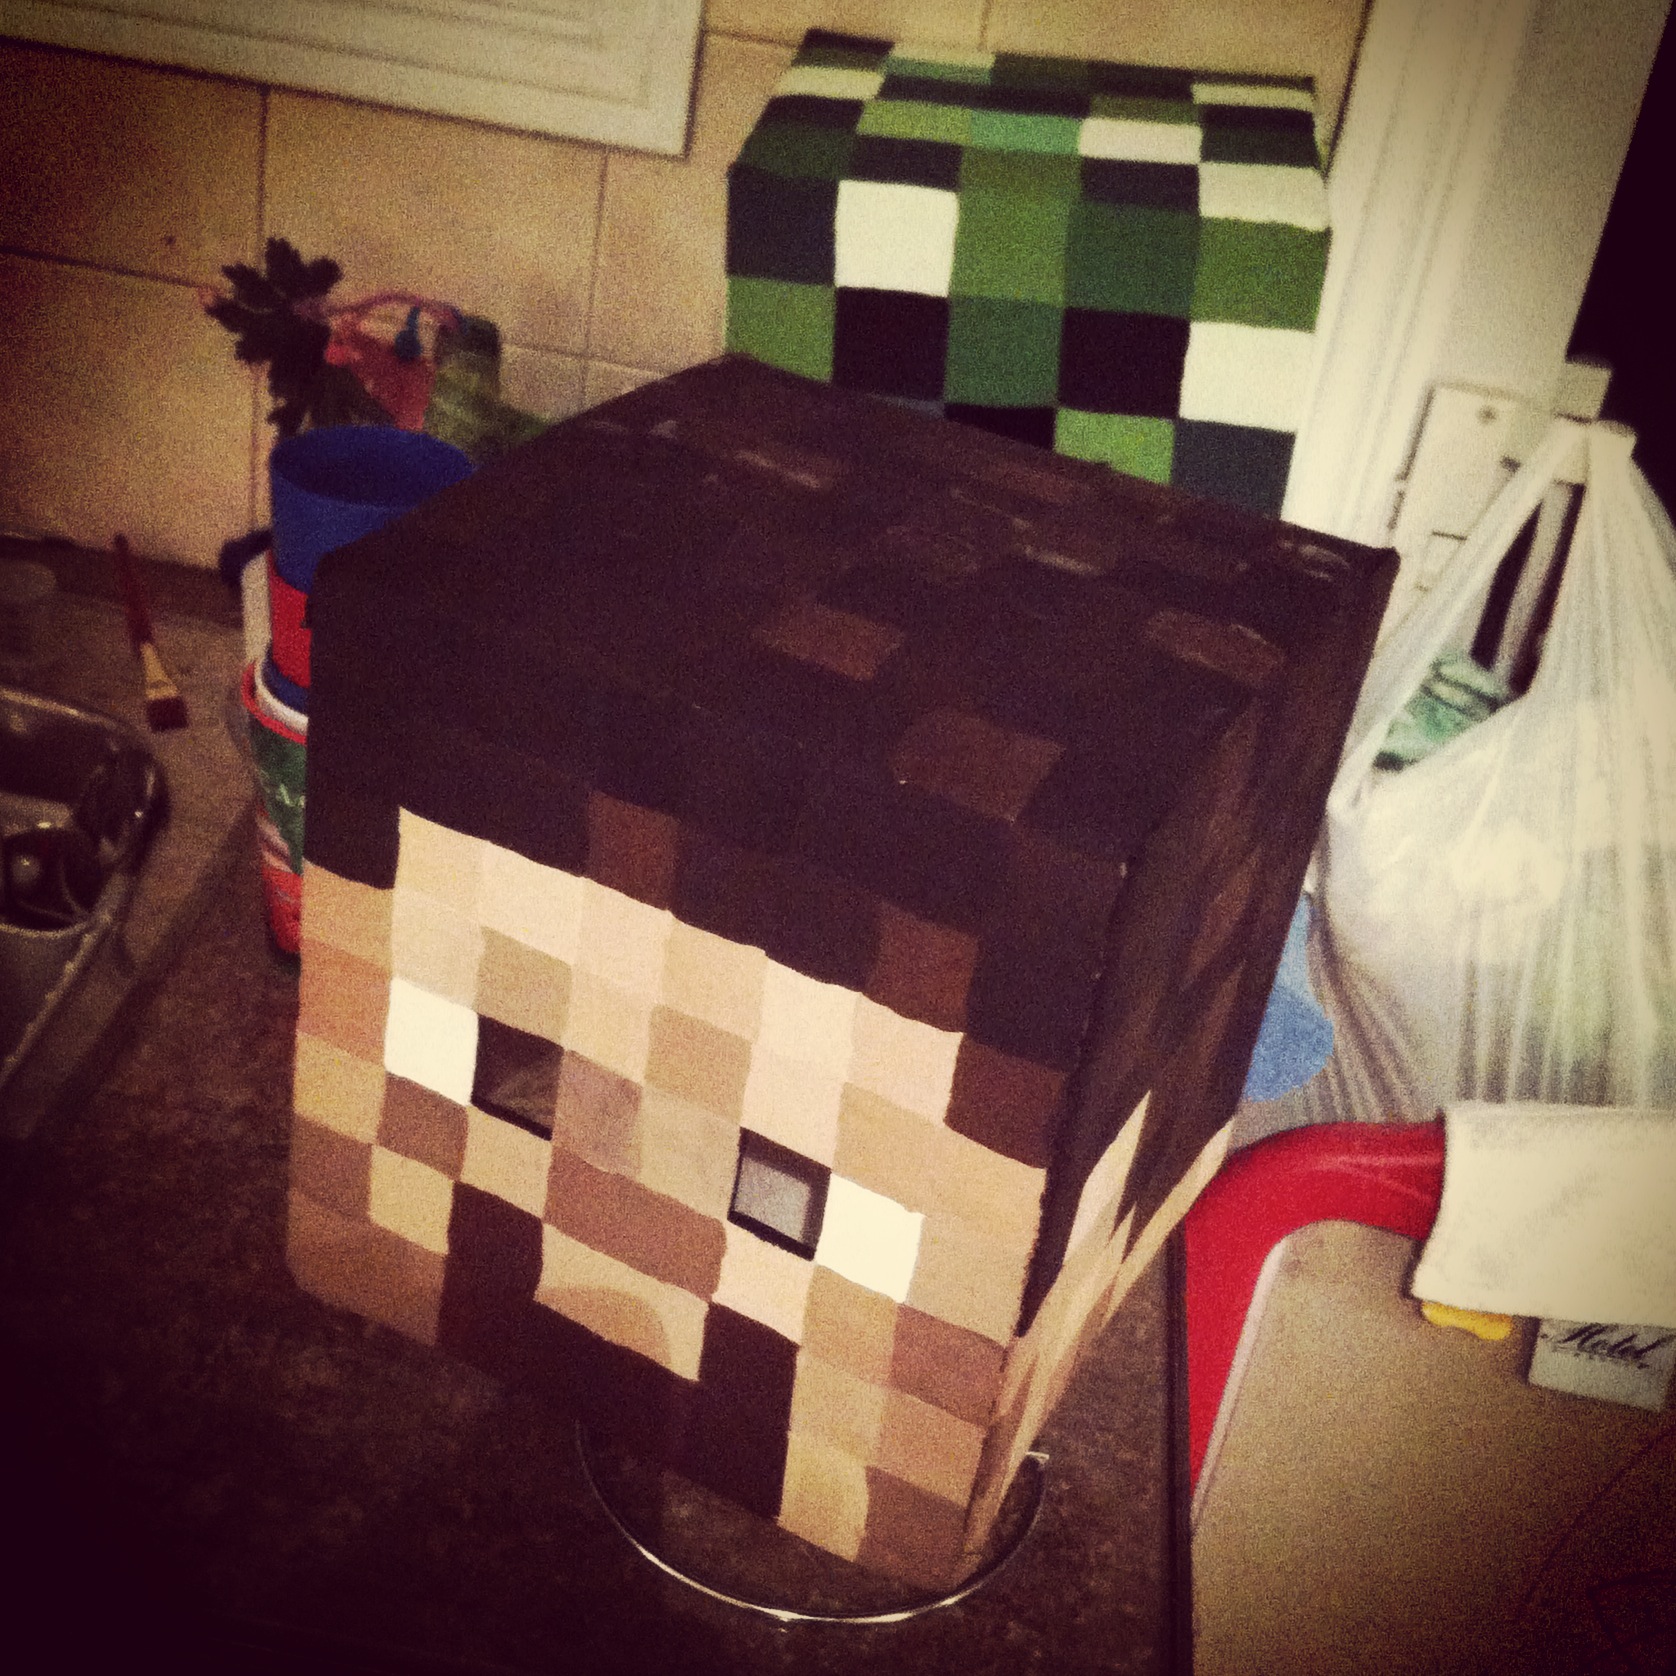
4. I divided the 4 sides and top into even grids. I looked at pictures of the characters online and mapped out roughly how many squares per color/face, and then used a ruler to divide the front (face side) into the grid. Once the face was set, I carried the markings around the sides of the boxes, and finally the top. Because the boxes are taller than wide, the top has fewer squares than the sides do. That’s not what the characters SHOULD look like, but I didn’t think the kids would mind.
5. Once the boxes were plotted I used a cutting blade (also from the dollar store) to slice out the eyehole sections. For Steve, only the dark pupil area was cut out. For the creeper it made more sense with where Henri’s face was to cut out the larger nose/mouth section. After removing those areas I covered the exposed edges with masking tape.
6. Finally it was time to start painting. The paints and brushes were from – you guessed it – the dollar store. The advantage with the Minecraft characters is that if you have to custom mix your paints to get the right colors, it doesn’t matter as much as it would in most projects if you have enough to complete your painting or if you need to mix more and risk not matching quite right. The goal is to have an assortment of shades, so blending colors works perfectly.
That said, if you prefer a more accurate version, I have compiled this tutorial into a downloadable PDF (linked at the bottom of the post) which includes full-color screen-accurate charts for both characters, including the hex codes for each color so you can color-match accurately.
Here’s the four sides of the painted creeper head. I set the boxes to dry on a paper towel roll to hold them off my counter until the lower edge was dry. (I held them up the same way while painting too).
Same goes for our buddy Steve here. I’d only had three shades of brown paint on-hand to work with, so I blended them together with some black for the hair, and then lightened with some white and a touch of red for the face. (I’d actually done the face/neck/ears first, so then I could re-use the same paints but darken them for the hair. That avoided any waste and kept the same unifying overall color tone for the head.)
I had them both on the counter while I cleaned up the dining room table of all my painting gear. Couldn’t resist this dramatic shot. Look out! He’s behind you!
7. The next step was to seal the heads with an aerosol can of clear sealant. I didn’t know what the weather would be like on Halloween and didn’t relish the idea of my hard work being ruined by a few drops of rain or thick snow settling on the kids’ heads. I moved the heads into the garage and set them on some newspaper to protect the floor as I sprayed, and did a few coats, allowing each one to dry for about 20 minutes in between. If you have a dry, open area outside or good, even weather you could do this next step outside, but here there was nowhere I could leave them unattended, so I had my garage door open the entire time I sprayed, and then left it about a foot open during the drying time between coats. Once they were properly sealed and dry to the touch I brought them inside and allowed them to dry for a full day before the final steps.
The last bit in getting the masks ready to wear was to block out the open areas. I bought a gauzy sheer black scarf (also at the dollar store!) and cut off squares large enough to fully cover the open areas.
8. Using the same double-sided tape I secured the black fabric down around the cut areas.
9. Finally I covered all the exposed edges of the cloth with masking tape, making it doubly secure and hiding any rough, cut edges so they wouldn’t catch or fray.
With that, the masks were complete! The black gauzy fabric looks opaque from the outside but from the inside it’s so sheer that it’s quite easy to see through it, making it perfect for this project.
From idea to finished product this project took about 4 days. Halloween was on a Friday last year and Yannick brought me home the boxes on Monday night. Tuesday I did everything up to/including painting. On Wednesday night I sprayed the clear coat, and then on Thursday night I stuck the black fabric in.
They were pretty darn excited!
Halloween night they posed for a quick picture inside…
…then it was time to go trick-or-treating.
Can’t you almost hear the tick…tick…tick…BOOM? The heads held up beautifully and the boys felt like mini celebrities as they walked down the street and people from all over, even in passing cars, yelled out “Steve!” and “Creeper!” and gave them high-fives. The heads have now become part of our dress-up box and are still in great condition, and they wore them for ‘Halloween Day’ at their camp this summer.
*Update in 2020: the heads are still going strong! The boys outgrew them of course, but we keep them as nerdy shelf displays and they look exactly the same as they did back when I made them.
I hope this post shows you how easy and fast it can be to make your own Minecraft Steve and Creeper heads!
You can adapt the tutorial to make any Minecraft mob, and I’ve got an assortment compiled for you here.
As mentioned above, if you’d like an easy-to-print-and-save PDF version of this tutorial, I have made it available on Etsy here. The 9-page PDF includes full instructions with additional details, clear photographs, as well as game-accurate full-color numbered charts for all 5 sides of both character’s heads along with their hex codes for perfect color matching.
Henri has wanted to be a viking for a while now. Not for Halloween, I mean he wants to be a viking in general. (It’s either viking or pirate, depending on the day).
Jakob got a light-up viking helmet at the How To Train Your Dragon Live Spectacular, and unfortunately when we brought Henri the next day they were all sold out of helmets, so he got a Toothless plushie instead. (Jakob, you’ll remember, got the one I knitted for his birthday…which I think I never blogged. Oops).
The kids share the helmet, and last month when it was time to pick costumes for ComicCon (which I think I also forgot to blog…crap) Henri REALLY wanted to wear the helmet and be a viking, but a quick search through the closets revealed that we didn’t have any viking clothes. All we had even close to a viking vest (like Hiccup wears in the movie) was a gray zippered sweatshirt-style vest. The kids dressed as Avengers instead but Henri had it stuck in his mind that that was his viking vest and he has worn it non-stop ever since. He’s worn it to school on back-to-back days, he’s worn it over his fall jacket, he wears it around the house, and on more times than I can count I check on him at night to find that he’s put it on over his pjs and worn it to sleep.
(Something about a 3 year old with tousled sleep hair in footie-pjs, amirite?)
He stops strangers to point out his “viking vest”, but commented a few weeks ago how “it’s not a REAL viking vest, Mommy, because it has a zipper and REAL viking vests have buttons”. Oh. Right. ‘Cus vikings didn’t have zippers.
I promised I’d make him a viking vest, and yesterday I did just that. I took photos throughout so if you want to make one, you can too.
–
I used some fur fabric my neighbor gave me, a sheet of newspaper, a sharpie & a pair of scissors, plus a sharp large-eyed needle, black acrylic yarn and white cotton yarn. The only other thing you need is a vest that fits your child (or you!).
I started by laying the vest on the paper and traced half of it. I used my finger to push down then traced to know where the neckline in the middle lined up.
I knew I wanted to add some length to the bottom and the armhole so it would fit him longer, as well as lowering the neckline to a v-neck, so I made those changes on my template.
I cut it out and checked against the vest.
I decided I wanted to make the neckline more sloped so marked off the changes on the pattern…
…then cut it out and checked again.
I was happy with the shape so I traced it onto my fabric. It’s hard to see, but I traced out the half-vest pattern, flipped it and traced again for the other front, then traced it back-to-back, flipped, for a piece to fit the back. The only thing I didn’t realize is that the fur fabric had a direction to it in which the fur laid flat. I tried to be as economical with the fabric as possible so didn’t have a choice, but you would probably rather make sure you’re lying the pieces with the fur running from up to down, like natural fur.
I cut the pieces out on the porch which was a great idea because there were bits of fur flying EVERYWHERE. I used my fingers to fluff up and pick at all the edges to make sure I’d gotten as many stray cut bits as possible before bringing it into the house.
I used a sharp needle and black chunky acrylic yarn from a big-box store to work a blanket stitch edging around each piece. I eyeballed it, placing the stitches roughly 0.5″ apart, and 0.5″ down into the fabric.
The simple edging really gave the pieces a finished, yet still “handmade by Vikings” look. (In this light you can see my fur runs in the opposite direction from how the vest will be worn, oops!)
This is the inside of the pieces, for those who like that kinda thing. 🙂
I used the same black yarn to seam the two sides and the shoulders together. I did something similar to mattress stitch, butting up the two pieces to be joined and catching a loop from each edge all the way along.
Almost done!
Inside shot.
For a finishing touch I used white worsted-weight cotton yarn (dishcloth cotton) and made large stitches across the joined pieces. This is purely decorative, but makes it look like Vikings really made it! according to my 3 and 5 year olds, and I trust them.
This is Henri’s final costume- a green long-sleeved tee, brown cords, his new vest and the light-up plastic helmet. I may make a Viking axe if I have time/remember by Halloween.
Henri the Brave!
Back view.
He thought he was dancing for me. I just wanted to see the decorative stitches.