Jakob turned 16 (!!) this week, so I thought it was high time to share another one of his past birthday cakes.
Made for his 9th birthday, this Pikachu fondant cake topper is a quick and easy DIY that you can copy on your own cakes, cupcakes or cookies.
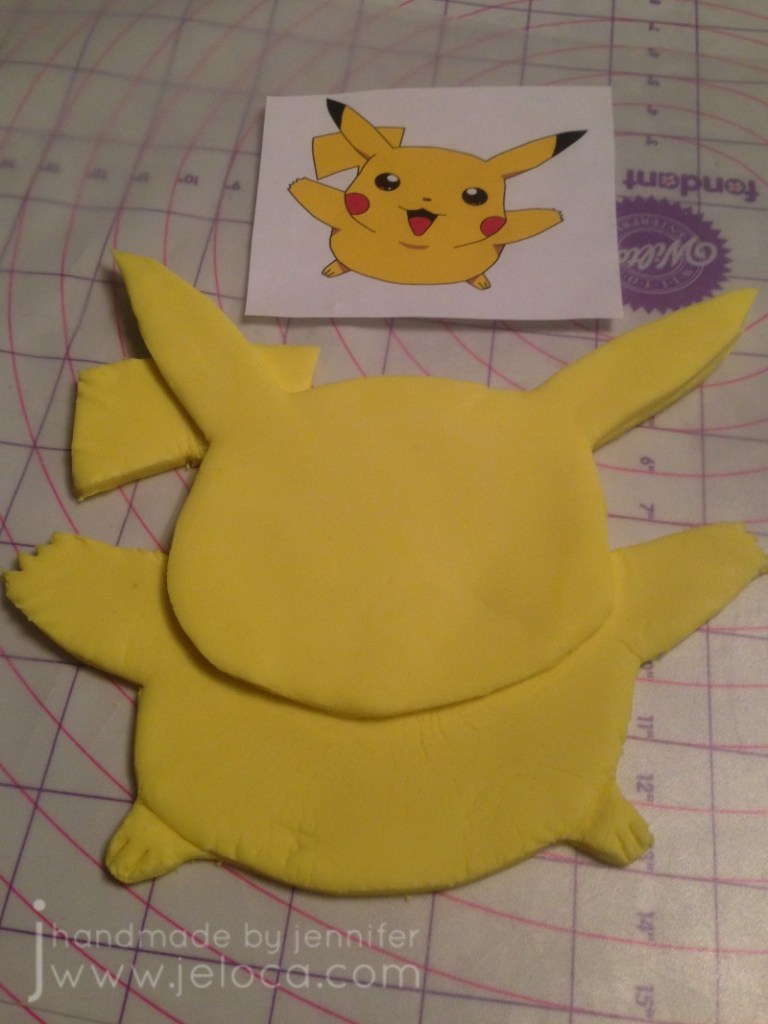
As always when making a topper for a known character I like to start with a template. After measuring my cake pan I resize an image of the character to fit and then print it out. For cartoon characters like Pikachu you can search for coloring pages to find black and white outline-based images.
For this cake I tinted some white fondant with yellow Americolor gel colors to get Pikachu’s signature yellow shade. I rolled it out on a silicon measuring mat using a fondant roller with the medium levels as I wanted to make sure I had enough fondant for a two-layer figure. I usually use the thickest level for fondant toppers and I would suggest that you prep enough fondant so you can do the same – as you’ve probably noticed above my topper was a little thin and wound up cracking.
I started by cutting out the base layer of the full image by tracing the entire template with a fondant cutter.
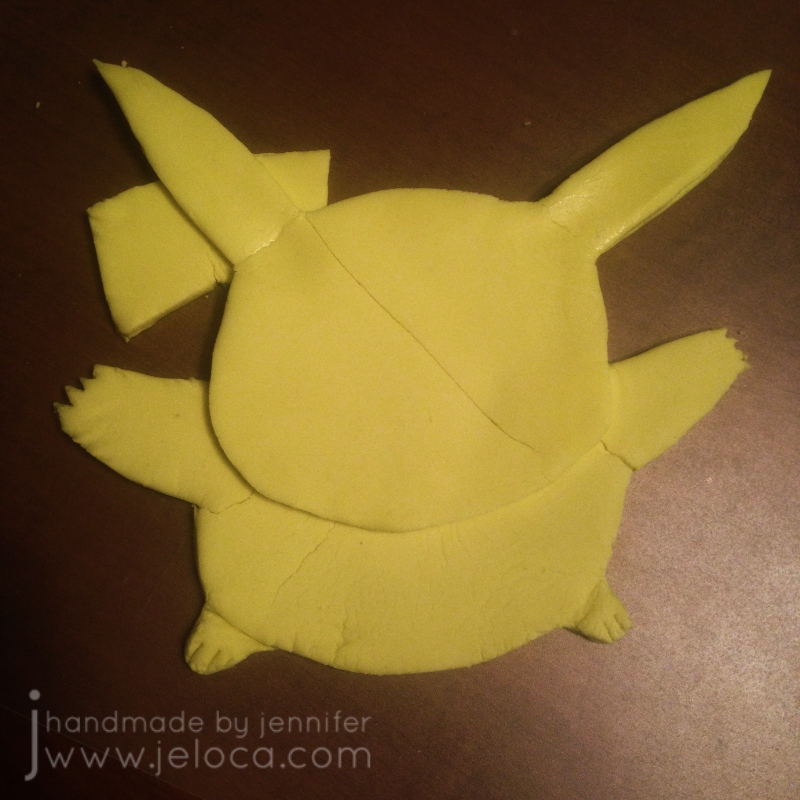
Then I cut out Pikachu’s head alone so I could layer the pieces similar to a 3D paper decoupage technique.
Carefully stack the head cut out on top of the fondant base using a little bit of water to secure it in place.
I always like to prepare my toppers in advance so they can dry out for a few days before I begin coloring/painting on them. As mentioned above I’d made Pikachu a bit too thin and he wound up cracking across his face and left arm.
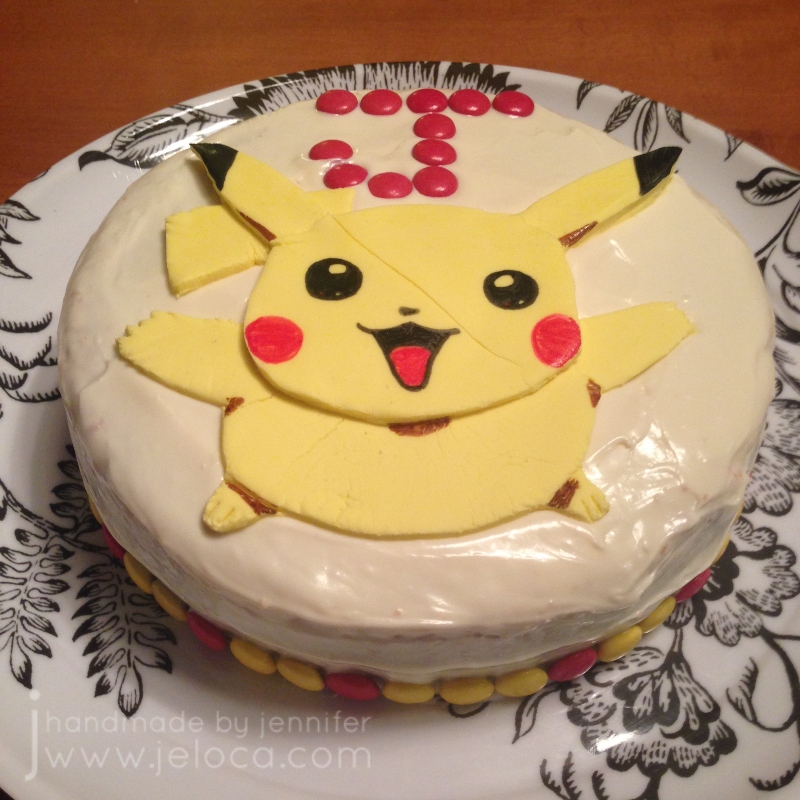
I used edible ink markers to draw on Pikachu’s face and details. I’m glad I had a reference image as I was about to color the tip of his tail black. Have you heard of that Mandela effect? It totally got me!
While the fondant was drying I baked a vanilla cake and prepped it as per my “how to bake a cake and prep it for decorating” post. To finish things off I decorated the base with yellow and red Smarties to match the colors of the topper.
This was a really quick and easy DIY that you can use to make your own Pikachu treats!
This post may contain affiliate links. This means I might make a small commission on purchases made through the links, at no cost to you.
A few years ago I made a dessert for my friend Debbie’s surprise Hallowe’en-themed party. I was given the option to make cookies or a cake, so I chose both! This Paint Nite-inspired cake and cookie set is easy to make and looks way harder than it is!
You can start with a store-bought cake, or bake one yourself and prepare it for decorating with a layer of fondant to look like a tablecloth. I used white so the rest would stand out but you could use any color.
To make the easels you will need narrow rectangular cookies. You can bake your own or go the faster route and buy them! I used Cadbury Fingers but any log or stick-shaped cookie will do. You will need candy melts as the “glue” to hold the easel together so just be sure to match the candy melt color to your chosen cookies. Note- you don’t want to use regular chocolate for this as it will soften at room temperature and your easels will fall apart.
First make an A shape with a cookie going horizontally across two others for the easel’s ledge, and then after the candy melts set up use a 4th cookie as the vertical support leg. It’s easy to work this assembly-line style, being sure to leave enough time for the chocolate to set hard. I found that I only had to hold them in place for about a minute before they were able to stand on their own.
Of course any Paint Nite needs something to paint on! You can bake cookies yourself or use any rectangular cookie that has at least one flat side, like Biscoff, butter biscuits or shortbreads.
To make edible “paint” mix icing sugar with small amounts of water until you get a loose icing consistency. Paint Nite projects often have a gradient background with a silhouette design on top, so I used that style for my mini paintings. I chose Fall colors with pumpkin orange and white for a sunset and as this was a Hallowe’en party I added a black cat on a fence silhouette and full moon. This also worked well with the Paint Nite habit of using few colors in beginner paintings.
I painted the cookies much as you would at an actual Paint Nite – first painting the gradient background, then once dry adding the top layer.
The fun part was making each one just slightly different, while still being the same image – exactly how the results at a true Paint Nite would be. Everyone follows the same process and comes out with mostly the same image yet they’re all slightly unique to the individual artists.
I also used a few extra cookies to write a message for the birthday girl on her big day.
Of course, every Paint Nite requires supplies, so we need to add the solo cups-as-water cups, Styrofoam plate “palettes” and big orange brushes.
I made all the accessories out of scraps of fondant. For the solo cups simply layer a thin strip of white on top of the red before cutting out a strip to roll into a cup shape. The brushes are narrow rolls of fondant with the brush end dipped into the icing “paint”. The plates are small discs of white fondant smeared with dollops of leftover paint from painting the cookies. To make the “dirty” paint water I swirled a bit of each paint icing into clear piping gel.
Staging the table was super fun! Unlike a real Paint Nite where I try to be as neat as possible, here I got to be messy! I “glued” the fondant accessories in place with a small dab of water and then added drips and splatters of the paint to really sell the “end of the night of crafting” look.
I was so thrilled with how the final cake came out! It was one of the most fun cakes to make and allows for a ton of personalization. All the components can be homemade or store-bought which means this design can work with all budgets, and you can tailor the paintings to match any theme.
This post may contain affiliate links. This means I might make a small commission on purchases made through the links, at no cost to you.
The last day of February is International Repetitive Strain Injury Awareness Day. Whether you knit, crochet, color, sew, cross stitch, embroider, or enjoy other crafty pastimes like diamond painting or LEGO building, you’ve likely done repetitive motions while in pursuit of your hobbies. I reached out to Alyssa Cape from Alyssa Massage for tips, tricks and helpful hints on ways to keep our mobility and flexibility healthy so we can continue to craft for many years to come.
Me: Hi Alyssa! Crafters (like myself) have a tendency to sit for long periods of time. We can be hunched over our desks during activities like coloring, sewing or diamond painting, or spend many hours cross-legged on the couch while knitting, crocheting or doing embroidery. Do you have any posture tips for long crafting sessions?
Alyssa: I’d put a small step stool or shoe box under the feet so the knees are slightly higher than the hips. This helps the small curve in your back from pinching and then your neck automatically goes forward. This way when your feet are slightly elevated, the pelvis is tilted back a bit so you can rest your back on lumbar support or pillow and your muscles relax.
I wouldn’t suggest sitting cross legged, however if you do, switch positions often. Get up to drink some water and to walk around to give your body a break.
There are multiple videos showing how to be comfortable while doing crafts like knitting or crocheting, like this one:
Me: Crafters can be prone to sore wrists, hands and fingers. Sometimes this pain can shoot up into the arm. Should we be doing exercises to keep our hands, wrists or arms in shape?
Alyssa: Here are 2 links, one shows 3 stretches for carpal tunnel and the other is self hand massaging. I do these myself as well! They can also be used for computer/ desk work.
I would recommend not to over-stretch as you can pull on the nerves. Nerves are like dental floss, they pass through the joints. They don’t stretch like muscle, tendons and ligaments. So if you feel tingling or burning in your fingers, stop!
Me: How hard should we be stretching? How often should we do them?
Alyssa: Do the stretches gently so you feel a slight stretch/ resistance and then stop. You’ll see mobility, flexibility and strength will come! Seeing a physiotherapist is also a good idea as they can provide you with multiple exercises and stretches and suggest the frequency of both as it’s different for each person.
Me: What should we do when in pain? Is that the time to stretch?
Alyssa: I don’t recommend when in pain to stretch and self massage. Rest hands as much as possible. There are thumb/ wrist/ arm braces that can be worn while crafting and at night as well to help stabilize the wrist during sleep.
Me: Do you recommend ice or heat?
Alyssa: You can alternate heat and cold compresses 15 minutes each. Heat allows for more blood flow which speeds up healing and cold reduces blood flow for swelling and inflammation.
Me: Any other tips?
Alyssa: A warm bath with 2 cups of Epsom salts really helps de-stress the muscles and then you can apply cold on the specific location. Drinking lots of water also helps with muscle soreness and tension!
That said- always consult with your doctor before doing any stretches or exercises to make sure there isn’t an underlying issue!!
About Alyssa:
Alyssa has been a registered & certified Massotherapist for over 12 years. She is professional, dynamic and intuitive in her practices and completely dedicated to your overall wellness. You can enjoy the benefits of preventative and ongoing massage therapy for your health and well-being by visiting her here.
Disclaimer: I reached out to Alyssa on my own and asked for her professional advice to share here today. There was no compensation given on either part in exchange.
It’s International LEGO Day today, so to celebrate here’s a really easy DIY you can do to turn any dollhouse/playset with flat surfaces into a LEGO playset!
That’s right – with just a few simple household tools we’re going to turn this:
into this:
What you’ll need:
dollhouse/playset with flat surfaces
I used this unfinished ArtMinds Wood Castle Dollhouse from Michael’s, (US / Can)
damp sponge or paper towels (to wipe off sanding dust)
For this project I used this ArtMinds Wood Castle (linked above).
Jakob had received this castle as a Hanukkah gift from my parents and I wanted to surprise him by turning it into a LEGO playset since he never really played with action figures but was completely obsessed with LEGO.
If working with an unfinished product like this castle, you’ll want to sand it before you begin. Some of the edges are unfinished or rough and could cause splinters. The wood is soft, though, so it’s easy work to bring it outside and give the exposed edges and surfaces a quick sanding. This will also help make sure your surfaces are flat.
If using something like a plastic play house, you will want to sand any of the surfaces where you plan to attach LEGO plates to help ensure they stick well.
After sanding, wipe all surfaces with a damp sponge or paper towel. You want to remove the fine sanding dust so it doesn’t interfere with your glue later.
We’ll be using a craft knife to score the LEGO baseplate and LEGO bricks to give us a good edge to cut and snap from.
In my case, every surface in the castle had the same depth, so I wanted to start by cutting my baseplate into strips that were the proper depth. Then later I could cut them into individual pieces for each section.
Set the corner of your baseplate into the corner of one of your sections and use a separate LEGO brick to mark the edge line. We don’t want to cut the studs in half so if necessary err for pieces that are slightly too short instead of ones that would stick out beyond the edge of your playset.
Once you know your depth, use additional LEGO bricks to continue the line all the way from edge to edge. Do not use flat bricks for this as the thickness of the standard bricks will help keep your blade from slipping. Be sure to press the bricks securely as any gaps where they’re not properly seated onto the plate could allow your blade to catch.
NOTE: use a cutting mat or cut on a protective surface. I use my table as a craft table so I cut directly on it. Don’t be like me!
Run the blade of your craft knife down the edge of bricks once or twice, then snap your baseplate away from the cut edge. If you use enough pressure when scoring it should snap cleanly.
If the baseplate doesn’t snap clean off, you can slide your craft knife down the cut edge and the two pieces will separate easily.
Here’s a video for those who find it easier to see the process:
As you can see, with proper pressure the piece will snap cleanly off with a neat, straight edge.
Now that you have strips that are the proper depth, use the same brick-marking method to mark off the width for each section you want to cover. Do each section one-at-a-time.
Here’s the first baseplate flooring cut to size and inserted in place.
NOTE: They are not glued into place. I merely like to place them where they’ll go to help me keep track of what I have left to do, and to make it easy to know where they will go later.
Repeat this process until you have cut baseplates for every surface you’d like to cover. I did all floor surfaces, as well as the stairs. After this image was taken I also cut pieces for the windowsills and doorframes.
When all your pieces are cut, lightly roughen the backs of each with your sandpaper. You want to remove the plastic’s shine and roughen up the surface to help the glue better adhere. At this point you can plug in your glue gun so it can start warming up. I like to keep my glue gun on a silicone mat or scrap tin foil to protect my surface from glue drips.
Apply glue to the back of each piece and hold in place for a moment, pressing firmly. Once all the sections were glued I set it aside overnight so the glue could harden fully.
That’s all it takes! One baseplate was enough to cover all the surfaces shown plus have some extra left over.
The studs on the floors and stairs allow your Minifigs to be posed nearly anywhere, and the ones on the windowsills are really cute to put flowers and plants. Plus you can build off the plates, creating LEGO furniture for your playset.
I couldn’t resist staging a few characters for Jakob to find when he got home from school.
The “renovation” was a big hit, and while it only took a bit of time over one evening to do, it has held up since 2018 and is still going strong. I hope you enjoy this DIY and that it gives you inspiration on how to convert existing toys that might not be getting much love into ones that will be played with for many more years.
Happy International LEGO Day!
This post may contain affiliate links. This means I might make a small commission on purchases made through the links, at no cost to you.
It’s been almost 2 years since my Order of the Phoenix blanket was published in the Knitting Magic book.
There it is on the cover!
The Black family’s ancestral home played a huge role in the source book (Harry Potter and the Order of the Phoneix) so in honor of today being Sirius Black’s birthday I’m going to answer the number one question I get asked about my pattern: how to enlarge the charts.
In case you missed my previous post about it, The Order of the Phoenix blanket is a circular throw that features motifs representing Harry’s scar as well as phoenix feathers and flames to represent the phoenix’ rebirth. A primary feature of the blanket is the text “The Order of the Phoenix” that goes around the center.
As the book is under copyright I’m not allowed to share a digital version of the charts when people request it, nor use that as my example here in this post. Instead I’m going to use my Lullaby baby blanket pattern for reference as they are both similar in having a charted band of words going around the center.
Lullaby was originally published in the Spring/Summer 2010 issue of the now-defunct St-Denis magazine, that supported Veronik Avery’s yarn line of the same name. It has a deep border of garter feather-and-fan lace and features the words HUSH * BABY * SLEEP * BABY * around the center.
Using my hand for scale you can see that the charts are of relatively similar size between the two pattern books:
Obviously I had to blur out the charts themselves but you can still see the suggestion of where the words are and so the instructions I give for Lullaby will work just as well on Phoenix or any other chart by any designer.
There are a few different ways you can enlarge your patterns, depending on if you start with a physical or digital pattern, and on the result you want (physical or digital enlargement).
How to enlarge a PHYSICAL pattern (book, magazine or printout)
There are 2 options for enlarging a physical pattern.
Option 1: home scanner/copier/printer
Most home printers these days have a built-in copy/scan feature. If you scroll through the copy settings you can find an “enlarge” option that will allow you to increase the size of the chart in the printout.
You can also use the printer’s scan function to get a digital copy of your pattern that you can enlarge with any of the following digital methods.
Option 2: public photocopy center/machine
You can find both self-service and with-service public photocopiers at commercial copy centers like Staples. You can also often find public photocopiers at your local pharmacy or library.
This is a direct photocopy from my pattern. My hand is provided for scale.
This is an enlargement of the same page, made using the photocopier’s built-in enlargement option. Most photocopiers can handle legal and oversized papers. In this case, I used the 129% option to print on the largest size paper available (11″x17″).
You can see the difference between the two sizes.
The HUSH chart, for example, is 1.75″ high by 6″ wide in the original (and copy), and 2.25″ high by 8″ wide in the enlargement. These differences might make printing as-is enough of an enlargement for you, or you can take the enlargement and use it as your starting image to photocopy again even larger…repeating the process as-needed until the resulting chart is of a size for you to work with comfortably.
How to enlarge a DIGITAL pattern
There are many options for enlarging a physical pattern. I will be demoing these methods using my computer and/or an iPad. It is possible to do them all on a smart phone as well but since the point is to enlarge a chart to make it more convenient to work from, I’m going to assume you’re going to be working from your tablet or computer/laptop and not the smaller screen of a phone.
Option 1: from a physical file
Take a picture of your chart with a smart device and then email it to yourself so you have a digital file to work with.
Alternately you can upload it directly to an accessible storage media like Dropbox or Google Drive, or upload the image directly into a data-processing app like Microsoft Word, Excel or OneNote, Google Docs or Sheets, or your favorite annotation app/software. From there you can proceed to the enlargement instructions below.
Option 1b: from a digital file
You would use this option if you already have your pattern in a digital format. In this case I’ll be using the sale pattern version of Lullabye.
Use your favorite screenshot app to take a picture of the chart on your screen. I like Microsoft’s built-in “Snipping Tool” but you can use Snagit or any others including the “print screen” button yon your keyboard. As the “print screen” key method has a few extra steps, both ways are shown below. TIP: enlarge the chart on-screen before taking the screenshot so you are already starting with a larger version.
A) Using Snipping Tool (or other screen-grab software)
Open your pattern document (ie: Word doc, Excel file or PDF) on screen. Make sure the chart (or section of the chart you wish to capture) is in full view, then open your screen-grab software.
Click “new” to start a new screenshot. The software will freeze the entire screen as it currently looks.
As it says on the prompt – drag the cursor around the area you want to capture. Use your mouse to drag a square or rectangle from one corner to the opposite diagonal, making sure your desired image is fully inside your boundaries.
You can see the red boundaries on the image above. I started my capture at the upper left corner and dragged down to the lower right (where the cross is). Everything inside the red rectangle will be part of my screen-grab. I made sure to include my chart’s legend as well as the instructions on the bottom.
After you release the mouse after dragging, your cropped result will appear within the software’s window. If you don’t like the results, or are missing part of your chart, simply click “new” to start over and drag again.
Once you have the results you want, click “file” then “save as” and save the image to your computer. I keep a folder for every project I work on so I would save it in there for easy reference but you can save it to your downloads or anywhere that you would like.
B) Using your keyboard’s “print screen” key
Open your pattern document (ie: Word doc, Excel file or PDF) on screen. Make sure the chart (or section of the chart you wish to capture) is in full view, then tap the “print screen” button on your keyboard. This will take a screenshot of your full screen – everything showing on your monitor.
Open any software that will allow you to paste and then crop an image. I’ve used Word, Excel and Paint regularly with great results, and many other programs will work as well. My example is using Word.
Place your cursor anywhere on the page and use ctrl-v or click file→paste to paste your screenshot into the document.
You can see the image of my screen is now pasted into the Word document – background, taskbar, clock and all.
Click on the image within the document itself.
This will bring up a “Picture Format” tab at the top of your Word window. Click on it.
If you look over to the far right of the ribbon bar at the top, you will see a “crop” option. Click on it and you will see black crop bars appear on the border of your image. We will use those to remove all the excess parts of the image, leaving only the chart you want to work with.
Drag the dark black crop marks to surround only the part of the image that has your chart. As you drag you will see the edges of your image get shaded. Those are the parts that will be cropped out of the final image.
Keep moving the borders from the top, sides or corners until your chart is isolated. Then click anywhere outside of the image.
The shaded areas will disappear and you will be left with your desired chart.
Right-click anywhere within the image and choose “Save as Picture”. Now you can save your cropped chart image anywhere on your computer for use in the following enlargement step. In this example I kept all 3 words and the legend as one image, but if you want to enlarge each word even bigger you can repeat this process 3 times to crop out each individual word and save it as its own chart image.
Enlargement Instructions:
Once you have your chart in digital format enlarging it is really easy!
Option 1: Paint, Befunky or other photo-editing software
Insert or open your saved chart image into your favorite photo editing software and resize it to enlarge. You can save the image in its larger size and print it at home or email it to your local copy center for printing. You might also find that having it large on-screen is enough for your purposes.
Option 2: Word, Excel, Docs or Sheets-type data processing software
Open your favorite processing software and use the “insert” feature to add your digital chart image. Once inserted you can drag on the corners to resize the chart. You can also right-click for more editing options. Once you have the image large enough for your purposes you can use it on-screen or print it for a large paper copy.
Option 3: PDF Annotation Software
There are a number of computer and iPad/Android programs that will allow you to annotate a PDF. To use your favorite one, insert your chart image into Word or Sheets as per Option 2 and then save your file as a PDF. Open the PDF in your annotation software and you can zoom in as well as make notes or highlight directly onto the chart.
My favorite annotation software is OneNote, and I use it daily for making notes, highlights and annotations on PDFs as well as images for all my crafting needs. It is free but since it might not be widely-used I’m putting it as a standalone option below:
Option 4: OneNote
I use OneNote extensively and find it an invaluable tool for any crafter/hobbyist. I love that I can import an image of a chart, blow it up as big as I’d like, and then in draw mode can use my Apple Pencil or finger and the highlight pen to highlight chart rows as I go just as I would on paper. The ability to undo mistakes is a big improvement over paper charts and I can also annotate as I go.
I like to insert my digital chart image into a new page created for my current project.
Tapping on the image will allow you to move it on the page as well as to drag the corners for an initial resize. You also have the option to rotate the image if desired, though as the chart in this case is rectangular I prefer to use the width of my iPad.
You can resize the image even larger if needed. Use two fingers to pinch and zoom out to enlarge the chart to its maximum size.
My favorite thing about OneNote is how I can work on my charts completely digitally. Here I’ve left part of the chart un-blurred so you can see how I use it. It’s possible to make notes about dropped sts, missing yarn-overs or any other reminders for yourself, as well as to switch to a highlighter pen in your favorite color and nib width and mark off your rows as you go. Better than on real paper- if you make a mistake you can easily erase the highlighting so you’ll always be able to keep track of exactly where you are.
I do use the Apple pencil as pictured above but you can do the same with your finger tip or a stylus, including change the pen nib size so everything is clear and legible.
I’ve used this method for everything from complicated cable knits to incredibly detailed 18ct cross stitch and it works perfectly every time. It also syncs to my OneNote account so I can access my chart on the computer or on my phone or even log in from any internet device so I can bring my work with me where ever I go.
I regret that I cannot share the charts for my Order of the Phoenix blanket pattern, but no matter what project you’re working on hopefully the above tips and techniques will help you enlarge your charts into something you can work with comfortably. If there are any other tips or techniques you’d like to learn about, feel free to message me or leave a comment below!
It’s National Cake Decorating Day today so I’ve decided to share a project from my personal archives along with a tip to help you level up your cake decorating skills.
A few years ago I made this baby shower cake for one of my sister’s friends.
I didn’t take too many progress pictures so I can’t share a visual step-by-step, but the process is pretty similar for most of my cakes. A few days before the event I bake the cake(s) and then wrap them in saran while still warm to trap in the moisture while they cool down.
The step that took the longest with this cake was to create the fondant topper. The dad-to-be is a hockey player so I was asked if I could create a baby ice skate for the top. It’s fully fondant except for the lace, and I made it about a week in advance so it would have plenty of time to dry out and harden before the party. I wanted the skate on a long skewer to make it easy to slide securely into the cake after delivery so I put the skate and blade together while soft so I could slide the skewer in and make sure the holes were lined up, but then I took them apart to dry separately. I didn’t want the weight of the skate to distort the blade before it was fully set up.
When there is going to be a lot of weight on a cake it’s important to have enough support in the lower layers so the cake doesn’t sag. First I covered the lower layer in a base of baby blue and then I broke a dowel into 5 pieces to create a support to hold the weight of the upper tier. I didn’t want to take a chance on any splinters getting into the cake so there’s a cut length of straw around each dowel. I also made a note for the recipient letting them know how many supports there were so there would be no chance of a guest receiving more than they bargained for on their plate.
I don’t have progress pics of the decoration itself but it’s fairly simple – the base tier was covered in strips of fondant in various shades of blue and white and then topped with a disk of gray on top to clean up the edges and hide the supports. The top tier was covered with white fondant and then fondant circles of blues and gray in assorted sizes. To get the smaller circles I used an assortment of cookie cutters as well as straws of varying thicknesses.
This is where the tip comes in! When creating a fondant pearl border for the cakes the easiest way to make sure you get all your balls the same size is to use a cutter to cut out identical pieces of fondant before rolling. You can use a straw for really small pearls or a cookie cutter like I did to get larger ones, or any size in between! It’s super fast and easy and eliminates the guesswork of judging how large a piece of fondant you’ll need to roll. You can use the same tip for clay work as well!
As you can see with my pearls, there’s still a tiny bit of variance. This is because I didn’t roll my fondant to the same thickness each time. I’d advise using guide rings on your fondant roller to get the same thickness every time.
I added 2 more circles of blue on top to give a contrast for the skate, and then the cake was ready for pick-up.
My box wasn’t tall enough for the cake so I used 2 skewers to hold the lid in place, and set the skate in a bed of paper towel in the plastic container from a package of strawberries. The holes in the plastic were perfect to slip the skewer that was inserted in the skate through.
Here’s the finished cake. I’m really pleased with how it turned out!
I also really love this image I was sent of the cake in place among the other desserts at the shower. ♥
Here’s an easy-to-pin reference image for those who don’t already follow me on Pinterest. 🙂
Hopefully this little trick will help out the next time you’ve got to make a whole bunch of identically-sized fondant (or clay) balls!
Note: Today is also World Mental Health Day. This year’s Mental Health campaign is focused on showcasing the efforts various countries have made to bring mental health care to their populations, especially during the pandemic. For more information about the campaign, please click here, and if you’d like to donate to the World Federation for Mental Health you can do so here.
This post may contain affiliate links. This means I might make a small commission on purchases made through the links, at no cost to you.
It’s National Homemade Cookie Day in the USA today, and even though I live in Canada, who could say no to cookies? They’re tasty, versatile, and in these mid-pandemic days, a great way to provide individual portions per person.
Here’s an easy way to make a set of fun bowling cookies that you could even bowl with!*
I made these a few years ago for Father’s Day, as bowling has been a family sport since I was a kid. My dad was on a league through until Covid, and most of my siblings and I were on leagues at various times as well.
Back in the blogging heyday I used to follow a handful of cookie decorators (Sweetopia, The Bearfoot Baker and SweetSugarBelle were 3 favorites) and a big lesson I learned was how to use cookie cutters in creative ways. After deciding on “bowling cookies” I went through my bin of cookie cutters and pulled out 3 that would be perfect for this project.
The square cutter is from a nesting set similar to this one. Using it to create the lanes, choose the size that works best to fit as a multiple on the serving tray you plan to use. Rectangles would also work just fine. In my case I used the roughly 2″ square. The circle cutter is from a set similar to these. Used for the bowling balls, choose a size that looks appropriate on your size lanes. Mine is roughly 1″ in diameter. As for the bowling pin, this is where you have an opportunity to be creative! They do make actual bowling-themed cookie cutters, but I don’t have any so I used a Christmas bulb from a set similar to this one.
Step 1: Bake your cookies. You can use your preferred recipe of choice; I used my standard sugar cookie recipe adapted to taste years ago from this old Martha Stewart recipe. You want to avoid your cookies spreading while baking so be sure to chill your dough (before cutting works but after cutting is even better). Make enough squares (or rectangles) to fill the shape of your bowling lanes, plus a few extra to account for breakage. Bowling uses 10 pins so you’ll need to make at least that many, plus again extra to account for breakage. Finally, use the rest of your dough to make as many round cookies as you’d like. You really only need one to be the bowling ball, but I was serving a crowd so I made as many as I could with the dough that remained.
Step 2: Fondant toppers. If you prefer royal icing you could certainly line and flood the cookies and decorate them that way, but I find fondant a quick and easy way to get them done faster. Another example of this technique is here, where I used fondant to turn round cookies into records for a music-themed set.
Roll out white, ivory or cream fondant and use the same square and pin/bulb/etc cutter that you used for the cookies to cut a topper for each one. Moisten the back of the fondant (or the top of the cookie) with a bit of water and press the fondant into place, one topper on each cookie.
The bowling balls are a great place to use up leftover scraps of fondant. Roll out some black fondant then tear little pieces of your other colors and place them randomly on the black. Then roll over it some more to blend out the colors. Once you have it looking the way you like, use the same circle cutter to cut out enough toppers and place them on the ball cookies in the same way as above.
Step 3: Turn your base cookies into lanes. Start by using a yellow, orange or brown edible marker and a straight edge to draw stripes down your lanes to represent the individual planks of wood. I used a yellow Wilton FoodWriter and the edge of my transparent cutting mat. I generally prefer these AmeriColor edible markers so I tend to save them for when I’ll be needing to draw details because the Foodwriters are more broad-tipped.
Step 4: Wood grain, part 1. Using a paintbrush that’s ONLY ever used for food, dip it into a pot of brown icing gel color and blot onto a paper towel to get most of the globs of gel color off. Cheap plastic paintbrushes like what come in childrens’ art kits are perfect for this, but it’s super important that the brushes are reserved strictly for food use. Don’t worry about the messy bristles- the messier the better for this technique! Splotch the brown gel color directly onto the fondant cookie toppers. Try to pounce in a direction in line with the stripes you’d drawn so your wood grain goes in the proper direction. Repeat until you’ve done one full vertical row. In theory you could repeat this process on all the cookies and then move on to the next step, but I didn’t want to take a chance on the gel drying too much to reactivate so to be safe I did one strip at a time.
Step 5: Wood grain, part 2. Dip the same scrappy paintbrush into water and then brush lightly over the cookie to reactivate the brown tint and spread it across the fondant. Ensure to always brush in a vertical direction to create a faux woodgrain texture. Make sure to thin down the color just enough so that the stripes you’d painted earlier just barely show through.
Once you’ve completed the entire vertical stripe, repeat steps 4 and 5 on the remaining stripes of cookies.
Here’s the final look.
If you’re a longtime follower of this blog you’ll remember I’ve used this technique before, to make the hot tub for the Betty Boop cake for my mom’s birthday.
Step 6: Marker details. Use a red edible marker to add the characteristic stripes on the bowling pins…
…a black marker to add three dots to represent holes on the bowling balls…
…and the red marker again to add the triangular lane markers onto the lanes.
And that’s it! Assemble your pins into place at the top of the lanes and your set of bowling cookies is complete! I added a quick fondant ribbon sign to mark the occasion but that’s completely optional.
*Can bowl with them: If you take “bowl” to mean “stand up the pin cookies and flick a ball cookie at them, hoping to not get caught on the lip of one of the lane cookies”
This post may contain affiliate links. This means I might make a small commission on purchases made through the links, at no cost to you.
Henri’s 10th* birthday party was last weekend, and while I’m not a professional by any means, I have made enough cakes by now (not to mention the 40 or so ones I’ve yet to post) that I often get asked for tips or help. So I decided to put together a step-by-step guide on how I prepare a cake for decorating.**
I’ll get more into the “how to bake a cake” part in a future post, as there are a lot of little tweaks and tips for the baking part itself…but this post will cover specifically how to prepare a basic cake for decorating.
Note #1- I typically bake my cakes 1-2 days prior to when I plan to decorate, which – depending on the desired outcome – is 1-2 days prior to the cake’s due date. (IE: if the cake is for Sunday, I’ll bake it Thurs or Fri night, then decorate Saturday night. If it’s a very involved, sculptural cake, I might bump those dates back a day each to leave more time for decorating.)
Before you can bake the cake, you need to prepare your pan. This step ensures you’ll be able to remove the cake from the pan once it’s baked. Some people line their pans with parchment, but I use this method:
Grease the pan’s bottom and sides with either Pam, margarine, or butter
Drop a tablespoon of flour onto the greased pan
Over the sink (I learned the hard way) slowly rotate and tilt the pan until the flour fully coats the bottom and sides, tapping if necessary to move things along
Make sure it’s fully covered, touching up bare spots if necessary
To remove excess flour, hold pan upside-down over the sink and smack the bottom of the pan a few times. The loose flour will fall into the sink.
Note #3- I’ve heard of, but never tried, using Pan Grease in lieu of the above. I’m planning to try it out sometime when I don’t have a deadline looming 🙂
Pan Grease

1 cup shortening
1 cup flour
3/4 cup vegetable oil

Mix well with electric mixer and store in airtight container. Does
not need refrigeration.
Note #4- It doesn’t matter what kind of flour you use. One time I’d bought the wrong kind of flour for a recipe and had no use for it, so I used that one for preparing pans until it had been all used up. Ever since I use all-purpose, but you can use whatever you’d like, including nut-based and gluten-free flours. I’ve also seen people use cocoa powder when preparing pans for chocolate-based recipes.
Note #5- Don’t try to tap out the excess flour over a garbage can unless your pan is small enough to hold lower than the rim of the can. I learned this the hard way…
Once the pan is ready, you can prepare your batter, then pour it in. Some cakes need to be left alone, but for my regular birthday-type cakes, I drop the pan on the counter a few times so the air bubbles in the batter can raise to the surface and pop.
Once the cake is ready to come out of the oven, a very important step is to let the cake set in the pan for about 10 minutes. Try to remove it too soon and it will fall apart, but wait too long and it will get very difficult to remove. My standard is to set my oven timer for 10 minutes and use that time to get out the items I’ll need for the wrapping step coming up.
Once 10 minutes are up, your cake is ready to remove from the pan. Loosen around the edges with a knife. I also like to sort of “tuck” the knife under the cake and give it little test lifts to help ease it from the bottom of the pan.
The photos above show how I used to remove the cakes from the pan- I’d flip the pan over onto a flexible cutting board, then use a 2nd board to flip it back to right-side up, before sliding it onto a tray to allow it to cool overnight.
However- I don’t do this method any more. Instead I remove the cake from the pan and place it immediately onto a long length of Saran Wrap, which I then fold over to seal. Then I turn the cake 90 degrees, place it onto a 2nd long length of Saran, and wrap it again, so the 2nd layer covers any gaps in the 1st. I do this immediately after the 10 min rest in the pan.
Once the cakes are wrapped in Saran, you can leave them to cool. I’ve done this up to 5 days in advance of serving, and the cakes still came out perfect. In fact, I’d recommend this even more for cakes made in advance- unlike my previous method of leaving them uncovered, the Saran traps the heat and steam into the cake, leaving them dense and moist and delicious instead of dry and crumbly.
Leave the Saran-covered cakes somewhere dry and cool where they won’t be disturbed. (Don’t leave them stacked as the top one might sag, I only did this when I took the photo as I was trying to estimate how tall the finished cake would be).
Allow the cakes to cool at minimum overnight. A cake might feel cool on the outside but still have residual heat trapped inside, and icing and decorations will slide right off.
Once cooled, you’re ready to level and tort. (Tort is just a fancy word for “cut the cake in half, horizontally). For best results, use a knife long enough to fit across the narrowest edge of the cake.
Slowly and evenly cut off the rounded cake dome, starting at one corner then easing your way across until you can go straight down along the cake. Keep your hand steady and try to hold the knife as flat and parallel to the table as you can. Once you’ve cut all the way across you can remove the scraps for eating or other uses. I always like to have a storage container handy as well to hold the cake scraps which I use later with any leftover icing to make cake pops for my kids.
In the demo cake shown here, I didn’t tort, but if I would have it would have been at this step. Using the same knife as above, cut the cake horizontally into two layers.
Note #6- I recently picked up these cake level guides and OMG they’re perfect! I clipped one to my knife and held it flush against the table as I cut and I’ve never had a cake turn out as perfectly level before. I <3.
Before you can begin decorating, you must consider your base. Is the cake to be moved? Is it going to be heavy, and need a cake board? For the cake shown, I iced, decorated and transported it on the white tray, and I would use the same method with any other tray or cake stand. If this was a tier in a larger cake, however, I’d be using a cake board.
Put a dollop of icing into the center of where your cake will go. This will “glue” your cake to the tray/board and keep it from sliding around. Center the cake into place and give it a little push down to adhere.
Fill your cake. Do a border of icing around the edges of the cake and then fill it with more icing, jam, whatever you’d like. Then place your other layer on top and press down lightly. I often flip it so the flatter bottom of the cake layer becomes the top of the cake, but this 9×11 was a bit too large and thin for me to feel comfortable flipping without risking breaking. I’m a klutz after all…
Before I begin to ice the outside of the cake, I protect the tray/stand/surface with parchment paper or wax paper. Cut off a narrow piece and then cut that into pieces to fit around the edges of the cake. For a rectangle or square cake I’d cut 4 narrow strips, if it was a round cake I’d cut the full-size strips into thirds and slightly overlap them to surround the cake with a hexagon of paper.
See the crumbs on the parchment? That’s why it’s there- to protect the base from crumbs and icing. The crumb coat (shown) isn’t part of the decorative exterior, it’s used (and named) to capture any loose crumbs that would otherwise fall off as you work. Ice the cake on the top and all sides, but don’t worry about covering every inch of the cake. The main thing is to trap the crumbs and fill in any gaps in between the layers of the cake.
Note #7- Mine is sloppy. Both the crumb coat and the upcoming icing. This cake was for fun. If you are planning to cover the cake in fondant later OR planning to have smooth or knife-edge sides, then you should make sure your crumb coat is smooth as well, or it will be more difficult later.
After the crumb coat I like to put the cake in the fridge to set the icing. This isn’t completely mandatory, so don’t stress if you don’t have room in your fridge. Place the cake somewhere cool and undisturbed for about 30 minutes, or until the icing crusts over.
Once the crumb coat is done you’re almost ready to decorate. The cake just needs one more layer of icing. If I’ll be covering with fondant, I put a thinner layer. It’s more to smooth the top/sides and give the fondant something to ‘stick’ to vs a layer of icing to eat. If I’ll only be using icing, then I put a thicker layer, making sure to cover the cake completely.
For the cake in these examples, it was just for fun and I wasn’t going to be adding decorations, so I gave it a quick layer of thicker icing. I made it even but didn’t spend any time trying to make it smooth.
Whether or not I’ll be adding fondant, or additional decorations, this is the point at which I’ll remove the parchment/wax paper strips. Gently lift them away, making sure not to drop any icing blobs onto the cake or tray. If necessary, use a sharp knife to break the seal of any hardened icing that is connecting the papers to the cakes.
Note #8- Even if the icing on the strips looks clean, I don’t add it back in with any remaining icing to re-use. It’s more likely than not that there are cake crumbs within.
And here’s the baked, iced cake, ready for topping with fondant decorations, candies, candles, or anything else you have in mind.
Hopefully this basic instructional was helpful! If you have any questions that weren’t answered, leave them in the comments and I’ll update it with my answers.
**This is only how I do things, after the last 10 years of trial and error. I’m not saying it’s the only way, nor even that it’s necessarily the right way. It’s just my way, and if it helps you, it can be your way too 🙂
When my boys were little, they wanted to be pirates. Henri especially – it was either a Viking or a pirate, depending on the day. Inspired by Jake & the Neverland Pirates they drew treasure maps with large scrawled Xs and hid their toys and told me it was their secret booty.
I wanted to give them some real toys to play with, but all the pirate-themed sets I could find weren’t safe for my rambunctious 3-year-old. I needed something childproof, and ideally inexpensive. Finally, after catching him trying to use his sippy cup as a spyglass just like the Backyardigans had on one of their pirate-themed adventures, I had an idea. One trip to the dollar store and some recycling-bin scrounging later, these fast, easy, and inexpensive toys were born.
I used items found locally, but the links above would work just as well 🙂
First up – the binoculars. (Btw…yes I know pirates didn’t use binoculars. But I couldn’t be certain my kids would use the spyglass as such, and not a makeshift sword, so I wanted to give them another sight-related option. Feel free to leave this one out, or use it for a different play idea. Perhaps an adventurer, bird-watcher or a fun game of I-spy?) For the binoculars you will need 2 clean toilet paper rolls, one cube from a dollar store packet of wooden craft shapes (about the size of a sugar cube), and a roll of electrical tape. At my dollar store this tape comes in a set of 4 colors all packaged together. You can use Washi or other decorative tapes on the outside, but I would not use them for the support structure. If you want to use them, apply them at the end, for decoration.
Step one is to cover the tubes in tape. I had done these first, and only later realized I should have covered the exposed edges FIRST, THEN wrapped the sides. When I get to the spyglass you’ll see I fixed that. If you want to be smarter than me, fold little pieces of tape over the exposed edges first. Be careful to not place the inside edge deeper than the width of the tape itself so you can cover it later. I have enough tubes for 3 sets shown because my neighbor’s young son was also really into pirates and I wanted to surprise him with a set of his own.
Step two is to cover 4 of the sides of the cube in tape. Place the tape on one edge of the cube and just keep wrapping around the other 3 sides until you reach the beginning again. You’ll be left with 2 exposed edges that are opposite of each other. Don’t worry about covering them, as they will be against the tube rolls and won’t show.
Step three is to connect the rolls to the cube. Place it a bit in from one edge so it looks like the bridge on a pair of binoculars. Be sure to place the raw, exposed edge against the tape so the covered sides are what is shown. Secure well with more tape.
This is what it looks like when you have three rolls done. I’d run out of tape, and had to go buy more to get more blue… d’oh.
This is when I covered the edges and realized I should have done it first. Oh well. If you’re like me, and goofed, place short strips around the exposed edges. This is for aesthetics as well as durability – no open edges means it’s less likely the toy will tear or fray after some hard toddler use. Be sure to not place the inside edge deeper than the width of the tape itself (see: left roll). Once you’ve covered the edge completely, cut a length of tape to fit on the INSIDE of the roll, and place it around, as close to the edge as possible, to cover and secure all the short edges (see: right roll).
Then you can use another length to go around the outside, covering those short pieces too. (This step is unnecessary if you covered the edges first).
Here’s a completed pair of binoculars. The new blue tape I’d bought was darker than the original, so it gave a nice finished look, almost like adjustable lenses. Even though they’re ‘only’ toilet paper rolls, the rubbery tape gives them a surprising amount of durability. Don’t get them wet, however, as the inside paper is still exposed.
Next I made the spyglasses out of paper towel rolls (though you can cut down wrapping paper tubes too). As you can see, for these I was smart enough to cover the ends FIRST, THEN wrapped the tubes. It’s easier to see on the white than the blue, but when you wrap, ease the tape slightly sideways so you can move along the tube/roll. Because the tapes are rubbery, they’ll stretch to where you want them to go, instead of tearing.
Finish covering the tubes by wrapping a piece of tape around the inside of the open edges to cover the short pieces. Because you did them first here, you won’t have to add more tape on the outside.
(This picture makes me laugh because it’s such a typical scene in my house – the dining room table covered with mom’s crafty projects, the kids’ placemats and a bag from the latest dollar store run for supplies. *chuckles* Plus seeing the boys’ bibs reminds me just how long ago I’d made these. Those are their “I ❤ Dic Ann’s” bibs. *grins*)
Once the spyglasses have been covered with tape, use glitter glue (from the dollar store) to paint on whatever decorative touches you’d like. I went with gold grip handles on mine. Set them aside to dry overnight, using drinking glasses or other supports to avoid messing up the wet glue.
For the treasure chests you’ll need some kind of chest-like container. I was lucky that my dollar store had these little wooden chests, but you can use any container or box you have on-hand, even an old Tupperware. I bought strips of glitter gem tape to decorate mine, but you can use sticker letters, nail gems, paint, or anything you like. (Oooh they would look INCREDIBLE painted to look like real, aged chests!)
Finally, you’ll need some pirate booty. I got these acrylic diamonds from my dollar store, as well as the strands of ‘Mardi Gras’ beads. I would have loved to include gold coins, but couldn’t find any on that visit. This set I found on Amazon has both gems and gold coins together, and would have been a great addition.
Decorate the chests. My kids picked their favorite colors of these jewel strips and I cut them to fit along the top edges, but you can do whatever you like to the outside of the chests.
To secure the booty inside, we’ll be using a high-tack craft glue. If you have older kids you can omit this step and leave the treasures removable, but since two of my recipients were 3 years old and some of the jeweled edges were sharp or choking hazards, I elected to make my treasures permanent. Plus this would ensure there was always booty ready to be discovered. Place a thick layer of glue in the bottom of the case, a little more than you think you’ll need because the wood absorbs some. Begin placing your chains and jewels down into the glue so that they look like they were piled in haphazardly. Use more glue as needed to secure any loose bits. Feel around to make sure any sharp edges are embedded in the glue vs sticking out. Every now and then hold up or shake the box to see if any bits move or shift, and keep adding glue into every nook and cranny. I went crazy on the glue because I know my toddler will find any loose edge to play with. Don’t worry about the white glue showing as it will dry clear. Finally, once you think your treasures are secure, set it aside to dry at least overnight. I dried mine overnight then held it upside down and shook it around, then added more glue to any of the bits that moved. One of the chests was going to be a gift for a toddler and I didn’t want to worry about any accidents on account of it.
Here’s how my collection turned out. They made fun play accessories for around the house and costume day at school, and were surprisingly long-lasting. The boys didn’t manage to get the gems and beads out of the boxes for at least a year and a half, and the chests, the spyglasses and even the binoculars are all still intact in our dress-up bin all these years later.
If you make any of these I hope they give your toddler/child just as much fun as my kids had with them. 🙂
This post may contain affiliate links. This means I might make a small commission on purchases made through the links, at no cost to you.
My phone has been pinging quite a bit lately, notifying me that people have been saving my pins. While I think that’s awesome, and am flattered, I was also confused because I couldn’t think of what I’d posted that would be so popular at the moment. And then I remembered – it’s almost Halloween! Sure enough, it was my Minecraft-related pins getting all the love, the Creeper/Steve head tutorial especially.
So for anyone who found my blog via those pins, or anyone else who’s interested, here are some quick links to my (few) Halloween/costume-related tutorials. I do have more coming up this month, so be sure to come back and see.
I hope you enjoy the links! For my fellow Minecraft-loving folks, I’ve got a matching Enderman tutorial coming up, complete with his very own diamond block. Stay tuned!