Happy Towel Day to all the hoopy froods out there! Here’s a free towel pattern (with custom mods) that you can work on while sipping your pan-galactic gargle blaster or some drink that is almost, but not quite, entirely unlike tea.
I first came across this pattern at Craft Time at work. (Yes- my job came with a craft club. YES- IT IS AWESOME). A few of my colleagues have knit this towel pattern, found for free online here (Ravely link here).
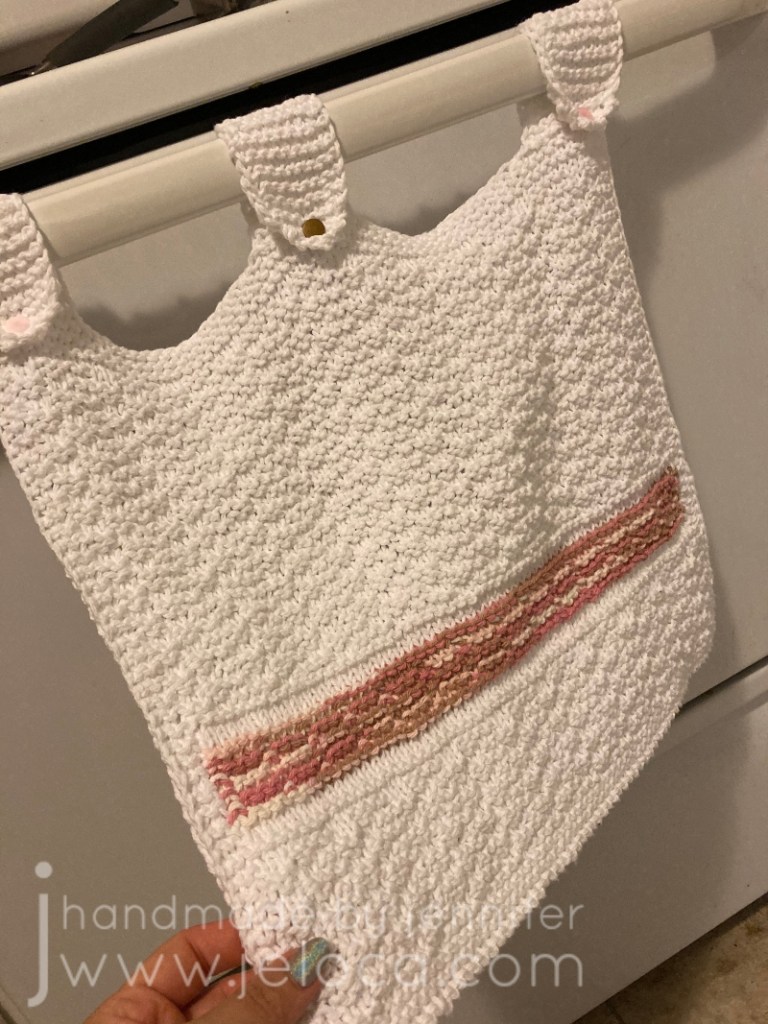
The version shared with me was the row-by-row Word Document version that is available here. (I’m not sure if/how it differs from Dixie’s original pattern above). I really liked the texture and stripe but am not a fan of the single hanging strap. In my experience there is too much strain on a single point and it winds up stretching over time until the towel is sagging lower than desired.
To fix this I reworked the final steps to have 3 hanging straps per towel. (You can also do 2 but I didn’t want the middle to sag either). I also worked the contrasting-texture stripe in intarsia for an inset colored band that used up scraps of cotton leftovers from previous projects.
I’ve now made 4 of them (with matching washcloths using the leftovers) and have been consistently having 2 on my oven while the other 2 are in the wash, and swapping them out regularly.
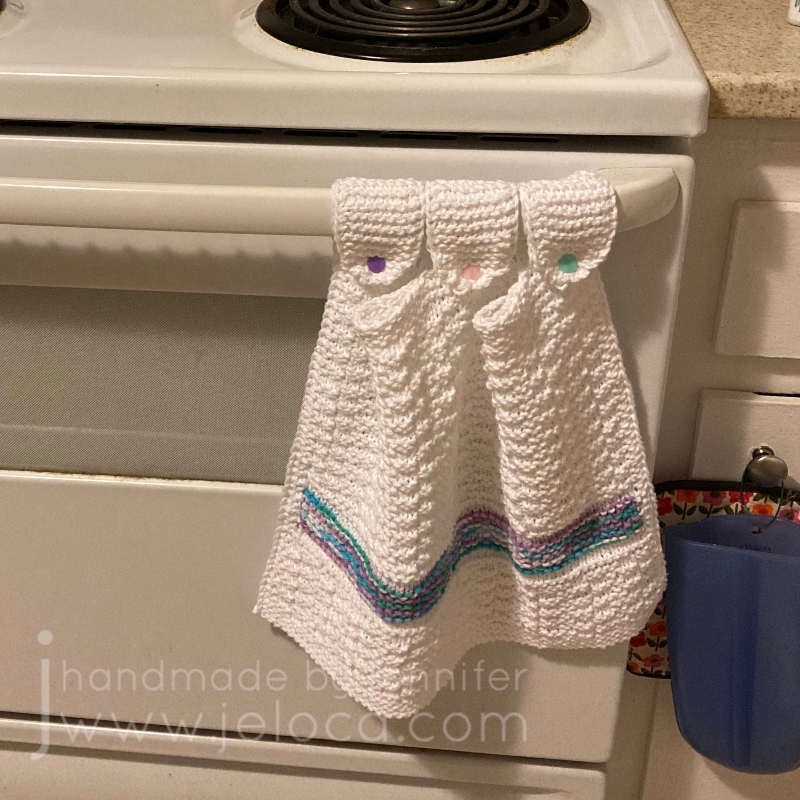
The top two sets in the image below were made with Lily Sugar ‘N Cream cotton for the white and have buttons in colors that match the contrasting colors.
The two bottom sets were made with Bernat Handicrafter Cotton for the white and have plastic snaps in matching colors set through the natural holes in the knitting. (I’ve been using my snap kit paired with a set of assorted color snaps and have managed to always find the colors I need for my projects). They have held up wonderfully and none of the snaps nor buttons have come loose with time or multiple repeated washings.
Work the towel pattern as written through row 61, adding repeats if desired to make longer towels. (Note that my towels pictured have 7 extra repeats of rows 43-46)
Row 62: Slip 1st st as if to purl (yarn in back), k to last st, p1
Rows 63-67: rep row 62 for garter band at top of towel
Row 68: (hanging strips setup row) Slip 1st st aitp (yib), k9, BO 17, k10, BO 17, k9, p1. You will now have 3 sections of 10 live sts with 2 BO sections in between.
Row 69: (first hanging strip) slip 1st st aitp (yib), k to last st, p1
Rows 70-100: rep row 69
Row 101: SSK, k6, k2tog
Row 102: SSK, k4, k2tog
Row 103: SSK, k2, k2tog
Row 104: SSK, k2tog
Row 105: BO rem 2 sts
Cut yarn, leaving tail to weave in, then rejoin yarn to next set of 10 live sts.
Repeat rows 69-105 twice.
If you use snaps, wiggle the post of each side of the snap through an opening in a stitch before pressing. If using buttons, add a YO on row 101
This post may contain affiliate links. This means I might make a small commission on purchases made through the links, at no cost to you.
Seventeen years ago, on September 7 2004, I started this blog. Yes, this creative passion project of mine is officially old enough to be in college and donate blood. It began on Blogger in the boom of knitting/craft blogs that fed blogrolls and Yahoo swaps and RAOK groups. We’ve seen the onset of Ravelry and Worldwide Knit In Public Day, and welcomed pattern sources like Knitty, Craftsy, Twist Collective, St Denis Yarns and others before having to say goodbye to some of them.
With YouTube, Instagram and TikTok flooding the internet with video-based creative content, running a blog feels almost antiquated. I’ve been asked by friends and family why I don’t switch to another format but the truth is… I don’t want to. I love video tutorials. I follow a TON of craft-content YouTubers, and have saved a huge amount of “try one day” crafty TikToks to my favorites list too, so it’s not a critique of the other formats. They absolutely have their place, especially for some techniques or tutorials that can really only best be shown in video. That said, I still think there’s a place for blogs and photo-based project/pattern support.
My “blogaversary” this year falls on the first day of Rosh Hashana, which is the Jewish New Year. I think that makes it perfect timing for a long-overdue blog restart. (I know, I know, I’ve said this before. Shhhh!) Coincidentally I was born on was erev (eve) Rosh Hashanna (we won’t say how long ago!) so Happy birthday to the blog, happy sort of birthday to me, and happy Jewish New Year!
To celebrate 17 years in the public craft domain I’ve scoured the site, my notes, folders, and metadata and picked 17 fun, interesting or long-forgotten items from my blogging history.
1-7
Numbers 1-7 are from the archives. These are posts even I forgot about! Some are helpful tips, some are free patterns/tutorials, and all are added to the How To section above.
Even when I don’t post regularly I get a steady stream of visitors (thanks!) and I’m always curious to see what search terms bring people my way. So number 8 is my top referrer keywords from back in my Blogger days. Funny enough it’s a tie between two completely random things that have almost nothing to do with my site: “cute japanese cartoons” & “hangman”. I’m guessing the former is related to the time I knit a Japanese boy band, but the latter? NO idea.
9
Number 9 is the results of my top search terms after migrating the blog to WordPress. Unfortunately/fortunately Google has been encrypting the vast majority of search terms since 2013 so 9771 of my results are “unknown”. Of the list that remains the top three terms are: “Toothless”, “pocketbook slippers”, and “pocket book slippers”, likely linking back to these two projects (Toothless, slippers). Wanna know the lowest search result that brought someone my way? “Long hair cut feet”. I wonder how disappointed the searcher was to find my post was literally about a long hair transformation??
10
Number 10 is a really cool fact- I’ve had visitors from 170 different countries! The majority are, unsurprisingly, from Canada and the United States, but rounding out the top 20 are the UK, Australia, Germany, Brazil, the Netherlands, Mexico, France, Iceland, Spain, Italy, the Philippines, Israel, New Zealand, Poland, South Africa, Argentina, Hungary and Denmark.
11-14
Numbers 11-14 are my the top 4 posts since switching to WordPress. I had a hunch what these were because they keep Pinterest flashing up on my phone. What I didn’t expect was that the top post would outrank second place by more than double!
I’ve spent the last few months poring over my unshared projects and planning out a blog schedule for the year. For number 15 I thought it would be fun to look through my folders and see just how old my oldest unshared project truly is. There was a lot to wade through but I found it! Coming in at over a decade old a crafty hack that you’ll see on the block next year dates all the way back to February 2010!
16
Looking through all those projects was a fun trip down a creative memory lane. As number 16 here’s a little teaser of a post I can’t wait to share in full…
Any guesses?
17
And finally, for making down this far: number 17 is a picture of me at the same age as this blog.
Whether you’ve been here since day 1 or day 6204, thanks for being a part of my creative adventures. I run this blog for me, but I love sharing it with you. ♥
*All search terms and other totals above were accurate as of the date of preparing this post.
Update: see end of post for information about a downloadable pattern pdf
With my upcoming surgery looming in the near future, I decided to make the most of my time and get a head start on this year’s holiday teacher gifts. I still make the Christmas and Hanukkah gifts for my kids’ teachers, lunch ladies and daycare workers, and, not knowing how much I’d be up for a long bout of down-to-the-wire crafting post-op (since I somehow always end up working til 4am the night before the last day of school), I was smart and started early.
I decided to make dish/washcloths again. It’s been a few years since the junior campus staff got regular square washcloths, and I haven’t made them for anyone on senior side yet, so I wasn’t worried about being too repetitive. I dug some favorite Bernat Handicrafter Cotton from my stash and pulled up the most basic, well known, standard dishcloth pattern Ravelry had to offer – a plain old, diagonal-knit garter washcloth.
Plenty of yarn, plenty of time, and a well-worn pattern. This, I thought, would be a breeze. I was even optimistic enough to think I’d have the Xmas gifts ready before November!
Heh.
My troubles started early on. After completing the first washcloth, actually. I had finished it and set it down flat on the table and noticed the lower edge immediately curl upwards. I smoothed it flat but it quickly rolled inwards again. It wasn’t terribly noticeable, and – let’s face it – this is a dishcloth. If used properly it would end up scrunched and rolled and pulled and would sag and ease out of shape quickly. But I was annoyed at how it looked and poked around at it a bit trying to figure out why the top half was fine but the lower half curled in. The top half, by contrast, lay beautifully flat. I couldn’t figure out what I’d done wrong.
Finally I realized it wasn’t my fault – there was an inherent flaw with the pattern. It was the kind where you increase into the second stitch of every row. That type of increase pulls imperceptibly on the outer stitch, eating up the slack between the first two stitches. When this is done at intervals one would hardly notice, but when it is done at the beginning of every row the result was edges that curled inwards. This didn’t occur on the top half of the diamond because that was the decrease half and I wasn’t using any of the previous row’s slack at all.
I could smooth it flat and I could have blocked it but come on… blocking washcloths? No thanks. I’d rather figure out how to knit it without the flaw.
The main thing was to figure out what increase to use. Any increase which went into the prior row, including a standard ‘make 1’, would cause the same inward tugging. Yarn-over increase patterns didn’t have that problem, but I didn’t want eyelets dotting the sides of my washcloth. I wanted these cloths to look less dainty, more ‘rugged’, if that makes sense. I decided to work YO increases but to close them on the subsequent rows by knitting them through the back loop.
Once I was tinkering with the pattern I also added a plain row at the max width point before transitioning into the decreases. Diagonal patterns always seem to have you go from wide to narrow without any plain row in between and I find that the extra row tugs less on those points of the diamond. The result is a lovely garter washcloth which has wonderful drape and lays flat beautifully, and is now my go-to knit washcloth or dishcloth.
I’ve knit 9 of them so far… sadly not anywhere near how many I need, but enough to know I’m really happy with how it works out, and I added it to Ravelry tonight.
The yardage listed is for a dishcloth knit to 41 sts, which results (at my tension) in a 9” x 9” square. You can easily make them larger or smaller. If desired before binding off you can create a strip to fold over and sew down for a hanging loop by either knitting about 4” of garter on those 3 sts or knitting them into a 4” long 3-st i-cord.
This pattern would work equally well for baby blankets or throws, continuing to increase until whatever max diagonal is desired before working the plain row and then beginning the decreases.
Directions
CO 3 sts
row 1- k across
row 2- k1, yo, k to end
inc row– k1, yo, k to previous row’s yo and knit it tbl (to close the hole), k1
Repeat inc row until diagonal of cloth is at desired widest point (I stopped at 41 sts)
Next row- k to previous row’s yo and knit it tbl (to close the hole), k1
dec row– k1, k2tog, k to end of row
Repeat dec row until cloth is back down to its original number of sts
This pattern is provided for free above, but if you’d prefer an easy-to-print version, I have made it available here for a very small fee. The PDF includes the full instructions, an easy to read layout and full color images.
*Updated January 2020
This post may contain affiliate links. This means I might make a small commission on purchases made through the links, at no cost to you.
I have added all of my patterns to Ravelry’s pattern store. In celebration I am going to repost the patterns here over the next few weeks. Some are free, some aren’t, but I hope you enjoy them all!
Update: see end of post for information about a downloadable pattern pdf
Finally! As promised!
The cozies were first shown on the blog here and here.
I designed this pattern last week as part of my cousin’s fiancé’s bridal shower gift basket. I wanted a mug cozy that was removable, machine washable and dryable, and didn’t need ties, snaps or hooks. This is what I came up with.
The cozies have some stretch to them, but were designed to fit standard mugs. If you want to make this cozy for a taller mug, you will need to keep knitting the plain section until you have enough clearance for the top of the mug handle. Likewise, if you want to make it for a wider mug, you will need to add extra stitches.
Unfortunately, I forgot to write down my gauge and the gifts have already been given to the bride (who lives 2 hours away) so I can’t measure them. However, I don’t feel that this will be a big issue with this pattern. The nature of the cozy will forgive a slightly too tight or too loose fit.
Directions
CO 30 sts with 5mm needle and join for working in the round, being careful not to twist
K 1 round
P 1 round
K 1 round
P 1 round
Next round: BO 2 sts, k to end of row – 28 sts
You will now be working flat, turning the work at the end of each row.
Row 1: sl 1 st purlwise, p to end of row
Row 2: sl 1 st purlwise, k to end of row
Repeat the last 2 rows until 14 rows have been knit flat. At the end of the 14th row do not turn.
CO 3 sts then k across the rest of the sts, rejoining the work into the round – 31 sts
This pattern is provided for free above, but if you’d prefer an easy-to-print PDF version, I have made it available here for a very small fee. The PDF includes the full instructions, abbreviation definitions, an easy-to-read layout and full color images.
Update: see end of post for information about a downloadable pattern pdf
Hey guys! Even with my hands usually full of baby lol I managed to finish and write up a pattern!
After my son Jakob was born I told my husband we had no choice but to buy a new camera. Our existing camera was huge- larger than an 80’s cell phone! It was the kind of camera I couldn’t even bring to social events like a wedding or shower as it would have required its own carrying bag and I would have looked like overdressed paparazzi. Now that we had a child, I insisted, we needed a camera small enough to keep in the diaper bag or in my pocket. There was no way I would miss those special first moments!
Buying the camera didn’t solve all of my problems, however. The camera didn’t come with a case- only a thin tufted slip of paper that it fell out of easily. Friends and family of mine have knitted themselves camera cozies, but all had the same basic design; a tube with one closed end and one ribbed end. While you could knit it as tightly as you’d like, there was nothing to officially stop the camera from falling out.
I was determined to remedy that. Buttons and Velcro were out. I knew the camera would end up in my pocket and with my luck the flap wouldn’t be properly closed and the rough Velcro side would scratch the screen, or the button would cause worse damage. There had to be a better way…
And there is!
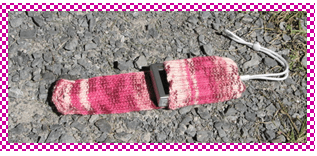
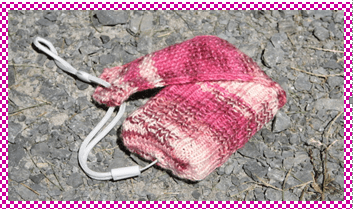
Elphie!
Presenting Elphie– a camera case that will fit any flat camera. Don’t worry about knitting to a particular gauge- this worksheet will accommodate any yarn and any size needles. The case has built-in, double-layer protection over your camera’s exposed screen area and a cover that stays on and CAN’T come off, all without any snaps, ties or Velcro. Oh, and did I mention that it’s seamless? Mine were designed to fit my Canon Digital Elph camera- hence the name.
Want to make one for yourself? Here’s how!
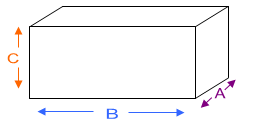
The first thing you’ll need to do is measure your camera, so get a measuring tape and paper and pencil/pen. And the camera of course! On the paper write “A”, “B”, “C”, “S” and “R” with a dash after each. We’ll be filling in those values as we go.
Step 1
Measure your camera and fill in the values for A, B and C on your paper, in inches.
Knit a 4″ x 4″ gauge swatch with your desired yarn and needles. Measure the swatch and figure out the number of stitches (S) and number of rows (R) for 1 (one) inch. Fill in the values on your paper.
Step 2
Multiply your stitch gauge by the width (C) of your case.
S_____ x C_____ = CO_____ sts. (If this results in an even number, add 1 to get an odd number of sts.
Begin knitting:
The case starts at the flap, knitted flat in Moss Stitch, then stitches are cast on for the body of the case which is knit in the round in ribbing.
Cast on the resulting CO value you obtained above.
Multiply your row gauge by the depth (A) of your case.
R_____ x A_____ = D_____ rows.
Work in Moss stitch for half this number of rows (D_____/2).
Next row: work in Moss Stitch until halfway across the row, BO 2 sts, then continue in Moss Stitch (paying attention to the pattern as established) to the end of the row.
Next row: Work in Moss Stitch until the gap created by the bound-off stitches, CO 2 sts, then continue in Moss Stitch (paying attention to the pattern as established) to the end of the row.
Continue working in Moss Stitch until your knitting reaches the length of A+B+A.
A_____ + B_____ + A_____ = _____inches.
Multiply your stitch gauge by the full measurement of your case.
Adjust this new number to the closest lower number that is a multiple of 4. AM=____
(For example, if your M = 28, the closest lower number below that which is divisible by 4 is 24, so your AM would = 24).
Subtract the number of sts you cast on from the adjusted measurement.
AM_____ – CO_____ = _____
Place a marker at the beginning of the next row, work in Moss Stitch across the row, then CO the resulting number of sts you just got after the last equation. Your total stitch count should now equal AM_____
NOTE: if you prefer a snugger case, subtract 4, 8 or 12 from the number of sts to cast on in the previous instruction.
Join in the round, being careful not to twist. Your stitch marker will serve as the beginning of each round.
Work in 2×2 rib until the tube portion of the case measures the length of B and half of A.
B_____ + (A_____/2) = _____ inches.
Make sure your stitches are evenly arranged on 4 needles, with 1/4 of the sts on each needle. (For example, if your AM = 24 sts, then you would have 6 sts on each of the 4 needles).
Decrease round: Ndl 1: ssk, k to 1 st before the end of needle, BO 1 st. Ndl 2: BO 1 st, k to 2 sts before end of needle, k2tog. Ndl 3: ssk, k to end of needle. Ndl 4: k to 2 sts before end of needle, k2tog.
Next round: Ndl 1: k to the end of the needle, CO 2 sts, Ndls 2-4: knit across
Continue in stockinette stitch until, counting from the decrease round, you have knit 2 rows less than D_____/2.
Finishing
Turn your work inside out and work a 3-Needle Bind-Off on the remaining stitches. Weave in all ends.
How To Use
To place the camera in the case, pull your camera’s strap through the hole at the bottom. Insert camera fully into case positioned so that the long flap folds over the screen area of your camera, providing it with a double layer of protection. Pull the camera strap through the hole in the flap to secure the flap shut.
And there you have it!
Feel free to knit as many of these as you like, and you can even sell items made from this pattern as long as you credit me as the designer of the pattern.
This pattern is provided free above, but if you’d prefer an easy-to-print PDF version, I have made it available here for a very small fee. The PDF includes the full instructions in an easy-to-follow worksheet, the definition of all abbreviations used in the pattern, yardage requirements, as well as instructions on the Moss Stitch, Ribbing and 3-Needle Bind-Off used in the pattern.
I redid the eyes ‘cus both Yannick and Annette (the CLSC nurse who comes by once a week to check how I’m changing Y’s bandages) thought the original had psychotic eyes. Apparently an “evil” stuffed toy is not thought of to be the best choice of gift for a 14 year old. Apparently this will cause severe traumas including sleeplessness, delusions and a paranoia of all things porcine. Who knew?
As a last minute addition I was asked to incorporate the recipient’s name. I made up a knitted scarf and spent this evening trying to duplicate stitch her name. Apparently I don’t do duplicate stitch. I do, however, cross stitch. Voila:
I had to make the scarf tube-like so I could hide the back of the lettering, so this is what I did:
CO 80 sts
Row 1- k
Row 2- k
Row 3- k3, p to last 3 sts, k3
Row 4- k
Repeat rows 3 & 4 twice more
Row 9- k3, p to last 3 sts, k3
Row 10- k3, p to last 3 sts, k3
Row 11- k
Row 12- k
Rows 13-18- repeat rows 3 & 4 three times more
Row 19- k
Rows 9 through 12 gave me a garter border that matched the border of the first 2 rows, then a purl row to fold over, then repeated for the back. Once I finished the lettering I just stitched up the live sts to the CO row and added a fringe.
I hope Trish gives him a good home. Now I can knit! :]