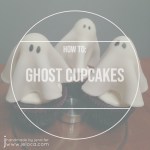
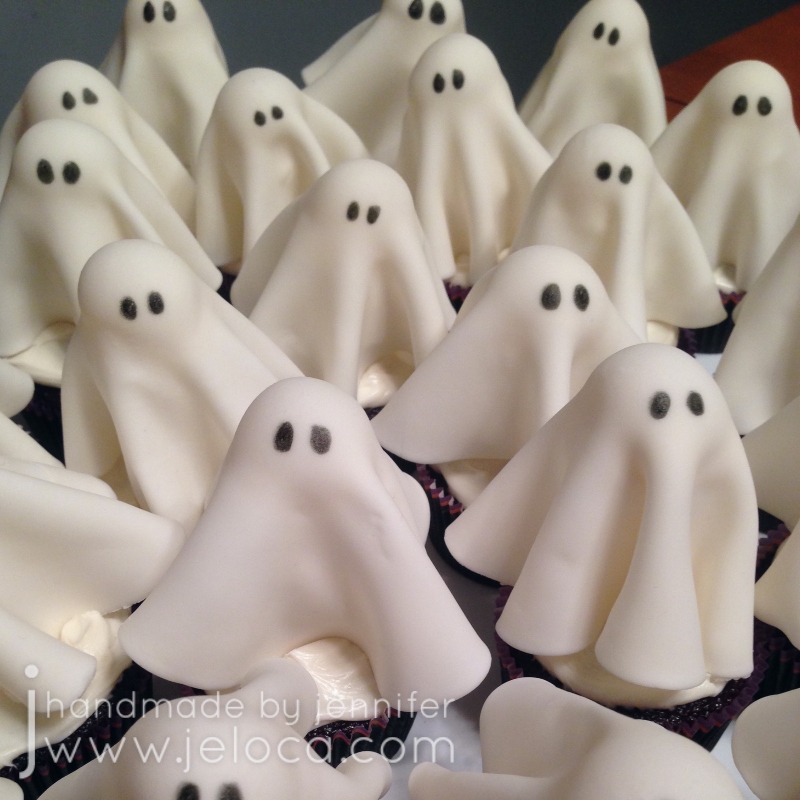
In today’s post I’m going to show you how to make these fast and easy ghost cupcakes, perfect for Hallowe’en!
The sweet treats can be prepped in advance and top homemade cupcakes or you can pick up store-bought cupcakes and throw the whole thing together last-minute.
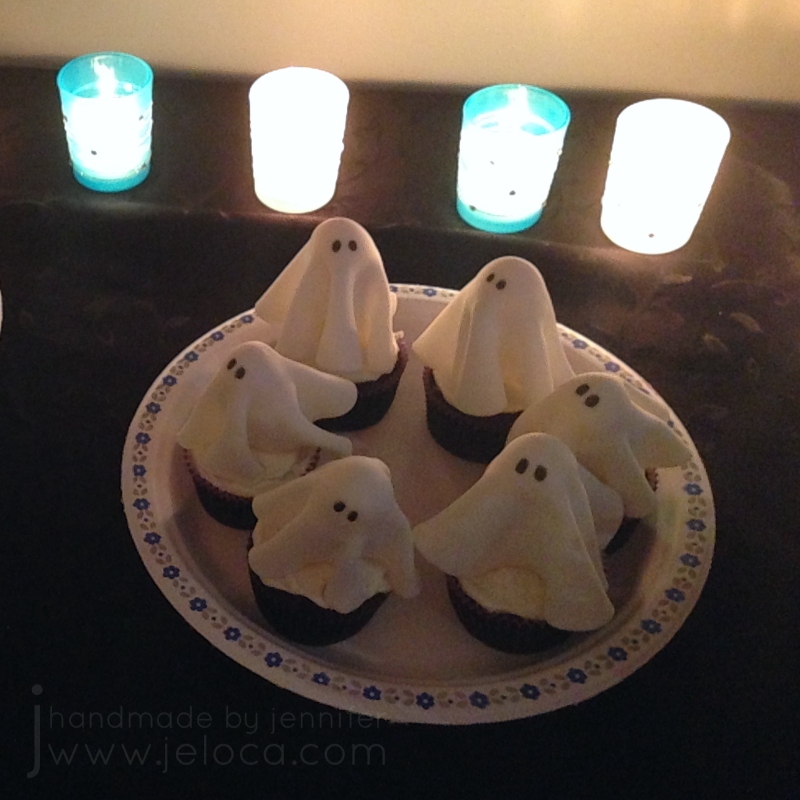
I’d seen versions of this style topper on various sites around the internet and put mine together using the features I liked from various ones, plus added my own twist. These and these have fondant over marshmallows but I didn’t like the square look it gave the ghosts. These and these achieve a more rounded look by draping fondant over lollipops, but as my cupcakes were for a party for adults I didn’t think the lollipops would end up eaten. After browsing my local bulk shop I came up with the idea of topping the marshmallows with rounded gumdrop candies.
You can place each ghost in a treat bag and hand out as-is or use them to top homemade or store-bought cake or cupcakes.
Step 1: Assemble your marshmallows, gumdrops and sticks to prepare the ghost bases
Push the lollipop stick up through a marshmallow and halfway into a gumdrop. You can wet the top of the marshmallow first with a thin smear of icing, clear piping gel or light brush of water to help the marshmallow and gumdrop adhere together, however I found that the tackiness on the stick from being shoved through the marshmallow did not make this necessary.
Repeat until you have as many ghost bases as you need, then set them upright by pressing into foam, flower foam, egg cartons, etc…
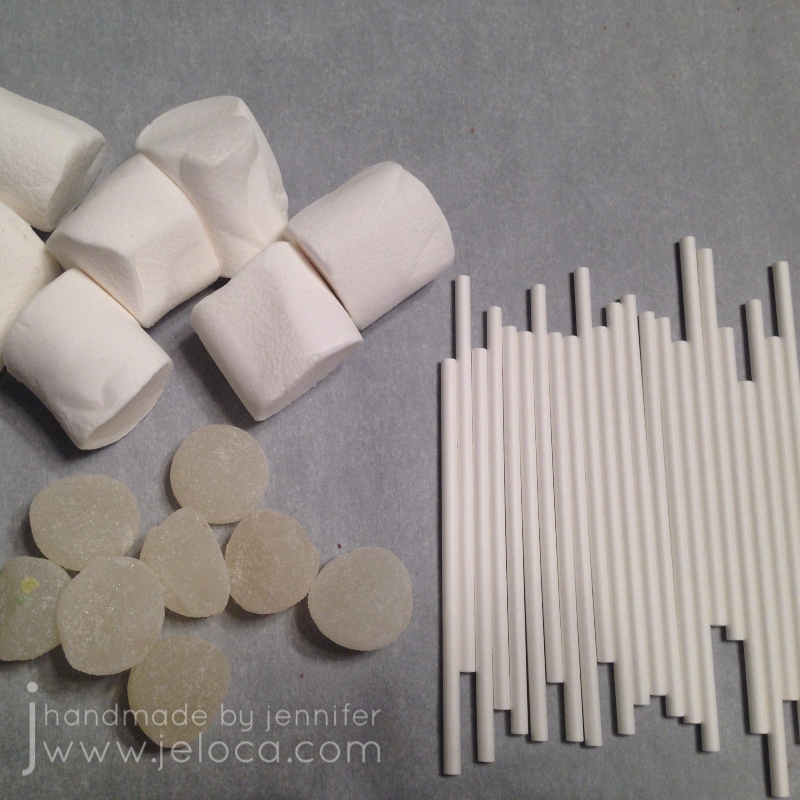
Roll out your fondant and cut out a circle with your cutter. I topped each gumdrop with a small dollop of icing so the fondant would stick, but you can also use clear piping gel or water. Apply the fondant over the ghost base, centering the circle over the gumdrop and smooth into place. Use your fingers to crease the excess into ghostly folds. Note: don’t apply too much icing/water/gel or the fondant can thin and tear if it gets too wet.
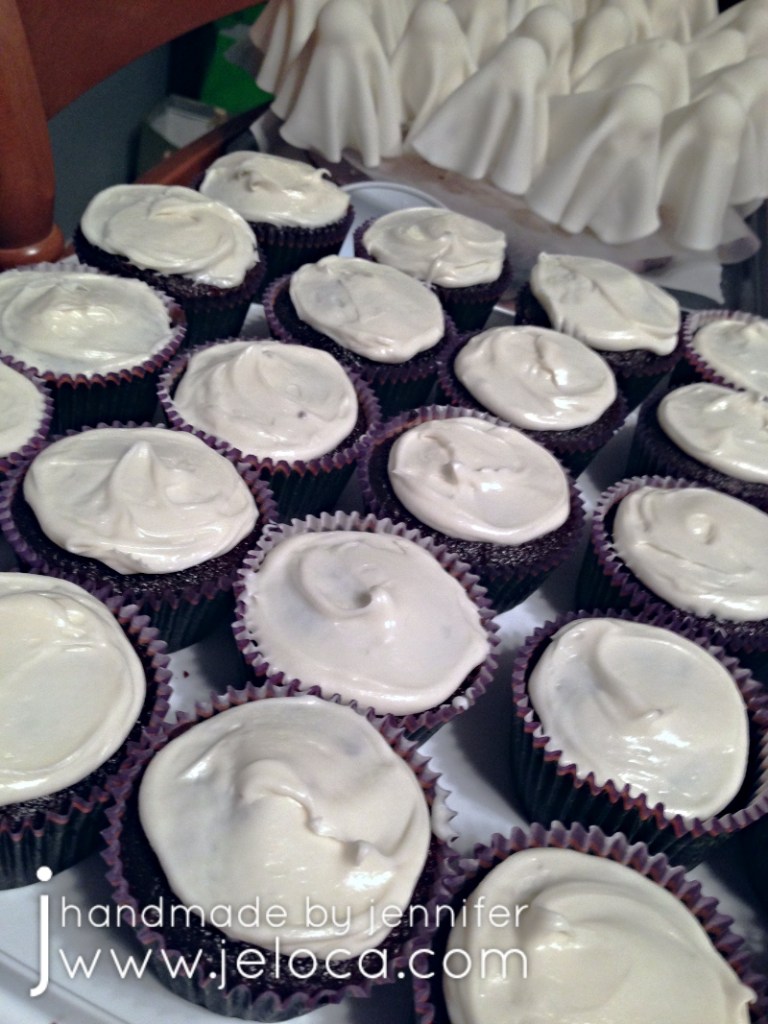
Repeat for each ghost and set them aside in your chosen support so the fondant can set up a bit. If desired prep a cake or cupcakes to be ready for the toppers. I’d baked up some chocolate cupcakes and gave them a thin layer of vanilla icing.
Once the fondant is no longer pliable you can finish off your ghosties by adding black eyes with a black edible marker. You can play around with the eye shape to give them all unique expressions!
Repeat until all your ghosts can see and then set them into your cake/cupcakes (if using). If you are placing them into treat bags to give out as Hallowe’en favors, allow them to air-dry until the fondant sets up.
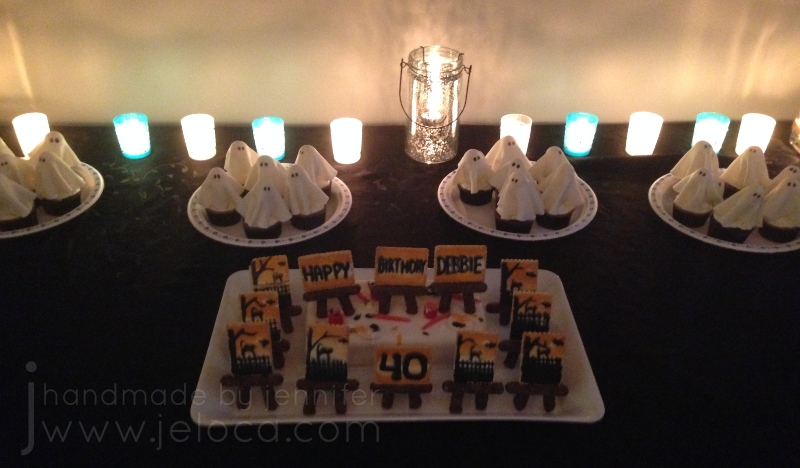
These were served along with the Paint Nite cake and cookies from my last post, and made for a really fun Hallowe’en party treat table!
This post may contain affiliate links. This means I might make a small commission on purchases made through the links, at no cost to you.
A few years ago I made a dessert for my friend Debbie’s surprise Hallowe’en-themed party. I was given the option to make cookies or a cake, so I chose both! This Paint Nite-inspired cake and cookie set is easy to make and looks way harder than it is!
You can start with a store-bought cake, or bake one yourself and prepare it for decorating with a layer of fondant to look like a tablecloth. I used white so the rest would stand out but you could use any color.
To make the easels you will need narrow rectangular cookies. You can bake your own or go the faster route and buy them! I used Cadbury Fingers but any log or stick-shaped cookie will do. You will need candy melts as the “glue” to hold the easel together so just be sure to match the candy melt color to your chosen cookies. Note- you don’t want to use regular chocolate for this as it will soften at room temperature and your easels will fall apart.
First make an A shape with a cookie going horizontally across two others for the easel’s ledge, and then after the candy melts set up use a 4th cookie as the vertical support leg. It’s easy to work this assembly-line style, being sure to leave enough time for the chocolate to set hard. I found that I only had to hold them in place for about a minute before they were able to stand on their own.
Of course any Paint Nite needs something to paint on! You can bake cookies yourself or use any rectangular cookie that has at least one flat side, like Biscoff, butter biscuits or shortbreads.
To make edible “paint” mix icing sugar with small amounts of water until you get a loose icing consistency. Paint Nite projects often have a gradient background with a silhouette design on top, so I used that style for my mini paintings. I chose Fall colors with pumpkin orange and white for a sunset and as this was a Hallowe’en party I added a black cat on a fence silhouette and full moon. This also worked well with the Paint Nite habit of using few colors in beginner paintings.
I painted the cookies much as you would at an actual Paint Nite – first painting the gradient background, then once dry adding the top layer.
The fun part was making each one just slightly different, while still being the same image – exactly how the results at a true Paint Nite would be. Everyone follows the same process and comes out with mostly the same image yet they’re all slightly unique to the individual artists.
I also used a few extra cookies to write a message for the birthday girl on her big day.
Of course, every Paint Nite requires supplies, so we need to add the solo cups-as-water cups, Styrofoam plate “palettes” and big orange brushes.
I made all the accessories out of scraps of fondant. For the solo cups simply layer a thin strip of white on top of the red before cutting out a strip to roll into a cup shape. The brushes are narrow rolls of fondant with the brush end dipped into the icing “paint”. The plates are small discs of white fondant smeared with dollops of leftover paint from painting the cookies. To make the “dirty” paint water I swirled a bit of each paint icing into clear piping gel.
Staging the table was super fun! Unlike a real Paint Nite where I try to be as neat as possible, here I got to be messy! I “glued” the fondant accessories in place with a small dab of water and then added drips and splatters of the paint to really sell the “end of the night of crafting” look.
I was so thrilled with how the final cake came out! It was one of the most fun cakes to make and allows for a ton of personalization. All the components can be homemade or store-bought which means this design can work with all budgets, and you can tailor the paintings to match any theme.
This post may contain affiliate links. This means I might make a small commission on purchases made through the links, at no cost to you.
As we count down towards Halloween I’m going to share a few more quick and easy projects that can improve an existing costume or be a brand new one. Today’s post is the former.
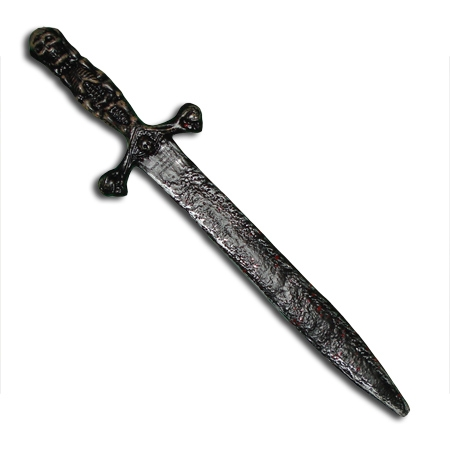
A few years ago the boys got Ninja Halloween costumes from Walmart. They weren’t fans of the faux weapons that came with the outfits so we went to Spirit Halloween and picked up a sword for each of them.
They both chose this one with a skeleton hilt. It probably belongs to a pirate, but they loved it, though they weren’t fans of the mixed color scheme. Henri wanted an all gold sword to match his Gold Ninja, and Jakob wanted an all silver look. I was quick to agree because differentiating between whose was whose would make my life as a parent easier.
Besides… how could I say “no” to these faces?*
The instructions are so easy I didn’t even take action photos! Using your gold and silver craft paint of choice, dab on paint over the raised areas. Leaving the grooves black will keep the depth and shadows. You can use a paintbrush, Q-Tip, even your finger, to dab on the paint. Wipe off any excess with a paper towel.
In this image I’ve repainted the bronzed skeleton silver to match the blade. I used DecoArt Crafter’s Acrylic from my local dollar store in Spun Gold and Silver Morning, but you can use any metallics that match your props. This gold and this silver are good options by the same brand.
You can see what a big difference it makes when comparing it to the original hilt! Luckily my silver matched the blade exactly but if it didn’t you could easily mix in some white or black to adjust the shade.
The second step was to do the same for Henri’s sword. Instead of a darker bronze like the hilt he wanted gold to match his costume. I brushed it on with a paint brush then quickly pounced on a crumpled paper towel to remove some of the paint and make sure the texture still showed through.
The last step for each was to fill in the skeletons’ eyes so they looked like gemstones. I used glitter nail polish for this but you can use anything sparkly you have on hand- glitter glue, nail polish, craft glue and loose glitter… even a tightly-packed glitter eyeshadow would work! Once dry, seal the eyes with clear nail polish or a protectant like Mod Podge. You can seal the rest of the sword if you like, with the same Mod Podge or a spray sealer, if you’re worried about the elements or long-term wear.
And that’s it! A few paint dabs to transform store-bought plastic swords into custom swords for my little Ninjas. So easy to do, and easy to adapt for any prop to add the color or wear you like. A touch of orange and green can add rust stains and oxidation, while dabbing on a few spots of red can imply the sword has seen more than the inside of a sheath.
You can find this year’s Halloween costume/prop/tip roundup here.
*Aside- it astounds me how much they’ve changed since 2017 when that pic was taken! This is the same duo in August 2021
This post may contain affiliate links. This means I might make a small commission on purchases made through the links, at no cost to you.
Another year means another roundup of costume-related projects and tutorials! With almost 3 weeks left until Halloween you’ll still have plenty of time to make any of the projects below.
Halloween is in two weeks, so you know what that means- time to start scrambling for (not quite) last-minute costume ideas! To help out, here are some costume-related projects from my archives that are short enough to get done before the 31st. 🙂
All month Henri has been telling me he planned to wear his Creeper costume for Halloween this year. He’s brought it up many times and even pulled the head out of the dress-up bin in our den to try it on and be sure it still fit. And then this past Friday his class went to circus school for the day and he came home like this:
and then told me he wanted to be Pikachu for Halloween.
This guy:
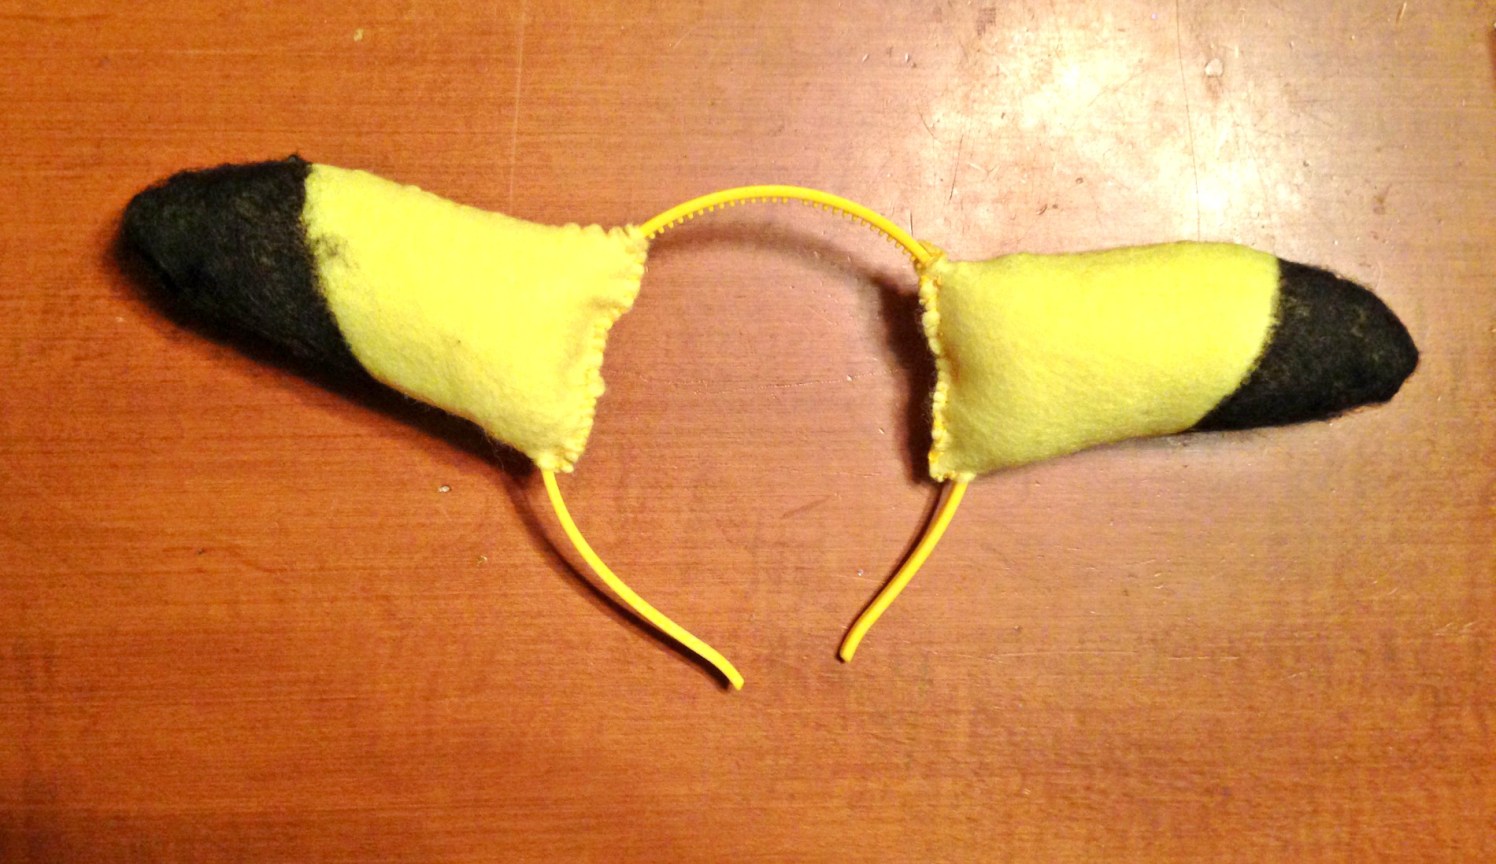
Um. Okay. We had nothing at home I could use to make a physical costume, but I knew we’d be going to Walmart the next day so I told him if we found a set of face paint, I’d buy it and would paint his face like Pikachu.
Saturday we were at Walmart and found some inexpensive face paint, but then he started complaining that he didn’t have Pikachu’s ears. I thought about it a little and told him we’d be going to the dollar store next; if he found a headband that fit him I’d buy some yellow felt and make him some ears. He found a girl’s one with a plastic bow attached, but it was yellow and fit him, and they had a pack of felt with yellow in it so we brought it home and I set it aside.
Yesterday I was at my parents’ house for dinner and Henri made a comment about being excited to wear his Pikachu costume to school the next day and I realized – oh crap, Halloween is tomorrow!
Ahem. Forgive me, my brain has been a little foggy lately.
We got the kids home and to bed and then I sat down and made Henri’s costume. It was quick, and it was easy, and it used either dollar store supplies or things you may already have on hand, so if you’re stuck for a last-minute costume, here’s how you can whip this up in plenty of time to go trick or treating tonight. Grab a friend who’s dressed like a Pokemon Trainer and you can be your very own live Pokemon Go team. 🙂
The first thing I did was carefully cut off the plastic flower on the head band, then I put it on Henri’s head and marked off where the ears should sit. As it happens we have a large Pikachu doll that was the right size to trace for the ear shape, but you can just freehand it.
After the ear shape was drawn, I drew a second line about a quarter inch outside it, for a seam allowance. Then I cut out the shape through all 4 layers of yellow felt.
The next step is to sew the ears together. I used yellow thread and a simple running stitch since the ears wouldn’t really be under any tension. I left the open end edges unsewn for about a quarter inch so I had enough fabric open to gather over the heandband. If you don’t want to sew, you could also glue the sides shut, but if you do make sure to put the ear side that you drew on on the inside to hide the pen markings.
Next I colored the ear tips with a black sharpie. The mess you see on the right is the transfer of ink from one side when I flipped it over to color the other side. I’m showing you this so you can be prepared and cover your work surface.
Once the tips were colored I stuffed each ear with some loose batting then sewed them over the sides of the headband where I’d previously marked. I used a blanket stitch to close the open edge but you can use any stitch you like, or glue them shut as well.
Here are the finished ears. They look silly off but are kind of cute on.
(Yes I had to try them).
While I was working on the ears I kept glancing over at the tail on our stuffed Pikachu and realized it wouldn’t take that much more effort to make one too, and surprise Henri.
To start I took some cardboard from our recycling bin and sandwiched it between two sheets of white cardstock with a regular glue stick. To make sure it dried well I placed it flat on the table and set some heavy books on it. Once the ears were done the cardboard had fully dried and I was able to trace Pikachu’s tail onto it.
Then I cut out the tail. I brainstormed a few different ways to attach it to Henri. I don’t like the idea of sending a 7yo to school with a safety pin on his butt, so I came up with a belt method. To make it work I carefully pried back about an inch of the tail section and folded the cardstock on each side outwards.
I used my Spectrum Noir markers to color the yellow of the tail and then colored the lower edge with a black Sharpie, completely overlooking the fact that it’s supposed to be brown, because I was working in dim lighting. D’oh. You can use any permanent markers, and do the proper colors. 🙂
To make the belt section, I first cut two holes into each side flap. I then threaded three strands of yellow yarn through each side, made a knot to secure them near the top, and then braided them into belts which I could then slide through the belt loops on his jeans and tie at the front. I made them longer than needed because I didn’t have his waist with me to try them on, and had planned to cut the excess this morning but we ended up just tucking the ends into his jeans.
And there you have it! Add in some yellow face paint, bright red cheek circles and a black triangular nose and poof-
You’ve got one happy Pikachu.
Have a happy and safe Halloween!
—-
Looking for more Halloween costume ideas? Check out here.
This post may contain affiliate links. This means I might make a small commission on purchases made through the links, at no cost to you.
When my boys were little, they wanted to be pirates. Henri especially – it was either a Viking or a pirate, depending on the day. Inspired by Jake & the Neverland Pirates they drew treasure maps with large scrawled Xs and hid their toys and told me it was their secret booty.
I wanted to give them some real toys to play with, but all the pirate-themed sets I could find weren’t safe for my rambunctious 3-year-old. I needed something childproof, and ideally inexpensive. Finally, after catching him trying to use his sippy cup as a spyglass just like the Backyardigans had on one of their pirate-themed adventures, I had an idea. One trip to the dollar store and some recycling-bin scrounging later, these fast, easy, and inexpensive toys were born.
I used items found locally, but the links above would work just as well 🙂
First up – the binoculars. (Btw…yes I know pirates didn’t use binoculars. But I couldn’t be certain my kids would use the spyglass as such, and not a makeshift sword, so I wanted to give them another sight-related option. Feel free to leave this one out, or use it for a different play idea. Perhaps an adventurer, bird-watcher or a fun game of I-spy?) For the binoculars you will need 2 clean toilet paper rolls, one cube from a dollar store packet of wooden craft shapes (about the size of a sugar cube), and a roll of electrical tape. At my dollar store this tape comes in a set of 4 colors all packaged together. You can use Washi or other decorative tapes on the outside, but I would not use them for the support structure. If you want to use them, apply them at the end, for decoration.
Step one is to cover the tubes in tape. I had done these first, and only later realized I should have covered the exposed edges FIRST, THEN wrapped the sides. When I get to the spyglass you’ll see I fixed that. If you want to be smarter than me, fold little pieces of tape over the exposed edges first. Be careful to not place the inside edge deeper than the width of the tape itself so you can cover it later. I have enough tubes for 3 sets shown because my neighbor’s young son was also really into pirates and I wanted to surprise him with a set of his own.
Step two is to cover 4 of the sides of the cube in tape. Place the tape on one edge of the cube and just keep wrapping around the other 3 sides until you reach the beginning again. You’ll be left with 2 exposed edges that are opposite of each other. Don’t worry about covering them, as they will be against the tube rolls and won’t show.
Step three is to connect the rolls to the cube. Place it a bit in from one edge so it looks like the bridge on a pair of binoculars. Be sure to place the raw, exposed edge against the tape so the covered sides are what is shown. Secure well with more tape.
This is what it looks like when you have three rolls done. I’d run out of tape, and had to go buy more to get more blue… d’oh.
This is when I covered the edges and realized I should have done it first. Oh well. If you’re like me, and goofed, place short strips around the exposed edges. This is for aesthetics as well as durability – no open edges means it’s less likely the toy will tear or fray after some hard toddler use. Be sure to not place the inside edge deeper than the width of the tape itself (see: left roll). Once you’ve covered the edge completely, cut a length of tape to fit on the INSIDE of the roll, and place it around, as close to the edge as possible, to cover and secure all the short edges (see: right roll).
Then you can use another length to go around the outside, covering those short pieces too. (This step is unnecessary if you covered the edges first).
Here’s a completed pair of binoculars. The new blue tape I’d bought was darker than the original, so it gave a nice finished look, almost like adjustable lenses. Even though they’re ‘only’ toilet paper rolls, the rubbery tape gives them a surprising amount of durability. Don’t get them wet, however, as the inside paper is still exposed.
Next I made the spyglasses out of paper towel rolls (though you can cut down wrapping paper tubes too). As you can see, for these I was smart enough to cover the ends FIRST, THEN wrapped the tubes. It’s easier to see on the white than the blue, but when you wrap, ease the tape slightly sideways so you can move along the tube/roll. Because the tapes are rubbery, they’ll stretch to where you want them to go, instead of tearing.
Finish covering the tubes by wrapping a piece of tape around the inside of the open edges to cover the short pieces. Because you did them first here, you won’t have to add more tape on the outside.
(This picture makes me laugh because it’s such a typical scene in my house – the dining room table covered with mom’s crafty projects, the kids’ placemats and a bag from the latest dollar store run for supplies. *chuckles* Plus seeing the boys’ bibs reminds me just how long ago I’d made these. Those are their “I ❤ Dic Ann’s” bibs. *grins*)
Once the spyglasses have been covered with tape, use glitter glue (from the dollar store) to paint on whatever decorative touches you’d like. I went with gold grip handles on mine. Set them aside to dry overnight, using drinking glasses or other supports to avoid messing up the wet glue.
For the treasure chests you’ll need some kind of chest-like container. I was lucky that my dollar store had these little wooden chests, but you can use any container or box you have on-hand, even an old Tupperware. I bought strips of glitter gem tape to decorate mine, but you can use sticker letters, nail gems, paint, or anything you like. (Oooh they would look INCREDIBLE painted to look like real, aged chests!)
Finally, you’ll need some pirate booty. I got these acrylic diamonds from my dollar store, as well as the strands of ‘Mardi Gras’ beads. I would have loved to include gold coins, but couldn’t find any on that visit. This set I found on Amazon has both gems and gold coins together, and would have been a great addition.
Decorate the chests. My kids picked their favorite colors of these jewel strips and I cut them to fit along the top edges, but you can do whatever you like to the outside of the chests.
To secure the booty inside, we’ll be using a high-tack craft glue. If you have older kids you can omit this step and leave the treasures removable, but since two of my recipients were 3 years old and some of the jeweled edges were sharp or choking hazards, I elected to make my treasures permanent. Plus this would ensure there was always booty ready to be discovered. Place a thick layer of glue in the bottom of the case, a little more than you think you’ll need because the wood absorbs some. Begin placing your chains and jewels down into the glue so that they look like they were piled in haphazardly. Use more glue as needed to secure any loose bits. Feel around to make sure any sharp edges are embedded in the glue vs sticking out. Every now and then hold up or shake the box to see if any bits move or shift, and keep adding glue into every nook and cranny. I went crazy on the glue because I know my toddler will find any loose edge to play with. Don’t worry about the white glue showing as it will dry clear. Finally, once you think your treasures are secure, set it aside to dry at least overnight. I dried mine overnight then held it upside down and shook it around, then added more glue to any of the bits that moved. One of the chests was going to be a gift for a toddler and I didn’t want to worry about any accidents on account of it.
Here’s how my collection turned out. They made fun play accessories for around the house and costume day at school, and were surprisingly long-lasting. The boys didn’t manage to get the gems and beads out of the boxes for at least a year and a half, and the chests, the spyglasses and even the binoculars are all still intact in our dress-up bin all these years later.
If you make any of these I hope they give your toddler/child just as much fun as my kids had with them. 🙂
This post may contain affiliate links. This means I might make a small commission on purchases made through the links, at no cost to you.
Update: This tutorial is now also available as a downloadable PDF here. More details at bottom of this post.
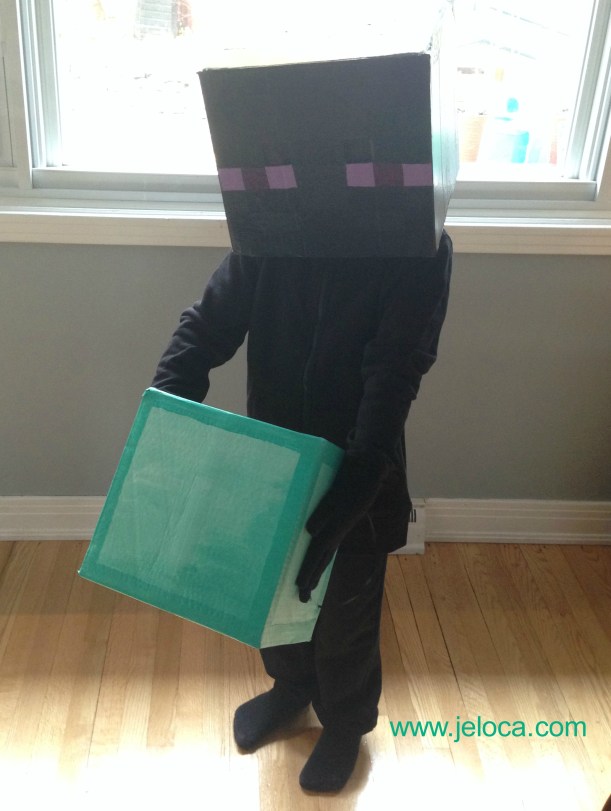
Some of you may, like me, be suddenly realizing there are only ten days left until Halloween. No stress – there’s still plenty of time to make a Minecraft Enderman costume, complete with a matching diamond block trick-or-treat basket!
For Halloween last year Jakob wanted to be a Minecraft Enderman. For reference, these are the tall, spindly black figures who appear out of nowhere to steal your blocks. They’re neutral mobs who can teleport and will only attack when provoked by looking them in the eyes (which, to be honest, is kind of hard to avoid, seeing as how they’re the most vivid part of the things!).
In the game Enderman can’t actually pick up diamond blocks, but that’s what Jakob wanted anyways. To be an Enderman carrying a diamond block.
I was fresh off my “Skylanders Sprocket wrench pulling double-duty as secret purse” achievement so I thought if he’s gonna be schlepping a box around anyways… why not make it useful and turn it into his trick-or-treat basket? So that’s what I did. 🙂
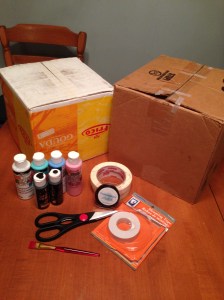
The first thing to do was assemble all materials. In total the two parts of the costume required the following:
2 boxes (one large enough to fit over the wearer’s head, & a second box to be the treat basket)
Everything but the boxes and scissors came from my local dollar store, making this not only an easy costume to make, but a really inexpensive one too.
ENDERMAN HEAD
Top row:
Assemble all materials
Cut off the flaps on the side of the box you want for the opening. Tape down all other flaps securely, cover all seams and use tape to cover the cut edges at the bottom.
Measure out your grid on all 5 remaining sides of the box.
Middle row:
Cut out the eye holes.
Cover the cut edges of the eye holes with masking tape, then paint the Enderman’s eyes with two different shades of purple.
Paint the rest of the Enderman’s head. I followed a actual chart pattern using shades of charcoal and black but you can just as easily paint the whole rest of the head solid black.
Bottom row:
Optional: tape a piece of sheer black fabric over the eye holes so they don’t show from the outside but can still be seen through on the inside
Enjoy your new Enderman head!
Wear with black sweatpants, a black sweatshirt, and black stretchy gloves. Add a diamond block trick-or-treat basket for a complete Halloween costume!
(optional- seal the paint with spray sealant, more on that below)
DIAMOND BLOCK TRICK-OR-TREAT BASKET
Top row:
Assemble all materials
Cut off the flaps on the side of the box you want for the opening. Tape down all other flaps securely, cover all seams on the outside and cover the cut edges at the bottom.
Mix aqua and white together to get a few different light aqua shades.
Middle row:
Following an in-game image of a diamond block, paint one side in shades of aqua, making one lower corner darker for shading. Repeat on the other 4 sides.
Add a border to all 5 sides using the aqua paint at its full strength.
Paint the inside of the box black.
If you prefer a more accurate version, I have compiled this tutorial into a downloadable PDF (linked at the bottom of the post) which includes full-color screen-accurate charts for both the Enderman and the 16×16 grid of the diamond block, including the hex codes for each color so you can color-match accurately.
Bottom row:
Make 2 holes in 2 opposing sides. Knot ribbon through the holes to act as handles.
Enjoy your diamond block trick-or-treat basket!
Add to the Enderman head for a complete Halloween costume.
One optional step that I did but is not obligatory at all is to spray the painted sides with a sealant. I didn’t know what the weather would be like on Halloween and didn’t want to worry about rain causing the paint to run.
*Update in 2020: the heads are still going strong! The boys outgrew them of course, but we keep them as nerdy shelf displays and they look exactly the same as they did back when I made them.
And that’s it! The longest part in making these costume pieces is waiting for the paint to dry. 🙂
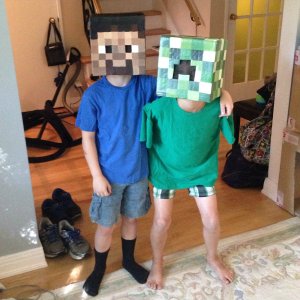
(PS: Looking for the big guy’s little buddies? Check out my tutorial for Minecraft Steve and Creeper heads here!)
I hope this post shows you how easy and fast it can be to make your own Minecraft Steve and Creeper heads!
You can adapt the tutorial to make any Minecraft mob, and I’ve got an assortment compiled for you here.
As mentioned above, if you’d like an easy-to-print-and-save PDF version of this tutorial, I have made it available on Etsy here. The 12-page PDF includes full instructions with additional details, clear photographs, as well as game-accurate full-color numbered charts for all 5 sides of both the Enderman’s head and the diamond block, along with their hex codes for perfect color matching.
My phone has been pinging quite a bit lately, notifying me that people have been saving my pins. While I think that’s awesome, and am flattered, I was also confused because I couldn’t think of what I’d posted that would be so popular at the moment. And then I remembered – it’s almost Halloween! Sure enough, it was my Minecraft-related pins getting all the love, the Creeper/Steve head tutorial especially.
So for anyone who found my blog via those pins, or anyone else who’s interested, here are some quick links to my (few) Halloween/costume-related tutorials. I do have more coming up this month, so be sure to come back and see.
I hope you enjoy the links! For my fellow Minecraft-loving folks, I’ve got a matching Enderman tutorial coming up, complete with his very own diamond block. Stay tuned!
Those who follow me on Instagram/FB got a sneak peek at Henri’s Halloween costume this year. The boys fell hard into the world of Hogwarts when we began showing them the films this year, though we stopped after the 5th one because they were getting a bit too dark.
Jakob wants to be Draco Malfoy. It was his original costume choice, now possibly swapped out for a Minecraft Enderman, but in general, he wants to be a Slytherin. He thinks Harry was put in the wrong house, and that Slytherin is where it’s at. It’s less to do with the negative traits or a penchant for the color green, than it is that, as he likes to remind me, “We love snakes, Mom.“. Yes. Yes we do.
Jakob, age 4, with friend.
The Snake is my Chinese sign and a long-favored creature of mine, and that love transferred down to my oldest. In fact, we’d have a pet snake at home if it weren’t for 2 things: 1. I would be too heartbroken to feed it mice, and 2. my father-in-law would never visit again.
In any case, if ever he were to dress up as anything from the Potterverse, it would be in Slytherin colors. But Henri? He’s Gryffindor all the way.
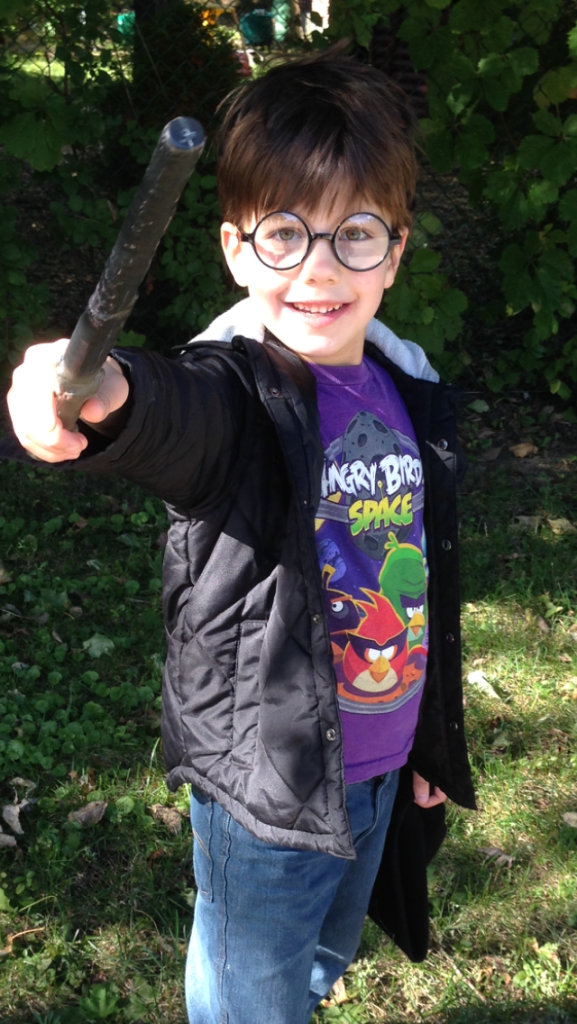
Doesn’t he even LOOK like a young Harry???
We bought those glasses and wand last weekend at the local Halloween store, and my mom lent us a black grad gown that is PERFECT for his robes. I’d like to find time to make a crest for the robe, but the main finishing touch for his costume is the scarf, so I decided to get on that last night.
The burgundy isn’t quite right, but I’m working with stash yarn and I don’t think he’ll mind too much. The pattern is my own, such as it is.
CO 30 sts with burg yarn. Work 1×1 rib for 30 rows. Change to yellow, work 1×1 rib for 30 rows. Repeat, ending after a burgundy section. Add fringe.
I decided against working stockinette because I really didn’t feel like taking the extra time to make it doubled or in the round, and a flat panel of st st would curl like crazy. 1×1 rib contracts enough to look almost like stockinette and won’t curl, making it quicker and easier for a 6yo’s Halloween costume. 🙂
UPDATE AFTER HALLOWEEN: Here’s Henri’s final costume!


