Leave a comment

Happy Towel Day

Happy Towel Day to all the hoopy froods out there! Here’s a free towel pattern (with custom mods) that you can work on while sipping your pan-galactic gargle blaster or some drink that is almost, but not quite, entirely unlike tea.

I first came across this pattern at Craft Time at work. (Yes- my job came with a craft club. YES- IT IS AWESOME). A few of my colleagues have knit this towel pattern, found for free online here (Ravely link here).

The version shared with me was the row-by-row Word Document version that is available here. (I’m not sure if/how it differs from Dixie’s original pattern above). I really liked the texture and stripe but am not a fan of the single hanging strap. In my experience there is too much strain on a single point and it winds up stretching over time until the towel is sagging lower than desired.

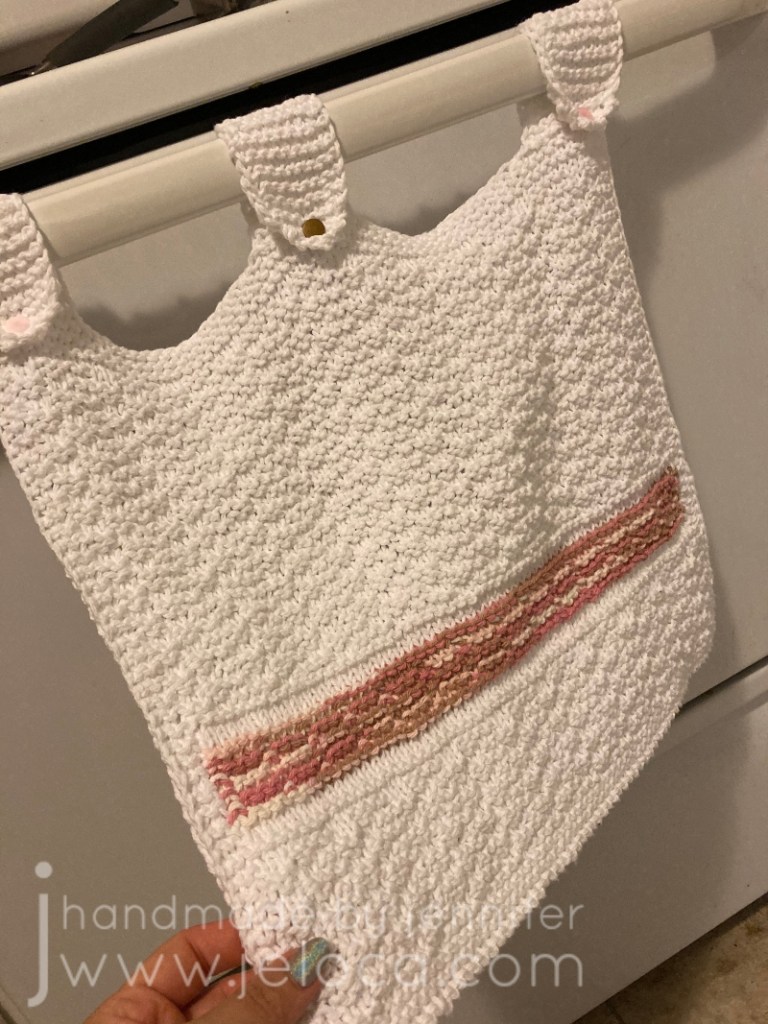
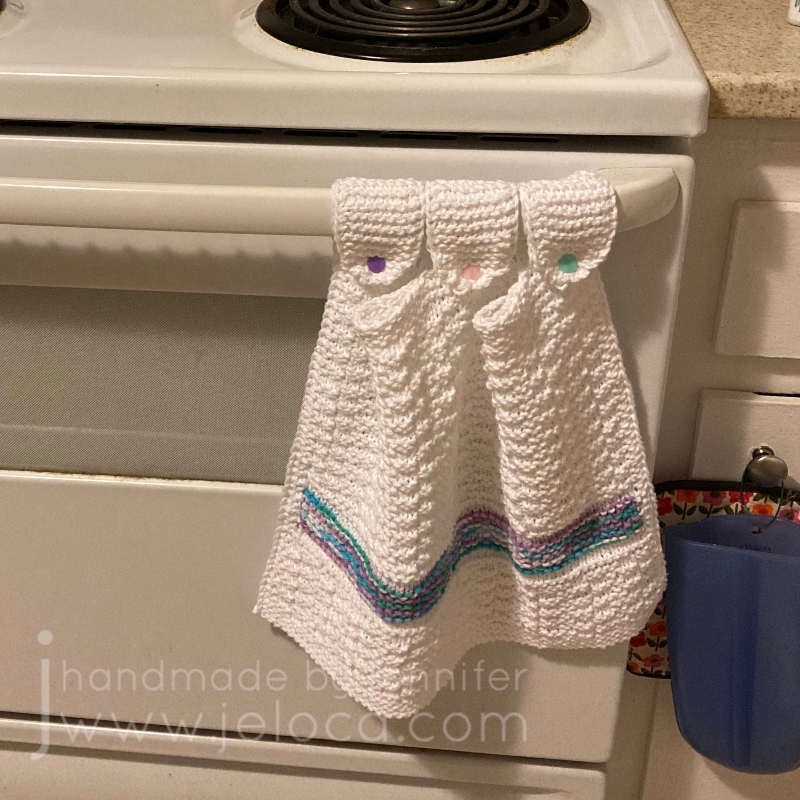
To fix this I reworked the final steps to have 3 hanging straps per towel. (You can also do 2 but I didn’t want the middle to sag either). I also worked the contrasting-texture stripe in intarsia for an inset colored band that used up scraps of cotton leftovers from previous projects.

I’ve now made 4 of them (with matching washcloths using the leftovers) and have been consistently having 2 on my oven while the other 2 are in the wash, and swapping them out regularly.

The top two sets in the image below were made with Lily Sugar ‘N Cream cotton for the white and have buttons in colors that match the contrasting colors.

The two bottom sets were made with Bernat Handicrafter Cotton for the white and have plastic snaps in matching colors set through the natural holes in the knitting. (I’ve been using my snap kit paired with a set of assorted color snaps and have managed to always find the colors I need for my projects). They have held up wonderfully and none of the snaps nor buttons have come loose with time or multiple repeated washings.

Finally I used the remaining scraps from each towel to make a matching dishcloth using my favorite easy dishcloth/washcloth pattern.

1 Strap-to-3 Strap Modifications

  • Work the towel pattern as written through row 61, adding repeats if desired to make longer towels. (Note that my towels pictured have 7 extra repeats of rows 43-46)
  • Row 62: Slip 1st st as if to purl (yarn in back), k to last st, p1
  • Rows 63-67: rep row 62 for garter band at top of towel
  • Row 68: (hanging strips setup row) Slip 1st st aitp (yib), k9, BO 17, k10, BO 17, k9, p1. You will now have 3 sections of 10 live sts with 2 BO sections in between.
  • Row 69: (first hanging strip) slip 1st st aitp (yib), k to last st, p1
  • Rows 70-100: rep row 69
  • Row 101: SSK, k6, k2tog
  • Row 102: SSK, k4, k2tog
  • Row 103: SSK, k2, k2tog
  • Row 104: SSK, k2tog
  • Row 105: BO rem 2 sts
  • Cut yarn, leaving tail to weave in, then rejoin yarn to next set of 10 live sts.
  • Repeat rows 69-105 twice.
  • If you use snaps, wiggle the post of each side of the snap through an opening in a stitch before pressing. If using buttons, add a YO on row 101
This post may contain affiliate links. This means I might make a small commission on purchases made through the links, at no cost to you.


4 Comments

FREE PATTERN: Perfect Lay-Flat Knitted Diagonal Garter Washcloth

Update: see end of post for information about a downloadable pattern pdf

With my upcoming surgery looming in the near future, I decided to make the most of my time and get a head start on this year’s holiday teacher gifts.  I still make the Christmas and Hanukkah gifts for my kids’ teachers, lunch ladies and daycare workers, and, not knowing how much I’d be up for a long bout of down-to-the-wire crafting post-op (since I somehow always end up working til 4am the night before the last day of school), I was smart and started early.

I decided to make dish/washcloths again.  It’s been a few years since the junior campus staff got regular square washcloths, and I haven’t made them for anyone on senior side yet, so I wasn’t worried about being too repetitive.  I dug some favorite Bernat Handicrafter Cotton from my stash and pulled up the most basic, well known, standard dishcloth pattern Ravelry had to offer – a plain old, diagonal-knit garter washcloth.

Plenty of yarn, plenty of time, and a well-worn pattern.  This, I thought, would be a breeze.  I was even optimistic enough to think I’d have the Xmas gifts ready before November!

Heh.

My troubles started early on.  After completing the first washcloth, actually.  I had finished it and set it down flat on the table and noticed the lower edge immediately curl upwards.  I smoothed it flat but it quickly rolled inwards again.  It wasn’t terribly noticeable, and – let’s face it – this is a dishcloth.  If used properly it would end up scrunched and rolled and pulled and would sag and ease out of shape quickly.  But I was annoyed at how it looked and poked around at it a bit trying to figure out why the top half was fine but the lower half curled in.  The top half, by contrast, lay beautifully flat. I couldn’t figure out what I’d done wrong.

Finally I realized it wasn’t my fault – there was an inherent flaw with the pattern. It was the kind where you increase into the second stitch of every row.  That type of increase pulls imperceptibly on the outer stitch, eating up the slack between the first two stitches.  When this is done at intervals one would hardly notice, but when it is done at the beginning of every row the result was edges that curled inwards.  This didn’t occur on the top half of the diamond because that was the decrease half and I wasn’t using any of the previous row’s slack at all.

I could smooth it flat and I could have blocked it but come on… blocking washcloths?  No thanks.  I’d rather figure out how to knit it without the flaw.

The main thing was to figure out what increase to use.  Any increase which went into the prior row, including a standard ‘make 1’, would cause the same inward tugging.  Yarn-over increase patterns didn’t have that problem, but I didn’t want eyelets dotting the sides of my washcloth.  I wanted these cloths to look less dainty, more ‘rugged’, if that makes sense.  I decided to work YO increases but to close them on the subsequent rows by knitting them through the back loop.

Once I was tinkering with the pattern I also added a plain row at the max width point before transitioning into the decreases. Diagonal patterns always seem to have you go from wide to narrow without any plain row in between and I find that the extra row tugs less on those points of the diamond.  The result is a lovely garter washcloth which has wonderful drape and lays flat beautifully, and is now my go-to knit washcloth or dishcloth.

photo2016-10-28113107amedit

I’ve knit 9 of them so far… sadly not anywhere near how many I need, but enough to know I’m really happy with how it works out, and I added it to Ravelry tonight.

The yardage listed is for a dishcloth knit to 41 sts, which results (at my tension) in a 9” x 9” square. You can easily make them larger or smaller. If desired before binding off you can create a strip to fold over and sew down for a hanging loop by either knitting about 4” of garter on those 3 sts or knitting them into a 4” long 3-st i-cord.

This pattern would work equally well for baby blankets or throws, continuing to increase until whatever max diagonal is desired before working the plain row and then beginning the decreases.

photo-2016-10-28-11-32-05-am

Directions

  • CO 3 sts 
  • row 1- k across 
  • row 2- k1, yo, k to end 
  • inc row– k1, yo, k to previous row’s yo and knit it tbl (to close the hole), k1 
  • Repeat inc row until diagonal of cloth is at desired widest point (I stopped at 41 sts)
  • Next row- k to previous row’s yo and knit it tbl (to close the hole), k1 
  • dec row– k1, k2tog, k to end of row 
  • Repeat dec row until cloth is back down to its original number of sts 
  • BO remaining sts & weave in the loose ends

Update!

This pattern is on Ravelry here.

This pattern is provided for free above, but if you’d prefer an easy-to-print version, I have made it available here for a very small fee. The PDF includes the full instructions, an easy to read layout and full color images.

*Updated January 2020

This post may contain affiliate links. This means I might make a small commission on purchases made through the links, at no cost to you.


4 Comments

go habs go

Maaike and I are going to see the Yarn Harlot at WEBS this weekend, and decided to keep up the tradition of knitters bringing her washcloths. We worked up some ideas and I quickly designed a cloth for Montreal and a cloth for Quebec. As a final touch, I also came up with a Habs cloth (the Yarn Harlot is from Toronto…and the Habs are doing better than the Maple Leafs this year). These cloths were designed by me with help/inspiration by Maaike.
I was going to wait to knit up a sample in all sizes before publishing, but in the spirit of last night’s game 7 win by the Canadians, I’m going to offer a rough cut of the pattern here so you can get your Habs fever on, knitting-style!
(about 4.5″ x 6″)
(just like the small size but with more space around the logo, adding about an inch to all directions)
(bigger than the others and has the words “GO HABS GO” across the top and bottom)

ETA1- I made a slight change to the pattern (added 2 rows in the red section below the C) for all sizes. The new files were uploaded and the links changed at 9:45am EST on April 23 2008. If you downloaded the files before that date please download the latest version. Thank you!

ETA2- I am aware that there was a problem downloading the files earlier. I have fixed this with the hosting people, and there shouldn’t be any more problems accessing the patterns. If you have any problems, please email me!


2 Comments

the week so far

On Saturday I spent my time crocheting to have the face/wash/dishcloths done in time for our dinner Saturday night, as they were a hostess gift for my mom’s friend who was having all of us over. I managed to finish 4 in time.

I used worsted weight Bernat cotton from Wal-Mart and a 4.5mm crochet hook for all of them.

This Brick Wall dishcloth was inspired by the one in the Mason/Dixon book. The free pattern can be found here. I followed the pattern but added a row of single crochet around the outside to finish off the side edges nicely.
This one is called the Chain-8 cloth and the free pattern can be found here. I really enjoyed this one, and plan to make more for our house.
This is a closeup of the cloth. What is really cool is that you knit the cloth much wider, with these chains of 8 chains wide on every row (hence the name). Once you are done your height, you use your fingers or a crochet hook and link the chained areas up in exactly the same way you would hook up a dropped knit stitch. As a variation you can give the loops a twist first before linking them up. I did. It gives a nice raised line that would work well for scrubbing.
This is the Diamond cloth and the free pattern can be found here. Instead of working to 21 rows then doing a fancy border, I did only 17 rows then a row of single crochet around since I had to leave for the dinner.
This is the Sunshine cloth and the free pattern can be found here. If I knit this one again I would make one of 3 alterations: I would either do it all in orange or yellow, or I would do the last row before the border in the border color, or I would do it the same as I did it, but I would do the border through both loops not just the front one. Doing it as the pattern states leaves a clear “front” and “back” whereas any of the other ways would have it reversable.

We had a nice dinner to break the fast (not that I fasted) and Jakob was a big hit, being passed around from person to person and behaving wonderfully.

Sunday we had my friend’s daughter’s first birthday party, and again Jakob was scooped from my arms the moment we arrived, and only given back to me to feed him. My friend had moved to Toronto and the guests were all of our old high school friend and her family, so even though most of them were people I have known since I was 12, none of them had ever seen him before and it was great to show him off. Everyone was amazed at his smiling, bubbly personality, and especially how, when it was time for his nap, he fell asleep in my arms (even though I was sitting on the floor in the middle of a crowded room while everyone talked and laughed and the birthday girl opened her gifts and cried and screamed).

On our way home from the party we did an impromptu stop- I bought a Nintendo Wii! I was talking about it with Yannick and next thing I knew we were in front of the store…and it is mine! We didn’t set it up because we had planned a date to go out and celebrate my birthday. My sister and her boyfriend came over to babysit Jakob and Yannick and I went for dinner and a movie. Dinner was great ‘cus we got to watch football at the restaurant, and I had a really yummy steak sandwich. Then we saw Good Luck Chuck which was a very cute movie. Also very wrong…in a few ways LOL. Penguin pr0n. That’s all I’m saying.

When we got home it was still early so we hooked up the Wii and played some Big Brain Academy with Laura and Mike.

Monday Yannick babysat while I went to have an old root canal worked on a bit (over a year later and the tooth still hurts), then I spent the afternoon both tidying up the house and playing on the Wii some more. When Yannick got home we challenged each other in the bowling and golf games that came with the system.

Tuesday I went into town to hang out at Robyn‘s house. I didn’t get any knitting done, but we had a good walk and some lunch then watched Knocked Up together. I found it cute but hard to catch all the jokes with the kids playing, so I’d like to watch it again with Yannick once Jakob’s asleep.

And finally today I took Jakob to the movies with Robyn, Sean and my aunt. We saw Across the Universe- the movie with all of the Beatles songs. I really enjoyed it, although it was REALLY trippy. Now we’re at my mom’s for supper then will be heading home later. I plan on putting Jakob to bed then knitting while I watch CSI:NY so hopefully I’ll have some knitting progress to post by tomorrow.