Another year means another roundup of costume-related projects and tutorials! With almost 3 weeks left until Halloween you’ll still have plenty of time to make any of the projects below.
Halloween is in two weeks, so you know what that means- time to start scrambling for (not quite) last-minute costume ideas! To help out, here are some costume-related projects from my archives that are short enough to get done before the 31st. 🙂
Update: This tutorial is now also available as a downloadable PDF here. More details at bottom of this post.
It’s October! That means it’s okay to start talking about Halloween, right?
It is according to Henri- when I woke him up for school this morning he gazed up at me sleepily and grinned “It’s October 1st.” When I asked why that mattered he smiled even more adorably and said “Because now it’s almost Halloween.”
‘Almost’ is relative. (He clearly gets his awareness of time from his father). However his mention of it reminded me that I never showed last year’s costume. So. Now, with plenty of time to get ready for this year’s holiday… here’s how I made the boys Minecraft Steve and creeper heads, and how you can too!
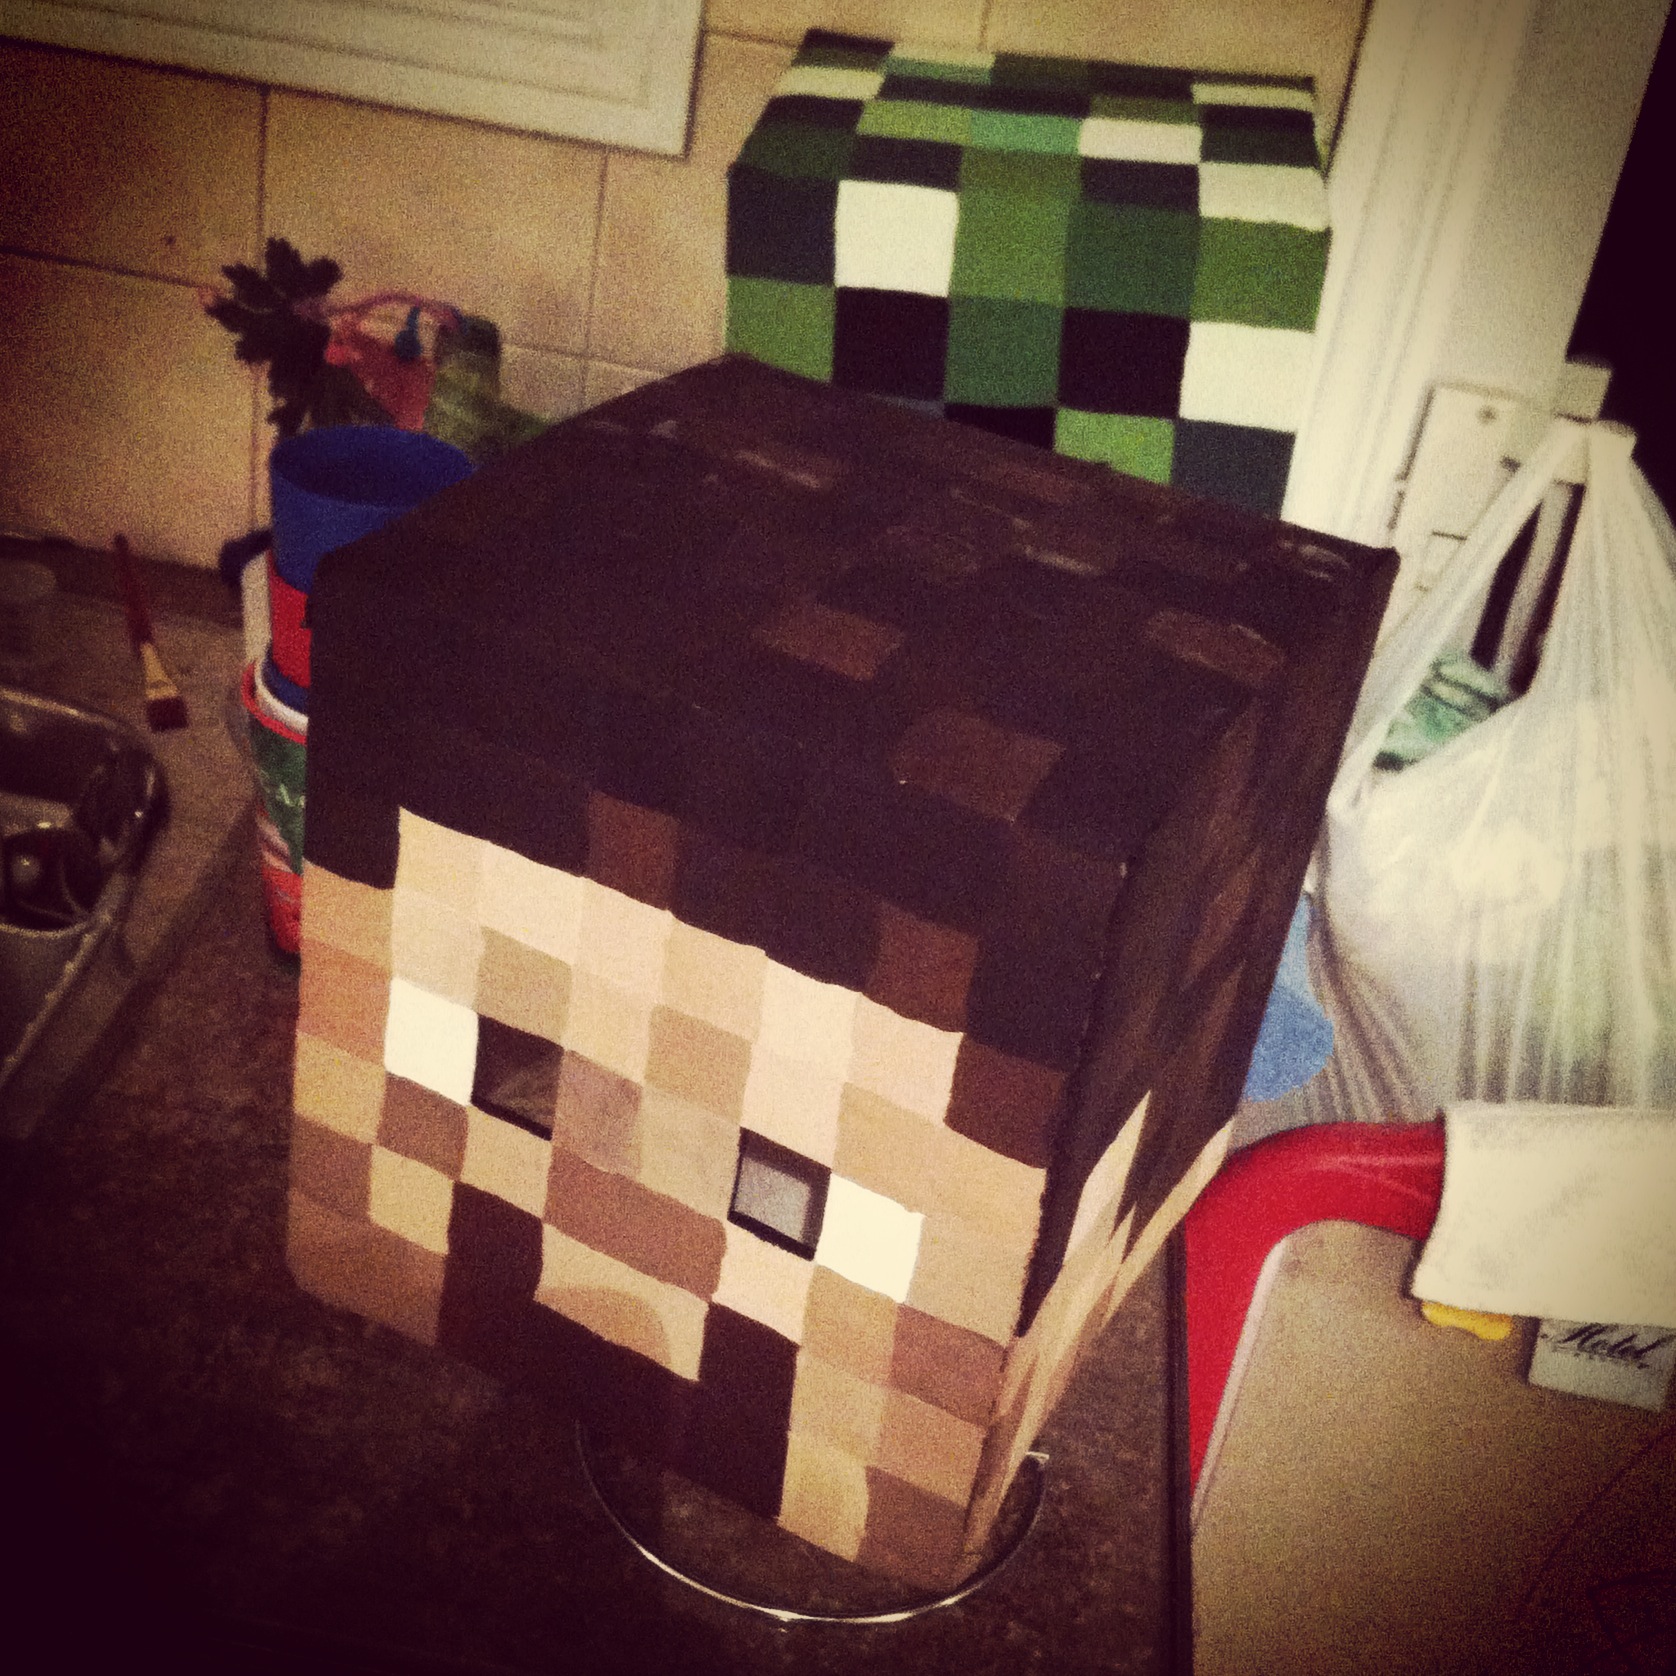
The boys decided for Halloween they wanted to dress up as their favorite Minecraft characters. They do sell ready-made cardboard heads in stores but they are expensive, and there are a ton of tutorials online. I looked at a few, then worked things out with what I had on hand, and what I was able to find at the dollar store.
What you’ll need:
square boxes (large enough to fit over the wearer’s head)
1. Yannick came home with 2 small boxes he’d found somewhere. Grocery stores often have ones you can ask for, or as a last resort you can buy boxes.
2. I used two-sided tape to tape the outer flaps to the inner ones (not shown) so the inner flaps wouldn’t drop down onto the kids’ heads. Then I used masking tape to fully tape over the top seam, both to securely close one end of the box, and to make the seams less visible once they were painted.
3. I cut the lower flaps off the boxes and then used the same masking tape to cover the exposed edges. It would gave a cleaner look, vs the rough look of cut corrugated cardboard, plus was less likely to catch and tear, which could potentially pull off the paint.
4. I divided the 4 sides and top into even grids. I looked at pictures of the characters online and mapped out roughly how many squares per color/face, and then used a ruler to divide the front (face side) into the grid. Once the face was set, I carried the markings around the sides of the boxes, and finally the top. Because the boxes are taller than wide, the top has fewer squares than the sides do. That’s not what the characters SHOULD look like, but I didn’t think the kids would mind.
5. Once the boxes were plotted I used a cutting blade (also from the dollar store) to slice out the eyehole sections. For Steve, only the dark pupil area was cut out. For the creeper it made more sense with where Henri’s face was to cut out the larger nose/mouth section. After removing those areas I covered the exposed edges with masking tape.
6. Finally it was time to start painting. The paints and brushes were from – you guessed it – the dollar store. The advantage with the Minecraft characters is that if you have to custom mix your paints to get the right colors, it doesn’t matter as much as it would in most projects if you have enough to complete your painting or if you need to mix more and risk not matching quite right. The goal is to have an assortment of shades, so blending colors works perfectly.
That said, if you prefer a more accurate version, I have compiled this tutorial into a downloadable PDF (linked at the bottom of the post) which includes full-color screen-accurate charts for both characters, including the hex codes for each color so you can color-match accurately.
Here’s the four sides of the painted creeper head. I set the boxes to dry on a paper towel roll to hold them off my counter until the lower edge was dry. (I held them up the same way while painting too).
Same goes for our buddy Steve here. I’d only had three shades of brown paint on-hand to work with, so I blended them together with some black for the hair, and then lightened with some white and a touch of red for the face. (I’d actually done the face/neck/ears first, so then I could re-use the same paints but darken them for the hair. That avoided any waste and kept the same unifying overall color tone for the head.)
I had them both on the counter while I cleaned up the dining room table of all my painting gear. Couldn’t resist this dramatic shot. Look out! He’s behind you!
7. The next step was to seal the heads with an aerosol can of clear sealant. I didn’t know what the weather would be like on Halloween and didn’t relish the idea of my hard work being ruined by a few drops of rain or thick snow settling on the kids’ heads. I moved the heads into the garage and set them on some newspaper to protect the floor as I sprayed, and did a few coats, allowing each one to dry for about 20 minutes in between. If you have a dry, open area outside or good, even weather you could do this next step outside, but here there was nowhere I could leave them unattended, so I had my garage door open the entire time I sprayed, and then left it about a foot open during the drying time between coats. Once they were properly sealed and dry to the touch I brought them inside and allowed them to dry for a full day before the final steps.
The last bit in getting the masks ready to wear was to block out the open areas. I bought a gauzy sheer black scarf (also at the dollar store!) and cut off squares large enough to fully cover the open areas.
8. Using the same double-sided tape I secured the black fabric down around the cut areas.
9. Finally I covered all the exposed edges of the cloth with masking tape, making it doubly secure and hiding any rough, cut edges so they wouldn’t catch or fray.
With that, the masks were complete! The black gauzy fabric looks opaque from the outside but from the inside it’s so sheer that it’s quite easy to see through it, making it perfect for this project.
From idea to finished product this project took about 4 days. Halloween was on a Friday last year and Yannick brought me home the boxes on Monday night. Tuesday I did everything up to/including painting. On Wednesday night I sprayed the clear coat, and then on Thursday night I stuck the black fabric in.
They were pretty darn excited!
Halloween night they posed for a quick picture inside…
…then it was time to go trick-or-treating.
Can’t you almost hear the tick…tick…tick…BOOM? The heads held up beautifully and the boys felt like mini celebrities as they walked down the street and people from all over, even in passing cars, yelled out “Steve!” and “Creeper!” and gave them high-fives. The heads have now become part of our dress-up box and are still in great condition, and they wore them for ‘Halloween Day’ at their camp this summer.
*Update in 2020: the heads are still going strong! The boys outgrew them of course, but we keep them as nerdy shelf displays and they look exactly the same as they did back when I made them.
I hope this post shows you how easy and fast it can be to make your own Minecraft Steve and Creeper heads!
You can adapt the tutorial to make any Minecraft mob, and I’ve got an assortment compiled for you here.
As mentioned above, if you’d like an easy-to-print-and-save PDF version of this tutorial, I have made it available on Etsy here. The 9-page PDF includes full instructions with additional details, clear photographs, as well as game-accurate full-color numbered charts for all 5 sides of both character’s heads along with their hex codes for perfect color matching.
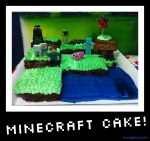
I know. I don’t know where the time went. I’ve been blogging since before he was born, and now he’s 8 and such a good kid. Of course he wants a Minecraft-themed party too, but, um, I haven’t begun to do anything for it yet, so instead I’ll finish showing you what I’d done for Henri’s Minecraft party, back in January.
To be honest, it’s not my favorite-looking cake. I’m a lot prouder of the loot bags and the toppers than I am of how the cake turned out. But- and here’s the important part- HE loved it. (And it was delicious).
I started out by baking 2 9×11 chocolate cakes. My kids prefer vanilla but going for the ‘dirt’ look I knew it would be easier on me to have a chocolate base in case the chocolate icing didn’t fully cover everything. I also filled an 8×8 greased dish with blue Jell-O prepared as Jigglers, and set that to chill.
When I sat down to work on it I didn’t have a plan. I knew I’d baked enough cake to stack layers, similar to the grass in the forest biomes. (Yes, I play LOL). I knew I had enough chocolate icing to slap it all together. I knew I had a finite amount of “water cubes”, so I started with that.
I turned the Jell-O out onto a mat and squared the edges, then cut it into 2″ sections. Then, after leveling the cakes, I used toothpicks to divide the cakes into 2″ sections as well. Then I began to cut. I held my platter over the cake to figure out how much to cut off to make it fit along at least 2 sides, and then cut away enough of the ‘front’ to fit the water ‘cubes’. Then I cut the upper layers, holding and testing until I had something that had as little waste as possible while still looking as ‘unboring’ as I could manage. (Technical term).
I stuck the upper layers down with icing then dirty iced the whole thing before sticking it in the fridge a few minutes to set up. Then I gave all the sides a thicker coating of chocolate icing. The ‘grass’ was piped with a star tip and not-completely-mixed vanilla icing and green icing gels, so there’s a slight variation in the color. I was hoping that the shading, along with the star tip, would help it look ‘pixellated’ like the game. I also piped some areas, leaving others blank, so as I ran low on icing and mixed in more, the colors would be different even within those areas. (Best seen in the overhead view, above).
I placed the Jell-O in only AFTER the cake had chilled for a few hours. I was afraid one would leech water out of the other and that I’d end up with a gooey, dissolving mess. Then, at the party, I stuck the figures on just before serving, including tucking Mr. Squid under a few water cubes.
Even though I wasn’t as crazy about it, the kids loved it, the birthday boy loved it, and there were enough fondant figures so everyone who wanted one got one to eat. (Apologies to their parents for any resulting sugar-rush).The great thing about Minecraft is that it’s SUPPOSED to look boxy – it’s all squares! So whether it’s by shaping a cake, cutting rice krispy treats into cubes, or cutting brownie squares and topping them with green-tinted shredded coconut, there are a ton of ways you can make an easily-recognizable Minecraft cake.
I wasn’t sure what I was going to do for the cake itself, but I knew I wanted to have a bunch of Minecraft mobs scattered about. I didn’t feel like having to prepare enough fondant in the assorted colors, nor did I really want to start sculpting, so I turned to my current favorite technique- hand-painted toppers.
I’ve used this on a number of cakes, which I’ll link to once I post them. With one exception, Nick’s Star Wars cookies, I always painted with thinned-down color gels, and had great results… (especially the Jake & the Neverland Pirates figures) but there were some flaws. The painted pieces too much longer to dry, making it more difficult to do finishing touches, the “paint” was often very wet, which could cause the fondant base to soften and/or get slimy, and sometimes the piece would crack as it dried (like in the Charlie & Lola cake).
For some reason I switched techniques when making Sean’s last Goalie cake, I tossed in some icing sugar to give my white coloring some opaqueness, and then I recalled painting with icing on the Star Wars cookies. It was a duh moment, and I’ve stuck with that ever since. It’s easier (for me), faster (for me), and it dries quicker, so I can add eyes or other details MUCH faster. Plus, because icing is thicker than water, I can play with layers and build up dimensions, if I want, similar to decorating cookies with royal icing.
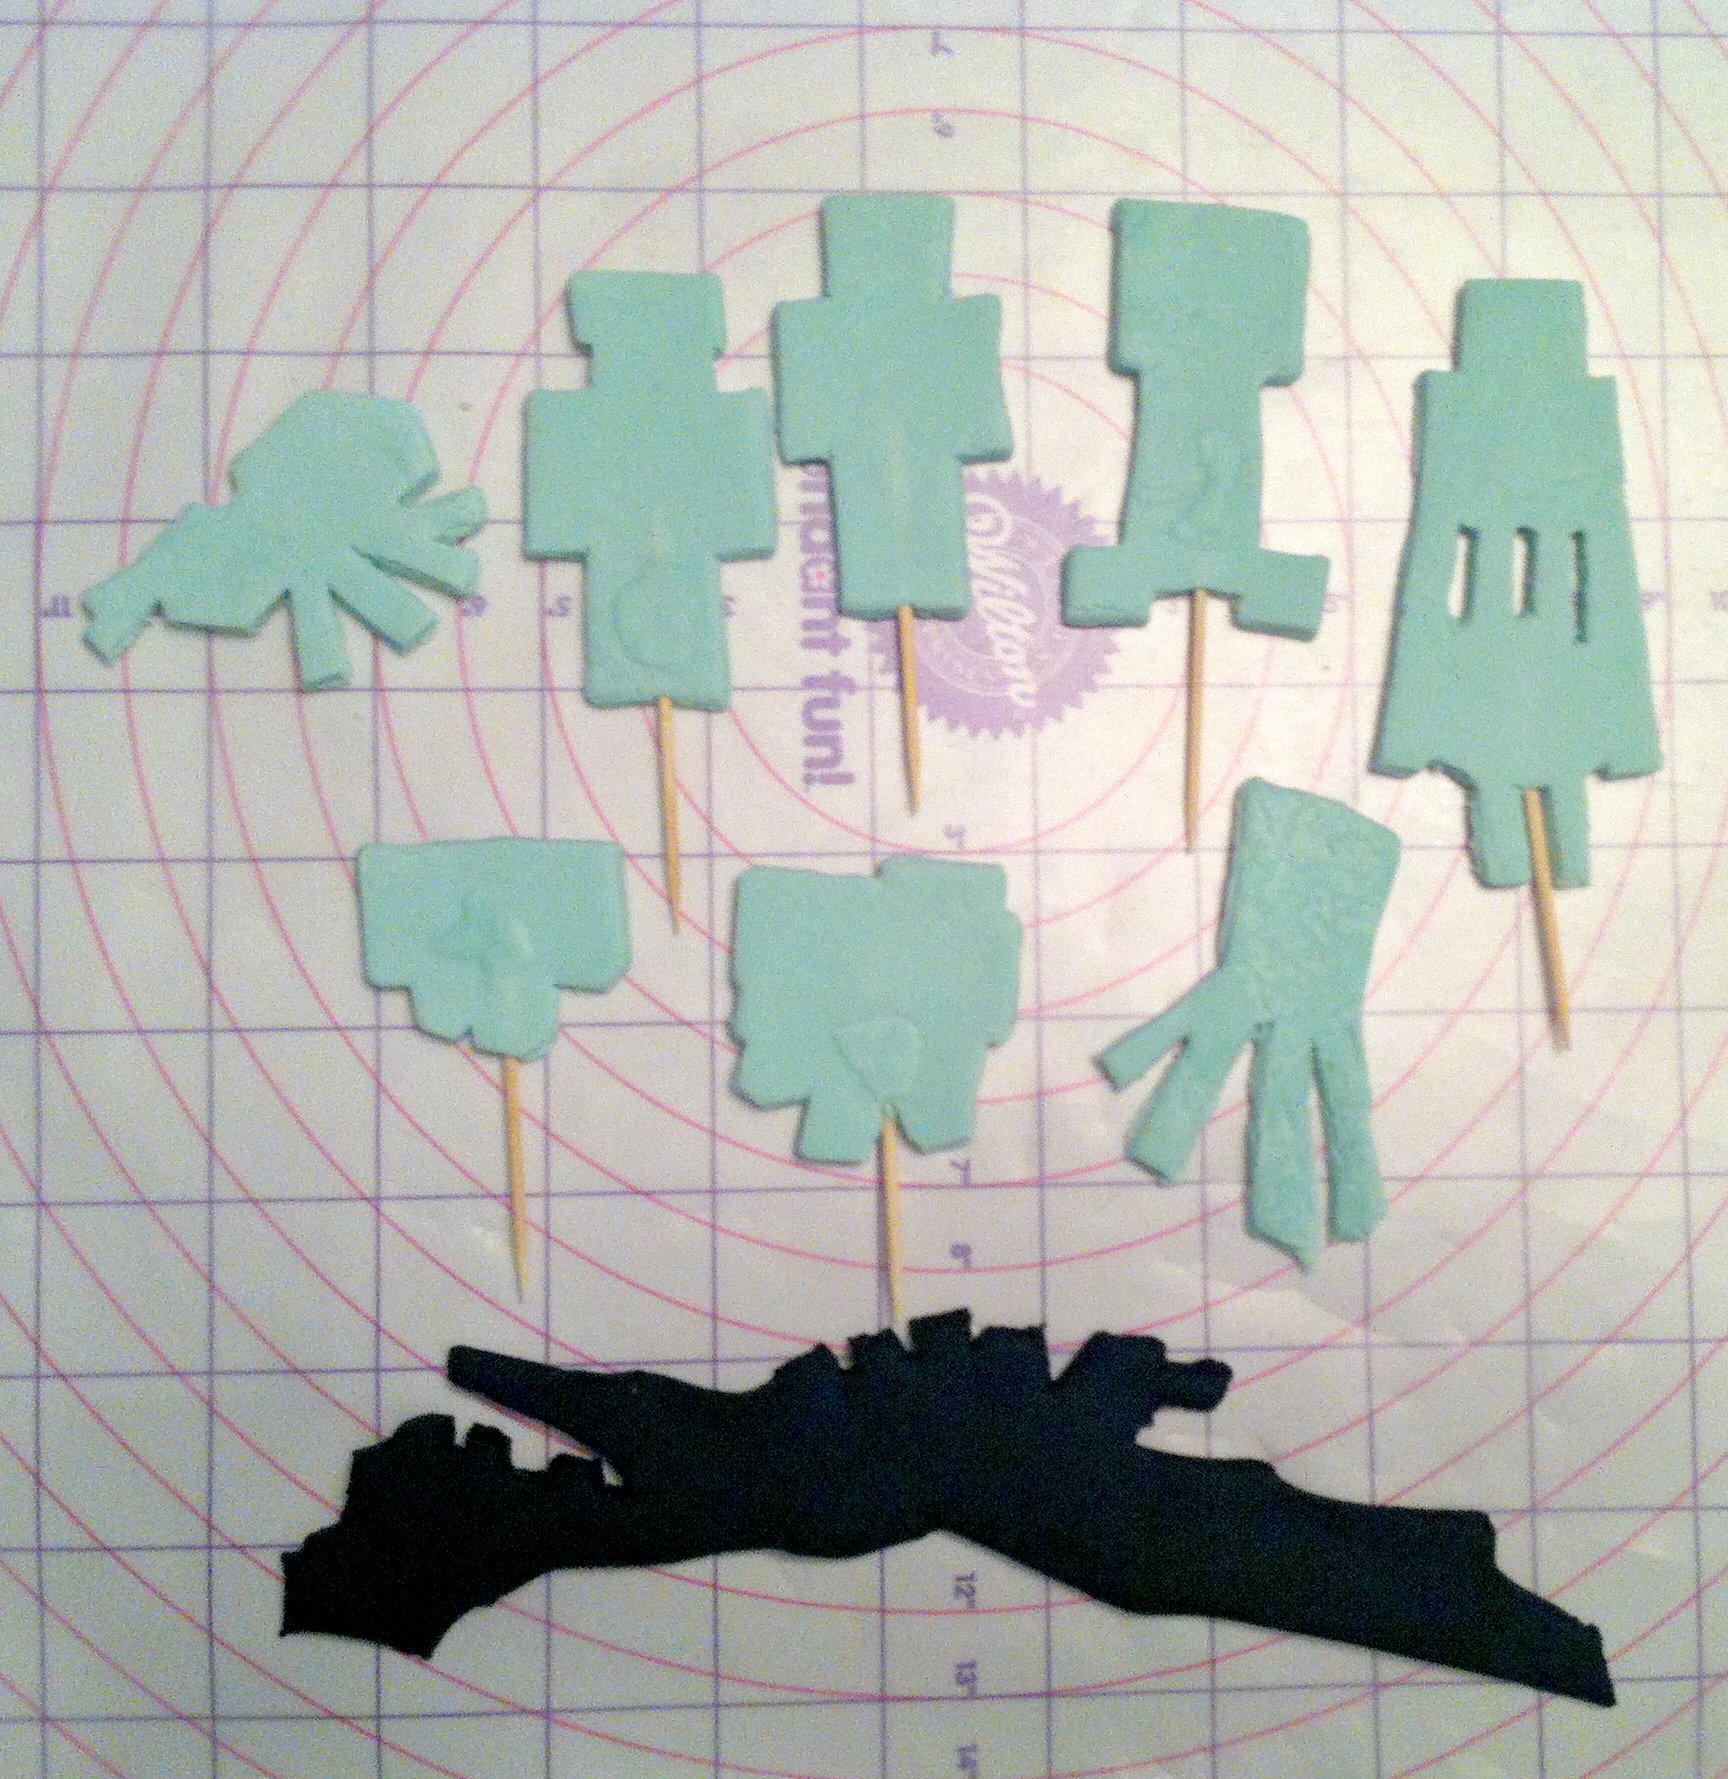
My first step is to cut out the topper shapes from fondant (or if you’re painting on cookies, bake them and let them cool until there is no heat left inside, I’d wait overnight if possible). You can use cookie cutters or freehand it, I am not above tracing. I’d printed out the mobs (it stands for mobiles for those of you who don’t play… all the moving characters in the game) I wanted to use and scaled them all to the rough sizes I wanted.
I rolled out some scrap teal fondant left over from Jakob’s 2nd Adventure Time cake, the B-MO & Gunter cakes. The thickness of the fondant depends on the intended use of the piece. In my case I needed something thick enough to stand up, and also be thicker than a toothpick. For something that will be laying flat on a cake you can go thinner, and if it was meant to be a plaque that would stand upright or lean at a diagonal I’d go thicker, so there would be a solid base.
Lay the paper templates out on the fondant and cut it up into manageable sizes, then use a knife or your preferred cutter to trace around the templates. In the pic above you can see I’ve almost finished cutting out Diamond Steve. Keep your fondant scraps and store them properly for next time.
Here are all the mobs cut out. I slid a toothpick into most of them while the fondant was still soft, and reinforced where necessary with more fondant. I wasn’t worried about the smaller fondant blobs showing because I knew I’d be painting with icing, which is thick, but if you’re painting with straight color gels you’d rather have a flat surface.
The next step is to let the pieces dry. I mean really dry. At least a day. Two is better. The longer you can wait, the more in-advance you can get them cut and set them aside, the better, because fondant will wilt and melt when it gets wet, and there is a lot of moisture in the icing. Also, larger pieces will take longer to dry through than smaller ones. The Jake & the Neverland Pirates gang were dry enough to paint after 2 days left exposed to the air. I hadn’t given myself enough time with the Charlie & Lola toppers, they were so big and still flexible after 2 days. Or maybe my house was more humid at the time. Either way, they ended up spending 24 hours in a bed of icing sugar to draw out as much moisture as I could get.
Once the pieces are firm, not floppy, they’re ready to paint.
I didn’t take any in-progress painting shots. You can use whatever you like as a palette as long as it’s food-safe and not used for any non-food purpose. (I also keep my cake stuff away from peanut and nut products because I make 3 nut-free cakes every year). I mostly paint with toothpicks but I have some food-only paint brushes I’ll use from time to time, and I use repurposed apple sauce cups for extra water and icing sugar. There are a bunch of tricks I use, like using a medicine dropper to add water to thin the icing if necessary vs a spoon, so I have more control over how much I add, and using those sewing pins (in the tracing pic) to help mark out any details on the fondant cut-outs, in addition to “drawing” on them before I paint.
These are the non-hostiles- a sheep, Diamond Steve, regular Steve and a pig. I chose some of my kids’ favorite characters, leaving out only the Mooshroom because I knew I already had plenty to cover the cake. Plus if I’d kept going they also wanted an ocelot, and a dog, and a bat, and a spider jockey, and zombies, and…
I didn’t plan too far ahead on each piece, though I do try to work in a way that makes sense. Whenever possible I work backwards in color, to minimize icing waste. For example, I didn’t want to have to re-mix black, so planned to work with it last, and do any details if necessary then, at the end. I started with the Steves, and mixed up their skin color (though now they look like Zombie Steves), then added a touch more brown and used the same icing for the sheep’s face and the lighter areas on his hooves. A touch more brown and it was used for the darker areas of the hooves and Steve’s hair.
The same blue used for Steve was also used for the squid’s face, then darkened for his body, and eventually darkened further for the black.
Just like when painting with real paints, when I mix colors I don’t always blend it all in, so if I’m adding more pink to do some shading on the pig, I only mix it into half of the icing, so I still have some light pink to play with.
The hostile mobs- the Ender Dragon, a spider, a creeper, an Enderman and a squid (who probably isn’t technically ‘hostile’). I don’t know why the Enderman’s eyes don’t look purple, I think the light washed it out ‘cus in person they did. The splotches on the spider were made by mixing in some white while the black was still wet, and most of the details on the Ender Dragon were dry-brushed for shading, since I didn’t have to actually paint him black to start.
The final touch was to make a wooden sign and then the gang was all done, ready to set aside somewhere safe to dry (and avoid being eaten) until the party.