If you’ve been anywhere on the planet over the last few weeks you’ve seen the pink haze that’s spread down as Barbie movie fever ramped up. Just like most of the rest of the world, I saw movie last week, so figured it was the perfect time to share the first Barbie cake I’d ever made.*
Like always I start with a sketch.
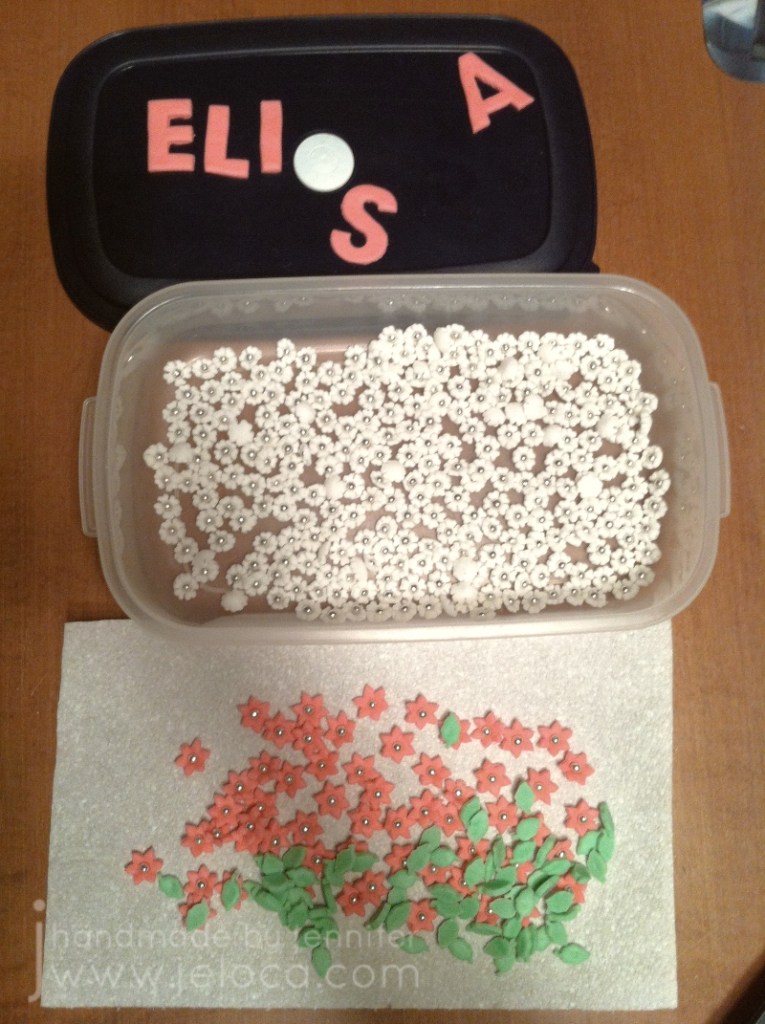
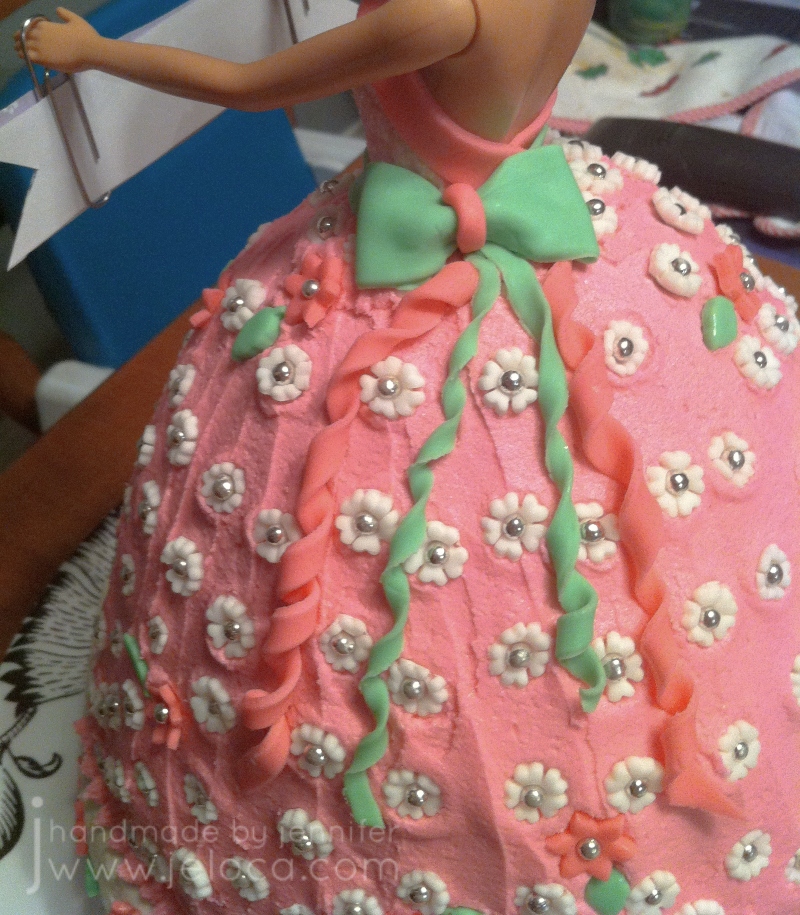
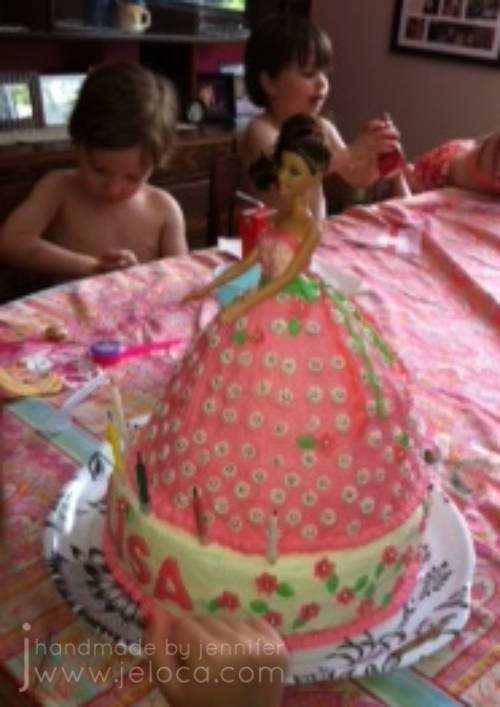
This cake was for Jakob’s daycare “girlfriend” Elisa, and was requested to be “pink and white”. Instead of using a doll pick designed for cake decorating I wanted to use a real Barbie that the birthday girl could keep later. As such I decided to go for a multi-tier cake to give enough height for the doll’s legs.
A few days before the party I used mini plunger-style fondant cutters to make a ton of flowers and leaves, popping a tiny silver dragée into the center of each flower before setting them aside to air dry. I also made the birthday girl’s name using alphabet cookie cutters.
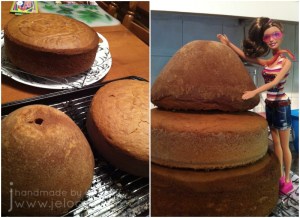
I’d used 3 cakes total – the top used Wilton’s doll cake pan, and then I added an 8″ and 10″ round.
I’d chosen a Barbie with the birthday girl’s hair and eye color and packaged the clothing and accessories into a little gift box to keep them clean. I also wrapped the doll in saran wrap from her torso to toes to make sure she didn’t get stained by the icing.
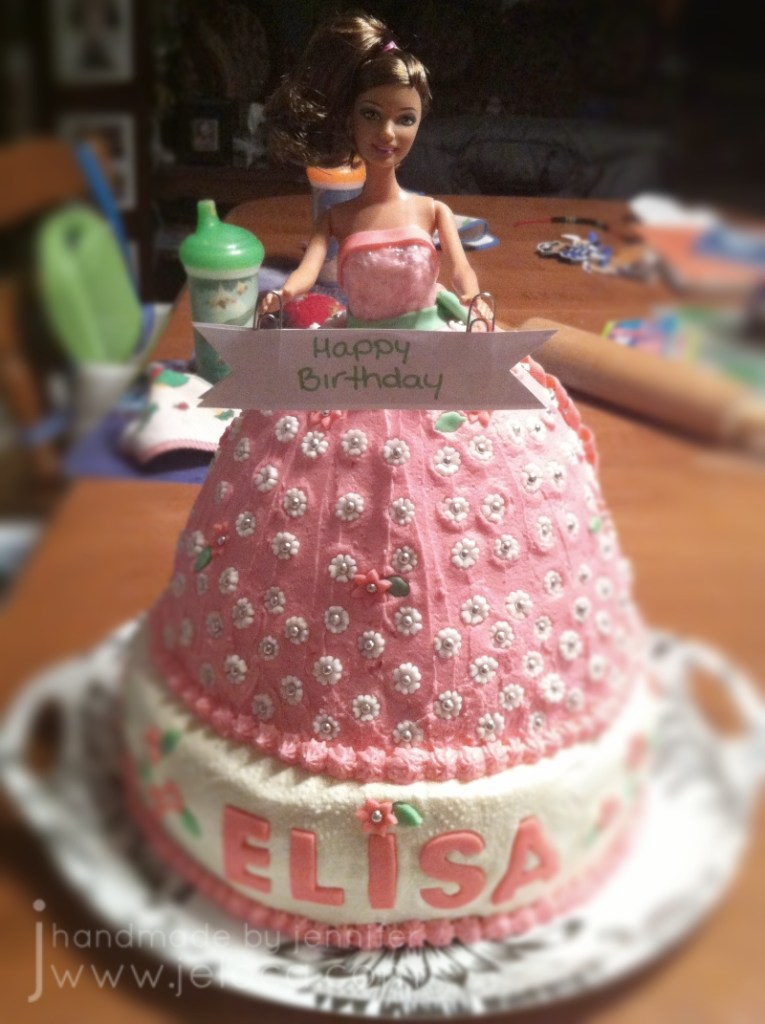
I don’t have step-by-step images of the the decorating part but after filling and stacking the cakes I’d cut a slot for the doll’s legs and inserted her into the cake. I covered both tiers with icing and added final touches with the fondant flowers.
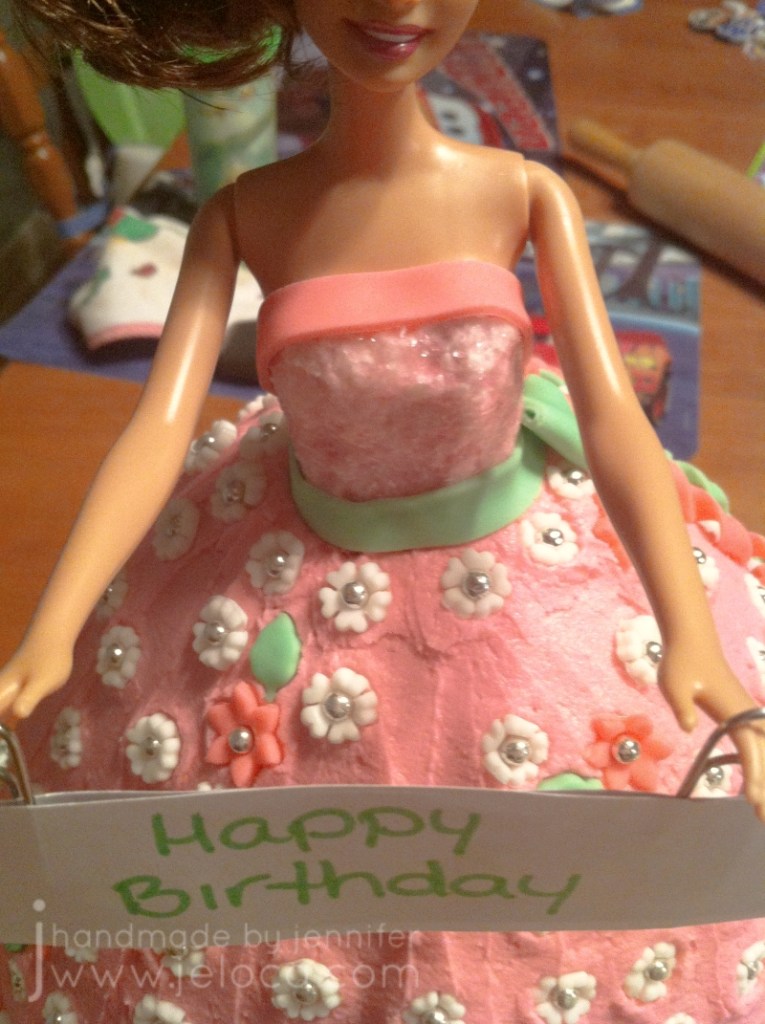
The bodice of the dress is fondant covered with pink edible sparkles, and topped with a fondant border and belt.
To enable Barbie to hold the birthday banner I sandwiched two paperclips between strips of paper.
The fondant bow and ribbons was added to give some visual interest to the back of the cake and to use up the extra bits of green and pink fondant.
The cake was a big hit with the birthday girl!
Bonus- here’s a pic of Jakob and Henri at the party. They were so little!!
*The second Barbie cake I’d made was my sister’s bridal shower cake.
If you want step-by-step tutorial on how that one was made, click here.
This post may contain affiliate links. This means I might make a small commission on purchases made through the links, at no cost to you.
Today’s post will walk you through step-by-step on how to make this cake featuring the Master Sword from The Legend of Zelda video game series.
I’m a huge Zelda fan and the love for the series has been passed down to Henri with a vengeance! In addition to dressing as Link on Halloween and poring over game art collections he plays all the games from Link’s Awakening on my old Gameboy Color straight through to Breath of the Wild on the Switch. It’s on the BotW Master Sword specifically that he requested I use as the theme for his 11th birthday cake.
This is the Master Sword:
And this is the sword in the game:
I decided to use this image as the inspiration for my cake. The sword itself would be sculpted out of fondant and I’d expand the stone base so there would be enough cake for his birthday guests.
The cake took a total of 3 days to make. On Day 1 I sculpted the sword so it could have time to dry out to lessen the chances of the fondant dissolving under paint application. On Day 2 I baked the cakes for the base and set them aside using the methods I outline in my How to Bake a Cake and Prepare it for Decorating post. On Day 3 I painted the sword and the base. Note: you can absolutely merge Days 1 and 2 into one evening if you’d like.
Keep the excess scrap as you’ll need it to sculpt the details.
As a long, skinny piece of fondant this size would be fragile I used a clean, splinter-free wooden dowel as a support, leaving enough at the base to secure it into the cake.
Then I used the excess fondant and began blocking in the sword’s details. As you saw in the finished cake it would remain flat so I only had to sculpt the front half.
I used the template for the basic shapes and then referred to a clear online image to get the details right.
At this point I set the sword aside to air-dry.
Here’s how it looked the next day.
Here it is alongside the template. It did grow a bit as I sculpted additively but I knew the slight size increase wouldn’t matter with the final cake.
Pleased with it, and deciding it didn’t need any adjustments, I let it continue to harden and baked the confetti cakes Henri had asked for.
On Day 3 it was time to assemble and decorate!
I had 2 8″ square cake layers to work with. To achieve the triangular base I cut the first layer into two triangles by removing the center strip, ensuring that one triangle was slightly shorter than the other. I repeated the process with the second cake making each subsequent triangle shorter than the previous one. This design does leave extra cake that you can eat or make into cake balls with any leftover icing.
Note: always check your transport method! In my case I couldn’t simply cut the first square diagonally to achieve my largest pieces as the resulting triangle would have been too high to fit into my cake carrier!
I used a bit of icing to “glue” the cake to the carry board and then began to stack the cakes horizontally, icing in between to keep the layers together.
Yes- that IS Betty Crocker icing in the background. And yup- this is totally a Betty Crocker Rainbow Chip box cake. There is zero reason why a box cake can’t be done up the same way scratch cakes can. Whether you’re short on time, find the mixes cheaper or easier, or if you’re simply baking for a bunch of 11yo boys who won’t know or care about the difference then by all means go for it! I do generally doctor my cakes so the cake mix winds up more as an ingredient vs the main staple, but that’s absolutely not necessary to get great-tasting, great-looking results.
Once stacked I protected the board surface with parchment paper strips and dirty iced the cake, then covered it with more white fondant. Then came the fun part- poking, scratching and dinging it with an assortment of knives and sculpting tools to give it the texture of an old weather-beaten rock.
I put some wax paper strips down to protect the board again and then painted the “rock” with custom icing gel colors. I have a large collection of Wilton gel pots and a kit of Americolor icing colors and I like them both equally as they fill in color shades I don’t have in the other. The gel pots of the Wilton kind are great for dipping in a toothpick for a really tiny amount, while the Americolor ones are in squeeze bottles that make adding precise drops really easy – perfect for when you need to replicate a color you’d already mixed up.
I used an assortment of browns and yellow thinned with vodka for the main color, adding darker touches for shadows and age. I also dry brushed green shades around the base and edge as if grass or moss had started to encroach similar to how I indicated forest-y age on the fondant bricks in the Pitfall: the Lost Expedition cake.
Bringing up another reference on my iPad, I used the same supplies to paint the sword, adding in a bit of silver luster dust for the metallic portion.
The luster dust mixes nicely with a bit of vodka to become a metallic “paint” that dries down well once the vodka evaporates.
I used gold pearl dust in a similar manner for the gold accents and completed the rest with blues and green gel colors.
The last bit of prep is to cut out a small bit of the fondant so the sword fits nicely into place and then the cake is done!
Here’s a closeup of the cake “rock”. I love how the texture came out!
My only regret is not having smoothed the underlying cake surface better, as you can see the ridges of where the fondant curves around the cake layers…but the kids sure didn’t mind. It was a huge hit for the birthday boy and his friends.
A few months ago I posted a version of an Angry Birds cake where Red was created by shaping the cake and using icing for the different colors. Yesterday was Rovio’s Bird Day so it’s a perfect time to share this alternate version where the character is created using fondant.
This is an easier method for those who aren’t comfortable cake sculpting. I also find fondant is more forgiving and easier in fixing mistakes than icing, though that’s a personal preference.
Step one is to make the cake topper out of fondant. I use fondant toppers on a lot of my cakes (ie: Elmo, CARS, Charlie & Lola, Neko Atsume, Super Smash Bros) because I love the flexibility of being able to prep the topper in advance so I’m not rushing the day before the cake is due.
This cake uses a template to make a cut fondant topper. You can find my full tutorial here.
Once the cake is ready all that’s left is to place the pre-made fondant pieces onto the cake.
I love how simple character-topped cakes can have a big impact by giving the birthday child exactly what they want without breaking the bank on supplies or causing unnecessary stress.
A few years ago I made a dessert for my friend Debbie’s surprise Hallowe’en-themed party. I was given the option to make cookies or a cake, so I chose both! This Paint Nite-inspired cake and cookie set is easy to make and looks way harder than it is!
You can start with a store-bought cake, or bake one yourself and prepare it for decorating with a layer of fondant to look like a tablecloth. I used white so the rest would stand out but you could use any color.
To make the easels you will need narrow rectangular cookies. You can bake your own or go the faster route and buy them! I used Cadbury Fingers but any log or stick-shaped cookie will do. You will need candy melts as the “glue” to hold the easel together so just be sure to match the candy melt color to your chosen cookies. Note- you don’t want to use regular chocolate for this as it will soften at room temperature and your easels will fall apart.
First make an A shape with a cookie going horizontally across two others for the easel’s ledge, and then after the candy melts set up use a 4th cookie as the vertical support leg. It’s easy to work this assembly-line style, being sure to leave enough time for the chocolate to set hard. I found that I only had to hold them in place for about a minute before they were able to stand on their own.
Of course any Paint Nite needs something to paint on! You can bake cookies yourself or use any rectangular cookie that has at least one flat side, like Biscoff, butter biscuits or shortbreads.
To make edible “paint” mix icing sugar with small amounts of water until you get a loose icing consistency. Paint Nite projects often have a gradient background with a silhouette design on top, so I used that style for my mini paintings. I chose Fall colors with pumpkin orange and white for a sunset and as this was a Hallowe’en party I added a black cat on a fence silhouette and full moon. This also worked well with the Paint Nite habit of using few colors in beginner paintings.
I painted the cookies much as you would at an actual Paint Nite – first painting the gradient background, then once dry adding the top layer.
The fun part was making each one just slightly different, while still being the same image – exactly how the results at a true Paint Nite would be. Everyone follows the same process and comes out with mostly the same image yet they’re all slightly unique to the individual artists.
I also used a few extra cookies to write a message for the birthday girl on her big day.
Of course, every Paint Nite requires supplies, so we need to add the solo cups-as-water cups, Styrofoam plate “palettes” and big orange brushes.
I made all the accessories out of scraps of fondant. For the solo cups simply layer a thin strip of white on top of the red before cutting out a strip to roll into a cup shape. The brushes are narrow rolls of fondant with the brush end dipped into the icing “paint”. The plates are small discs of white fondant smeared with dollops of leftover paint from painting the cookies. To make the “dirty” paint water I swirled a bit of each paint icing into clear piping gel.
Staging the table was super fun! Unlike a real Paint Nite where I try to be as neat as possible, here I got to be messy! I “glued” the fondant accessories in place with a small dab of water and then added drips and splatters of the paint to really sell the “end of the night of crafting” look.
I was so thrilled with how the final cake came out! It was one of the most fun cakes to make and allows for a ton of personalization. All the components can be homemade or store-bought which means this design can work with all budgets, and you can tailor the paintings to match any theme.
This post may contain affiliate links. This means I might make a small commission on purchases made through the links, at no cost to you.
Over the years I’ve made a couple Angry Birds-themed cakes. Two of them were for members of the same family, and even though they were made years apart I wanted them to each feel unique. For this first one I used minimal fondant and worked with an iced base.
Cakes like this are pretty easy to do, and while I don’t have full step-by-step pics I’ll outline the process.
The top layer also started as a 9″x13″ cake which was cut into the shape needed. As for most of my shaped cakes I started with a paper template scaled to the proper size on my computer.
The template serves two purposes. First I used it to trace out fondant pieces for the eyes, brows and beak. As I didn’t want to cut into the template I used a straight pin (that I keep for food use only) to pierce the shapes’ outlines into rolled fondant. The resulted dotted line is easy to cut out with a knife or fondant cutter and the individual pieces can be attached to each other with a bit of water or fondant glue. The eyebrows and pupils were cut from pre-tinted black fondant, the beak was cut from white fondant tinted yellow with icing gels, and the eyes were cut from white fondant later outlined with a black food marker. Before putting away my fondant supplies I also cut out the birthday boy’s name from red-tinted fondant with alphabet-shaped cookie cutters.
Then I used the same paper template on top of the cooled cake and cut around it to cut the cake itself to the proper shape. (You can do these steps in the reverse order but sometimes cake will stick to the underside of the paper and that can discolor your fondant. Another option is to trace the cake shape onto wax paper or parchment paper which won’t stick as easily)
The second cake was then iced with red and white icing to match Red’s proportions and finally the fondant topper was added.
The fondant pieces give the cake a polished look while requiring minimal shaping or sculpting ability, making this a great way for beginners to try out fondant for the first time.
This post may contain affiliate links. This means I might make a small commission on purchases made through the links, at no cost to you.
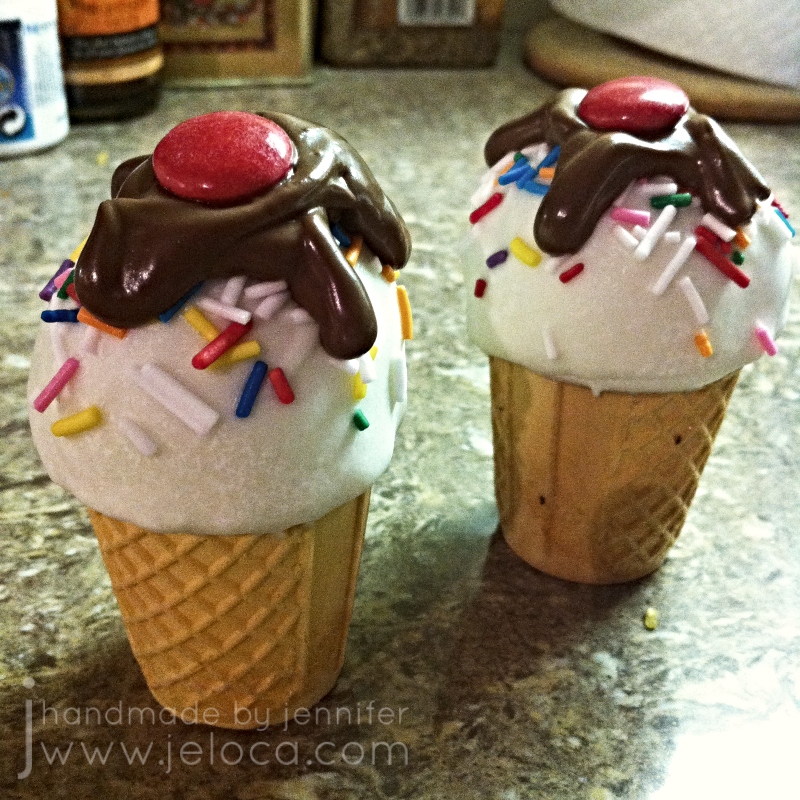
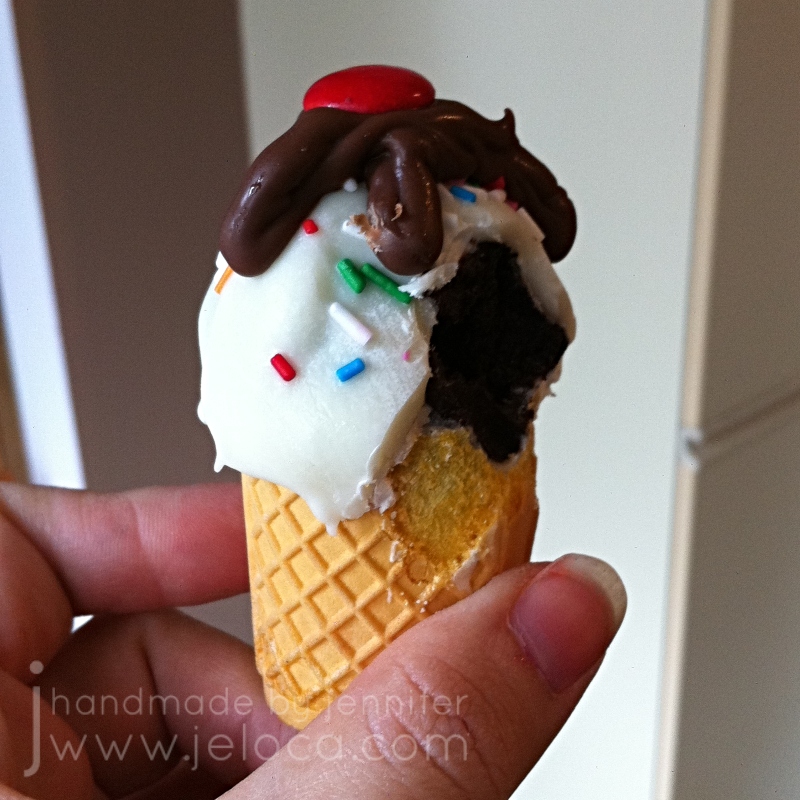
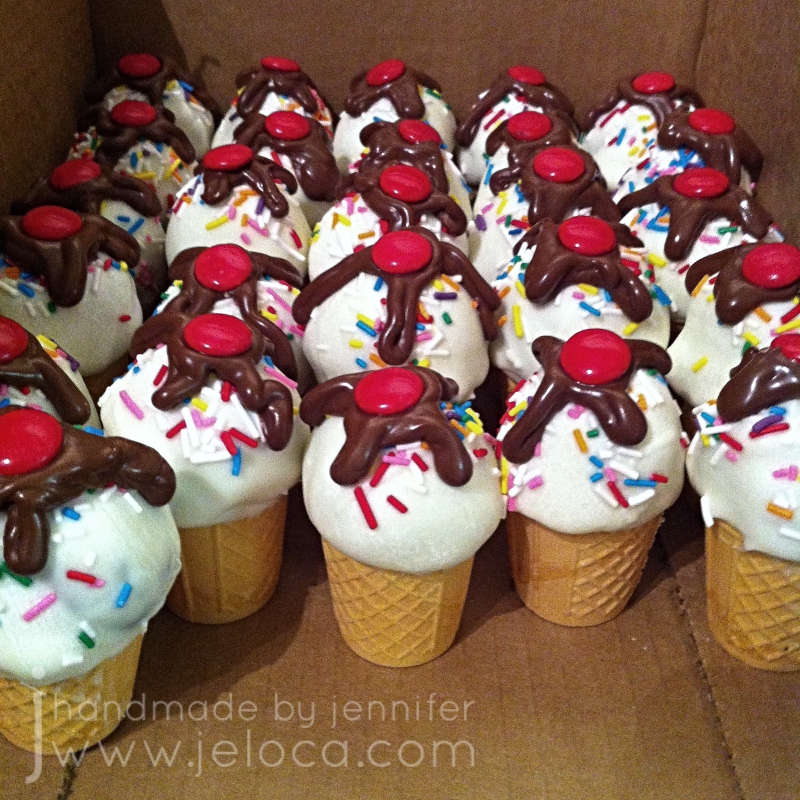
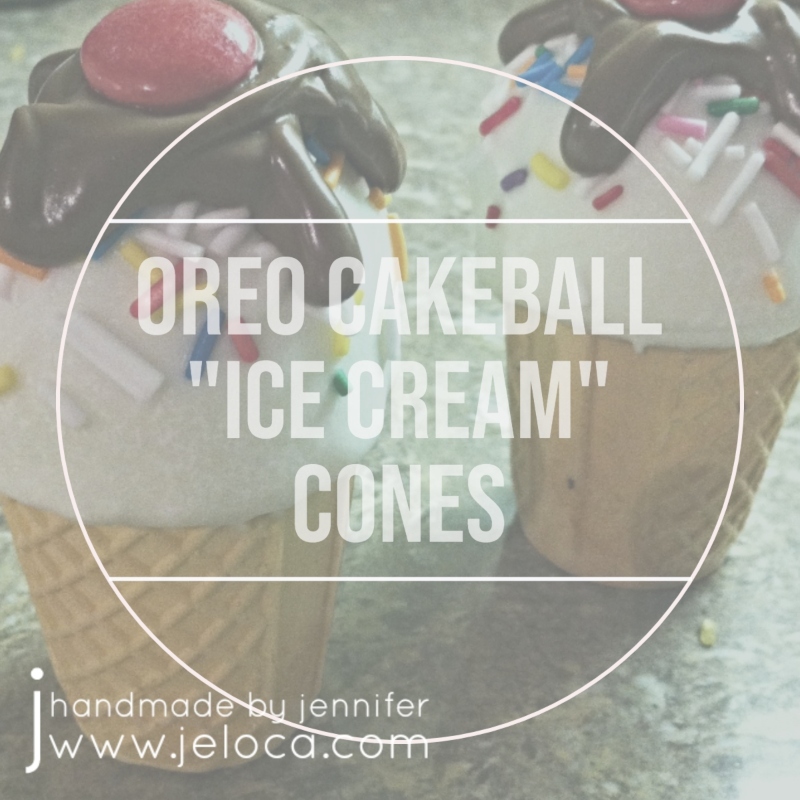
In honor of today being National Ice Cream Cake Day, here are some ice cream cones I made out of cake!
Cake pops are a great way to use up the extra cake bits you get from leveling or carving your cakes. I usually like to crumble the cakes into leftover icing, mix in sprinkles or peanut butter or some other add-in, then roll the mixture into balls and store in my freezer for future snacking.
In this case I’d mixed chocolate cake with crushed Oreos and vanilla icing and pressed the resulting cake balls into mini ice cream cones.
The ice cream “shell” is white candy melts heated in the microwave. Dip the cone in a few times to build up a thicker layer then top with sprinkles while the final layer is still wet.
Brown candy melt “chocolate syrup” and a red Smarties “cherry” make the final touch to help sell the illusion!
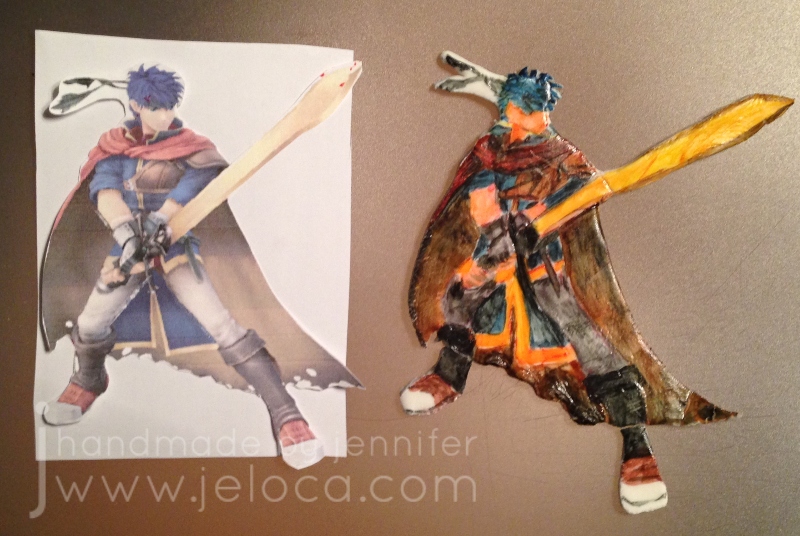
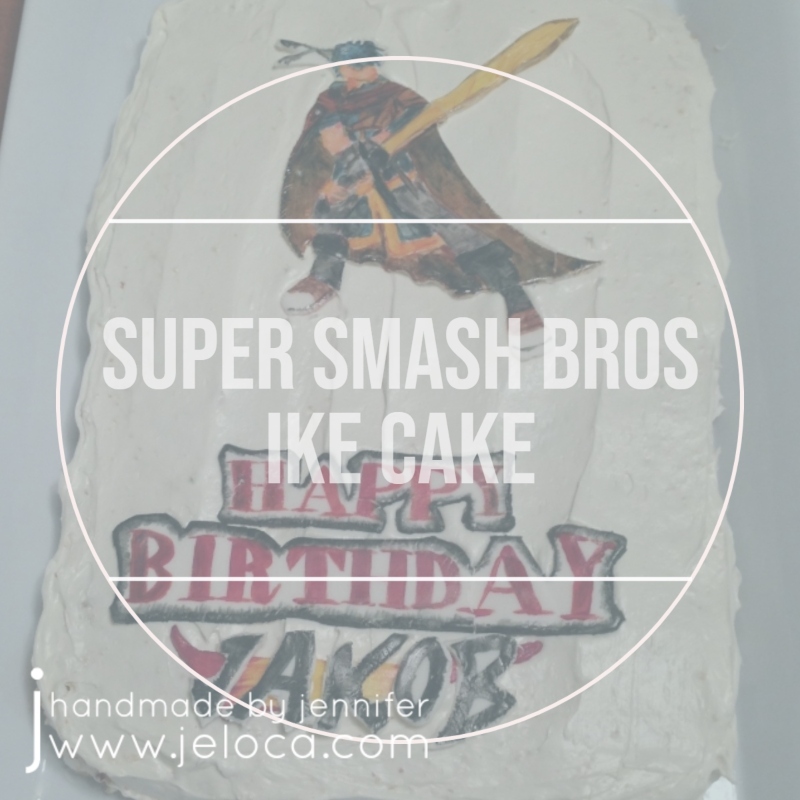
Today’s the big day! Jakob is 15!! In honor, here’s the first of 2 cakes he got for his 9th birthday, back in 2016.
He asked for a “Super Smash Bros Brawl”-themed cake, specifically featuring Ike, a character from Nintendo’s Fire Emblem series.
This guy:
The first thing I did was isolate the logo:
Then I recreated it only now saying Happy Birthday Jakob.
This was done using my usual method of preparing the fondant cutouts in advance and then hand painting them with gel colors and vodka once they’d had a few days to harden.
I’m really happy with how he came out, even though his sword broke. The fondant wasn’t quite dry enough and the vodka didn’t evaporate fast enough so it cracked when I went to move it.
I was able to lay it together on the cake, however, so it wasn’t too big of a problem.
Considering the fondant pieces were done in advance, decorating cakes like this is really quick and easy to do. It was a big hit at his party- poor Ike never stood a chance!
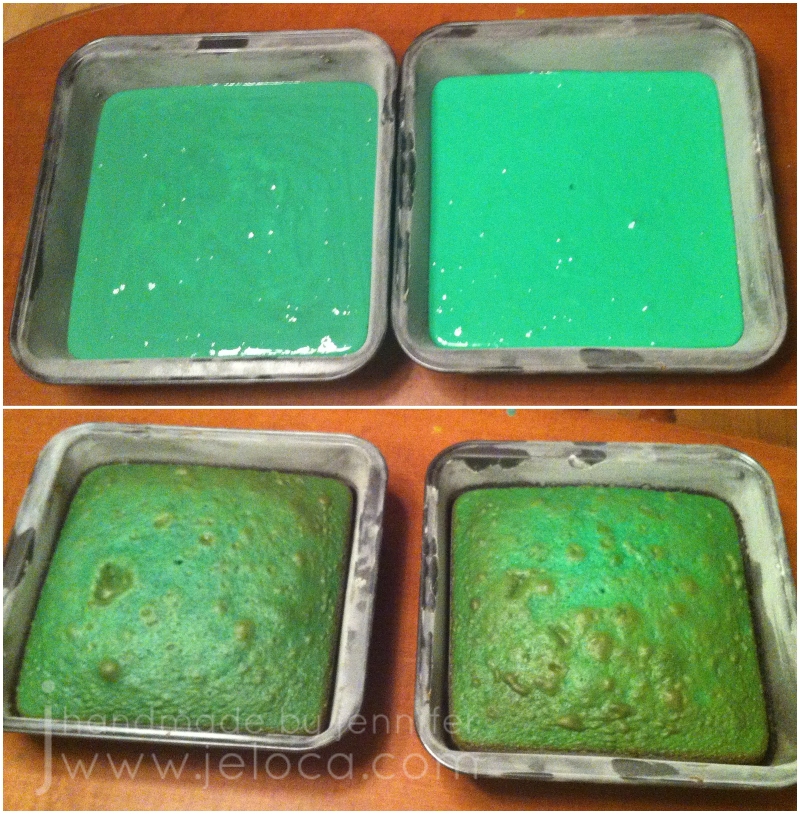
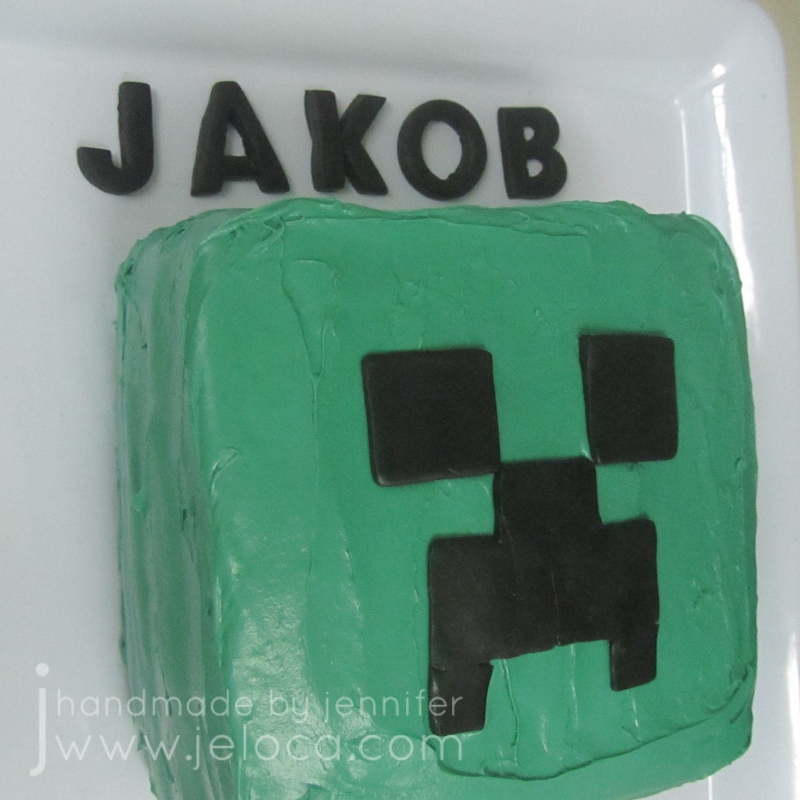
Jakob was obsessed, in particular, with the Creeper. This unassuming green dude looks real cute until he shows up and blows up.
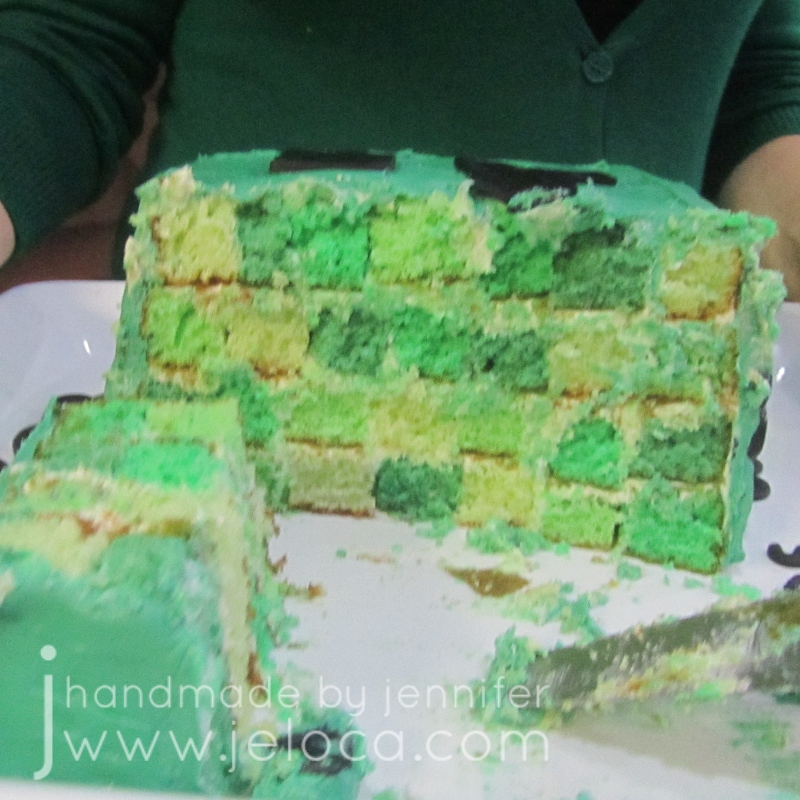
I decided to take inspiration for the inside of the cake from the Creeper’s multitude of green shades, and to theme the outside on the tshirts the boys would be wearing to the party, with the following image:
While I own a round checkerboard pan kit, I don’t have anything similar for square cakes so I had to get creative. I ended up coming up with a way to get the checkerboard look without requiring ANY special tools, and you can do it too if you follow the steps below.
Step 1 is to bake 4 cake layers, each tinted a different shade of green I used 8″ square cake pans and tinted my batter with gel coloring to get 4 different shades.
These are the colors I went with. You can choose to use more colors and more layers if you like – to copy the actual Creeper would require 8 layers for an 8×8 grid. If you want to match the colors exactly I provide the hex codes for all 8 colors in my Minecraft Steve & Creeper DIY costume head tutorial.
I only own 2 8″ square pans so I baked my cakes 2 at a time.
The cakes will turn golden on top as they bake so my icing swatches came in handy to remember which cakes were which later on.
Unfortunately I don’t have pics of the next steps but they’re very simple to follow-
Trim the golden top and sides off each cake
Cut each cake into even strips. Be sure to cut each cake into an identical number of strips. If you look at the cut section of my cake below, you can see I cut mine into 7 strips.
Place a bit of icing on your serving tray (to anchor the bottom pieces) and place 7 strips of assorted colors side by side to form the first layer. (Replace “7” with the number of strips you have in your cake). Once your color placement is to your liking, add a thin layer of icing between the sides of each strip to secure them to each other
Add a thin layer of icing across the entire top surface of layer 1
Repeat the last 2 steps 3 more times to add layers 2, 3 and 4. This will have used up all your cake strips
TIP: when cut vertically from the end, the cake will have a gridded/pixel look. You can use the same technique to create any pixel art desired
The key thing is to remember which direction your strips run. When you cut the cake you will want to cut horizontally ACROSS all the colors, to get the checkerboard look. If you cut horizontally WITH the strips, your cake will look like long rectangles of color.
To finish the cake simply ice and decorate the outside as desired. I covered mine with solid green icing and a fondant Creeper face, then added fondant lettering to match the boys’ shirts and Jakob’s name and age.
I used the placement of the face as my reminder which way to cut the cake later.
As you can see from the cross-section, the inside worked out perfectly! It looks just like the Creeper and Jakob was thrilled.
As mentioned in my last Adventure Time cake post, Jakob’s obsession with the show covered both his 6th and 7th birthdays. For this year he had both Gunter cupcakes for school AND Gunter & BMO cakes for his birthday party.
Both cakes started with doctored box mix and store-bought icing that I adjusted even further by mixing in crushed Oreo cookies to either the cake batter or the icing.
The Gunter cake was Oreo cake with plain vanilla icing, and the BMO cake was plain white cake with Oreo icing.
To make Gunter I carved the cake to give it a rounded top and then covered it with black fondant (the only color I sometimes buy pre-tinted). All the other colors used started as white fondant which was then tinted with gel colors.
I then layered on a white piece for the face/body, a faux-parchment birthday message, black wings and black and white eyes, with a yellow beak.
It was a similar process to make BMO. I started with a thicker, rectangular cake and covered it with a pale teal layer of fondant.
Small bits of blue, green, yellow, black and an even paler teal were used for the details, and then I rolled snakes of the body color to create BMO’s arms and legs.
I decorated the base cover of each cake separately then transferred them to the serving tray before applying the finishing details.
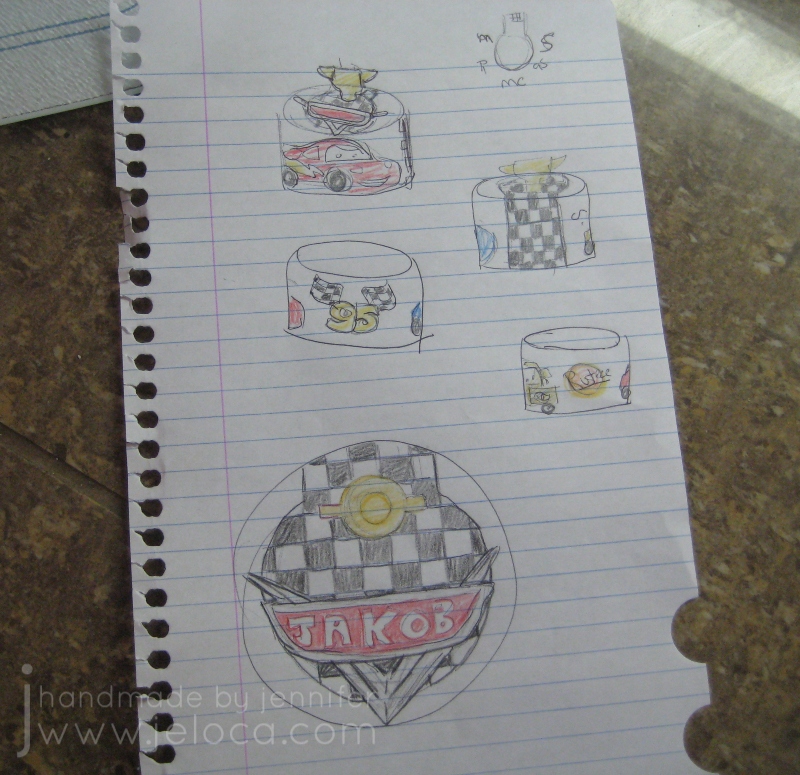
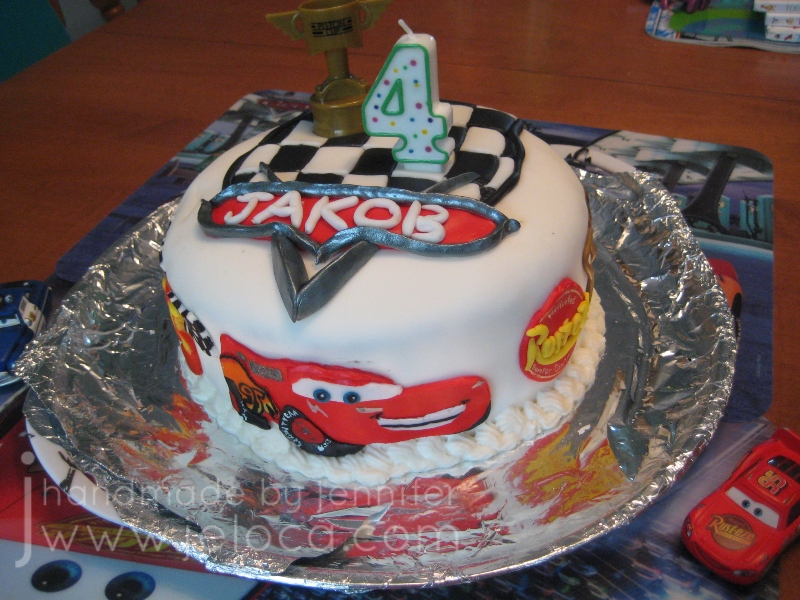
In 2011 Jakob was all about Pixar’s CARS. CARS toys, CARS books, even CARS bedsheets. So when he turned 4 that year, of course I had to make a CARS-themed cake.
Like most of my cakes, this one started with a sketch.
It was box-mix vanilla cake with pudding and egg add-ins, and vanilla icing between the layers. Except for the LEGO Piston Cup and candle, all toppers were handmade with white fondant that I tinted with gel colors.
The silver logo around Jakob’s name was made from black-tinted fondant and painted with silver luster dust mixed with a bit of vodka.
The top and back have a black & white checkered race flag, and the base of the cake is trimmed with icing. I was still learning how to properly prep a cake for fondant and you can see how lumpy the cake is, especially where it is starting to sag in the back. There are also a few cracks in the fondant in places.
The side decors were fun to make! Sally was the easiest- mostly blue fondant with black wheels, a white windshield/eyes and handpainted details. Lightning McQueen and Mater were a bit more involved, having more details to copy. To fill in the sides I also added Lightning’s number and the Rust-eze logo. All painting was done with gel colors mixed with Wilton White-White to be more opaque.
It was one of the first “figure” cakes I’d made and a different challenge than others I’d done at that point. I’m really happy with how it turned out, and the birthday boy loved it.