7 Comments

Super Mario Bros Toad Hat (Head) DIY

For my second post in this year’s Mario Month I’m going to demonstrate an easy DIY for Toad’s hat. I know – it’s been officially confirmed by Nintendo that it’s actually Toad’s HEAD and not a hat…but most people still refer to the white and red bulb as his hat so I’ll be calling it such in this post.

This is Toad:

A costume for a Toad is pretty simple as almost any colored vest, white pants and dark shoes will get the gist across. The main feature of all Toads and Toadettes is their big, pouffy toadstool-esque hat. Whether you call it a head or a hat there’s no doubt that it’s a needed part of any Toad cosplay and here’s how you can make your own!

What you will need:

NOTE: As with the rest of my Mario costumes & props this hat was needed for a stage show which meant it had to be durable enough to last for a number of rehearsals, dress rehearsals and then stage performances. As such while you can use cardboard to do these first few steps I chose to use plastic canvas for extra strength. The plastic might bend but it would be unlikely to tear or break making it more reliable for quick changes where the hat would get tossed around backstage.

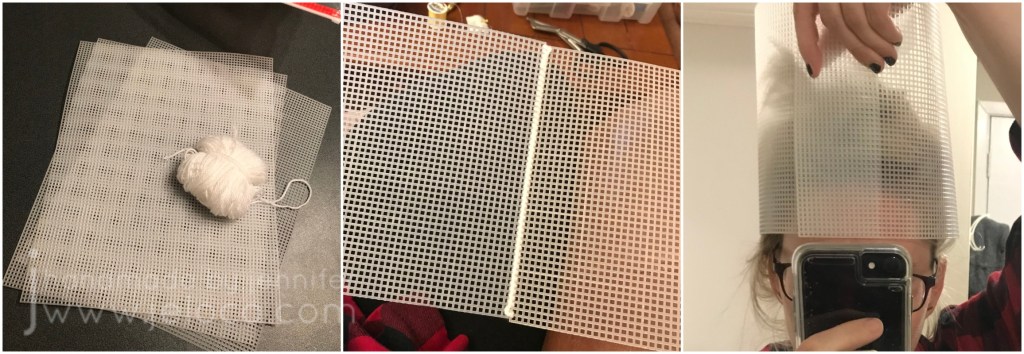
The hat needs structure to support its height so I started by aligning two sheets of plastic canvas vertically and whipstitching the side edges together. I repeated this with a third sheet and then tested the fit around my own head as the wearer would be another adult. I marked the appropriate row, cut away the excess and then whipstitched the final seam to create a tube.

I measured the diameter of the tube and traced out a circle of a matching size on a fourth sheet of plastic canvas, then cut it out. I could have whipstitched around the edge here as well but didn’t want to risk mis-aligning the pieces so for an easier option I used some of the white yarn to tie the disk to the tube in one spot with a knot. I then made another knot directly opposite the first so the disk was centered. I then knotted at the halfway point of each side so the quarters were each tied in place. This ensured the circle was evenly placed on top of the tube. Then I continued, knotting in pairs on opposite sides, until the disk was fully attached.

Try on the hat at this point. The tube will sink down so the disk rests on top of the wearer’s head. For the best result the lower edge should fall just above the wearer’s eyebrows, so if your tube is too long trim the bottom edge accordingly.

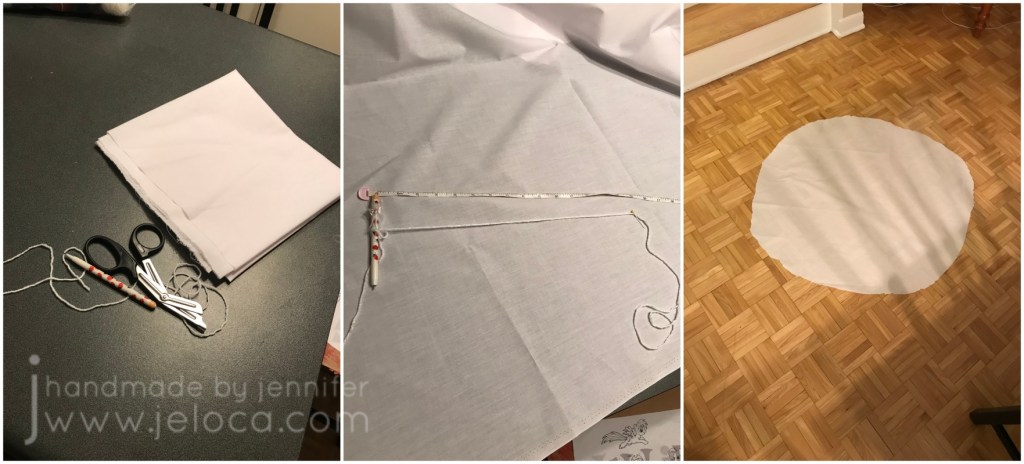
For the white outer shell of the hat measure the height up one side of your tube, across the top disk, and then down the other side. Add 2 inches for a generous seam allowance (1″ on either side). This will give you the diameter of the circle you will need to cut from your fabric. I didn’t trust myself to freehand an even circle so I divided this measurement by 2 to get the radius and tied a pencil and sewing pin the radius’ length apart on a length of yarn. I pinned the pin into the center of my fabric and swung the pencil around, keeping the yarn taut, to trace out the shape.

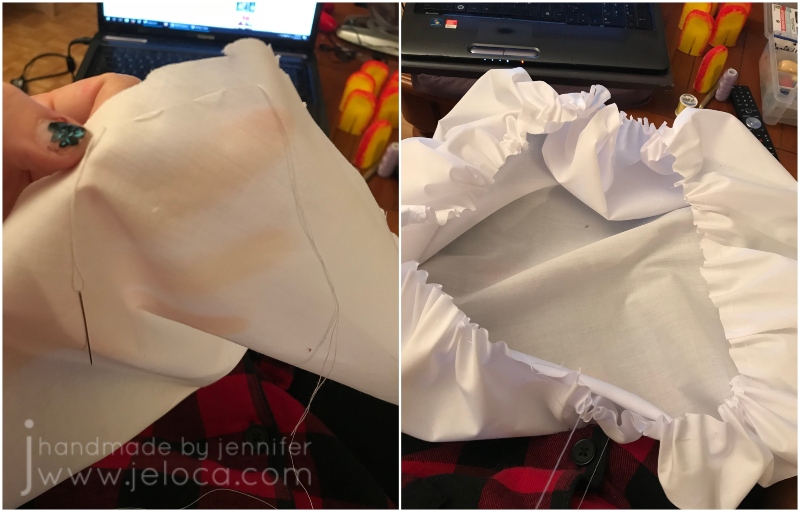
I cut a length of white sewing thread about 1.5 times as long as the outer perimeter of my circle and then sewed a running stitch all the way around, about 1/2″ in from the edge. When I got back to the beginning of the circle I snugged up the ends doing my best to keep the gathers even all around.

I inserted the plastic canvas tube into the bonnet-like white fabric and stuffed all around the sides. Don’t forget to stuff below the tube too so the top of the hat gets its round, puffy shape.

To join the fabric to the plastic canvas tube I switched to white yarn for strength and stitched around the open edge of the tube, through the white fabric. It’s a good idea to keep checking the look of the hat as you go, adjusting the gathers or adding more stuffing if necessary.

Here’s the finished puffy tube. I could probably have added more stuffing but I’d ran out.

Toad’s hat has 5 colored spots. I found a bowl that was a good size for the appropriate scale and traced it out 5 times on some red felt. You can sew the spots in place if you like but I chose to hot glue them instead.

Voila! Your very own Toad hat/head.

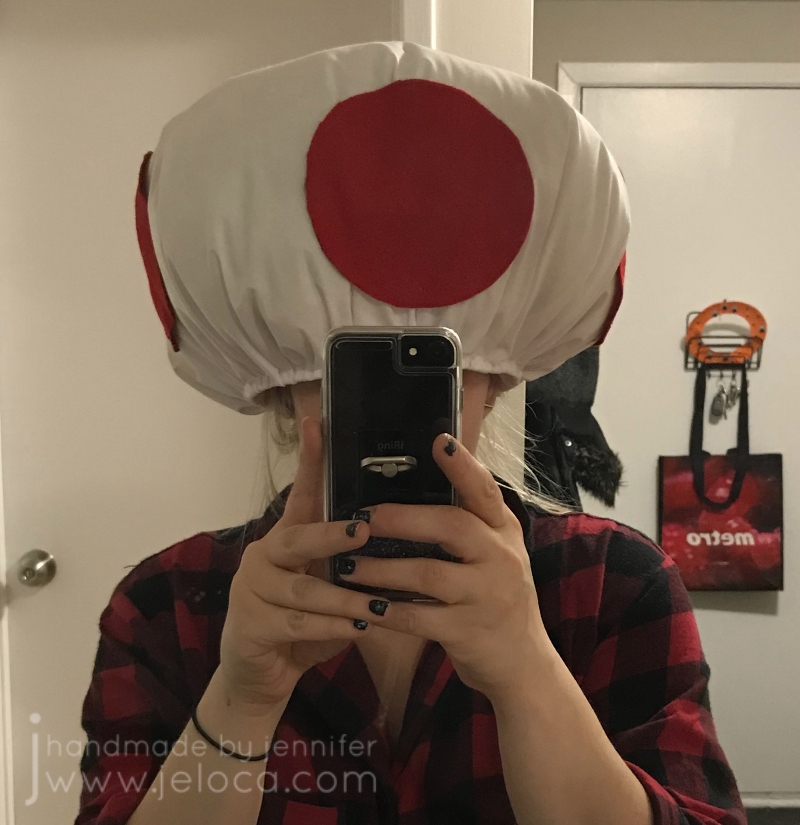
The hat can be worn as-is or you can add a chin elastic if needed to secure it in place on the wearer.

It fit our Toad cast member perfectly and just like all the other props and costume parts, lasted through all rehearsals and performances without any signs of wear or damage.

Even through vigorous dance routines and quick changes between numbers!

Other Mario-themed projects you might like:

This post may contain affiliate links. This means I might make a small commission on purchases made through the links, at no cost to you.


1 Comment

Paint Nite Cake and Cookies

A few years ago I made a dessert for my friend Debbie’s surprise Hallowe’en-themed party. I was given the option to make cookies or a cake, so I chose both! This Paint Nite-inspired cake and cookie set is easy to make and looks way harder than it is!

You can start with a store-bought cake, or bake one yourself and prepare it for decorating with a layer of fondant to look like a tablecloth. I used white so the rest would stand out but you could use any color.

To make the easels you will need narrow rectangular cookies. You can bake your own or go the faster route and buy them! I used Cadbury Fingers but any log or stick-shaped cookie will do. You will need candy melts as the “glue” to hold the easel together so just be sure to match the candy melt color to your chosen cookies. Note- you don’t want to use regular chocolate for this as it will soften at room temperature and your easels will fall apart.

First make an A shape with a cookie going horizontally across two others for the easel’s ledge, and then after the candy melts set up use a 4th cookie as the vertical support leg. It’s easy to work this assembly-line style, being sure to leave enough time for the chocolate to set hard. I found that I only had to hold them in place for about a minute before they were able to stand on their own.

Of course any Paint Nite needs something to paint on! You can bake cookies yourself or use any rectangular cookie that has at least one flat side, like Biscoff, butter biscuits or shortbreads.

To make edible “paint” mix icing sugar with small amounts of water until you get a loose icing consistency. Paint Nite projects often have a gradient background with a silhouette design on top, so I used that style for my mini paintings. I chose Fall colors with pumpkin orange and white for a sunset and as this was a Hallowe’en party I added a black cat on a fence silhouette and full moon. This also worked well with the Paint Nite habit of using few colors in beginner paintings.

I painted the cookies much as you would at an actual Paint Nite – first painting the gradient background, then once dry adding the top layer.

The fun part was making each one just slightly different, while still being the same image – exactly how the results at a true Paint Nite would be. Everyone follows the same process and comes out with mostly the same image yet they’re all slightly unique to the individual artists.

I also used a few extra cookies to write a message for the birthday girl on her big day.

Of course, every Paint Nite requires supplies, so we need to add the solo cups-as-water cups, Styrofoam plate “palettes” and big orange brushes.

I made all the accessories out of scraps of fondant. For the solo cups simply layer a thin strip of white on top of the red before cutting out a strip to roll into a cup shape. The brushes are narrow rolls of fondant with the brush end dipped into the icing “paint”. The plates are small discs of white fondant smeared with dollops of leftover paint from painting the cookies. To make the “dirty” paint water I swirled a bit of each paint icing into clear piping gel.

Staging the table was super fun! Unlike a real Paint Nite where I try to be as neat as possible, here I got to be messy! I “glued” the fondant accessories in place with a small dab of water and then added drips and splatters of the paint to really sell the “end of the night of crafting” look.

I was so thrilled with how the final cake came out! It was one of the most fun cakes to make and allows for a ton of personalization. All the components can be homemade or store-bought which means this design can work with all budgets, and you can tailor the paintings to match any theme.

This post may contain affiliate links. This means I might make a small commission on purchases made through the links, at no cost to you.


Leave a comment

The Color Cube

Picking colors that go well together can be a challenge when coloring. Sometimes you have no idea where to start, spending too long staring at the blank page afraid to make a mistake that will ruin the whole thing. You might find yourself gravitating to your favorite colors, only to have all your FOs start to feel the same.

Artists of any kind can have the same struggles, whether it’s choosing the right combinations of yarns for colorwork knitting or crochet, selecting floss shades when going rogue in an embroidery pattern, or blending the right fondant color to go with your iced cake base. This problem isn’t only for artists either! Think of matching accessories to an outfit or selecting the accent color for pillows to give your living room the spark it needs.

Colors can be hard. I’ve mentioned Sarah Renae Clark‘s Color Catalog here before as a solution I’ve turned to when coloring and I’ve found myself referencing it often for various projects.

The digital catalog is easy to search and scroll on my ipad and I like to take a screenshot of my chosen reference image to keep with my project notes and refer to as I work. For digital art it even provides RGB, CMYK & Hex codes for every color palette included in Vol 1 or Vol 2.

I’d also treated myself to her Color Catalog Companion to make swatching the right colors easier – it provides the color names/numbers to match the swatches for a number of popular marker and colored pencil brands.

The only problem with the catalogs is that they’re fully digital which could be an issue if my devices were low on battery or I was working outside and couldn’t see my screens well. I love swatching and always had a scrap of paper with my color scribbles on it but more so than the colors themselves I really benefit from the reference images in the respective palettes. They really help me to see how the colors work together and the various shades and tones of shadow and light.

Turns out having a hardcopy version has been a popular request and now it officially exists! This week Sarah introduced the Color Cube!

It’s available for pre-order now and *cough* I may or may not have treated myself to the bundle of both Vol 1 and Vol 2. I love the idea that I will be able to keep my chosen palette in my project bag or tucked into my coloring book for easy, convenient reference.

I also really, really love that not only does the back of the card have the same color codes as the digital version, but that the colors run right to the edge of the card – making color matching super easy.

The Color Cube is available through Sarah’s site right here. You can get Vol 1 or 2 (or both) or get them in a bigger bundle with the catalogs and companion too. I’m really excited about adding this resource to my crafter’s toolkit!

This post may contain affiliate links. This means I might make a small commission on purchases made through the links, at no cost to you.


Leave a comment

Secret, Secret, I’ve Got a Secret…

You guys.

YOU GUYS.

There is so much going on behind the scenes for this little blog, and I had all the plans to get it all going in the first half of this year but – YOU GUYS

Something came up. I was already falling behind because of other commitments I’d taken on, and then I was approached with an opportunity that was just… magical.* And I know – I KNOW – that is the LAMEST of excuses, but trust me when I say THIS WAS WORTH IT. I feel so very lucky and could not pass it up, even if it means shuffling other things a bit later down the pipeline.

I CANNOT wait to tell you all about it, but I’m under legal contract ** and can’t talk about it just yet. Just trust me that as soon as I can, I will. And in the meantime, you can follow glimpses of what’s going on with me via my Instagram, either through the link in the sidebar or directly here.

*Was that a hint?  Maybe.  <<innocent eyes>>
**Yup. 


Leave a comment

Halloween projects you’ll still have time to make

Halloween is in two weeks, so you know what that means- time to start scrambling for (not quite) last-minute costume ideas!  To help out, here are some costume-related projects from my archives that are short enough to get done before the 31st.  🙂

how to make minecraft steve and creeper heads

Still my most popular post- for those with some boxes and paint lying around: here’s how to make Minecraft Steve & Creeper heads.

enderman-costumeIf you’d prefer instead to teleport in out of nowhere and swipe your candy, here’s how to make a Minecraft Enderman costume head complete with his very own Minecraft diamond block trick-or-treat candy holder.

henripotter02

Speaking of apparating- for those who need an easy addition to their Gryffindor robes, here’s a quick free Gryffindor house scarf pattern.

viking vest how to square

For those with a young’un eager to train a dragon, here’s how to make a viking vest.

dollar-store-pirate-accessories-01

Easy props for your budding buccaneer made from dollar-store items.

post-pikachu-diy-costume-title

And finally, here’s a quick and easy Pikachu costume!

I hope you enjoy the links!


3 Comments

Crafty Compilation – w/e 01/28/17 – w/e 02/25/17

Ugghhhhh.  Is February really almost over?  Is that a thing?

Sigh.  When there’s nearly 4 weeks of everyone in your household getting back-to-back gastro, time can really get away from you, y’know?

I’m obviously behind on these little compilation posts of mine, so rather than upload a bunch of weeks’ worth of recaps in quick succession here’s an overview of the non-own-post-worthy stuff that happened during these last few weeks:


Knitting

  • Comfy Socks

My travel knitting socks have become my sit-on-couch-watching-Supernatural socks because I’ve only been back to work part time as yet and there hasn’t been much need for a travel project.  No pics, but the first one is about mid-foot.

  • V-neck sweater progress

The sweater was moving along at a great pace, as stockinette projects tend to do, until I was nearly finished the front.  You split the front at the v-neck, working each side individually.  I’d finished one half and held it up against me to see how it was gonna look…and noted that the v-neck began roughly in the middle of my rib cage.  I’m not one to shy away from a low-cut top but that’s a bit much to wear without an under layer, even for me.

Photo 2017-02-20, 11 12 02 PM.jpg

I calculated the height I wanted it to start at and ripped back, making notes so I could add that many rows before the split.  I have ripped this yarn back so many times I’m surprised it hasn’t fallen apart by now!

Crochet

  • Kitchen soap cozies

As part of my massive cleaning kick (see ‘other stuff’ below) I threw together these liquid soap bottle cozies for my kitchen.

post-03

The counter used to be a giant mess (pic censored to spare your eyes) and the cleaning supplies weren’t hideous but the kids (and I) had a hard time remembering which pump bottle I’d refilled with dish washing liquid and which one was hand soap.  The ‘dish’ one used to say ‘DISH’ in scrawled black Sharpie but it kept wearing off the bottle.

post-02

I didn’t use a pattern.  It took longer to keep casting on, starting then ripping to get the correct number of stitches than it did to actually work the two pieces.  In the end they took 30 sts, and I worked 4 rows of single crochet for stability, followed by 3 of double crochet (so it wouldn’t take as long to make), then 3 more rows of sc to have a more closed-in area to embroider on, another 2 rows of dc and then finished with a row of sc to stabilize the top.  I embroidered the words and then sewed the cozies together in place on the bottles.  They do stretch enough to be removed and since they’re dishcloth cotton when they get dirty or covered in soap drips I can wring them out a few times and they’ll be good as new.

post-01

Coloring

I’m not going to keep showing the coloring for each day… I tend to do them in batches as the images can start getting repetitive and I’m not always in the mood to work on them.  I’ve got them mostly completed through til February 12th or so, but I haven’t taken pics of them all yet so here are the last few I did photograph:

  • The Princess Bride coloring book

I have been ADDICTED to the new coloring book my brother got me for Hanukkah.

photo-2017-01-15-9-10-00-pm

This book is gorgeous.  It’s the entire movie in coloring book format!  No matter what your favorite scene from the movie might be, there’s a page ready for you to get to color it!

I always use the pages in the back of the book to swatch the supplies I plan to use.  I knew the pages were thick enough to allow water applications for my Inktense, but the little swatch sample I keep with the pencils is on beige paper.  I want to try to go for screen-accurate colors when possible, so I decided to swatch out ALL the Inktense colors.

Photo 2017-01-31, 3 38 30 PM.jpg

I gridded it out with a ruler then scribbled a tiny bit of color on one side of each cell.  Once it was dry I added the color numbers next to each but didn’t photograph that.

I’ve since begun working on some of the pages.  I’m going in order and have 4 pages in various states of completion.  It’s become my reward each night after I get the kids settled and tidy up and do laundry or whatever.  Chores done = coloring time LOL

Other Stuff

  • Cleaning!

Oh.  So.  Much.  Cleaning.  (…she says, pretending it wasn’t her own craft supplies making the mess in the first place!)  The house is long overdue for a big, thorough clean, and the first thing I’d tackled was the hutch in our dining room.  As you can see in the ‘before’ pic below, it was a massive jumble of an ill-organized mess, so crammed full of unnecessary things that there was no room for the things we DID need to store there.  During the brief lull between the kids’ gastro sessions I revamped the storage to better handle the things we needed.  My cake decorating supplies are still there, with the closed containers now spanning the top sections, and the open boxes and packages hidden inside the center.  Now the unit has become more of a central home art hub, with my drawing and coloring supplies on the left, and all of the home’s coloring and instructional drawing books on the right.  I’d grown up leafing through drawing books from a very young age and I didn’t want the boys to miss out just because mine were hidden away in my office.  The center square thing has become a homework depot (rather than homework remaining piled on the table or chairs during the week) with space for their binders and duotangs, as well as now being pre-stocked with construction paper, looseleaf, bond paper and cardstock, and the horizontal storage unit is all set up for them with glue sticks, scissors, erasers, sharpeners, etc.  All of their colored pencils and markers and such are in the top drawer right under the coloring books, so whether they’re up to some crafting or sitting down to homework, everything they need is right there.

I also did a similar complete overhaul to the den (I think that was between mine and Yannick’s bouts… ughhhh…), and am currently on a break with the kitchen about 85% complete to work on my office.  No pics of the rest cus there’s only so much of my mess I want to make public LOL

  • My hair 🙂

In the middle of all the illnesses I returned to work for the first time since roughly August.  Finally getting to be around people again was reason enough to treat myself to a little salon time, and I redid my crazy colors once more.me 2017-02-09 2.png

 
This post may contain affiliate links. This means I might make a small commission on purchases made through the links, at no cost to you.


1 Comment

Crafty Compilation – w/e 01/13/17

Last week felt so productive, and yet I don’t have much in terms of photos to show for it (yet).  The primary reason for that is because those pics are being saved for individual posts, so here’s what else happened:


Knitting

  • Sierra Socks

I looked at my records and they showed I started these in July 2015.  I thought that was a typo until I remembered I’d been knitting them during the Neil Patrick Harris gala with Maaike during the Just For Laughs festival…in 2015.  D’oh.  Guess I haven’t been carrying my travel knitting around with me as much as I should have been.

wip-sierra-socks-2015-07-27-02wip-sierra-socks-2015-07-27-01

(Photographic evidence of when the first sock was but a wee babe)photo-2017-01-16-8-42-09-pm

It’s always so satisfying when the strips line up perfectly.

photo-2017-01-16-8-43-15-pm

I do make note to cast on each sock at the same place in the yarn’s repeat, so it should line up… but there’s always the chance of finding something a bit ‘off’.  (Though I suppose that’s more of an issue with hand-dyed yarns vs machine-dyed commercial yarns like Regia).

photo-2017-01-17-12-09-58-amphoto-2017-01-17-12-09-29-am

I’ve worked on them off and on over the year and finally cast off the last stitch last week.  Now my travel bag is free to take on a new pair of socks.  🙂

Other Crafts

Over the holidays we’d received this Create A Treat Hanukkah House set from my mom.  The decorating was done right before New Years’, but this week I finally threw out the remaining pieces after the boys finally got to smash it to gobble it up, so I figured I’d share some of the decorating process.
photo-2017-01-01-11-03-40-am

They had a really good time decorating it!  Yannick and I took turns applying the icing in small sections, and then the boys took turns putting candy on before the icing had set.

photo-2017-01-01-11-19-00-am

Going in, I was doubtful that there’d be enough…of anything, really.  I fully expected to run out of icing and had a small tub of Wilton’s Fluffy White on standby just in case.  I’d also opened up about 20 packs of Rockets (if you’re Canadian…’Smarties’ if you’re American) into a little bowl but honestly I needn’t have bothered.
photo-2017-01-01-12-46-55-pm

There was so much leftover icing that I was able to cover the entire board the house was icing-glued to, and even blob it up to make small bushes.  I used up all the leftover snowflakes to cover the ‘ground’ but still have nearly half the little blue candies.  I included it in this post because while we didn’t DECORATE it during this week… we did SMASH AND EAT IT muahahahahaha.  It was surprisingly tasty…for a cookie that had been sitting in a box for who knew how long and then on our table exposed to the air for about two weeks!

  • 3Doodler Start

Photo 2017-01-14, 5 13 06 PM.jpg

Henri received this 3D pen for his birthday, and we spent a fun afternoon trying it out.  I’ve got a full review about it coming, and will update this post once it’s up.

EDIT: here it is, almost 6 full years later!

This post may contain affiliate links. This means I might make a small commission on purchases made through the links, at no cost to you.


3 Comments

Skylanders Sprocket Cosplay – Wrench Part 3

In my last post I explained how to calculate yarn yardage needed for plastic canvas stitching.  Here’s the breakdown of how that applies to my project, Sprocket’s wrench.

The following chart shows each piece I’ll need to stitch, its dimensions, and what the resulting area is (in ‘holes’).

wrenchyardage All that figuring tells me I need 189.18 yards of yarn to stitch the wrench NOT counting any edging or whipstitching to join.  Sadly I only had 160y of my first choice yarn, a skein of gray acrylic from my stash.  I went stashdiving (virtually, thanks to a long weekend spent entering everything into Ravelry) and discovered 2 other possible gray yarns.  Briggs & Little’s Tuffy in Smoke, of which I have 10 skeins, and the gray localspun wool from my frogged Linden.  I went initially to the localspun but in the light the natural wool, blended from assorted animals, was overall too creamy for this project.  There were a lot of beige tones that wouldn’t work well to represent metal.  I’d been hoping to avoid breaking into the Tuffy so I could keep the lot for some other project, but I realized that I’d been holding onto it, unused, for about 10 years now.  Time to use it.

I’ve been toting around my bag of project pieces everywhere I went, using every minute of available time to stitch.  It’s dawning on me just how close July 4th is, and how ambitious my version of this costume is, and I’m realizing I might have to cut corners somewhere, but using spare time wisely will help me get the most done.  So whether I’m waiting for my kids at daycare or sitting in a waiting room or in line at the grocery store, I’ve been pulling out a piece of canvas and stitching wherever I was.

And it paid off.  As of yesterday, June 12, the wrench pieces are complete.

skylanders sprocket wrench parts

All that remains now is to stitch them together into the assembled, 3D wrench/purse.

And then make a vest, goggles, wig, gauntlets, chest plate, belt and boots.

In two weeks.


2 Comments

mmm wasabi peas

Work was very swamped so I couldn’t post this earlier.  We had a guild exec meeting at my place tonight, so I couldn’t post this evening, so I’m posting now, even though I’m very tired.  I only got a row or two done but at least we accomplished a lot, guild-wise.

Very good outcome of tonight- I discovered a new brand of wasabi peas.  Mmmmm….wasabi-y.  Not only are these yummy, but they’re also salted, so they’re twice as good.  And every now and then you get one that makes you dance up and down and pound your foot on the floor because it’s so hot and you’re trying to distract your brain and your nose from the power of the green goodness.

I normally don’t like spicy foods, but there’s something about wasabi peas that’s got me hooked.  And my sinuses have never been clearer.

Oh- and I came up with an idea on how to save the original KAL Vegas scarf!  Stay tuned…