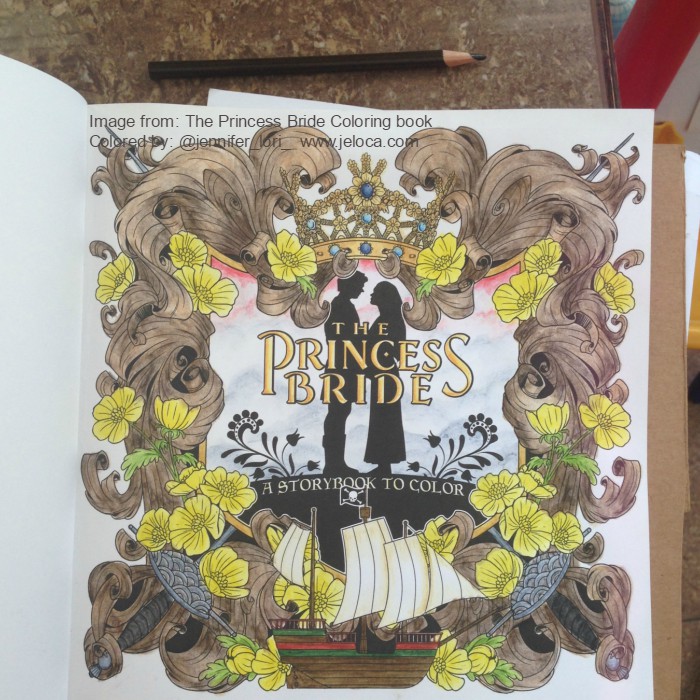
As I mentioned in my last post, I’ve been completely addicted to the Princess Bride Coloring Book lately. I’ve been using it as my reward for getting chores and stuff done, and currently have 5 pages in progress.
The title page is the first one I started with. I confess I felt really dumb when, after staring at the page for a while trying to figure out what color I wanted to make the flowers, I had a flash of insight and did a quick Google search. Sure enough – sigh – they had to be yellow. They’re buttercups! 😀
My plan for the book is to work primarily with my Derwent Inktense and then finish up with colored pencils when/if necessary for some finer detail work.
I don’t have full step-by-steps of the order I’d worked but for this page I’d tackled it like this:
-First I colored the buttercups with two shades of yellow (it’s hard to see but there’s a darker yellow in the center) and then done the greenery
-Next I used Payne’s Gray to shadow in some clouds behind Buttercup and Westley
-Then I colored the crown, using an image of Buttercup’s coronation crown for reference
-Then I worked on the ship. I spent way too much time trying to find decent pics of either of the two main ships in the movie (The Dread Pirate Roberts’ ship or Vizzini’s ship) but the one drawn doesn’t perfectly match either. If anything it’s closest to Vizzini’s but it has a skull and crossbones flag so…? Finally I did my best approximation copying, of all things, a LEGO ship build.
-Next I threw some gray and black into the two rapiers, and some pinks into the background, plus darkened the grays to give the illusion of mountains or far-off lands.
-The last thing I did at this step was to color the carved wood. I did a HORRIBLE job with my shading, and, while this paper is pretty thick and didn’t bleed through at all, it does start to pebble after too many water applications, so I eventually maxed-out on how deep I could get the shadows. That’s when I decided to jump right into some colored pencil.
In this image (above) I’ve worked colored pencil shading on the left side of the wood carvings only (so far), and I’ve used an eraser to lift out some highlights in both the wood as well as the sword handles.
This post may contain affiliate links. This means I might make a small commission on purchases made through the links, at no cost to you.
Ugghhhhh. Is February really almost over? Is that a thing?
Sigh. When there’s nearly 4 weeks of everyone in your household getting back-to-back gastro, time can really get away from you, y’know?
I’m obviously behind on these little compilation posts of mine, so rather than upload a bunch of weeks’ worth of recaps in quick succession here’s an overview of the non-own-post-worthy stuff that happened during these last few weeks:
Knitting
Comfy Socks
My travel knitting socks have become my sit-on-couch-watching-Supernatural socks because I’ve only been back to work part time as yet and there hasn’t been much need for a travel project. No pics, but the first one is about mid-foot.
V-neck sweater progress
The sweater was moving along at a great pace, as stockinette projects tend to do, until I was nearly finished the front. You split the front at the v-neck, working each side individually. I’d finished one half and held it up against me to see how it was gonna look…and noted that the v-neck began roughly in the middle of my rib cage. I’m not one to shy away from a low-cut top but that’s a bit much to wear without an under layer, even for me.
I calculated the height I wanted it to start at and ripped back, making notes so I could add that many rows before the split. I have ripped this yarn back so many times I’m surprised it hasn’t fallen apart by now!
Crochet
Kitchen soap cozies
As part of my massive cleaning kick (see ‘other stuff’ below) I threw together these liquid soap bottle cozies for my kitchen.
The counter used to be a giant mess (pic censored to spare your eyes) and the cleaning supplies weren’t hideous but the kids (and I) had a hard time remembering which pump bottle I’d refilled with dish washing liquid and which one was hand soap. The ‘dish’ one used to say ‘DISH’ in scrawled black Sharpie but it kept wearing off the bottle.
I didn’t use a pattern. It took longer to keep casting on, starting then ripping to get the correct number of stitches than it did to actually work the two pieces. In the end they took 30 sts, and I worked 4 rows of single crochet for stability, followed by 3 of double crochet (so it wouldn’t take as long to make), then 3 more rows of sc to have a more closed-in area to embroider on, another 2 rows of dc and then finished with a row of sc to stabilize the top. I embroidered the words and then sewed the cozies together in place on the bottles. They do stretch enough to be removed and since they’re dishcloth cotton when they get dirty or covered in soap drips I can wring them out a few times and they’ll be good as new.
I’m not going to keep showing the coloring for each day… I tend to do them in batches as the images can start getting repetitive and I’m not always in the mood to work on them. I’ve got them mostly completed through til February 12th or so, but I haven’t taken pics of them all yet so here are the last few I did photograph:
The Princess Bride coloring book
I have been ADDICTED to the new coloring book my brother got me for Hanukkah.
This book is gorgeous. It’s the entire movie in coloring book format! No matter what your favorite scene from the movie might be, there’s a page ready for you to get to color it!
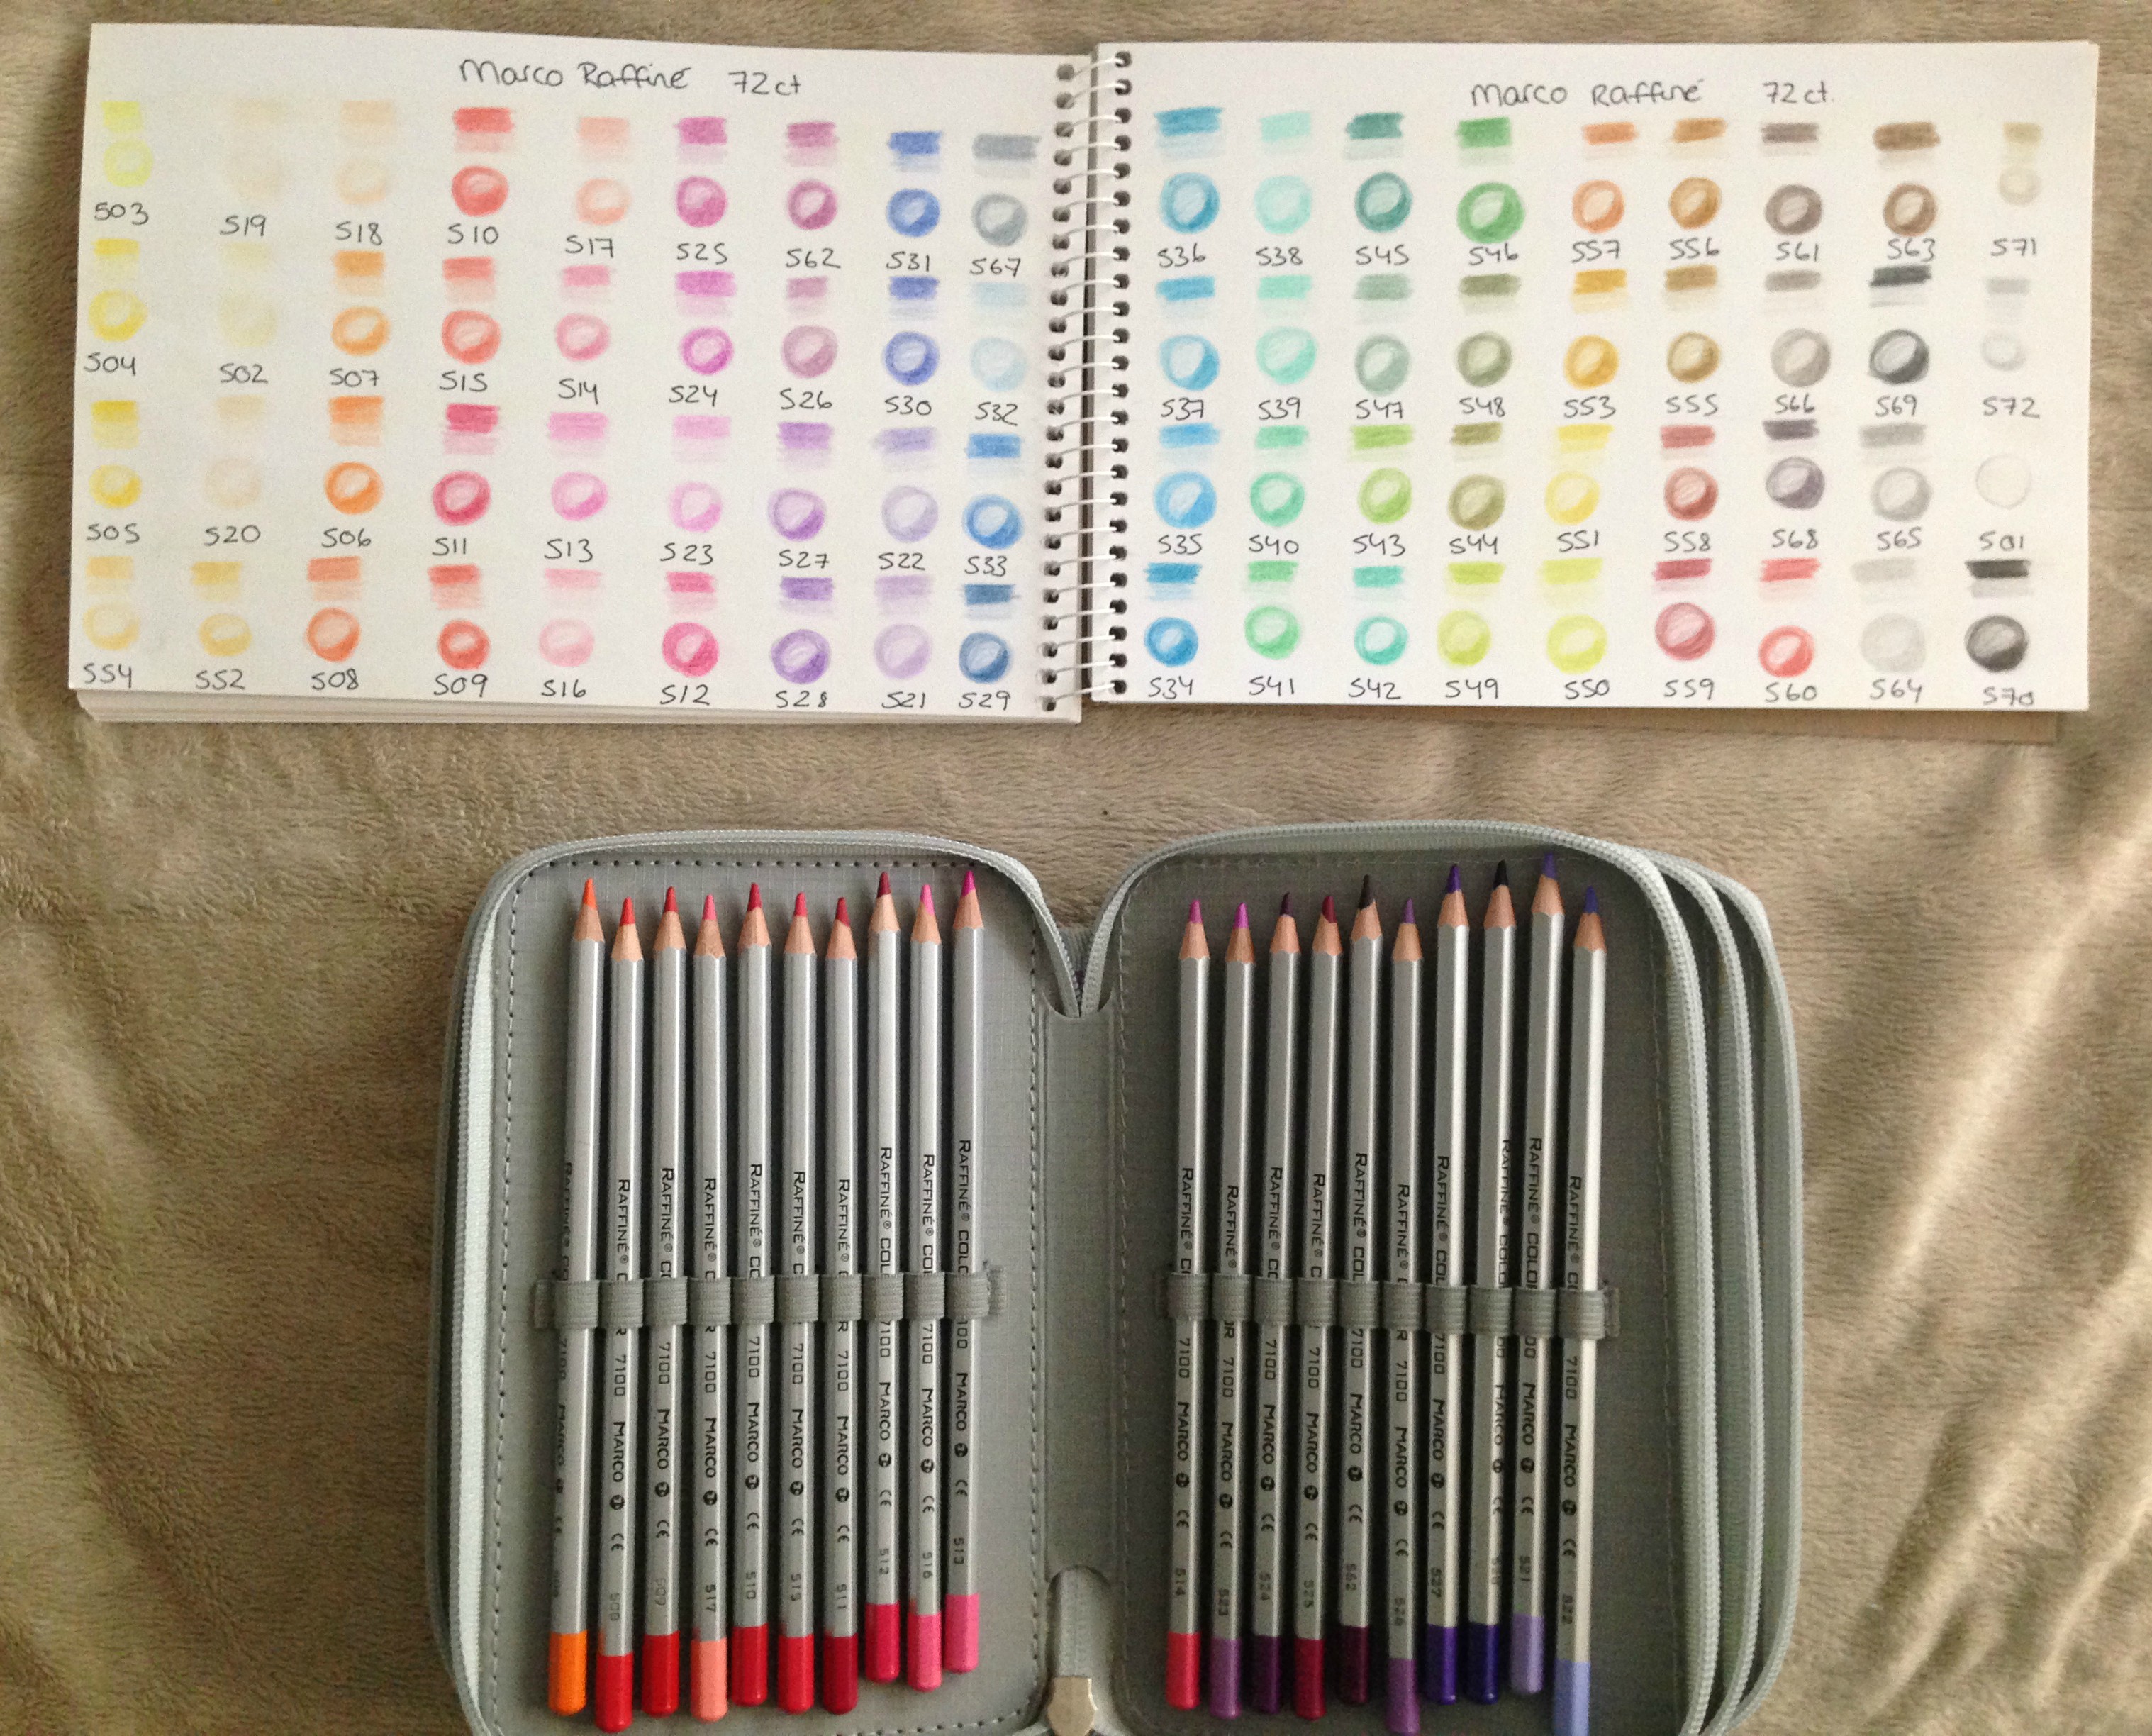
I always use the pages in the back of the book to swatch the supplies I plan to use. I knew the pages were thick enough to allow water applications for my Inktense, but the little swatch sample I keep with the pencils is on beige paper. I want to try to go for screen-accurate colors when possible, so I decided to swatch out ALL the Inktense colors.
I gridded it out with a ruler then scribbled a tiny bit of color on one side of each cell. Once it was dry I added the color numbers next to each but didn’t photograph that.
I’ve since begun working on some of the pages. I’m going in order and have 4 pages in various states of completion. It’s become my reward each night after I get the kids settled and tidy up and do laundry or whatever. Chores done = coloring time LOL
Other Stuff
Cleaning!
Oh. So. Much. Cleaning. (…she says, pretending it wasn’t her own craft supplies making the mess in the first place!) The house is long overdue for a big, thorough clean, and the first thing I’d tackled was the hutch in our dining room. As you can see in the ‘before’ pic below, it was a massive jumble of an ill-organized mess, so crammed full of unnecessary things that there was no room for the things we DID need to store there. During the brief lull between the kids’ gastro sessions I revamped the storage to better handle the things we needed. My cake decorating supplies are still there, with the closed containers now spanning the top sections, and the open boxes and packages hidden inside the center. Now the unit has become more of a central home art hub, with my drawing and coloring supplies on the left, and all of the home’s coloring and instructional drawing books on the right. I’d grown up leafing through drawing books from a very young age and I didn’t want the boys to miss out just because mine were hidden away in my office. The center square thing has become a homework depot (rather than homework remaining piled on the table or chairs during the week) with space for their binders and duotangs, as well as now being pre-stocked with construction paper, looseleaf, bond paper and cardstock, and the horizontal storage unit is all set up for them with glue sticks, scissors, erasers, sharpeners, etc. All of their colored pencils and markers and such are in the top drawer right under the coloring books, so whether they’re up to some crafting or sitting down to homework, everything they need is right there.
I also did a similar complete overhaul to the den (I think that was between mine and Yannick’s bouts… ughhhh…), and am currently on a break with the kitchen about 85% complete to work on my office. No pics of the rest cus there’s only so much of my mess I want to make public LOL
My hair 🙂
In the middle of all the illnesses I returned to work for the first time since roughly August. Finally getting to be around people again was reason enough to treat myself to a little salon time, and I redid my crazy colors once more.
This post may contain affiliate links. This means I might make a small commission on purchases made through the links, at no cost to you.
After finishing the Sierra Socks last week I immediately cast on for a new pair. It wasn’t so much that I needed new knitting as I needed new knitting to be ready ‘on hold’ in my purse in case I ever needed it in the future. Except for very few exceptions, I knit all my socks toe-up, with a short-row heel and toe, from a pattern I’ve long-since memorized. I’ll refer to past project notes to know how many stitches to work up to depending on if it’s a sock for Yannick or for myself, but otherwise the rest of it is pretty much pick-up-and-go. I knit without looking so the only parts of the sock that require my attention are the toe and heel. For that reason, I like to knit the toe before I stash it away in my project bag, so it’s ready at the ‘just knit’ part.
(I’m still loving the personalized travel knitting bag Maaike made for me!)
This sock is going to be an experiment. I’m using Regia Softy Color yarn that I got at a guild stash exchange a year or so ago, and I’m going to be knitting a heel-less sock. I get cold at night so I sleep with socks on, usually fuzzy ones from the dollar store. But then I get hot so I kick them off… and then my toes get cold again so I put them back on. A happy middle ground has been to push my socks off down to the pads of my feet, so my heels are exposed to the cool sheets but my toes are still kept warm. Therefore I’m going to see if a heel-less sock gives me the same effect. If it does, it’ll be a fun way to work through my fun-fur stash.
Coloring
Creative Coloring Throughout the Year page-a-day calendar
Some mornings after getting the kids off for school I got a chance to do some coloring. I don’t have any need to get the calendar pages ‘right’ in any way, so it was fun to pull out a bunch of coloring supplies and just apply color to the pages. I’m usually a lot more strict on myself when it comes to color placement… or adding highlights or shadow… whereas with these pages I’m not giving myself any restrictions to match any preconceived notions of what the resulting pages ‘should’ look like.
While I was at it I finished swatching my latest batch of gel pens – a 60-count set by Top Quality that I got on Amazon. There were a few duplicate colors to ones I already had, but also a lot of new shades. For the price I’m quite happy with the set.
I did want to differentiate between these colors and my Lolliz and other ones, so I used a Sharpie to mark an “L” on the caps of the Lolliz ones and “TQ” on the Top Quality ones (the other brands showed their brand names on the caps or pens). Then I followed that up with a layer of a clear nail polish topcoat to help prevent the writing from rubbing off too quickly as I used the pens.
I grew up playing Rummikub (we called it ‘Rummy-Q’), and I have fond memories of being my kids’ ages and playing with my Bubbie, so on Saturday afternoon after the kids had finished homework and had lunch I taught them how to play. We did one open game where I gave them a few pointers but then played two full games with our tiles hidden, and they’d picked it up perfectly! In fact- Jakob won the open round as well as one of the closed ones! It was awesome to see them playing the game that had given me so many good memories with my grandparents, and to spend technology-free time with my kids.
This post may contain affiliate links. This means I might make a small commission on purchases made through the links, at no cost to you.
2017. Wow. I can’t believe I started this blog roughly 13 years ago, nor that some of you have been around since the very beginning. Whether you’re one of my original few hundred subscribers or one of the couple thousand who discovered my site when looking for my most popular Halloween DIY, hi there, happy holidays, and happy New Year! I’ve got a lot planned for this little blog over the upcoming year, so if you’re an old friend- thanks for sticking around… and if you’re new- I hope you’ll pull up a chair and stay a while.
Some of you may note that I’ve slowly made changes to the type of content that I post. I’ve never been a mono-crafty person, and the blog will always adapt to whatever creative pursuits I’m into at the time, whether they’re knitting or crochet, cosplay or cakes. Coloring books are going to have more of a showing on the blog, as will as a variety of crafts beyond the yarn-based ones. For the last two years I’ve taken step-by-step photos of all the projects that I’ve made with the intent to focus more on sharing helpful DIYs, tutorials and tips going forwards, instead of merely showing off whatever I’ve made. I’m going to have more reviews coming up, both sponsored and non, and while there might be affiliate links popping up at the end of some posts, I can promise you that my reviews will always be strictly my honest, unbiased thoughts.
Another feature I’m going to add is a weekly roundup, to both keep track of and hold accountable to the projects I’ve got ongoing. Not everything needs to wait for a finished reveal, and sometimes quick projects or small pastimes get lost in the shuffle of the day-to-day. To that end – this is my first Crafty Compilation. I plan to post these on Sundays and to cover the previous week’s goings-on, but this first one is being posted on Thursday because life LOL. Amazing how, even when one is off work in post-op recovery, when it comes to crafting, there still isn’t enough time! This first CC will cover some stuff worked on over the holidays, as well as last week.
Knitting
Gift knitting
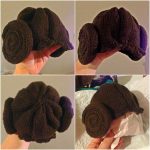
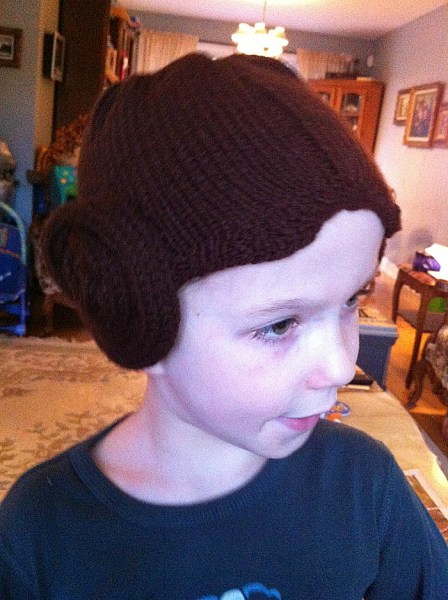
Over the holidays I knit a special baby hat. One of Yannick’s closest friends had a baby girl just before the holidays, and when he showed me the gifts he planned to bring for the friend and his other young daughter, I told him I knew just the thing to make for the new arrival. The little girl’s dad has similar geeky tastes as we do, and I thought this pattern would be perfect.
I’ve knit it once before, back in 2013, as part of a Hallowe’en costume for a baby girl aptly named Leia. This was a pic of Jakob trying it on for me at the time:
and this is a pic of the little sweetheart in her full costume. Cutest Leia I’ve ever seen!
The pattern is very well written and it’s a pretty quick knit, even with all the icord. The hat and the ear puffs each took a night’s worth of knitting to work up, then the assembly took barely an episode of Elementary.
Forgive the bad pics, it’s hard to take hat pics without an appropriately-sized head! 🙂 I’m really pleased with how the hat came out, even though I’d knit it before and expected it to look the same. One thing I love about this pattern vs others out there is how it incorporates ‘bangs’ and the center part (not clearly visible in these photos but seen better in the one of Leia wearing it above).
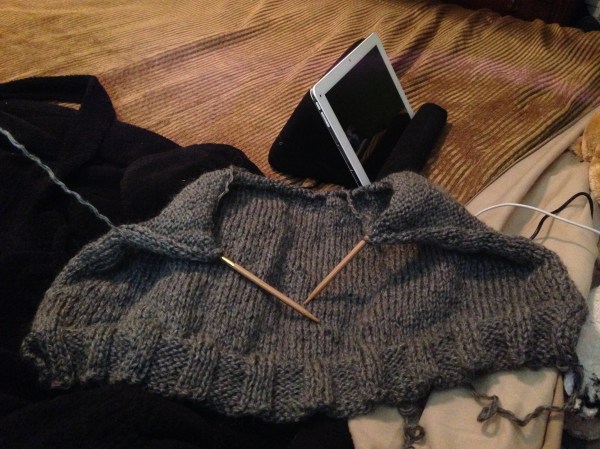
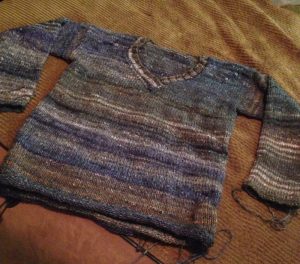
Drops v-neck sweater
I also completely frogged a sweater I’d been working on. Back in September I’d started a garter-stitch oversized sweater with a lovely gray yarn from my stash. I’d thought it would be perfect ‘no-look’ movie or tv knitting but after measuring a sweater I own that had the fit I wanted, I realized that what I was making wouldn’t have the proper shape. Plus I’d been having a nagging feeling that the garter stitch was eating up too much of my limited yarn. So I frogged it one evening last week and began this pattern instead. I’m pretty sure I’ll have enough yarn, and if not I’ll work the neckband and/or cuffs in something contrasting.
So far I’m at about 32cm of the 34cm I need to be at before splitting for the low v-neck.
Coloring
Doodle Fusion ‘Christmas Tree’
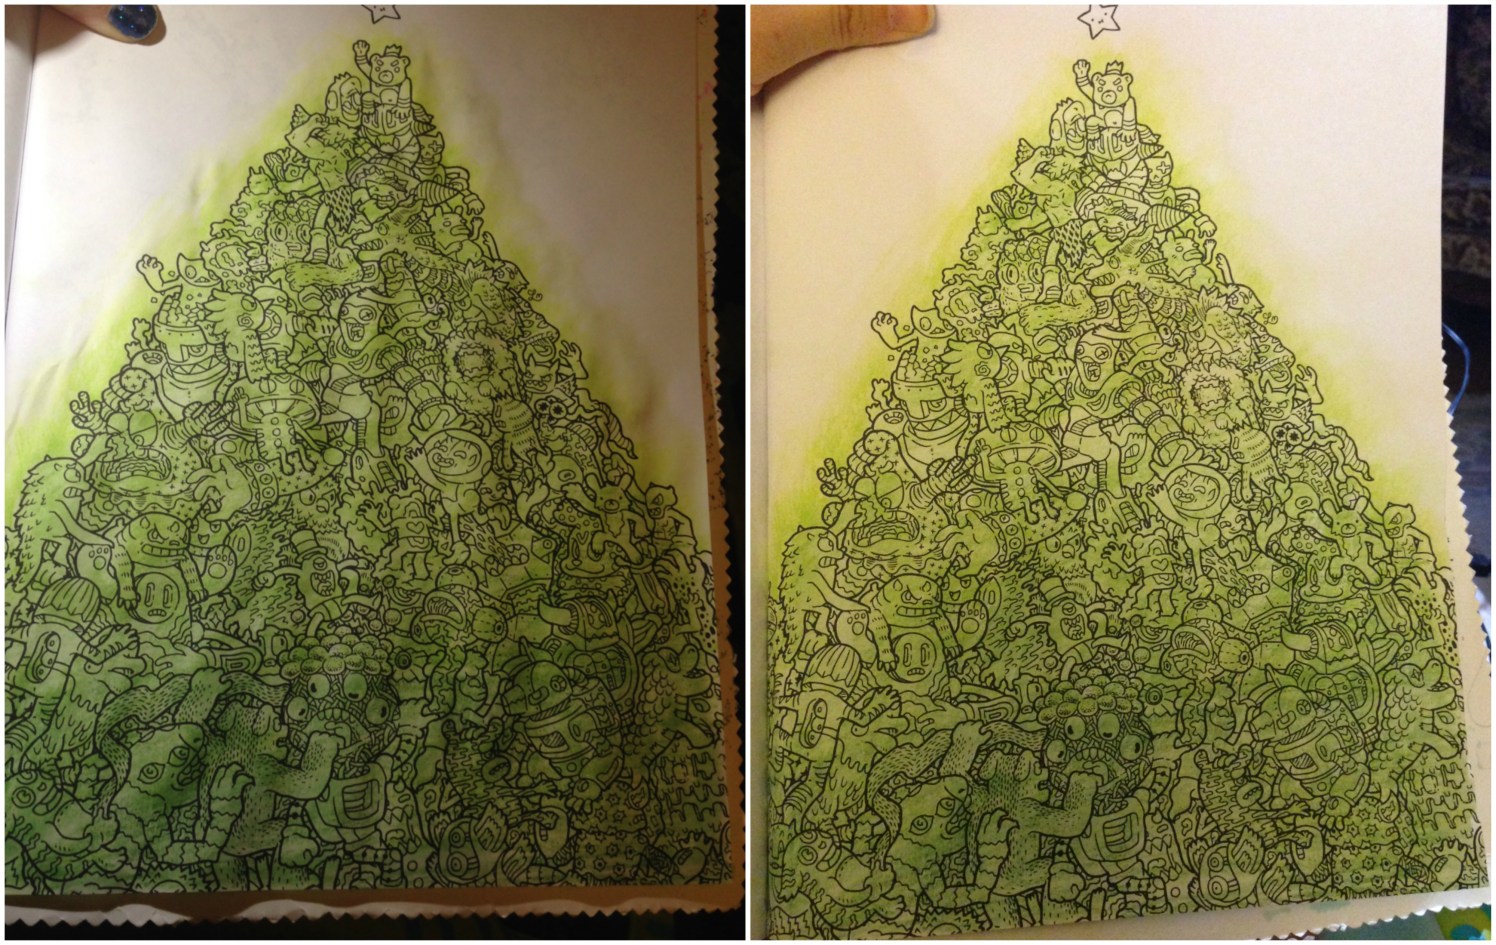
A few weeks ago I’d taken a page from Dede Willingham and done color washes across a bunch of my coloring book pages. From what I’ve seen she primarily uses acrylic paints, but I mixed it up a bit, using not only paint, but also my Neocolors(seen previously here, in imagimorphia) and my Inktense(last seen here, also in imagimorphia). This particular page, from Zifflin’s Doodle Fusion, seems to deliberately invoke a Christmas tree, so that’s how I decided to approach it. I colored over the whole image with the Inktense in shades of green. The first pic is immediately after wetting the pencils, and the second is the next day, after the page had dried.
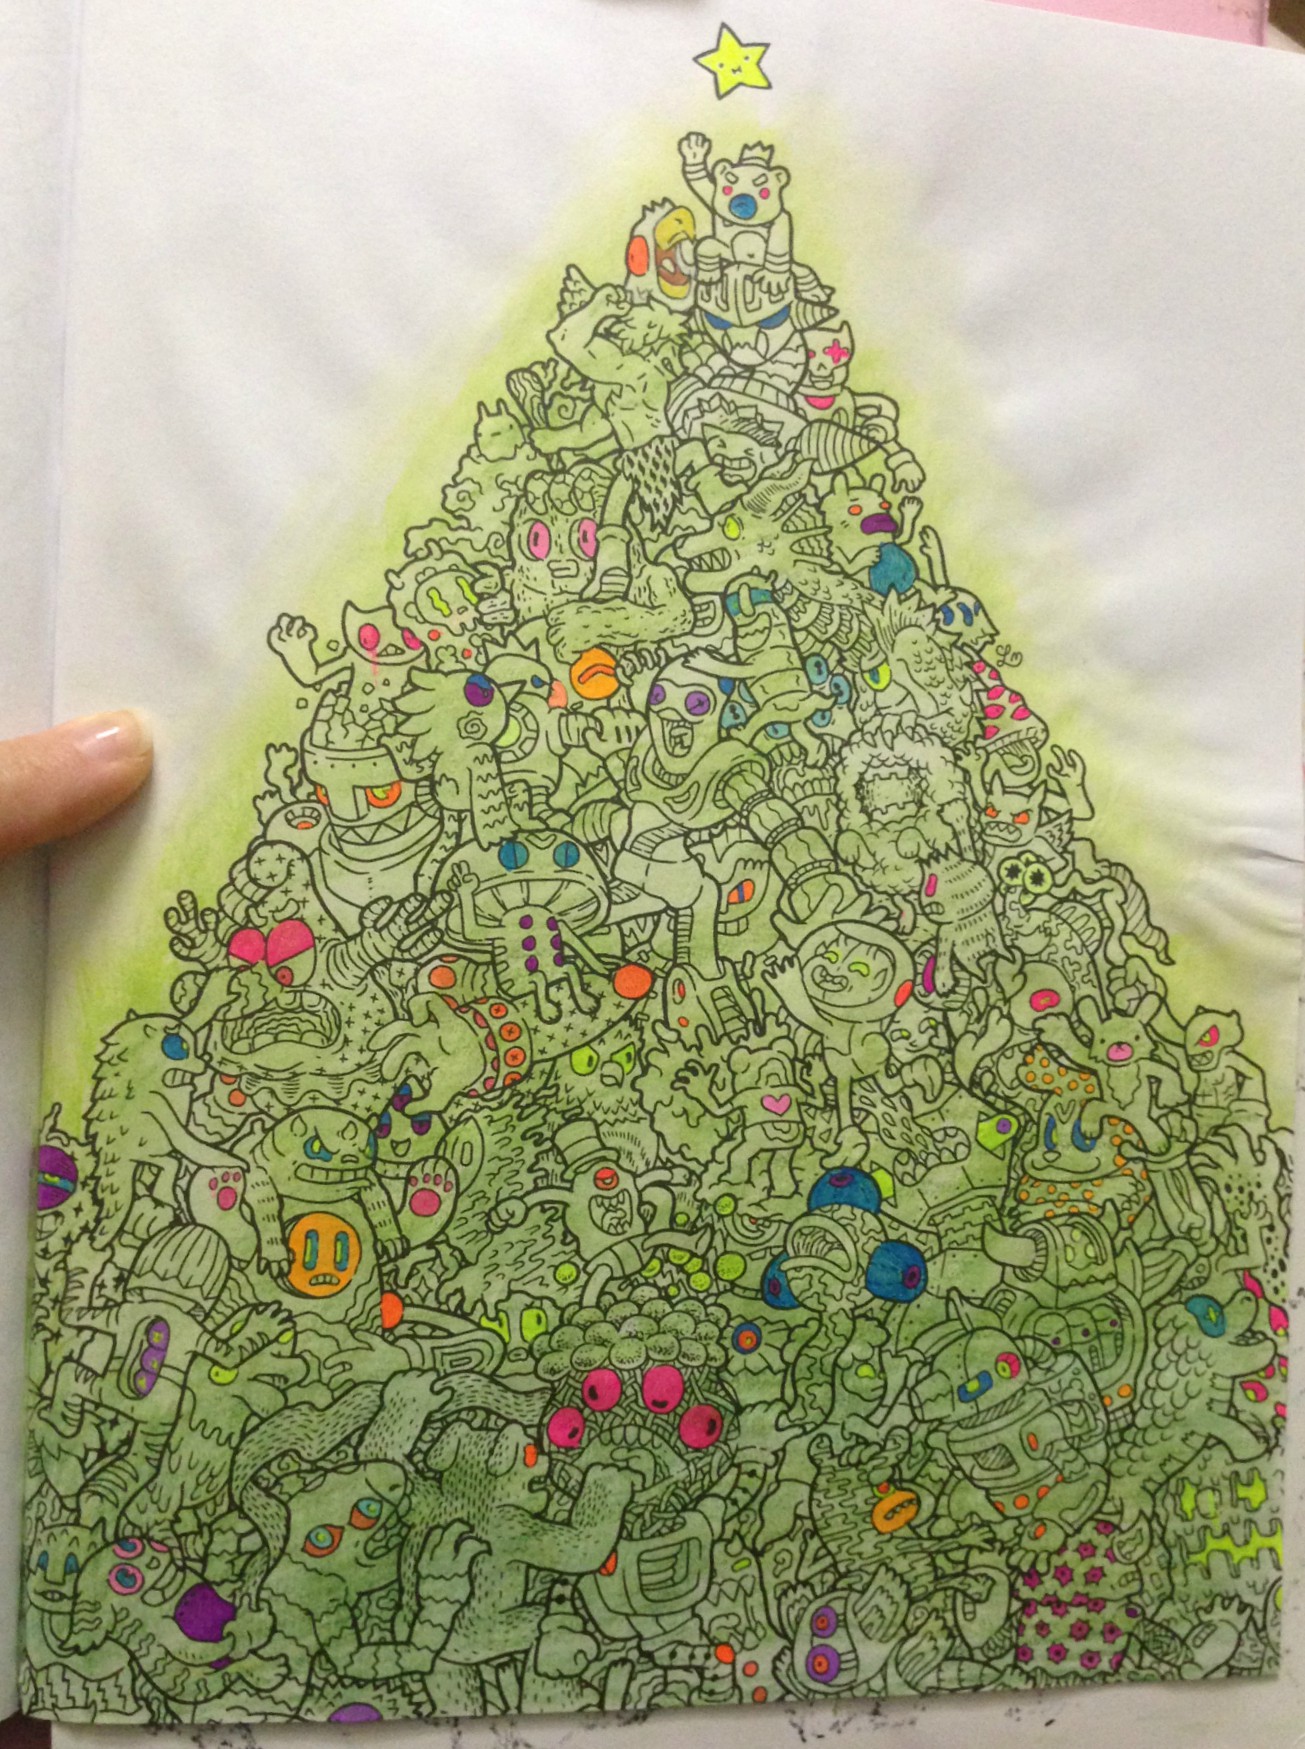
My plan is to color the characters in colored pencil over the Inktense, keeping them muted and dark, but to color all the eyes and anything round-ish in bright gel pens, so they’d (hopefully) look like bright ornaments on the tree. If you squinted at it. Maybe.
This was after my first pass with the gel pens. I think I got all the areas I’d wanted, but I’m sure as I work on the figures I’ll find more. I’m looking forwards to coloring the characters now in dark tones to really make the gel pen pop.
PS- this book is crazy, and I love it. I’ll be showing a lot more of it in future posts.
I finally finished a page I started coloring back in November in the Disney Villains coloring book Yannick had bought for me, but as this post is getting long I’ll save them for another. That’s another excellent coloring book that I’ve been working in quite a bit.
While the boys were off school for Christmas break I tried to keep them occupied with more than just Minecraft, Little Big Planet, or their new Skylanders Imaginators. Every few days we had ‘technology-free’ time during which we’d color, or do pencil puzzle books, and during one of those afternoons I taught them how to make their own stuffies. However I took a TON of photos and so I’ll share the step-by-steps of their work in another post
Alright, that’s it for this round-up!
This post may contain affiliate links. This means I might make a small commission on purchases made through the links, at no cost to you.
Remember when this was a knitting blog? *grins* Well this post is about crochet LOL
Last night I found out just how many geek & gaming videos one can watch while ripping out an entire sweater.
Earlier in the day I’d somehow found myself browsing granny square-related patterns on Ravelry yesterday, and stumbled across this pattern.
It’s the 171-35 Harvest Love Pullover by DROPS and it’s free on Ravelry. I think it’s got the potential to either look hideous or adorable on me, and hoping for the latter, I opened a new tab to check out my stash database and see if I had anything that might work. One yarn that came up was my Noro Silk Garden, because I’d never marked it as fully used in the v-neck sweater I’d knit last January.
This one. I’ve also never finished weaving in the ends for this sweater, because I’ve never been satisfied with how it fit or looked on me. I tried it on again last night and decided it was not going to ever be something I’d wear, and that Silk Garden is too gorgeous to leave relegated to a discarded FO box. So, I decided to frog it.
The process should have been easy enough: undo the bind-off on the neckline and rip that back, undo the bind-off on each sleeve and rip those back, then pull out the seam thread from each side, then undo the 3-needle bind-off from each shoulder and then frog the front and back pieces from neckline down to the hem. And it was… easy.
It was also a huge pain in the butt. I’d been so smart in my knitting that to avoid pooling I’d alternated balls of yarn every 2 rows. This now meant that every 2 rows I had to untwist the balls I was re-winding around each other. It wasn’t so bad on the body pieces because I could let them flip around to help me out, but the sleeves were still attached to the heavy body and had to be manually twisted after every short 2-row tugging bit.
So I guess now I’ve… got balls? Heh. I’ve also got a crochet chart to type out into rows I can tick off on a spreadsheet, and then I can get started on what will hopefully be the last project with which I attempt to use my lovely Silk Garden.
Boy it’s been a hot minute since I’ve posted last. Back-to-back secret projects will do that, unfortunately, so I’m gonna try popping in with the little things I work on around the big ones, when they’re ones I can’t share.
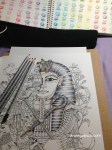
I’ve already shown a few coloring books from my collection, but those who follow me on Instagram or Twitter will have seen pages from others here and there. This is the one I’ve just started: the Egyptian-themed page from Kerby Rosanes’ imagimorphia, the sequel to his incredible animorphia (which I also own and have sadly neglected).
Ignore the dark circle in the lower corner. I forgot to take a pic of the page before beginning to color, so I had to photograph the smaller version from the hidden object answer key at the back of the book.
I’ve been using my Marco Raffiné colored pencils for this one. I have been using my fineliners a TON lately, and wasn’t sure if I’d enjoy going back to colored pencils. Plus, this book has all double-sided pages, and I was worried the markers would bleed through.
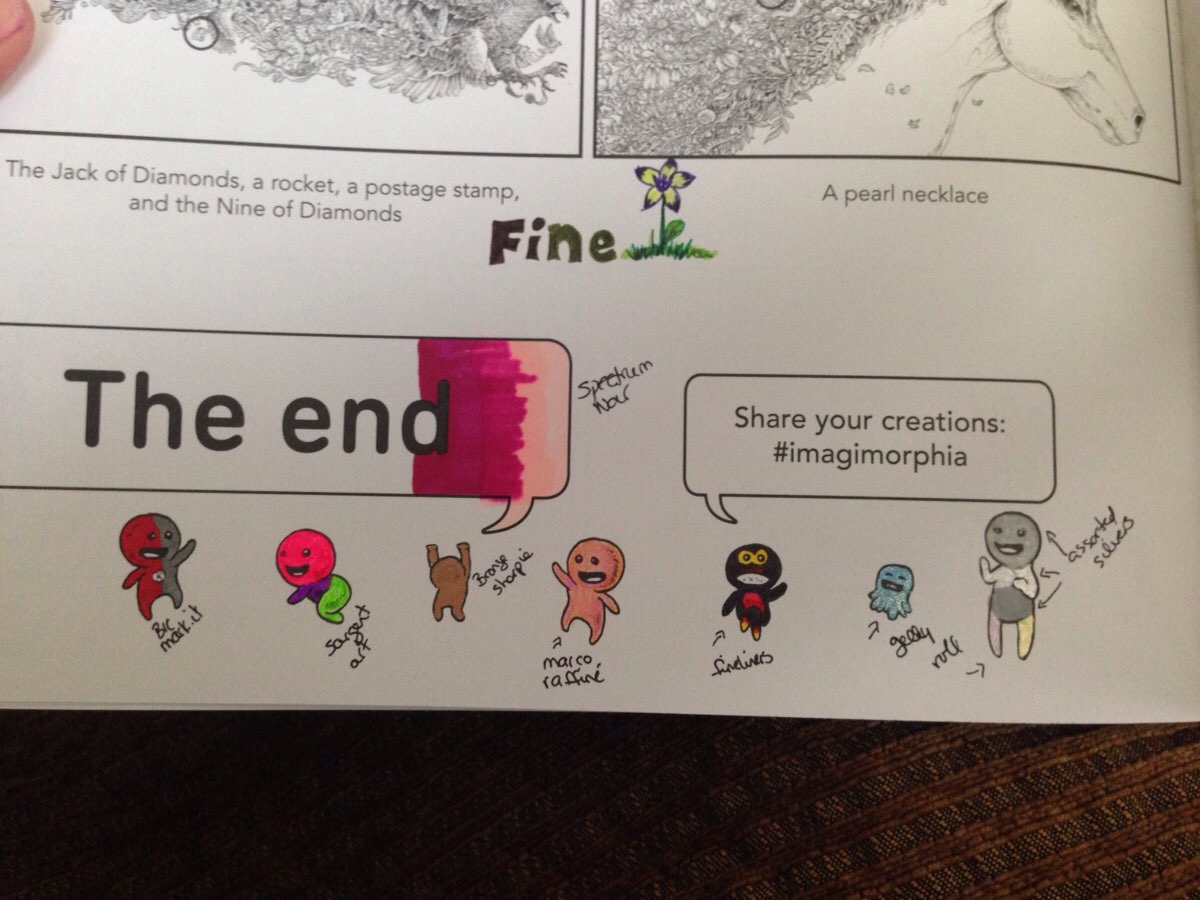
I did a little media test at the back of the book. The first little dude was colored with Bic Mark-Its, the next with fluorescent Sargent Art gel markers, and the third with bronze Sharpie. Fourth was the Marco Raffinés (I knew colored pencils wouldn’t show through but I wasn’t sure how they would take on the paper’s tooth.) Also Marco Raffinés are oil-based cp and not wax-based like my other ones so I need to swatch those elsewhere sometime. After the cp I have Stabilo 88 and Staedtler Triplus fineliners, then a Gelly Roll glitter pen, and finally a few assorted Gelly Roll and other-type metallic markers. In the word box I tried out my Spectrum Noir alcohol markers even though I KNEW they’d bleed, and then I doodled a flower and word up above because that was in a white area on the reverse side and I wanted to see if anything would show through where there wasn’t a drawing.
I was so pleasantly surprised with this book! Not only are there a crazy amount of pages, but almost nothing bled through. I expected the alcohol markers so I ignored that, and since the Bics are alcohol-based as well I wasn’t surprised to see they’d also bled. What really thrilled me is that none of the others did! There’s a faint bit of ghosting from the fineliners but it’s mostly only visible in the white space area. I think if I used them to color any image or sections that had a picture/patterning on the reverse, it wouldn’t even be noticeable. Yay!
I was also really happy with how the Marco Raffinés took to the paper. They don’t play nice at ALL with the paper of my swatch book (seen above, and again below), and it takes a lot of pressure to get any color to lay down. In the book, however, I could apply the barest touch and get a sheer wash of color, and was able to layer nicely. Double yay!
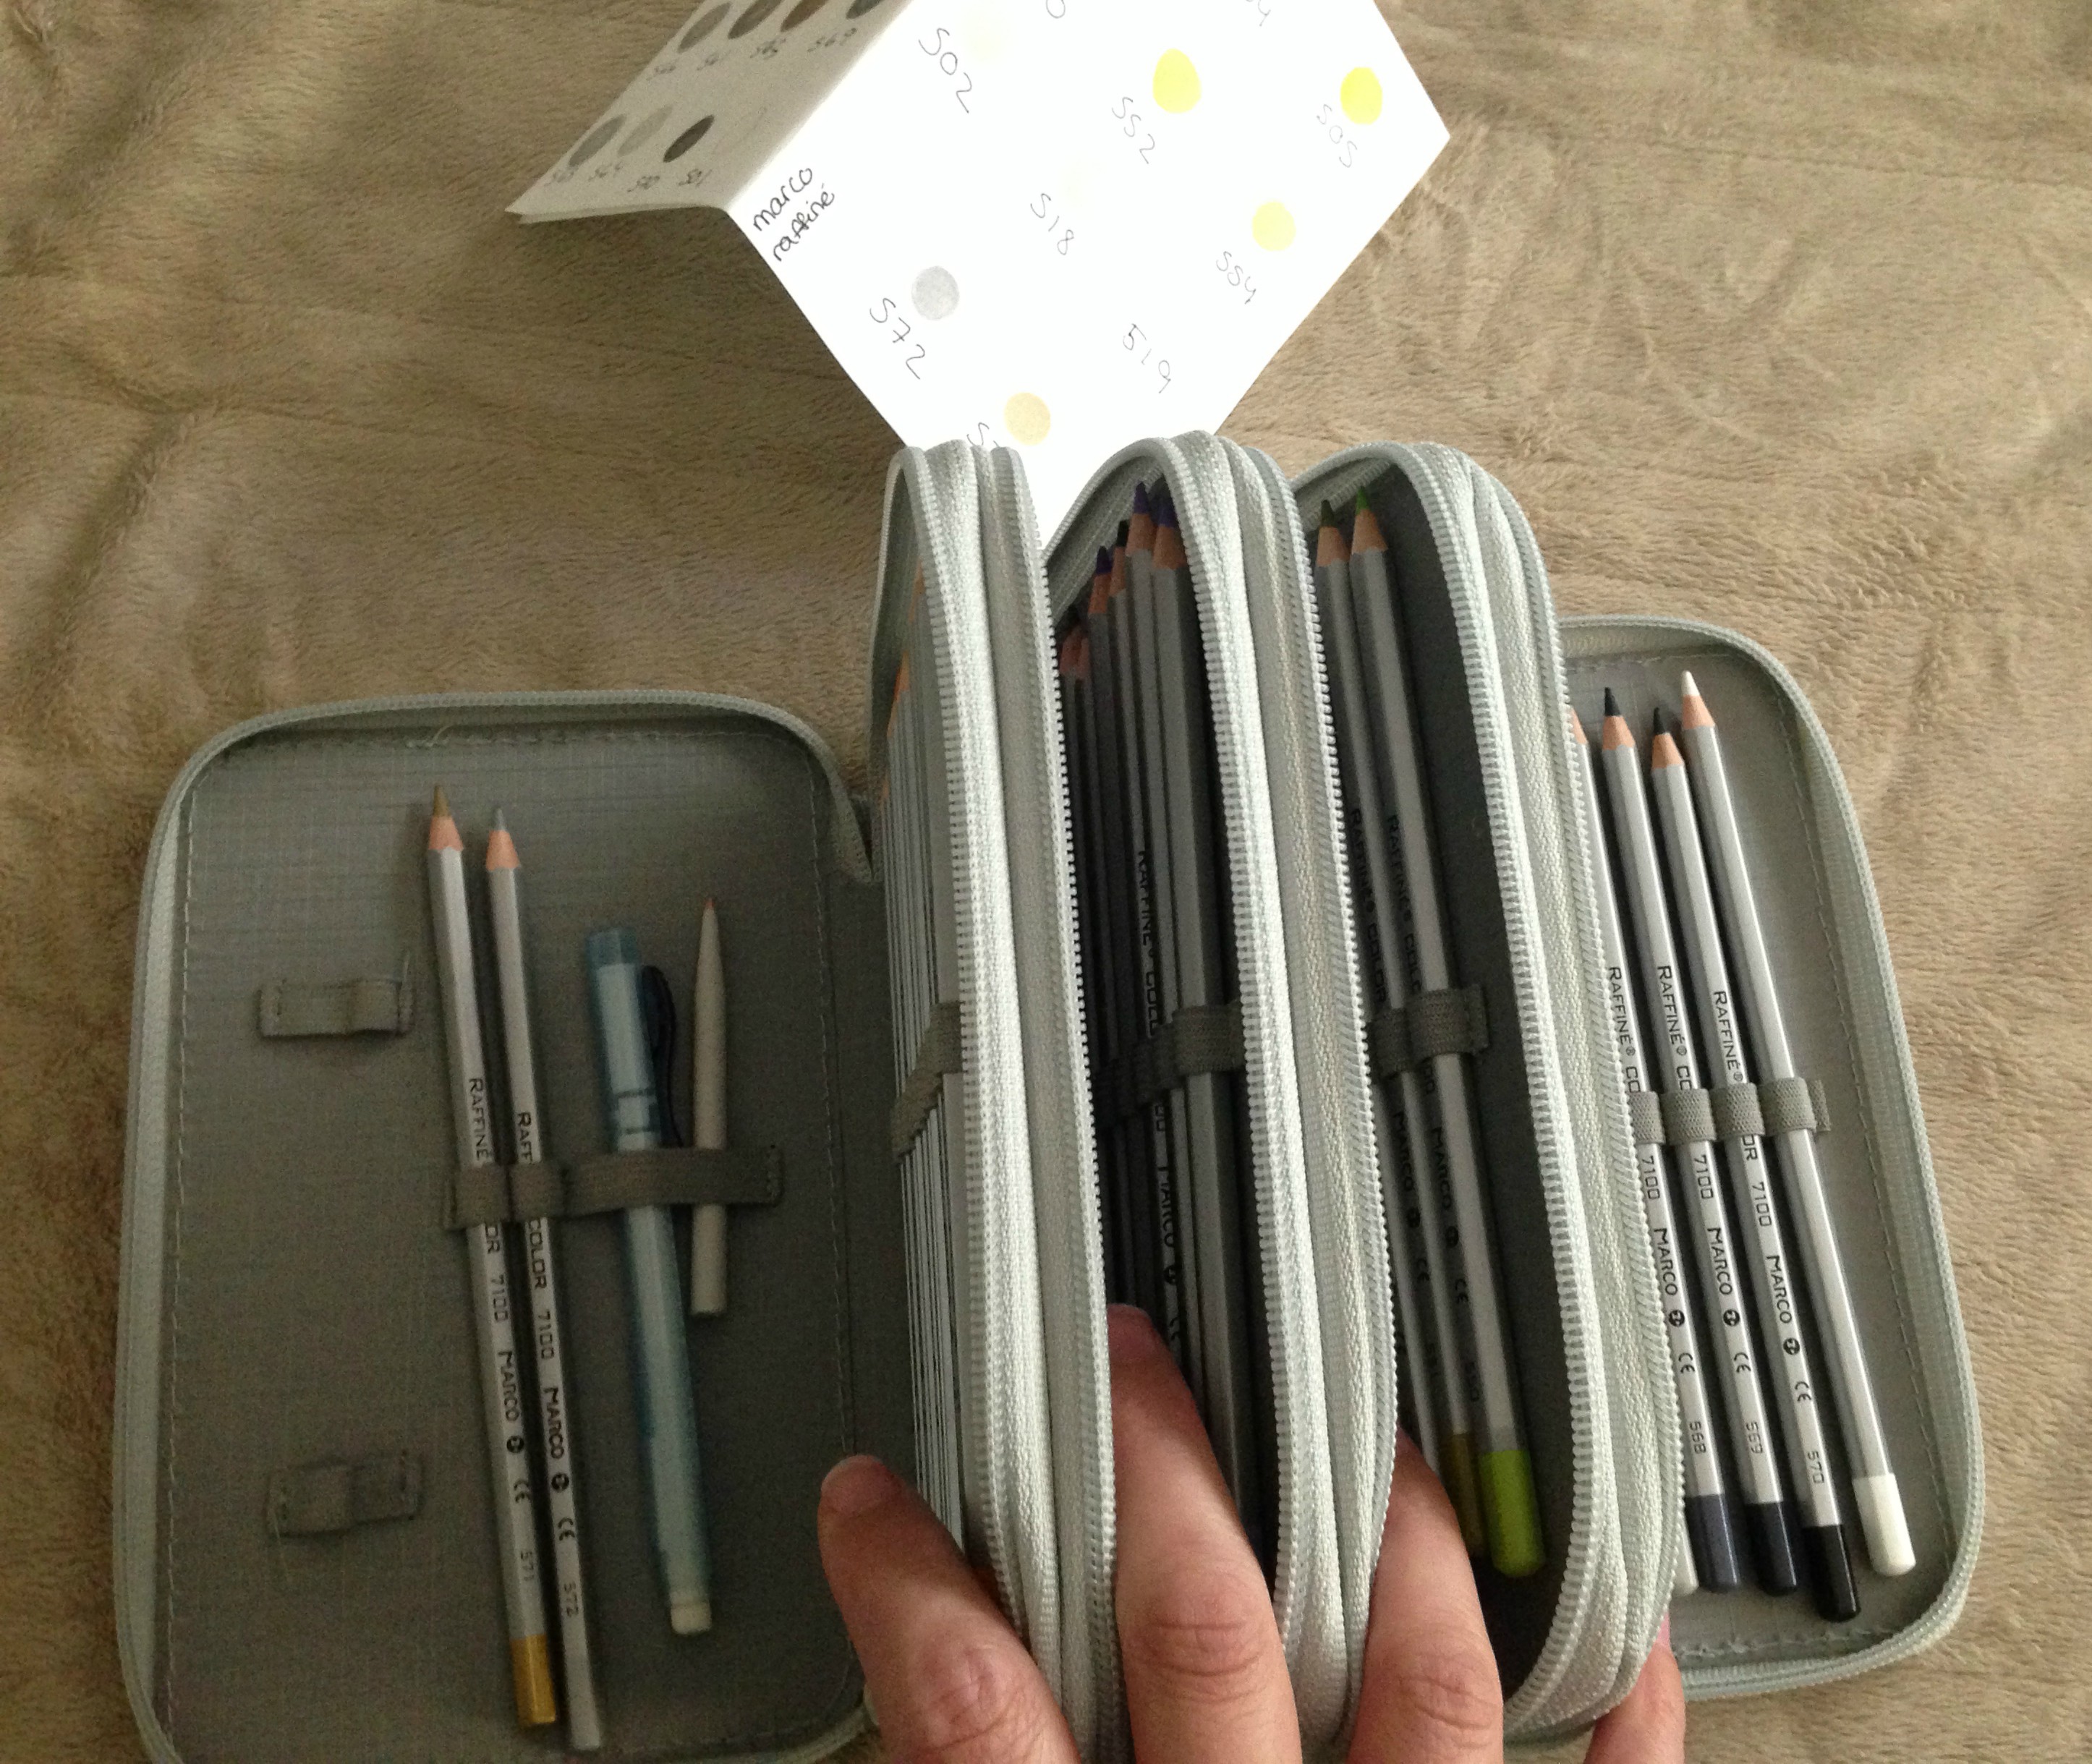
PS I’m storing my pencils in a case I ordered off eBay. I saw them in a review video that Peta (La-Artestino) did and picked up a few to try out. The largest size (4-zippers) holds 72 pencils which fits the full set of Marco Raffinés perfectly. (PS if you’re into coloring at all do check out Peta’s blog and her videos, she’s incredible!). I keep an eraser and blending tortillon inside, along with a sheet of watercolor paper with numbered swatches of the different colors so I don’t have to bring my swatch book around with me. I only wish there was some type of pencil-shaped sharpener so I could keep one inside too!
Finally, here’s the coloring in progress, where I stopped at last night. I started by lightly shading in the areas I wanted the darkest color, using my lighter blue and brown. Then, starting with the head-piece and curved staff, so far, I went back in, applying a longer fade of each color, which I then darkened up in the shadows with a darker version of each color.
This post may contain affiliate links. This means I might make a small commission on purchases made through the links, at no cost to you.
It’s been brought to my attention (*cough*Michelle*cough*) that I never finished posting Henri’s Pitfall cake. That is correct… February sort of got away from me, so I’ll take care of that right now. This post will cover the final details of finishing the cake the night before the party, and my next post will show the final cake at the party, complete, and enjoyed. 🙂
In my last Pitfall cake post I left off with the cakes assembled and dirty-iced. I set them aside for a little bit so the icing could crust and mixed up some green for the grass. I deliberately gave it a bit of an aged, almost faded color so it would match the tones of the fondant leaves and the brick wall. The wall was so dirty and stained/old-looking that a bright, primary-colored grass base would have looked really, really out of place.
I covered the top cake with the same cake-filled chocolate icing as I used on the lower base, blocking out an area for the small pool at the top of the waterfall. Then I used green icing to block out the larger pool at the bottom. Once the brown and green were done I used more white icing to thicken the base coat on the various water areas.
Then I realized that the pool I’d created wasn’t wide enough to fit the crocodile I’d already made. Oops! So I used more white icing to widen the water.
My cakes are often like this. Very rarely is something sprung to life, fully formed, exactly as it was in my head. It might be close, in the way this cake very closely resembles my initial sketch, but the actual details in the getting there are always very fluid, and often borne of the desperation and delirium that comes from cake decorating in the wee hours of the night when stores are closed and coffee is cooling.
Next I mixed up some blue for the water and layered it on over the white. I didn’t worry so much about the edges where the water and grass meet as I knew I’d be placing leaves there, and I deliberately left it choppy on the waterfall where I wanted it to look like there was some motion and churning. I also played with swirling my knife around to make the water look a bit rough because the waterfall would prevent it from being a clear, calm pool. Above you can see the cake as I worked on it (with the parchment protection) and then how it looks once I removed the parchment. I always keep the parchment in place until I’m ready for the finishing details as it’s much easier to remove dirty parchment from around a cake than icing from the cake board.
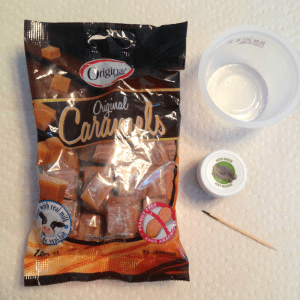
One of the things I’d been thinking about in the days leading up to D-day (decorating day) was how to make vines. I figured I’d just roll out some fondant pretty thin and hope it wouldn’t crack once it dried. But when at the dollar store that afternoon during my unexpected child-free time I hit on the idea to try using caramels.
I figured they were already pliable, and edible, just like fondant… but had a better stretch. Hmmm…could this work?
I’d decided to do a quick test before going to pick up the kids from the party. I softened 2 caramels in the microwave and then when they’d cooled enough to touch, added a touch of green food gels. I kneaded it together just like dough/fondant and was thrilled that the caramel took the color evenly, with no streaking or dissolving from the added moisture. I quickly rolled out a quick, curly vine and set it aside to dry while I was out.
This is what I came home to (above). A perfect, jungly-green colored, held-its-shape vine that was smooth, crack-free and best of all, delicious. (Okay, there had been 2. Yum.)
Sweet!
(Pun intended).
For my Pinterest friends, here’s a graphic for you!
Now that I knew I had the solution for the perfect vines, I got to work. I wanted to set the vines in place before finishing the grass because I knew working on one could destroy the other.
I rolled and rolled and rolled and rolled and rolled, placing each vine in place before rolling out the next one. The vines that draped around the wall stuck pretty well with a tiny touch of water, only on places where I wanted a curl or end to stay up. For the most part, though, I left them unstuck so gravity would work on the caramel and make it look more natural.*
I had an image in my head of vines hanging down like curtains, helping to hide the secret healing spring. So for those vines, as I made each one I used the tip of a knife to lift the cake board that the top cake was sitting on, just enough to wriggle the end of the caramel underneath, and poking it in with a needle tool if I had to.
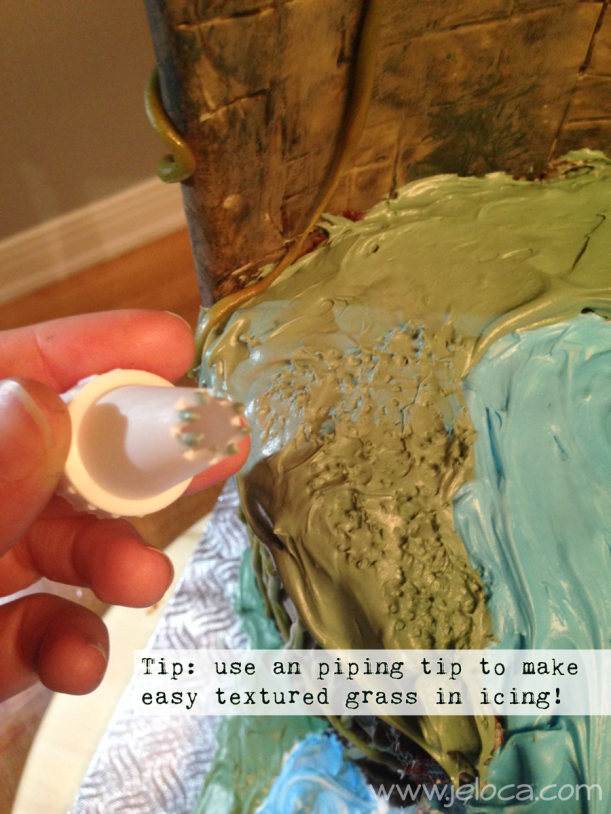
After the vines were done I tackled the grass. My first thought was to use my grass tip and pipe out the grass like I’d done around the Betty Boop cake. Only problem was I knew I was going to use my remaining green icing to do grass around the edges of the cake where it met the board and I didn’t think I had enough icing left. I was tapping some piping tips against my palm, trying to figure out if I had enough icing mixed up for all the grassy areas, when I looked at the marks I’d left on my skin and got another bout of inspiration. (My pain = cake gain).
I used an open star tip and basically poked the hell out of the grass areas. My icing had crusted enough to be an ideal surface, but if your icing is still soft I’d stop every now and then to clean your tip, as the grass effect works better with smaller pokes vs larger flat areas. It was remarkably convincing for grass, and I’m really, really happy with how it came out.
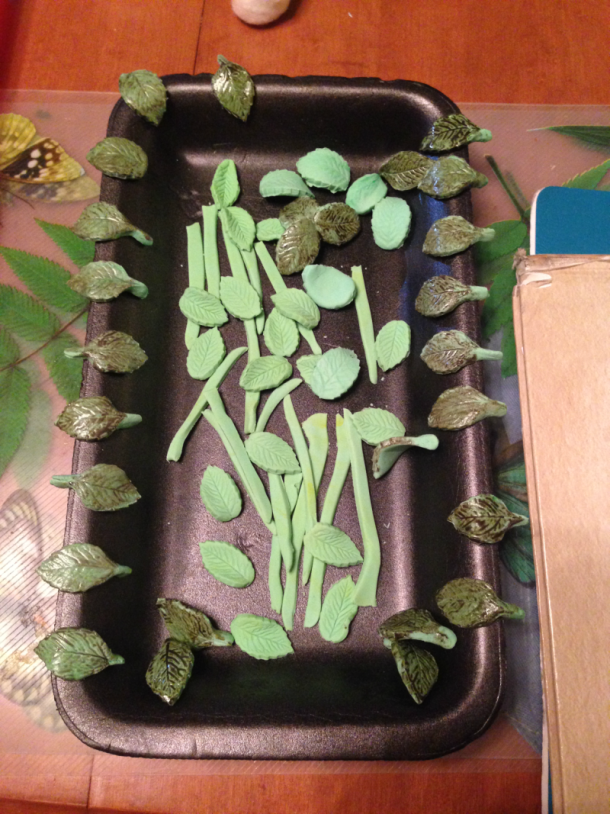
Plus it left me with enough green icing left to pipe long, marshy grass/weeds around the base of the cake. I did that, then stuck down the leaves I’d darkened, then decided to call it a night.
In the back you can see the remaining leaves I didn’t end up using. Don’t worry, they didn’t go to waste. The kids ate them all over the next few days. 🙂
I tried to vary the lengths of the grasses to make it look more natural than an even, trimmed border.
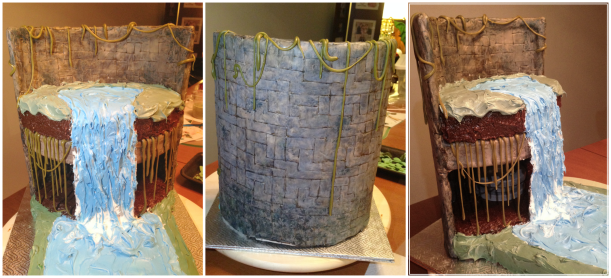
In these final two pics you can see the two sides of the cake, and the finished vines and grasses. I’d added some long grass to overhang the vines as well.
For those following along, at this point in the Pitfall: The Lost Expedition cake process, I had fondant pieces, I had rectangular baked cakes, and I had some cardboard and a brick-wall-looking stand. Now, on the night before the party, was the time to start putting it all together.
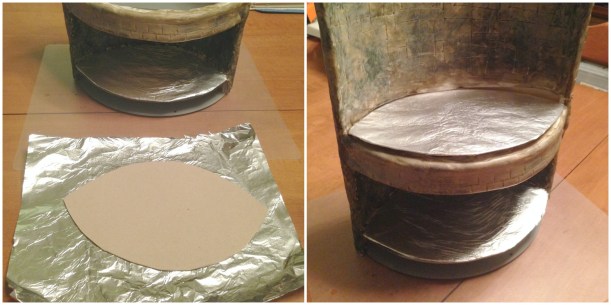
Step 1 – cover the cardboard cutouts with tinfoil to use as makeshift cake boards.
Step 2 – Confirm plan. At this point I got a piece of paper and made a note of the order in which I had to do each step, because if I’d gone out of order (like sticking the waterfall down on the top tier before icing the bottom, for example) I’d make things harder on myself than they’d need to be.
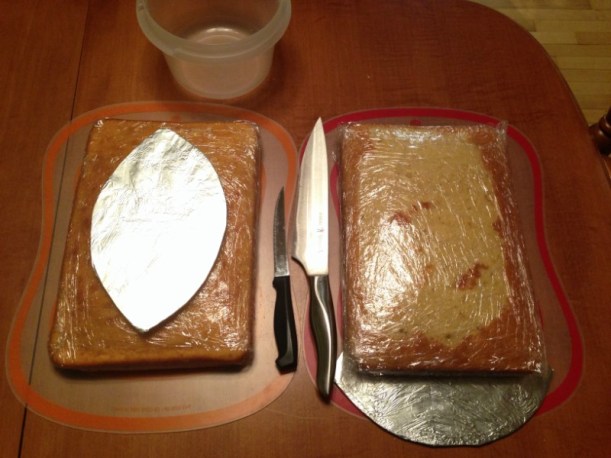
Step 3 – carve the cakes. I always use my largest unserrated knife for this, and have a large tupperware or two nearby for collecting the leftover cake (after being leveled or sculpted).
For the top cake, which would become the top of the waterfall, I didn’t level it. My cake had baked up much thicker in the center, but in a large enough area that I could cut a thicker cake in the shape I needed. If I’d leveled it first to the height of the outer edges I’d have had a much shorter cake for no reason. If the cake had been wide enough to cut my oval twice and stack them, I’d have done it, but it wasn’t big enough. I cut the cake from the thickest part and used some icing to ‘glue’ it down to the cake board, then set it aside.
For the lower cake I used the cardboard to carve out the right shape so I could butt the cake right up against the stand. After making sure it fit, I set that one aside as well.
Step 4 – Solidify base. I had my cake boards, 2 of them ‘glued’ together with icing. I needed to attach my base somehow because otherwise the moment I’d try to transport the thing it would tip backwards, being so heavy, and separate from the cake which would be stuck to the board. I stared at it a little while, wishing I had thought to Dremel 2 holes in the base BEFORE decorating, so I could quickly zip-tie it together, when I got an idea. The base sat a few mm above my cake boards (less than 1/4″). I couldn’t use glue or tape because I didn’t have any thick enough, but I did have fondant, and I knew that could dry pretty hard. First I traced the shape of the stand onto the silvered board. I took a few gobs (technical term) of white fondant and moistened them slightly so they’d be sticky all around, and pressed them down around inside the base’s outline. I quickly put the base in position and pressed down on the lowest tier, using a knife handle to get into the back, and really squish the fondant and board and base together. I waited a minute or two then tried to lift the base by the top tier… and the entire board lifted. Success!
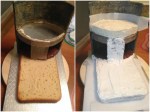
(Around this time I’d also cut open and re-taped a cardboard box, as seen above, for transport. It was open at the front but had a closed back so I could carry the cake by supporting the back of the box instead of touching the stand itself when I moved it.
Step 5 – After making sure the base was well-stuck to the cake boards I cut a strip of plastic from my baggie the width of the waterfall I wanted, and used packing tape to tape it down to the bottom of the lower tier. I used a few smears of vanilla icing to glue my cake board down over it, sticking it well to the stand. I didn’t want it able to move at all.
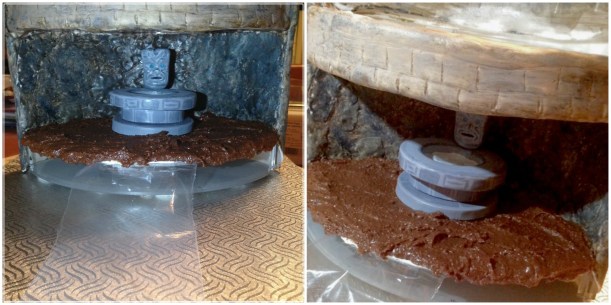
Step 6 – I crumbled some of the leftover cake and mixed it into store-bought chocolate icing to make a rough, earthy-texture, and used that to coat the cake board for the cave floor.
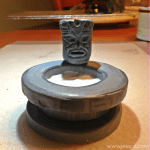
Then I set the healing spring into place. I didn’t bother using anything to stick it down, the icing floor was still wet and the spring was heavy enough that I knew it wasn’t going to move.
Step 7 – Then I taped the waterfall up and into place with more packing tape, making sure it was secure. I knew there’d be a cake sitting on top of it, but still…
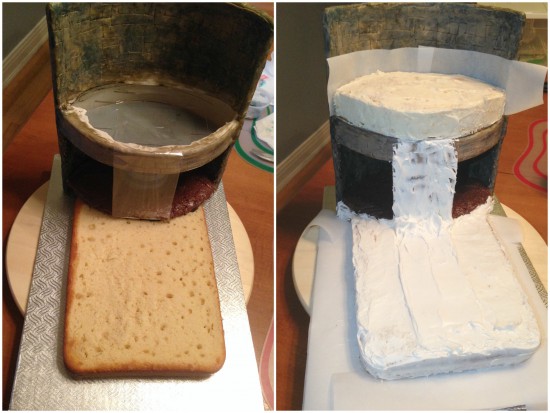
Step 8 – At this point I set the cakes into place. I put the lower cake down first, using icing to glue it in place. I protected the cake board with strips of parchment paper, then set the top cake down with some icing too. Putting the parchment around the back and under the front (on either side of the waterfall) was a bit trickier, but I used the tip of a knife to ease the cake forward or up and wiggled the parchment strips into place. Then I gave everything a dirty ice (crumb coat) with vanilla storebought icing.
I just realized the pics are out of order, and that I’d crumb coated the base before adding the top. Ah well.
Oh- I included the waterfall in the crumb coat on purpose. I knew it would later be mostly covered with blue icing, but I wanted there to be some depth to the water so it would look like it was moving. I also gave it a deliberate thick, choppy layer at the base where it reached the cake (as seen in the last pic). Waterfalls often have a churning, frothy spray at the base and this would help imply that.
Saturday morning I woke up bright and early to- *coughs* actually no. Saturdays I sleep in. But I did wake up somewhere around the crack of 10 or so and debated how to plan my day for the cake. I had 2 hours until I had to leave to take Henri to a birthday party, then had some shopping to do with Jakob, and then would have to go back out to pick Henri up, so didn’t think I’d get any more progress done until once I’d returned at the end of the day with both kids. But that was getting close to supper time, which would require clearing the table, so I wouldn’t want anything in progress that would dry up or break if I tried to move it or put it away for a few hours.
Hmmm.
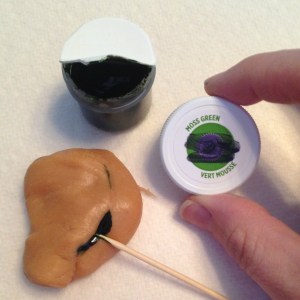
The first thing I did was run downstairs and take a peek at the brick wall/cake stand to make sure nothing crazy happened over night, like the entire back sagging off or something. Luckily, it was fine. I did realize the colors were much more desaturated and ‘natural’-looking, vs the bright greens of the sprinkles I’d bought to use for grass, and the fondant leaves I’d made. Hmmm. They wouldn’t quite go together. So the next thing I did was to thin some of the leftover dark green from the moss (this is why you save your palettes) and brush it over all the leaves that had stems. I later wished I’d done them all, but at the time I figured I’d do the ones I knew I’d use, and come up with some way to salvage the smaller ones later on if necessary. I ignored the long grass strands, having already decided I wasn’t going to use them.
I calculated that I’d have enough time to paint a first coat on the fondant pieces before leaving for the party. Mostly to just block in the colors and give it a chance to dry while I was out.
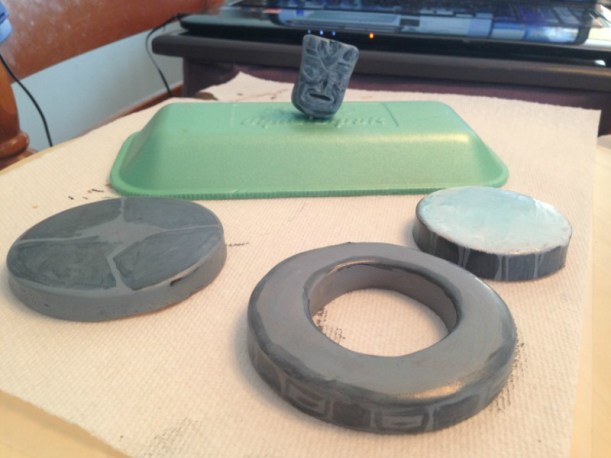
The healing spring got a base coat of gray made by mixing Wilton White-White with Americolor black gel, first a quick base and then lightly tapping on some darker areas. For the center of the spring I used White-White with a bit of Americolor teal. The crocs got brownish green base coats made mostly by mixing up some of the previous day’s colors together. It’s hard to see from this pic, but before painting the full croc I used a scribing tool to mark a scale pattern into the hardening fondant. For the open-mouth one I blocked in some areas of white and red for the inside of his mouth. I didn’t touch the struggling Pitfall Harry in between his jaws, not thinking I had enough time to pay attention to it before having to stop, get dressed, wrap the gift and shuttle Henri out.
This was the state of my palettes when I left. The artist’s-style one has pure gel colors that I could dab from as needed. (The smear at the top was to help me identify which color was which… the darker ones are difficult to tell apart when in one small glob). The styrofoam piece is what I was really working from, and the plastic hors d’oeuvres palette was there mostly because it still had quite a bit of white left over from the prior day, and a decent amount of brown that was still usable.
Had a minor change in plans – the birthday boy invited Jakob to stay as well, which gave me a few hours of time in the afternoon that I hadn’t expected. I took full advantage, slapping some more paint down so it could dry. The main hazard of painting fondant pieces with this White-White/gel colors mixture is that if you apply it too thickly, the White-White forms a latex paint-like ‘skin’ on the work. If you touch it while it’s tacky (which can last a few days) not only can you leave fingerprints in the work, but I’ve had entire sections of color lift off completely. Not fun.
Here you can see more of the texture in the croc’s back. You can also see the other colors added to make it look more natural and create the illusion of shadowy, raised eyes. I deepened the detail inside the open croc mouth and blocked in Harry’s colors, getting a base coat down so I could finish it with details later.
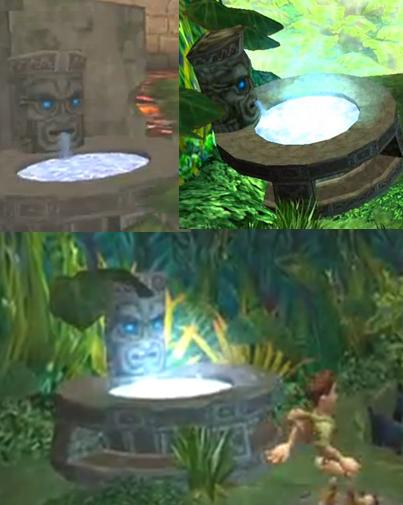
These are the healing springs from the game. Of course it was only on day 3 that I realized I’d forgotten to make the little side braces that decorate/support the top and bottom. Ahh well. Creative license.
Using the game stills as a guide I darkened the gray with more black and roughed in the decorative areas. The base had its 4 quadrants, the middle bit got some stripes, and I copied the box pattern around the top slab. I did my best to copy the dark areas on the face too, as well as I could with my fondant carving. I left any smudges/smears and added some around the top to make it look aged, like it had been sitting in a jungle for years.
Once the pieces were dry enough to handle I added teal eyes and jammed the head toothpick down through the other pieces. A tiny dab of water was enough to stick them together. Looks horrible with flash but it was the only pic that showed the eyes.
Here’s a shadowy shot that looks most like the game’s version, I think.
And some final beauty shots, because once it goes in the cake it won’t really be seen. For the ‘water’ I mixed together a few large dollops of Wilton clear glitter gel icing, a drop or so of White-White, and a touch of teal. Unfortunately the White-White hid most of the glitter, but there’s just enough of the teal to provide the glow. I really wanted to make the water pour from the head’s mouth but chickened out on actually brushing it down the face. Ah well.
Now on to Pitfall Harry and his perilous predicament.
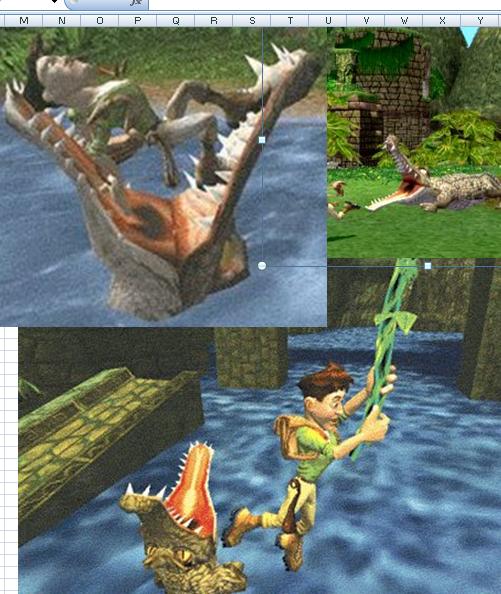
These stills show both the moment I was recreating (Harry in the croc’s mouth) as well as a clear view of his outfit.
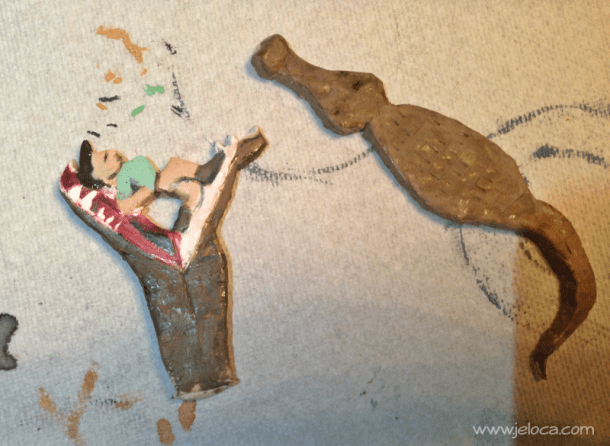
And here’s the final Harry piece. Henri had complained that I’d given him black hair, and ‘everybody knows Harry has brown hair, Mommy’… so I softened it up a bit. I also broke a tiny bit of fondant off the front of his chest, because Yannick asked me why Harry’s curves were so… Madonna-esque. I tried to justify that he was straining, back arched… showed the pic… bent over backwards to show him… but other than laughing at me he wasn’t convinced 😛 I touched up Harry’s details and gave the croc an eye and more depth in his mouth. The very last thing I did was to add a few more coats of white for the teeth, because White-White has a habit of absorbing base colors. To make it opaque I actually used a small dab of thinned Betty Crocker icing mixed with the White-White, and that seemed to do the trick.
Now I had my fondant toppers, two cakes, and an ornate stand. All I had to do was figure out how to put it all together.
Most of the cakes I make are a 2-4 day process. The final 2 days are always baking 2 nights before the party (so Friday for a Sunday cake) and then decorating on the day before the party (Saturday for a Sunday cake). I add a few more days prior if I need to make fondant decorations or anything that requires drying time. This Pitfall cake, for as detailed as it looks, took 3 days.
When I got home from work I prepared the base stand to get it to look like a brick wall with a cave by covering it with fondant and scribing a brick pattern to match one from the game.
Day 2: Friday
In the morning before leaving for work I gave the stand a quick wash of color. I needed to fill in the grout lines and give it time to dry before I got home. In a small cup I mixed together 1 drop of black Americolor food gel, 1 drop of brown gel, and 6 ml of water. I used a food-only paintbrush to apply the wash to the fondant, not aiming for any sort of pattern, and allowing the color to drip and run a bit before smoothing it around. I let it set for a minute or two then dabbed at it with a paper towel to remove areas of excess, and then used the same brush with only water to remove even more color. The goal was not to paint or finish the brickwork but to allow the dark color to seep into the etched lines and provide some aging.
At this point it looks like a dark, muddy mess.
When I got home from work I rushed to bake the 2 cakes I’d need. I knew I’d have plenty of time for them to cool before I planned to ice and decorate on Saturday, but I often use the oven for storing fondant bits overnight and didn’t want there to be any residual heat left inside it.
When the cakes were cooled some I wrapped them in saran wrap to set aside for the night.
Then I prepared the table for getting down to some fondant painting. These are the supplies I prepared: in the lid of my color box are a smaller box of Americolor icing colors and a bottle of Wilton White-White, then the contents of the case itself is my collection of Wilton icing gels and some regular, grocery-store-type food coloring. I brought down some cotton balls thinking I might use them for blotting, but testing on a scrap of fondant revealed it stuck terribly to the wet sweet, and I quickly got rid of them. I’ve got a measuring cup of water for rinsing my brushes, a small cup of water and syringe for adding clean water to my colors if I need to thin them any (the syringe gives you way more precision when working with tiny amounts of color than dropping by spoonful or pouring), and a small cup of the leftover dark wash from the morning that I’d kept moist in a tupperware for the day. I’ve got a few sizes of food-safe paintbrushes and some paper towels for blotting, and finally at the bottom is my standard palette, left over from an old pack of hors d’oeuvres.
That’s the palette I use most often, and it works great with larger quantities of color, like when tinting icing sugar/water for the fondant toppers I make. However when using tiny bits and blending a lot of shades I find it’s not as practical, and I eventually switched over to an artist’s style palette with small dabs of the gel colors on it, and a small styrofoam tray for blending. The colors bead up on the tray so I don’t lose any to absorption.
I prepared the stand by putting it on my lazy susan., These things are SO useful with decorating and crafting! I’ve actually got three – one wood, one glass, and one plastic, depending on my project needs. I stuck a tub of icing in there to help weigh it down. The stand is pretty heavy, especially with the fondant, but that was a precaution.
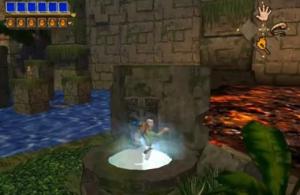
The first thing I did was to mix up a color that approximated the bricks I was trying to copy. In the game they look like this:
Now that I had the general shape scribed in and the darker grout lines, I needed to lighten the bricks to a faded, creamy, beige-ish color. I began to mix up a color, testing on the paper towel until I had something that looked right. You can see at the bottom of this next pic where I’d tried out a color that was too pale, and I had to darken it up a bit. In the end I used some Wilton White-White as a base, then some brown and black Wilton gel colors, a touch of Wilton lemon yellow, and some of the morning’s dark wash water to thin it out.
I painted small dabs of the resulting mix onto each brick individually, blending and smoothing until I got rid of the brush strokes and had something that looked like an old brick wall.
For the first time ever I took a short video of my process. If you find it helpful and want more video tutorials, please let me know in the comments. 🙂
After the back was done I moved on to the front. The small amount of mixed color that you saw in the video was enough to paint the entire back and front.
The next step was to add some greenery. I knew I’d have a lot of grass and vines and leaves in the cake, but wanted to add more depth to the bricks so I used more of the dark wash and deepened it up with Wilton gels (leaf green I think).
I used a messy brush to pounce the color in areas where moss would grow, mostly around the bottom of the back piece and around the top and sides of the front. This is a great reason to keep those brushes that get all messed up, so you don’t ruin good ones!
As I added the moss I made sure to keep the brush from being too wet – the effect was supposed to be subtle – and I also periodically touched my brush in different areas of the mix where I hadn’t fully blended, sometimes picking up straight gel from the edge of the palette. This gave me varying shades of green and a more natural look.
Finally I used some White-White and Americolor black and a touch of brown to get a nice varying gray shade for the rock cave. Again I resisted the urge to overmix the color, so I could get depth to the wall. Sometimes I touched in a bit more white, which lightened the grays, and then I’d go back in with a more liquid black, getting into the cracks.
Here’s the finished support, set aside for the night. The front (above) and the back (below).
This post may contain affiliate links. This means I might make a small commission on purchases made through the links, at no cost to you.