1 Comment

Doodle Fusion Marco Raffiné Test Page & Review

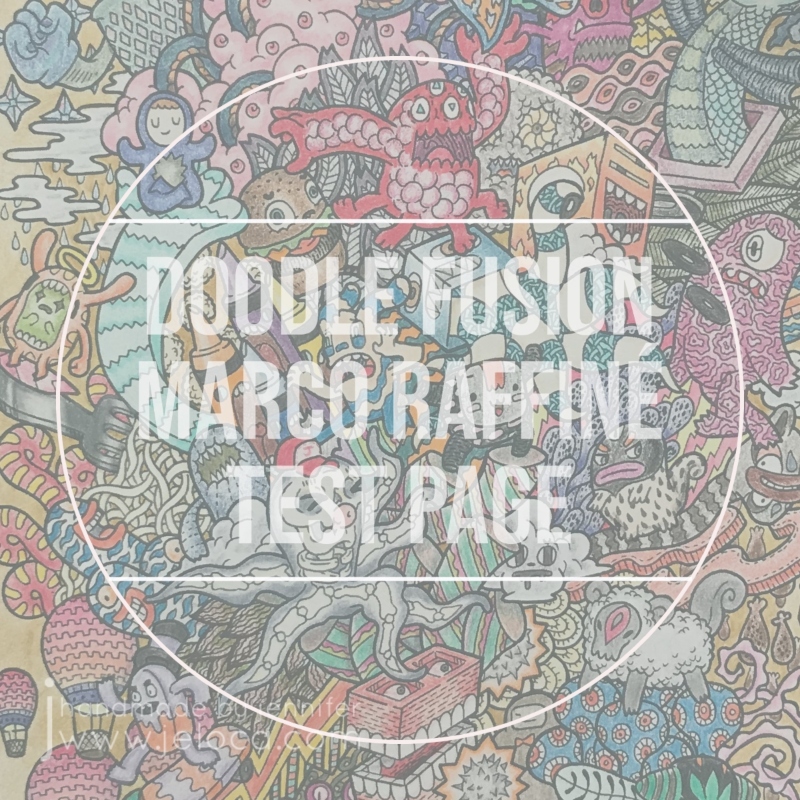
The next 2019 WIP to FO Challenge update (posted a whole 3 years later…sigh) is this page from Doodle Fusion. I love this silly book so much and have completed a bunch of pages from it (unposted), as well as prepped some in my color wash attempts. As they’re all filled with an assortment of wacky monsters it’s hard to come up with a unique name to identify some of the pages so since this one was deliberately done solely with the Marco Raffiné oil-based colored pencils, it’s become known as my test page of such.

I started this Doodle Fusion page on September 8 2019 with the intent of completing an entire page with the Marco Raffinés to really get a feel of how they work and blend.

I really like these pencils! They’re inexpensive (especially compared to the Polychromos or Premiers), and though the different pencils can’t truly be compared as oil-based vs wax-based will give different results and be preferred for different projects by different artists, they have their own unique charm and have been a joy to use. They’re less vibrant than some other brands but are no less pigmented, so while you won’t get neon brights (making them not a good choice for a fun 80s page) they’re great for softer, almost whimsical looks. They’re also slightly water-soluble, as per my tests here.

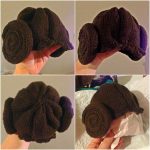
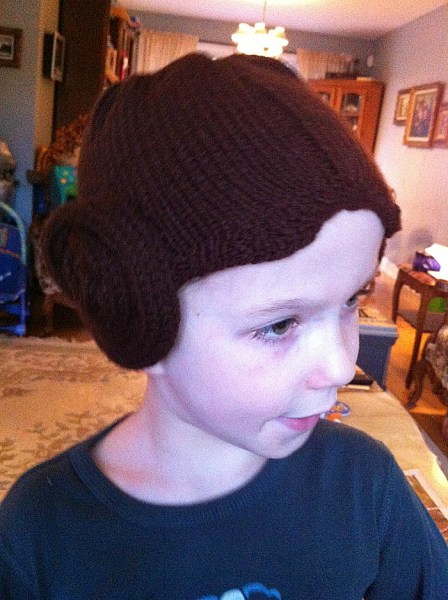
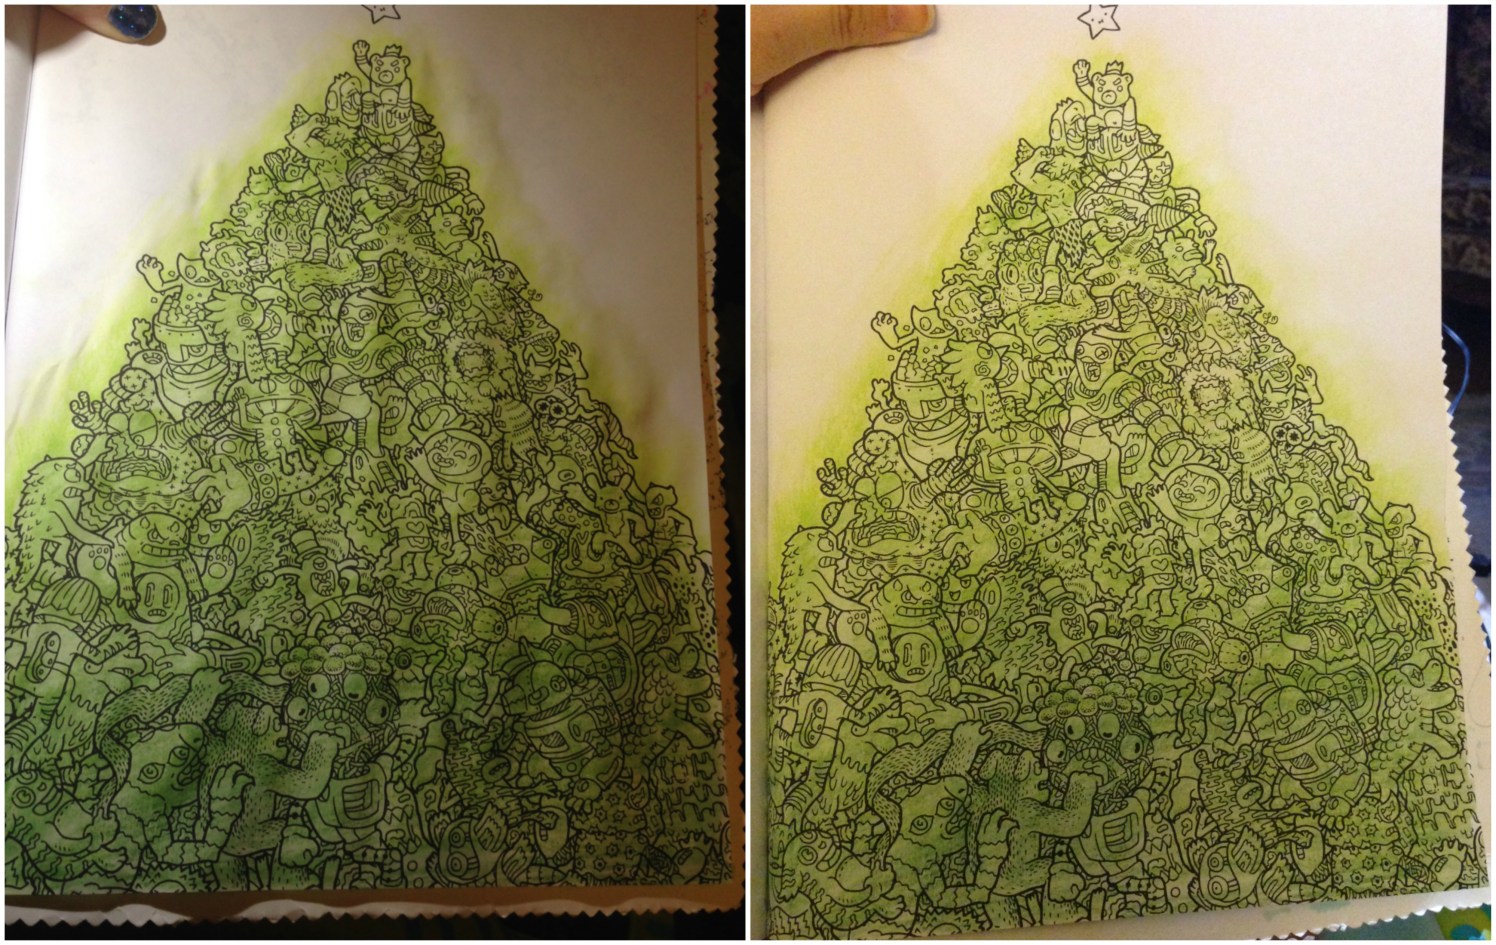
The first three images below show the lazy progress made over the rest of that month. I’d worked on the page slowly, picking out individual creatures and sections at random depending on my mood at the time.

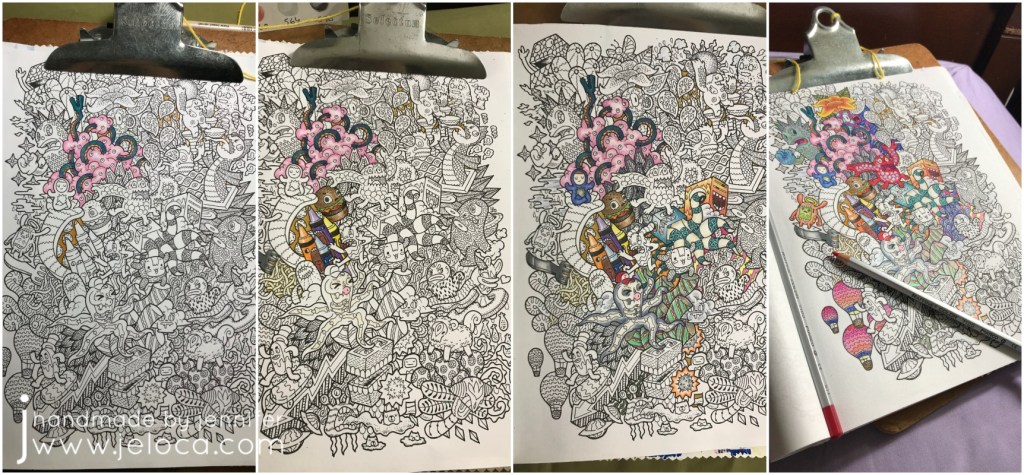
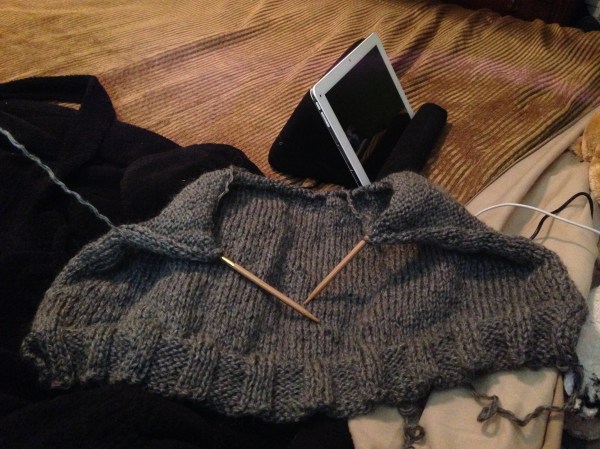
Posting my WIP-to-FO challenge publicly spurred me to continue working on it, and the fourth picture above was done in January of 2019. I did a bit more work that month and then my attention waned again…

…until October 2020 when I finally picked it back up, determined to finish it once and for all.

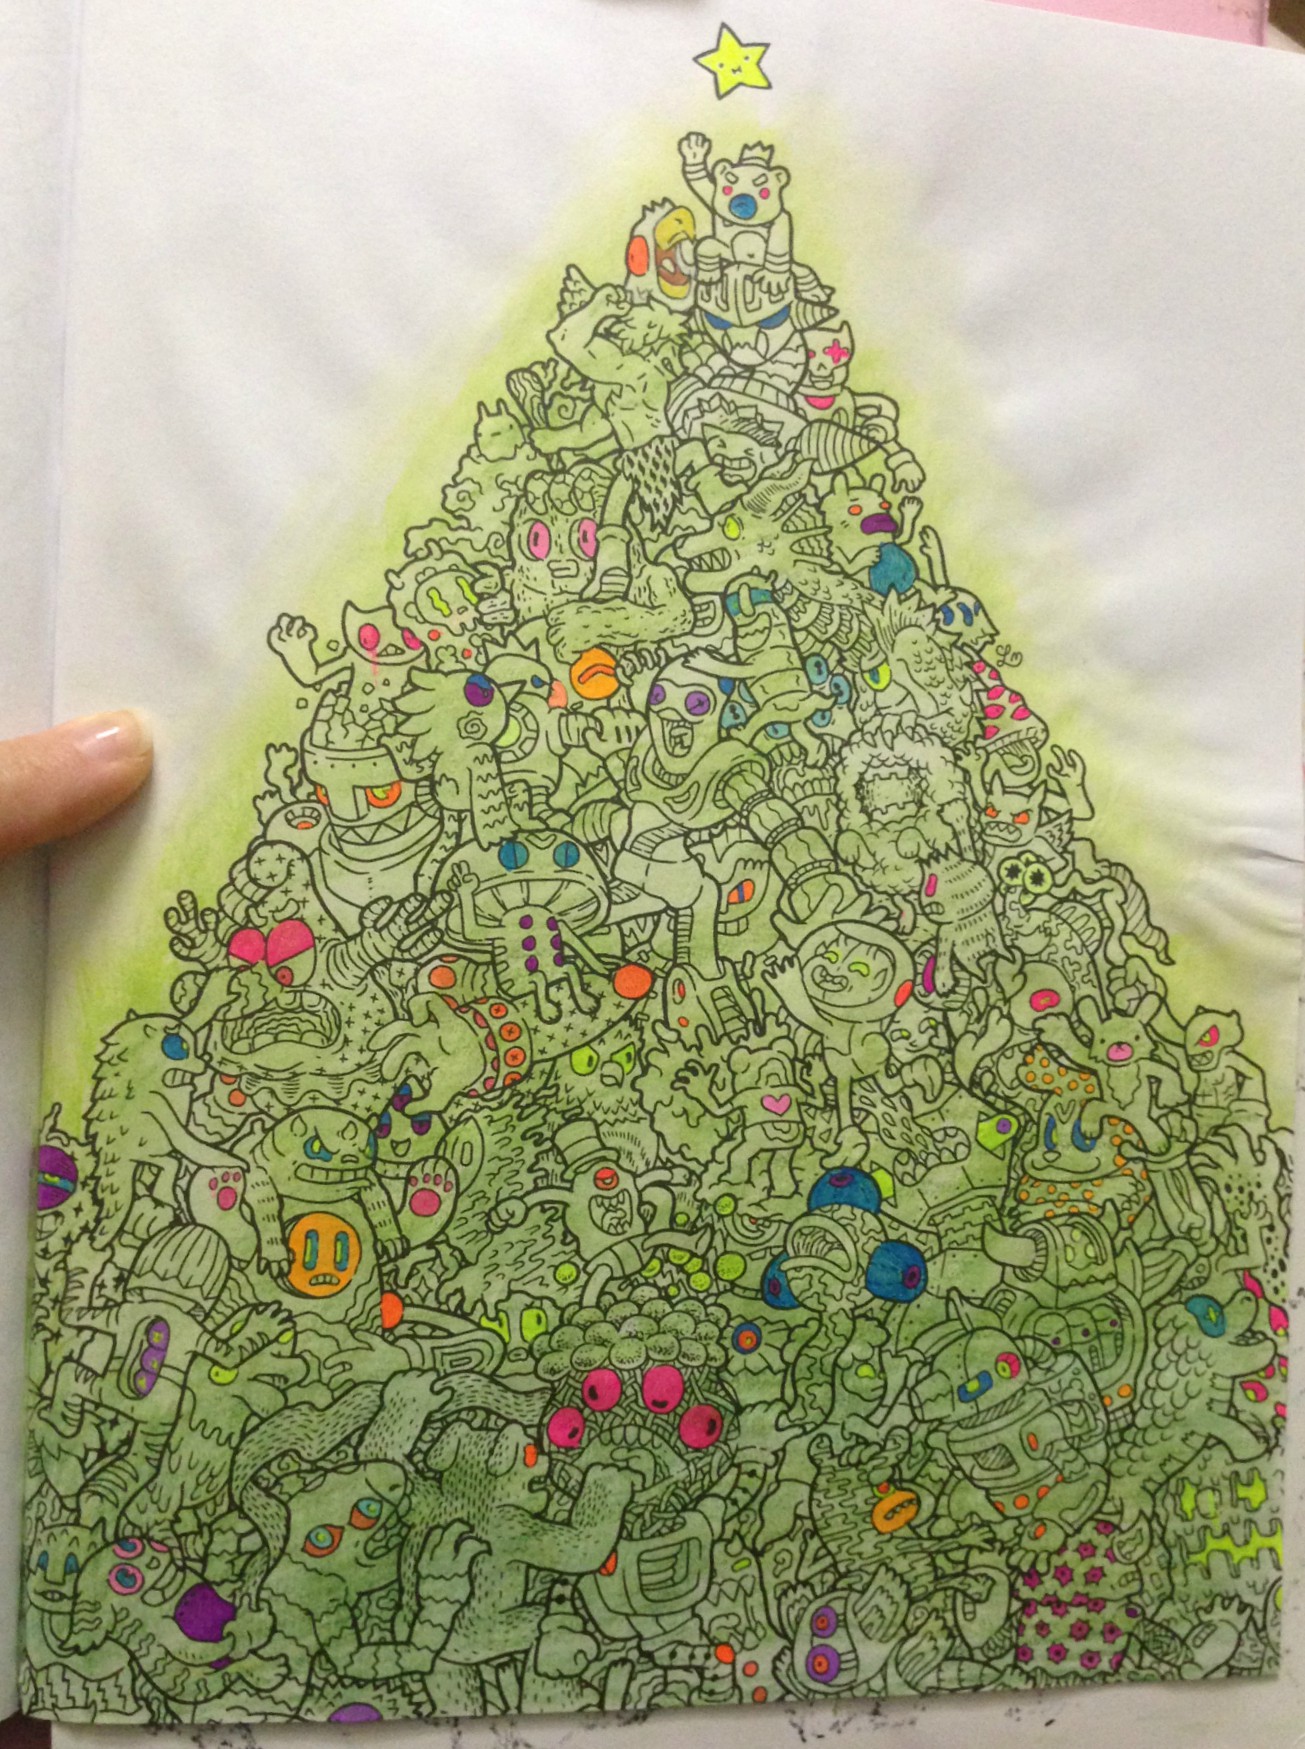
I added a fading border to the outer edges in order to test the pencils’ (and my own) shading and fading capabilities. Once that was complete I finished the remaining creatures and doodles.

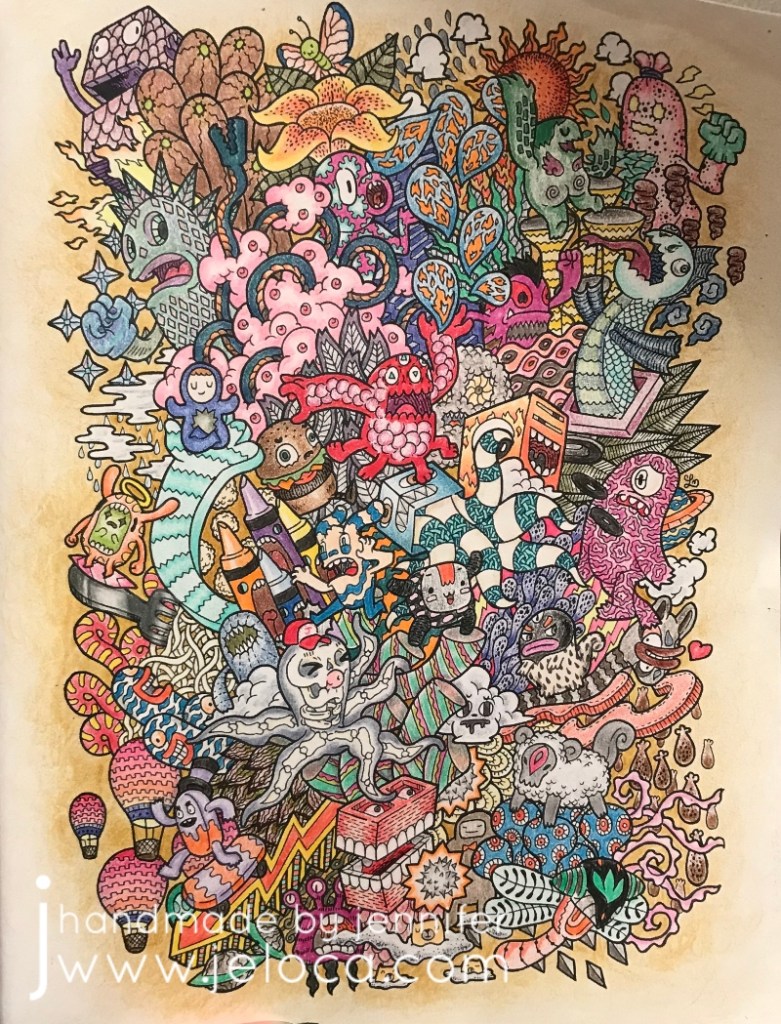
Overall I think these pencils work wonderfully in this book. It’s a plain-paper coloring book which can make using wet media difficult (although the pictures are one-sided so bleeding won’t be an issue if you protect the subsequent pages with a sheet of cardstock or something. There isn’t a lot of tooth to the page which isn’t the best for colored pencils generally, but these have enough “stick” to really take to the page well. After 2 years the page looks identical to the image above with no bloom (as can happen with wax-based pencils) and no apparent fading.

The only flaw I can see with the Marco Raffinés is the color payout. A number of sections above (ie: the red ball cap, the red 6-legged monster near the middle, the purple creature at the bottom center, the crayon bodies) were colored with maximum pressure to get the darkest, fullest coverage possible. As you can see there are solid, even sections of color but no real “brightness”. To me, all of the colors have a softness to them, even at full strength making them feel almost desaturated. You can see the difference more clearly in my swatches below.

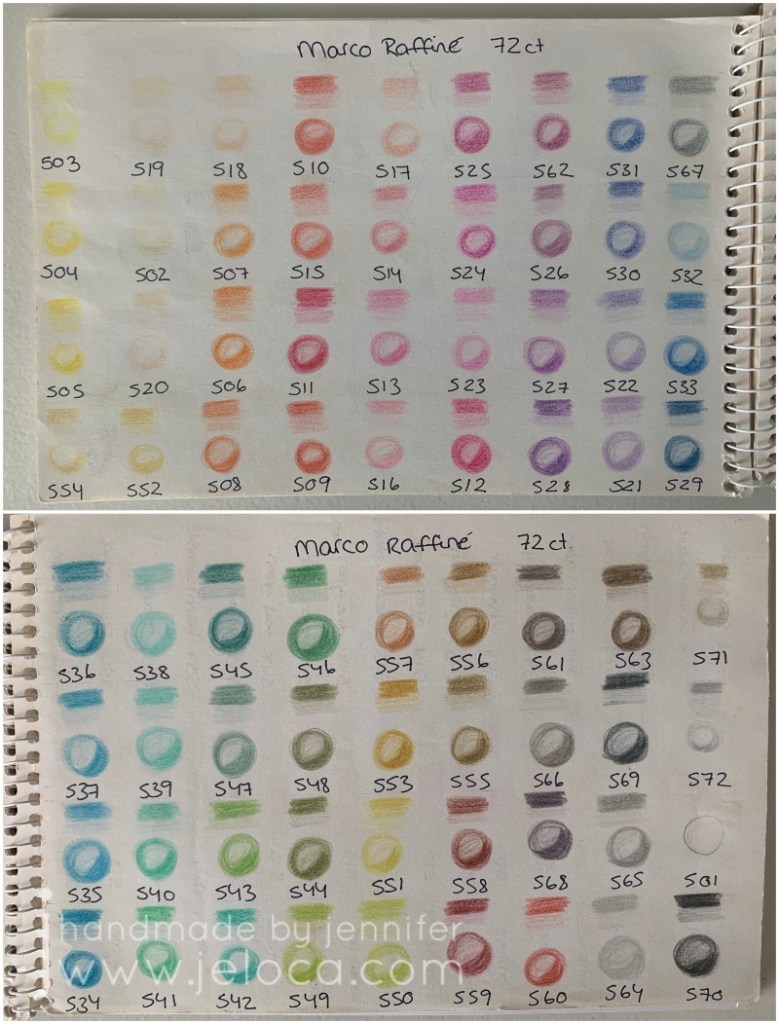
Every time I get new colored pencils I swatch them, labelling the swatches with the color name or number. The oil-based Marco Raffiné pencils (above) are lovely and soft, and very similar in tone to the Faber-Castell Polychromos (below), which are also oil-based.

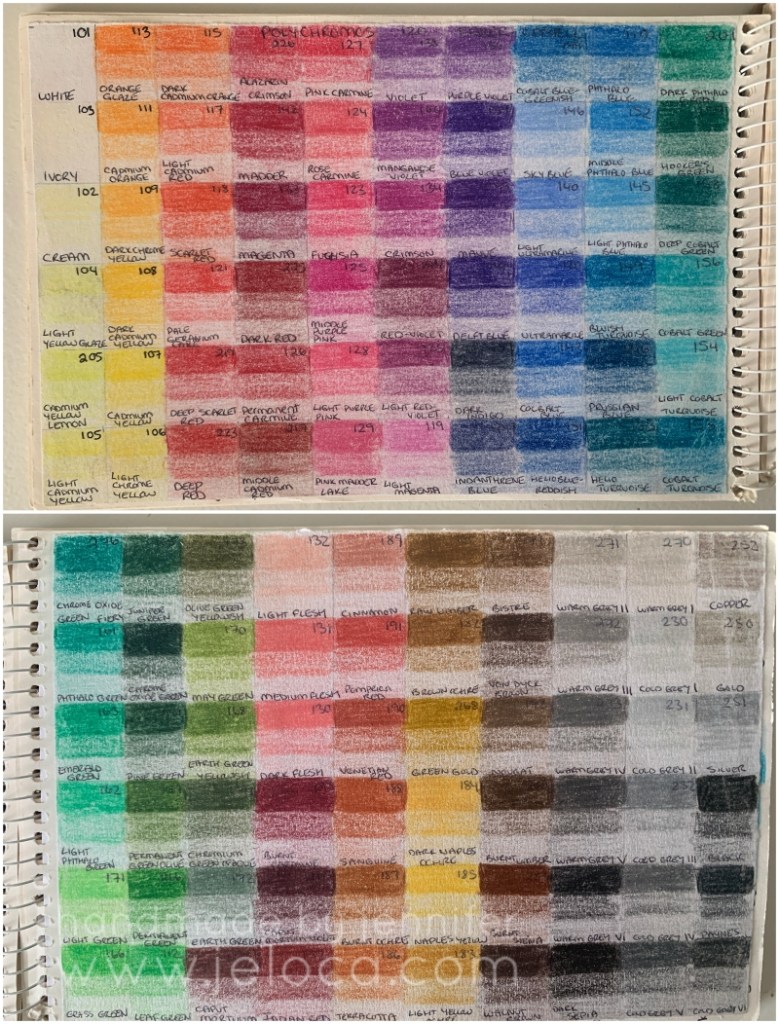
The Polys have more colors but the feeling of the individual shades is still softer, almost velvety, whereas the wax-based Primsacolor Premier pencils (below) are brighter and more vivid. (Click on any of the swatch images for a better view).

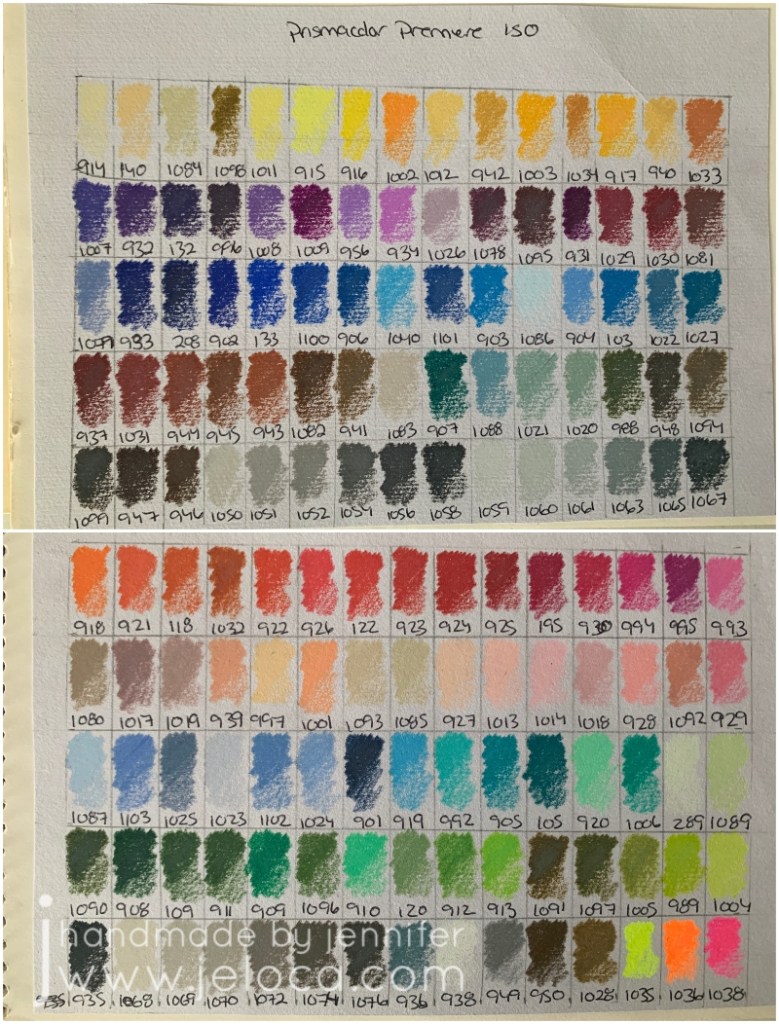
If you’re looking for deep, bright colors then you might be dissatisfied with these…but for anyone else they make a great, inexpensive option to have in your coloring toolkit.

This post may contain affiliate links. This means I might make a small commission on purchases made through the links, at no cost to you.


2 Comments

First Attempts at Background Washes in Coloring Books (FAIL)

I follow a number of incredible artists on YouTube and their work has inspired me often over the years. One such time was when I discovered the wonderful art done by Dede Wellingham. I’ve binged many of her livestreams and she’s as sweet and funny as she is talented (which is a lot).

The first video of hers that really got me revved up was “Color Washes in Imagimorphia AdultColor book by Kerby Rosanes Pt 1 of 3“. Adult coloring books were starting to become a big thing in the creative world (back in 2016) and something I’d come to late since I usually focused on fiber- or food-based arts. It hadn’t occurred to me to mix media in the ways Dede demonstrated and I could NOT WAIT to try it out. And I… well to say I missed the mark would be an understatement.

It started out so promising! I collected an assortment of my coloring books, some acrylic paint, my Neocolor II watercolor crayons and my Inktense water-soluble pencils (neither shown in pic).

Problem # 1 – using the wrong materials

Dede uses a number of media in her books, including pan pastels, paint, pencils, markers…but in particular the video that inspired me was based on using acrylic paint to drop in washes of color onto your pages. This has a two-fold effect: 1) it gets color down on the page and fills in the tiny detailed areas, making it easier and less intimidating (and faster) to color in with other media later, and 2) it creates an incredible base for colored pencil as adult coloring books are usually printed on paper that’s relatively smooth but pencils benefit enormously from a paper with more tooth. The acrylic paint gives the paper the missing tooth.

Neither the Neocolor IIs nor the Inktense are acrylic paint. Both of these can be used to add tooth to a page, but I’d diluted them so much that all I’d really managed to do was warp my paper and leave it remaining smooth once dried.

Neocolor II dry in imagimorphia
Neocolor II wet
Neocolor II dry in imagimorphia
Neocolor II wet
Inktense dry in imagimorphia
Inktense wet
Inktense dry in Doodle Fusion
Inktense wet
Neocolor II wet in Doodle Fusion

Looking back, even though I like some of the colors I’d chosen, I’m not happy with the results. I don’t like how all my random scribbles show because I hadn’t put the color down evenly, and I’m disappointed that I completely messed up on the entire “adding tooth” benefit.

Problem # 2 – using the right materials the wrong way

The remaining pages that I’d painted were all done with acrylic paint. That means they must be good, right? No, actually. Not at all. Some of them (the underwater ones in particular) look better in person than in the images below, but none of them are “good”, because I missed the mark again. I was so focused on getting a spread of color onto the page that I didn’t think I had to try and do it nicely. I’m embarrassed to admit it really didn’t occur to me that that it was more than a matter of simply splashing water into paint and wiping it across the page a few times. In most cases below I did a horrible application, and in the one or two that aren’t too bad, I used too much water and so the resulting color doesn’t have the tooth either. (And in the final case, I’d used much too much water and caused the marker on the reverse to completely bleed through).

Acrylic paint in imagimorphia
Acrylic paint in Doodle Fusion
Acrylic paint in The Time Garden
(the next page that bled through to the one above)

Problem # 3 – choosing the wrong pages

I think this was the worst mistake I made out of all of them – I chose the wrong pages. With one exception, I’ve never really wanted to color ANY of the images above. Rather than pick pages that I looked forward to, instead I thought I could “cheat” my way into getting pages “done”, and done “faster” by slapping color down to make the final coloring quicker and easier. Instead I now have pages I still don’t want to do, just now they have some color on them.

So why am I bringing this up now? Well Dede’s videos have come back into my recommendeds and I’ve begun binging again, and once again am completely hooked. On THIS TIME I’ve learned from my mistakes!

This post may contain affiliate links. This means I might make a small commission on purchases made through the links, at no cost to you.


7 Comments

WIP to FO Challenge- 19 for 2019

It seems like everywhere you look online these days, people are taking stock of 2018 and setting goals for moving forward.  The first few days of the new year tend to be all about making resolutions, and to that end- here’s one of mine:

I resolve to turn the following 19 wips (works in progress) into FOs (finished objects) before the end of 2019.

I’ll write at length about each project when I finish (and post) about them, but for now here’s a short blurb for each:

1. FO Project Jars

wip yearly fo jars

I need to rip out all the individual lengths of yarn (1-10 yards long, each), match them up with what project they were from, and put the separated yarn into jars designated for each year.

2. Harvest Moon Pullover – crochetwip crochet harvest moon

I started this sweater on November 25 2016 as a way to use my adored Noro Silk Garden limited stash on something for myself.  Limited yarn + crocheted pattern with big holes = a sweater that might fit… right?

3. Granny Rectangle Blanket – crochetwip granny rectangle blanket

I started this blanket on August 9 2015 as a way to use up random sock yarns I figured I’d never get around to using for, y’know, socks.  Figured out how to make granny squares as rectangles and then alternated with white for… some reason.

4. & 5. Ralph and Black Sheep’s Sweaters – sewing & cross stitchwip boys toys sweaters

I started these sweaters for the boys’ favorite stuffed animals a few nights before Christmas 2016.  They were intended to be little surprises for them but instead they’ve sat in a bag ever since.  Sadly Jakob is no longer as into iHasCupQuake as he used to be, so I’ll need to rip out the stitching on the front of Ralph’s sweater and hope it doesn’t leave gaping holes in the fleece.  Then I’ll have to figure out new designs to personalize the fronts, find where I put the sleeve pieces, and sew the little sweaters together.

6. Drops V-Neck Pullover – knittingwip drops knit vneck

I started this deep-v sweater somewhere in 2015 or 2016.  It’s slouchy and soft and I want to wear it already.

7. Fluffy Shawl – knittingwip fluffy shawl

I started this shawl on April 6 2015.  It’s been sitting untouched in a bag since roughly that Fall.  I love how the colors blend together (black Sandes Garn Sisu and purple/green Noro Kureyon Sock) and would like it to be done and hugging my shoulders.

8. Comfy Socks – knittingwip fluffy ankleless socks

According to myself, I started these socks 2 FULL YEARS AGO.  They’re supposed to be my ‘take along’ knitting but because I haven’t finished designing the pattern, I never take them with me to work on.  I need them done so I can reclaim the needles and portable hanging knitting bag and start being more productive again.

9. Fun Fur Vest – knittingwip fun fur vest

I started this Bergere de France vest in 2012(!!).  My Ravelry projects page has it listed as completed on Feb 10 2015 but clearly it isn’t.  No ends are woven in, it might need armhole cuffs, and I think I was debating overdying the entire thing black.

10. Doodle Fusion Marco Raffiné Page – coloringwip doodle fusion marco raffine

This page from Doodle Fusion was started last summer (I think) using only my set of Marco Raffiné oil-based colored pencils.

11. Grimm Fairy Tales Alice Page – coloringwip grimm alice in wonderland

This page from Grimm’s Fairy Tales was a test to see if I could get good results using dollar store colored pencils.  I’ve since moved the pencils somewhere else and want to finish the image so I don’t need to dig them out any more.

12. Grimm Fairy Tales Little Red Page – coloringwip grimm little red riding hood

Those of you who follow me on Instagram would have seen this page from Grimm’s Fairy Tales back when I started it in June.  I love how it’s turning out and want to see how well I can complete it.

13. Imagimorphia Eagle 2-Page – coloringwip imagimorphia eagle

This double-page spread from Imagimorphia was started in the Fall of 2016.  I loved coloring the tiny rainbows and then lost steam.

14. Imagimorphia Egypt Page – coloringwip imagimorphia egypt

I honestly don’t remember when I started this page.  Luckily I’d blogged about it!

15. The Time Garden Quilt Page – coloringwip time garden pattern page

I don’t recall when I started working on this page in Daria Song’s The Time Garden either but judging from other posts about it I’d made in April 2016, I’m going to guess it was about that time.  I have NO idea, however, why I stopped it so close to being done.

16. The Princess Bride Fred Savage 2-Page – coloringwip princess bride fred savage

This page was blogged when I first started it, way back in March 2017.  I don’t want to move on to another page in the book until this one is done, though, so I need to make the time to finally get it finished up.

17. & 18. & 19. Harley Quinn, Betty Cooper & Teela Wall Hanging Trio – plastic canvas

wip plastic canvas girls trio

I’ve never shown these before, except for the odd glimpse in the background of Instagram pics.  I started this trio of plastic canvas portraits when I moved in August 2017.  While I love how they look in black and white (and blue), I designed them to be in full color and I’d love to see them complete.

Think I can do it?  Want to play along? Use the tag #19WIPtoFO2019 so I can see how many you get through!

ps: As I’m about to post this I just realized that 19 projects means committing to completing more than one per month.  Months that are already pretty busy with Becket, work, kids, commissions and all the new projects I want to work on and might come up over the year… Wish me luck- I’m gonna need it!!

This post may contain affiliate links. This means I might make a small commission on purchases made through the links, at no cost to you.


2 Comments

Crafty Compilation – w/e 01/07/17

2017.  Wow.  I can’t believe I started this blog roughly 13 years ago, nor that some of you have been around since the very beginning.  Whether you’re one of my original few hundred subscribers or one of the couple thousand who discovered my site when looking for my most popular Halloween DIY, hi there, happy holidays, and happy New Year!  I’ve got a lot planned for this little blog over the upcoming year, so if you’re an old friend- thanks for sticking around… and if you’re new- I hope you’ll pull up a chair and stay a while.

Some of you may note that I’ve slowly made changes to the type of content that I post.  I’ve never been a mono-crafty person, and the blog will always adapt to whatever creative pursuits I’m into at the time, whether they’re knitting or crochet, cosplay or cakes.  Coloring books are going to have more of a showing on the blog, as will as a variety of crafts beyond the yarn-based ones.  For the last two years I’ve taken step-by-step photos of all the projects that I’ve made with the intent to focus more on sharing helpful DIYs, tutorials and tips going forwards, instead of merely showing off whatever I’ve made.  I’m going to have more reviews coming up, both sponsored and non, and while there might be affiliate links popping up at the end of some posts, I can promise you that my reviews will always be strictly my honest, unbiased thoughts.

Another feature I’m going to add is a weekly roundup, to both keep track of and hold accountable to the projects I’ve got ongoing.  Not everything needs to wait for a finished reveal, and sometimes quick projects or small pastimes get lost in the shuffle of the day-to-day.  To that end – this is my first Crafty Compilation.  I plan to post these on Sundays and to cover the previous week’s goings-on, but this first one is being posted on Thursday because life LOL.  Amazing how, even when one is off work in post-op recovery, when it comes to crafting, there still isn’t enough time!  This first CC will cover some stuff worked on over the holidays, as well as last week.


Knitting

  • Gift knitting

Over the holidays I knit a special baby hat.  One of Yannick’s closest friends had a baby girl just before the holidays, and when he showed me the gifts he planned to bring for the friend and his other young daughter, I told him I knew just the thing to make for the new arrival.  The little girl’s dad has similar geeky tastes as we do, and I thought this pattern would be perfect.

I’ve knit it once before, back in 2013, as part of a Hallowe’en costume for a baby girl aptly named Leia. This was a pic of Jakob trying it on for me at the time:

jakob-in-leia-hat

and this is a pic of the little sweetheart in her full costume.  Cutest Leia I’ve ever seen!leia-in-princess-leia-hat

The pattern is very well written and it’s a pretty quick knit, even with all the icord.  The hat and the ear puffs each took a night’s worth of knitting to work up, then the assembly took barely an episode of Elementary.

leia hat collage.jpg

Forgive the bad pics, it’s hard to take hat pics without an appropriately-sized head! 🙂 I’m really pleased with how the hat came out, even though I’d knit it before and expected it to look the same.  One thing I love about this pattern vs others out there is how it incorporates ‘bangs’ and the center part (not clearly visible in these photos but seen better in the one of Leia wearing it above).

  • Drops v-neck sweater

I also completely frogged a sweater I’d been working on.  Back in September I’d started a garter-stitch oversized sweater with a lovely gray yarn from my stash.  I’d thought it would be perfect ‘no-look’ movie or tv knitting but after measuring a sweater I own that had the fit I wanted, I realized that what I was making wouldn’t have the proper shape.  Plus I’d been having a nagging feeling that the garter stitch was eating up too much of my limited yarn.  So I frogged it one evening last week and began this pattern instead.  I’m pretty sure I’ll have enough yarn, and if not I’ll work the neckband and/or cuffs in something contrasting.

photo-2017-01-09-11-02-39-pm

So far I’m at about 32cm of the 34cm I need to be at before splitting for the low v-neck.

Coloring

  • Doodle Fusion ‘Christmas Tree’

A few weeks ago I’d taken a page from Dede Willingham and done color washes across a bunch of my coloring book pages.  From what I’ve seen she primarily uses acrylic paints, but I mixed it up a bit, using not only paint, but also my Neocolors (seen previously here, in imagimorphia) and my Inktense (last seen here, also in imagimorphia).  This particular page, from Zifflin’s Doodle Fusion, seems to deliberately invoke a Christmas tree, so that’s how I decided to approach it.  I colored over the whole image with the Inktense in shades of green.  The first pic is immediately after wetting the pencils, and the second is the next day, after the page had dried.

doodle fusion christmas tree 00.jpg

My plan is to color the characters in colored pencil over the Inktense, keeping them muted and dark, but to color all the eyes and anything round-ish in bright gel pens, so they’d (hopefully) look like bright ornaments on the tree.  If you squinted at it.  Maybe.

doodle-fusion-christmas-tree-01

This was after my first pass with the gel pens.  I think I got all the areas I’d wanted, but I’m sure as I work on the figures I’ll find more.  I’m looking forwards to coloring the characters now in dark tones to really make the gel pen pop.

PS- this book is crazy, and I love it.  I’ll be showing a lot more of it in future posts.

I finally finished a page I started coloring back in November in the Disney Villains coloring book Yannick had bought for me, but as this post is getting long I’ll save them for another.  That’s another excellent coloring book that I’ve been working in quite a bit.

UPDATE: those pages are posted here.  🙂

Other Crafts

  • While the boys were off school for Christmas break I tried to keep them occupied with more than just Minecraft, Little Big Planet, or their new Skylanders Imaginators. Every few days we had ‘technology-free’ time during which we’d color, or do pencil puzzle books, and during one of those afternoons I taught them how to make their own stuffies.  However I took a TON of photos and so I’ll share the step-by-steps of their work in another post

Alright, that’s it for this round-up!

 
This post may contain affiliate links. This means I might make a small commission on purchases made through the links, at no cost to you.