1 Comment

Pitfall: The Lost Expedition cake

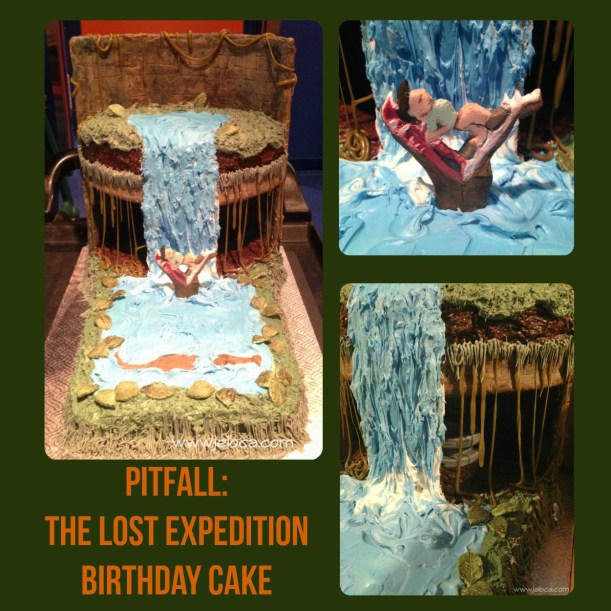
Only 3 months late, here’s (finally) the completed Pitfall: The Lost Expedition birthday cake.
pitfall the lost expedition birthday cake
The morning of Henri’s party I woke up and went downstairs, peering cautiously into the gloom of the laundry room to see how the cake had held up overnight.  There’s always the chance for decorations to slip, or icing to crack or worse – to discover that one of the kids had found the cake and begun to dig in…so I was nervous when I slowly approached.

pitfall-cake-party-day-02

Then I breathed a sigh of relief.  It looked good.  I’d finished so late in the morning that I’d passed out, so seeing the cake again was a pleasant surprise.  I was actually feeling quite proud of myself.

pitfall-cake-party-day-03

Oh yeah, I thought- Henri’s gonna love it!  All that remained was to transport it to the party without incident and then it would be-pitfall-cake-party-day-01

W-wait.  Why does something look wrong…?

Oh.

Oh no.
pitfall-cake-party-day-05

Do you see it?

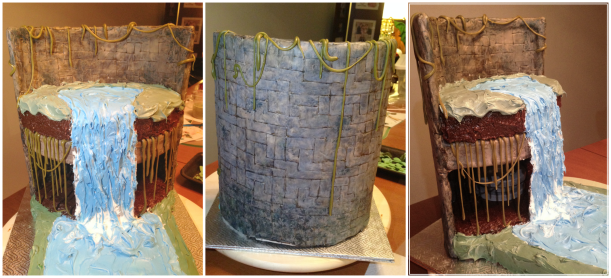
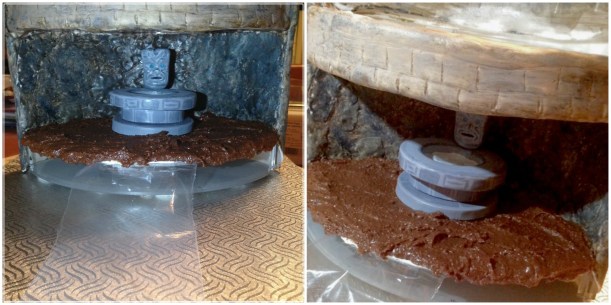
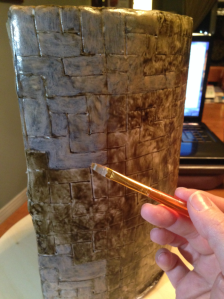
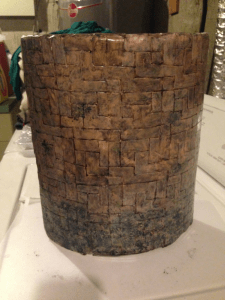
Remember in my last cake post when I was all cocky about the vines working out?  Hmm.  Looked like I’d spoken too soon.  The first vine I’d attempted had had a chance to set up while laying horizontally… so when I hung it over the edge of the back board to test out it held its shape perfectly.  The new vines, however… I’d rolled each out and tucked them into place under the top cake right away.  And they’d looked good.  ‘Great’, even, if I may be so bold.pitfall-cake-party-day-04

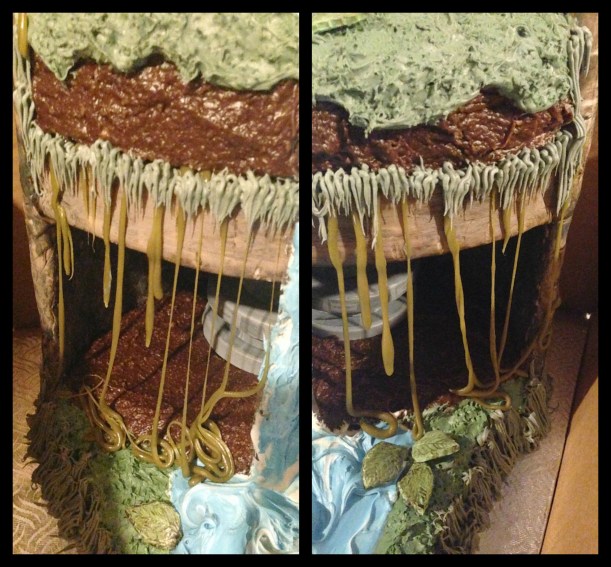
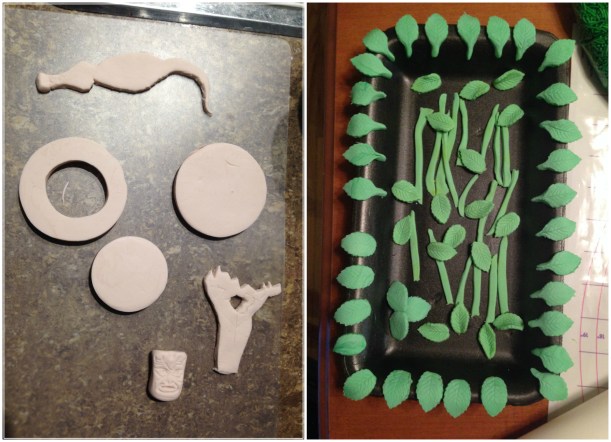
But overnight gravity took hold, and the once relatively-uniform vines began to sag slowly.  Some had narrowed enough to look delicate and thin, twisting and tangling among others in a pretty cool, natural way (see the ones on the right).  Others, though… like the ones on the left… they’d basically collapsed.  Luckily they’d thinned before falling, so the resulting puddle of vines still looked pretty natural, I guess…which was good because it would have seriously messed things up to try and detach them.  The only one I did detach was the vine that had attached itself to the waterfall.  I thought it ruined the illusion of flowing water to have a vine stuck up alongside.  ðŸ˜›pitfall-cake-party-day-06

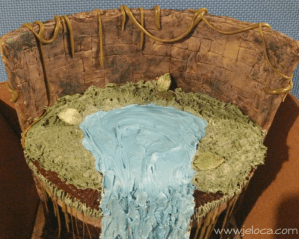
This pic was taken on my lap in the car en route to the party, and is probably the only pic taken strictly with sunlight.  The color is pretty accurate though I find the blue too bright.  (That may have been my phone, it’s notorious for having a hard time photographing blues and purples accurately).
pitfall-cake-party-day-07

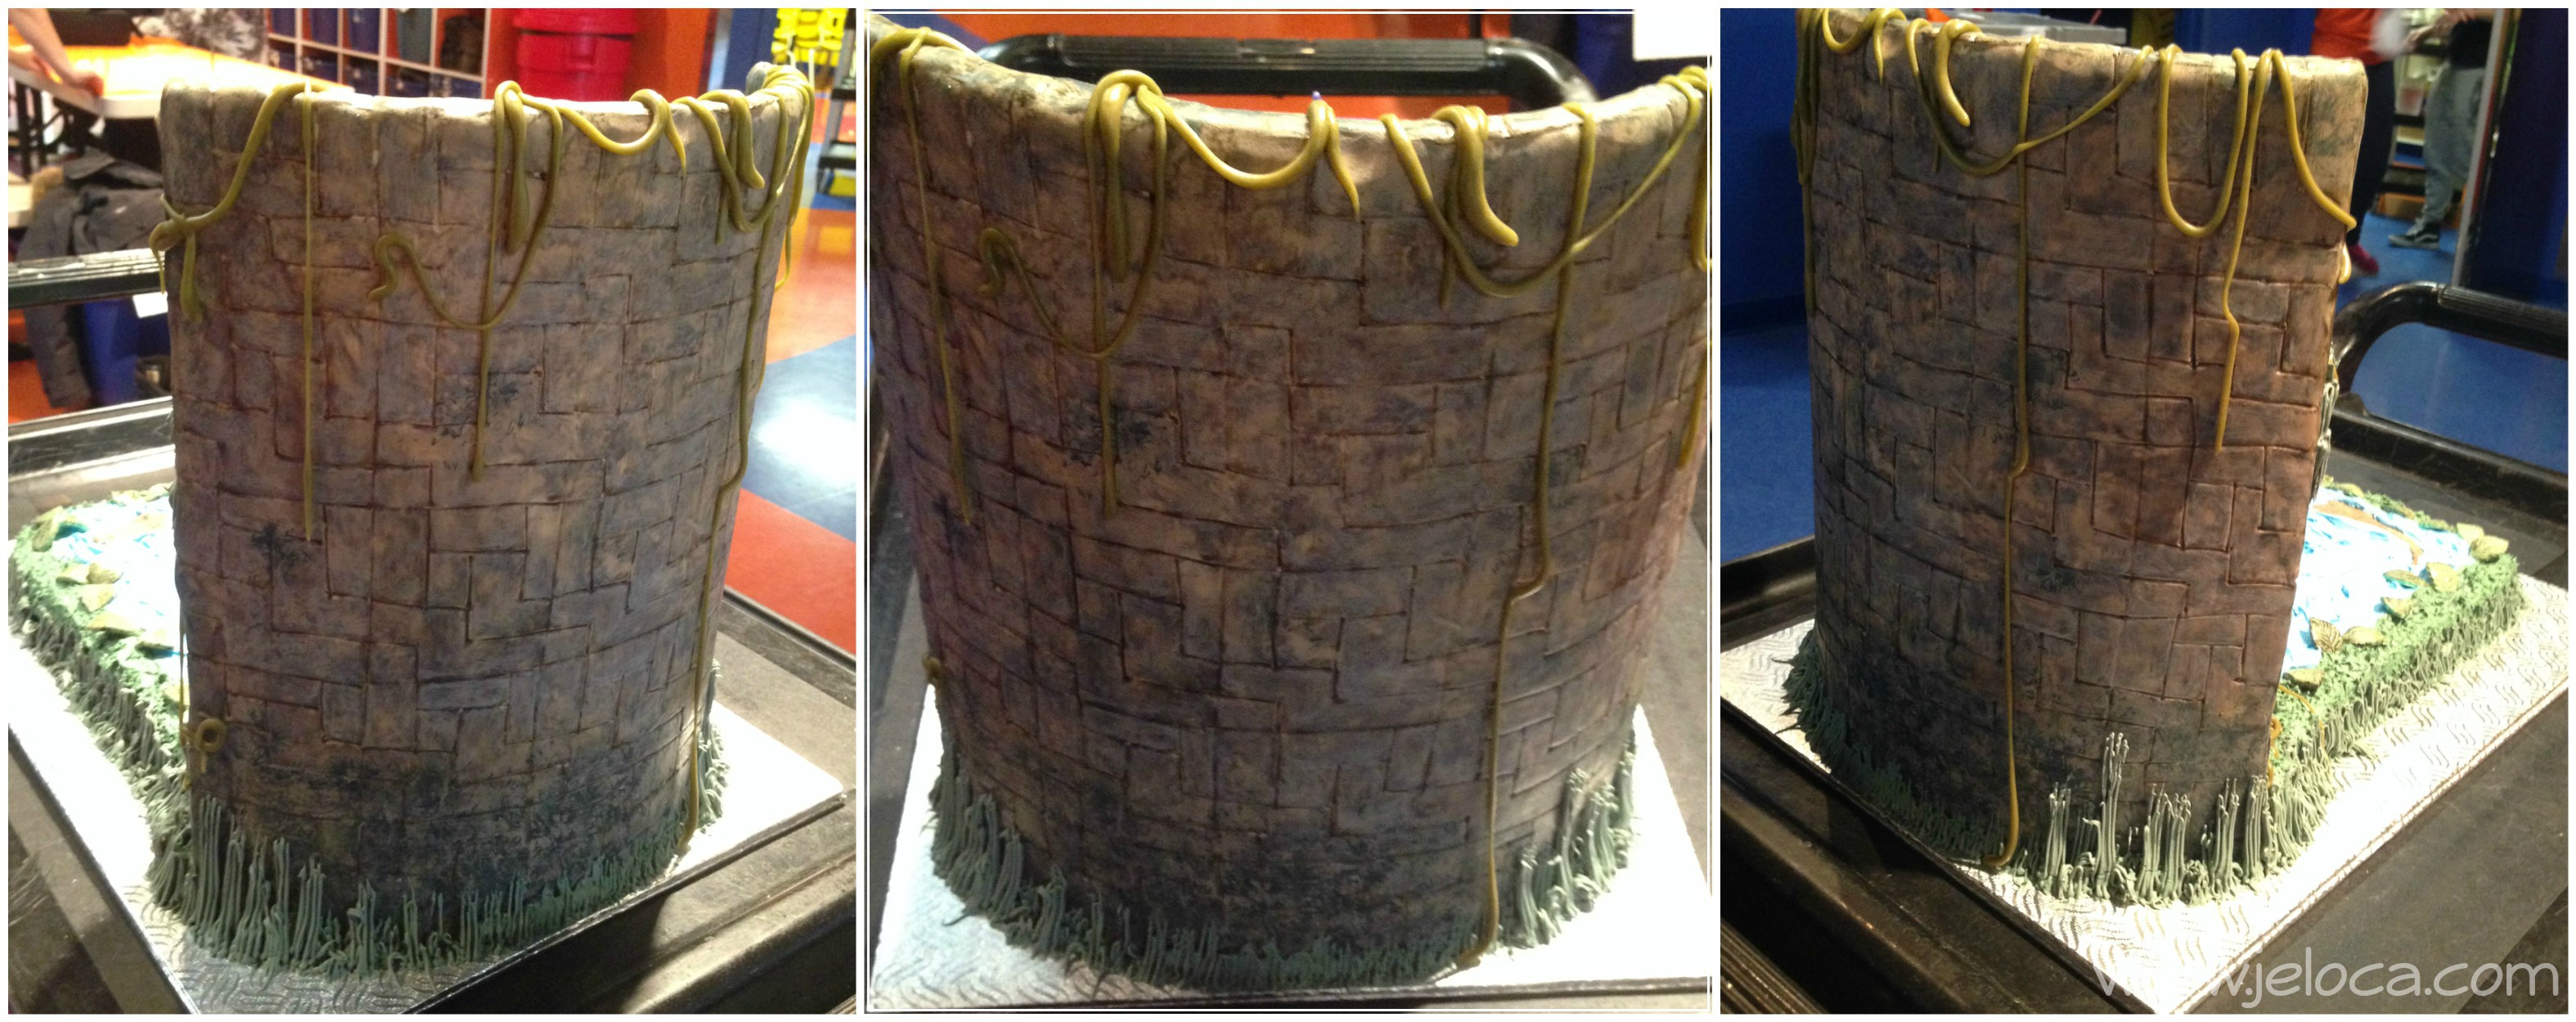
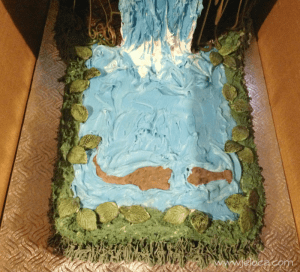
I took a last quick set of pics at the party before serving.  Here’s the backside.  You can see how the vines here too have thinned and sagged.
pitfall-cake-party-day-08

And here’s the finished cake, complete with Pitfall Harry himself.
pitfall-cake-party-day-09

I waited until the very last moment to stick him in the cake, partially to avoid the risk of snapping the figure, and partially so he wouldn’t absorb moisture from the cake/icing and then have the fondant soften and fold over.  I likely needn’t have worried… there was probably enough ‘paint’ on the front at least to seal the moisture out, but the back was still bare fondant and I didn’t want to take a chance.pitfall-cake-party-day-10

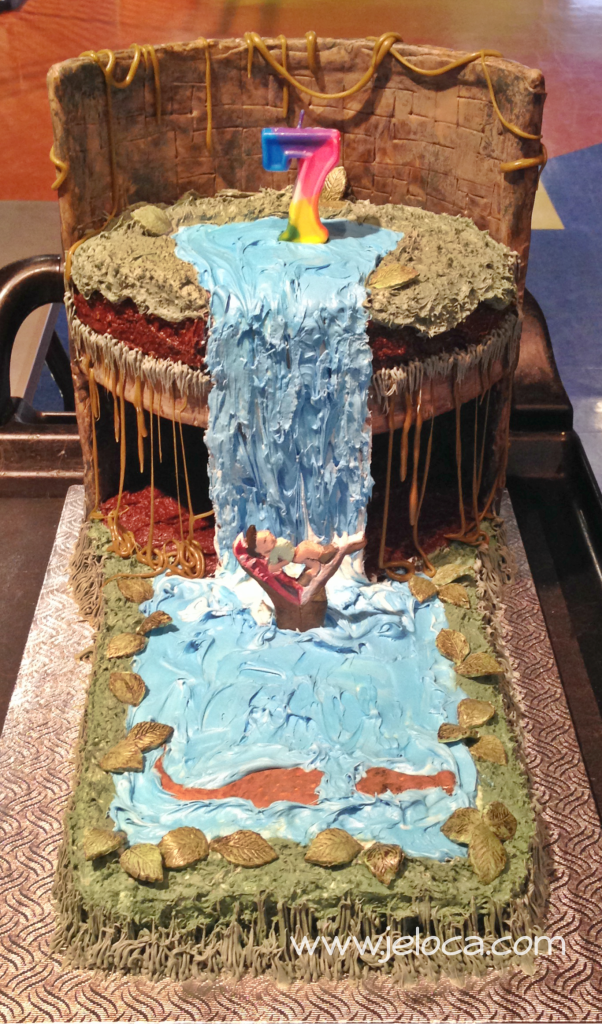
Add one quick candle for the birthday boy’s age, and then I wheeled it over to his table.  It was a huge hit!  The kids got their choice of location to eat from and we served some to the parents as they came to pick up their children.

pitfall-cake-party-day-13

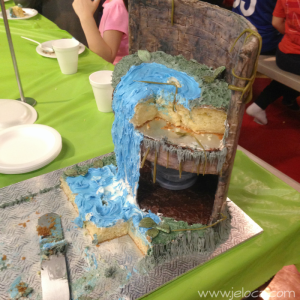
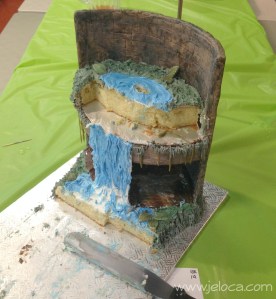
In the end this is all that was left – a tiny bit of cake and a filthy board.

pitfall-cake-party-day-12

I had planned to take it home and pop the fondant off the base stand so I could use it again, but sadly I broke it.  The fondant ‘glue’ was so strong in adhering the stand to the cake board, that when I was trying to separate the two I cracked the plastic of the stand itself.  I was impressed with the strength… but unfortunately it meant I had to throw out the stand.  Ah well.

PITFALL CAKE COLLAGE SQUARE

All the ‘making of’ posts:

1. Making a Pitfall: The Lost Expedition cake, day 01

2. Making a Pitfall: The Lost Expedition cake, day 02

3. Making a Pitfall: The Lost Expedition cake, day 03 part 1- Pitfall Harry, crocodiles and a healing spring

4. Making a Pitfall: The Lost Expedition cake, day 03 part 2- assembly

5. Making a Pitfall: The Lost Expedition cake, day 03 part 3- finishing

Henri’s other birthday treats


1 Comment

Making a Pitfall: The Lost Expedition cake, day 03 part 3- finishing

It’s been brought to my attention (*cough*Michelle*cough*) that I never finished posting Henri’s Pitfall cake.  That is correct… February sort of got away from me, so I’ll take care of that right now.  This post will cover the final details of finishing the cake the night before the party, and my next post will show the final cake at the party, complete, and enjoyed.  🙂

In my last Pitfall cake post I left off with the cakes assembled and dirty-iced.  I set them aside for a little bit so the icing could crust and mixed up some green for the grass.  I deliberately gave it a bit of an aged, almost faded color so it would match the tones of the fondant leaves and the brick wall.  The wall was so dirty and stained/old-looking that a bright, primary-colored grass base would have looked really, really out of place. pitfallcakeday03part03-04

I covered the top cake with the same cake-filled chocolate icing as I used on the lower base, blocking out an area for the small pool at the top of the waterfall.  Then I used green icing to block out the larger pool at the bottom.  Once the brown and green were done I used more white icing to thicken the base coat on the various water areas.pitfallcakeday03part03-05

Then I realized that the pool I’d created wasn’t wide enough to fit the crocodile I’d already made.  Oops!  So I used more white icing to widen the water.

My cakes are often like this.  Very rarely is something sprung to life, fully formed, exactly as it was in my head.  It might be close, in the way this cake very closely resembles my initial sketch, but the actual details in the getting there are always very fluid, and often borne of the desperation and delirium that comes from cake decorating in the wee hours of the night when stores are closed and coffee is cooling.pitfallcakeday03part03-06

Next I mixed up some blue for the water and layered it on over the white.  I didn’t worry so much about the edges where the water and grass meet as I knew I’d be placing leaves there, and I deliberately left it choppy on the waterfall where I wanted it to look like there was some motion and churning.  I also played with swirling my knife around to make the water look a bit rough because the waterfall would prevent it from being a clear, calm pool.  Above you can see the cake as I worked on it (with the parchment protection) and then how it looks once I removed the parchment.  I always keep the parchment in place until I’m ready for the finishing details as it’s much easier to remove dirty parchment from around a cake than icing from the cake board.

One of the things I’d been thinking about in the days leading up to D-day (decorating day) was how to make vines.  I figured I’d just roll out some fondant pretty thin and hope it wouldn’t crack once it dried.  But when at the dollar store that afternoon during my unexpected child-free time I hit on the idea to try using caramels.  pitfallcakeday03part03-01

I figured they were already pliable, and edible, just like fondant… but had a better stretch.  Hmmm…could this work?

pitfallcakeday03part03-02

I’d decided to do a quick test before going to pick up the kids from the party.  I softened 2 caramels in the microwave and then when they’d cooled enough to touch, added a touch of green food gels.  I kneaded it together just like dough/fondant and was thrilled that the caramel took the color evenly, with no streaking or dissolving from the added moisture.  I quickly rolled out a quick, curly vine and set it aside to dry while I was out.pitfallcakeday03part03-03

This is what I came home to (above).  A perfect, jungly-green colored, held-its-shape vine that was smooth, crack-free and best of all, delicious.  (Okay, there had been 2.  Yum.)

Sweet!

(Pun intended).vinepintereststrip

For my Pinterest friends, here’s a graphic for you!

Now that I knew I had the solution for the perfect vines, I got to work.  I wanted to set the vines in place before finishing the grass because I knew working on one could destroy the other.pitfallcakeday03part03-07

I rolled and rolled and rolled and rolled and rolled, placing each vine in place before rolling out the next one.  The vines that draped around the wall stuck pretty well with a tiny touch of water, only on places where I wanted a curl or end to stay up.  For the most part, though, I left them unstuck so gravity would work on the caramel and make it look more natural.*

I had an image in my head of vines hanging down like curtains, helping to hide the secret healing spring.  So for those vines, as I made each one I used the tip of a knife to lift the cake board that the top cake was sitting on, just enough to wriggle the end of the caramel underneath, and poking it in with a needle tool if I had to.

After the vines were done I tackled the grass.  My first thought was to use my grass tip and pipe out the grass like I’d done around the Betty Boop cake.  Only problem was I knew I was going to use my remaining green icing to do grass around the edges of the cake where it met the board and I didn’t think I had enough icing left.  I was tapping some piping tips against my palm, trying to figure out if I had enough icing mixed up for all the grassy areas, when I looked at the marks I’d left on my skin and got another bout of inspiration.  (My pain = cake gain).pitfallcakeday03part03-08

I used an open star tip and basically poked the hell out of the grass areas.  My icing had crusted enough to be an ideal surface, but if your icing is still soft I’d stop every now and then to clean your tip, as the grass effect works better with smaller pokes vs larger flat areas.  It was remarkably convincing for grass, and I’m really, really happy with how it came out.

Plus it left me with enough green icing left to pipe long, marshy grass/weeds around the base of the cake.  I did that, then stuck down the leaves I’d darkened, then decided to call it a night.

pitfallcakeday03part03-09

In the back you can see the remaining leaves I didn’t end up using.  Don’t worry, they didn’t go to waste.  The kids ate them all over the next few days.  🙂

pitfallcakeday03part03-10

I tried to vary the lengths of the grasses to make it look more natural than an even, trimmed border.  pitfallcakeday03part03-11

In these final two pics you can see the two sides of the cake, and the finished vines and grasses.  I’d added some long grass to overhang the vines as well.pitfallcakeday03part03-12

Next time – the cake in situ!

*remember this for my next post :/


1 Comment

Making a Pitfall: The Lost Expedition cake, day 03 part 2- assembly

For those following along, at this point in the Pitfall: The Lost Expedition cake process, I had fondant pieces, I had rectangular baked cakes, and I had some cardboard and a brick-wall-looking stand.  Now, on the night before the party, was the time to start putting it all together.pitfall the lost expedition cake day 03 part 02 assembly 01

Step 1 – cover the cardboard cutouts with tinfoil to use as makeshift cake boards.

pitfall the lost expedition cake day 03 part 02 assembly 06

Step 2 – Confirm plan.  At this point I got a piece of paper and made a note of the order in which I had to do each step, because if I’d gone out of order (like sticking the waterfall down on the top tier before icing the bottom, for example) I’d make things harder on myself than they’d need to be.pitfall the lost expedition cake day 03 part 02 assembly 02

Step 3 – carve the cakes.  I always use my largest unserrated knife for this, and have a large tupperware or two nearby for collecting the leftover cake (after being leveled or sculpted).

pitfall the lost expedition cake day 03 part 02 assembly 03

For the top cake, which would become the top of the waterfall, I didn’t level it.  My cake had baked up much thicker in the center, but in a large enough area that I could cut a thicker cake in the shape I needed.  If I’d leveled it first to the height of the outer edges I’d have had a much shorter cake for no reason.  If the cake had been wide enough to cut my oval twice and stack them, I’d have done it, but it wasn’t big enough.  I cut the cake from the thickest part and used some icing to ‘glue’ it down to the cake board, then set it aside.

For the lower cake I used the cardboard to carve out the right shape so I could butt the cake right up against the stand.  After making sure it fit, I set that one aside as well.

pitfall the lost expedition cake day 03 part 02 assembly 04

Step 4 – Solidify base.  I had my cake boards, 2 of them ‘glued’ together with icing.  I needed to attach my base somehow because otherwise the moment I’d try to transport the thing it would tip backwards, being so heavy, and separate from the cake which would be stuck to the board.  I stared at it a little while, wishing I had thought to Dremel 2 holes in the base BEFORE decorating, so I could quickly zip-tie it together, when I got an idea.  The base sat a few mm above my cake boards (less than 1/4″).  I couldn’t use glue or tape because I didn’t have any thick enough, but I did have fondant, and I knew that could dry pretty hard.  First I traced the shape of the stand onto the silvered board.  I took a few gobs (technical term) of white fondant and moistened them slightly so they’d be sticky all around, and pressed them down around inside the base’s outline.  I quickly put the base in position and pressed down on the lowest tier, using a knife handle to get into the back, and really squish the fondant and board and base together.  I waited a minute or two then tried to lift the base by the top tier… and the entire board lifted.  Success!

(Around this time I’d also cut open and re-taped a cardboard box, as seen above, for transport.  It was open at the front but had a closed back so I could carry the cake by supporting the back of the box instead of touching the stand itself when I moved it.pitfall the lost expedition cake day 03 part 02 assembly 05

Step 5 – After making sure the base was well-stuck to the cake boards I cut a strip of plastic from my baggie the width of the waterfall I wanted, and used packing tape to tape it down to the bottom of the lower tier.  I used a few smears of vanilla icing to glue my cake board down over it, sticking it well to the stand.  I didn’t want it able to move at all.pitfall the lost expedition cake day 03 part 02 assembly 07

Step 6 – I crumbled some of the leftover cake and mixed it into store-bought chocolate icing to make a rough, earthy-texture, and used that to coat the cake board for the cave floor.pitfall the lost expedition cake day 03 part 02 assembly 08

Then I set the healing spring into place.  I didn’t bother using anything to stick it down, the icing floor was still wet and the spring was heavy enough that I knew it wasn’t going to move.

pitfall the lost expedition cake day 03 part 02 assembly 09

Step 7 – Then I taped the waterfall up and into place with more packing tape, making sure it was secure.  I knew there’d be a cake sitting on top of it, but still…pitfall the lost expedition cake day 03 part 02 assembly 10

Step 8 – At this point I set the cakes into place.  I put the lower cake down first, using icing to glue it in place.  I protected the cake board with strips of parchment paper, then set the top cake down with some icing too.  Putting the parchment around the back and under the front (on either side of the waterfall) was a bit trickier, but I used the tip of a knife to ease the cake forward or up and wiggled the parchment strips into place.  Then I gave everything a dirty ice (crumb coat) with vanilla storebought icing.

pitfall the lost expedition cake day 03 part 02 assembly 11

I just realized the pics are out of order, and that I’d crumb coated the base before adding the top.  Ah well.

Oh- I included the waterfall in the crumb coat on purpose.  I knew it would later be mostly covered with blue icing, but I wanted there to be some depth to the water so it would look like it was moving.  I also gave it a deliberate thick, choppy layer at the base where it reached the cake (as seen in the last pic).  Waterfalls often have a churning, frothy spray at the base and this would help imply that.

Up next – the fun/scary part… decorating!


1 Comment

Making a Pitfall: The Lost Expedition cake, day 03 part 1- Pitfall Harry, crocodiles and a healing spring

Saturday morning I woke up bright and early to- *coughs* actually no.  Saturdays I sleep in.  But I did wake up somewhere around the crack of 10 or so and debated how to plan my day for the cake.  I had 2 hours until I had to leave to take Henri to a birthday party, then had some shopping to do with Jakob, and then would have to go back out to pick Henri up, so didn’t think I’d get any more progress done until once I’d returned at the end of the day with both kids.  But that was getting close to supper time, which would require clearing the table, so I wouldn’t want anything in progress that would dry up or break if I tried to move it or put it away for a few hours.

Hmmm.

The first thing I did was run downstairs and take a peek at the brick wall/cake stand to make sure nothing crazy happened over night, like the entire back sagging off or something.  Luckily, it was fine.  I did realize the colors were much more desaturated and ‘natural’-looking, vs the bright greens of the sprinkles I’d bought to use for grass, and the fondant leaves I’d made.  Hmmm.  They wouldn’t quite go together.  So the next thing I did was to thin some of the leftover dark green from the moss (this is why you save your palettes) and brush it over all the leaves that had stems.  I later wished I’d done them all, but at the time I figured I’d do the ones I knew I’d use, and come up with some way to salvage the smaller ones later on if necessary.  I ignored the long grass strands, having already decided I wasn’t going to use them.

leaves wip

I calculated that I’d have enough time to paint a first coat on the fondant pieces before leaving for the party.  Mostly to just block in the colors and give it a chance to dry while I was out.

fondant figures wip 01

The healing spring got a base coat of gray made by mixing Wilton White-White with Americolor black gel, first a quick base and then lightly tapping on some darker areas.  For the center of the spring I used White-White with a bit of Americolor teal.  The crocs got brownish green base coats made mostly by mixing up some of the previous day’s colors together.  It’s hard to see from this pic, but before painting the full croc I used a scribing tool to mark a scale pattern into the hardening fondant.  For the open-mouth one I blocked in some areas of white and red for the inside of his mouth.  I didn’t touch the struggling Pitfall Harry in between his jaws, not thinking I had enough time to pay attention to it before having to stop, get dressed, wrap the gift and shuttle Henri out.

palette

This was the state of my palettes when I left.  The artist’s-style one has pure gel colors that I could dab from as needed.  (The smear at the top was to help me identify which color was which… the darker ones are difficult to tell apart when in one small glob).  The styrofoam piece is what I was really working from, and the plastic hors d’oeuvres palette was there mostly because it still had quite a bit of white left over from the prior day, and a decent amount of brown that was still usable.

Had a minor change in plans – the birthday boy invited Jakob to stay as well, which gave me a few hours of time in the afternoon that I hadn’t expected.  I took full advantage, slapping some more paint down so it could dry.  The main hazard of painting fondant pieces with this White-White/gel colors mixture is that if you apply it too thickly, the White-White forms a latex paint-like ‘skin’ on the work.  If you touch it while it’s tacky (which can last a few days) not only can you leave fingerprints in the work, but I’ve had entire sections of color lift off completely.  Not fun.fondant figures wip 02

Here you can see more of the texture in the croc’s back.  You can also see the other colors added to make it look more natural and create the illusion of shadowy, raised eyes.  I deepened the detail inside the open croc mouth and blocked in Harry’s colors, getting a base coat down so I could finish it with details later.pitfall lost expedition fountain

These are the healing springs from the game.  Of course it was only on day 3 that I realized I’d forgotten to make the little side braces that decorate/support the top and bottom.  Ahh well.  Creative license.  healing spring wip 02

Using the game stills as a guide I darkened the gray with more black and roughed in the decorative areas.  The base had its 4 quadrants, the middle bit got some stripes, and I copied the box pattern around the top slab.  I did my best to copy the dark areas on the face too, as well as I could with my fondant carving.  I left any smudges/smears and added some around the top to make it look aged, like it had been sitting in a jungle for years.healing spring flash

Once the pieces were dry enough to handle I added teal eyes and jammed the head toothpick down through the other pieces.  A tiny dab of water was enough to stick them together.  Looks horrible with flash but it was the only pic that showed the eyes.healing spring no flash

Here’s a shadowy shot that looks most like the game’s version, I think.healing spring fo collage

And some final beauty shots, because once it goes in the cake it won’t really be seen.  For the ‘water’ I mixed together a few large dollops of Wilton clear glitter gel icing, a drop or so of White-White, and a touch of teal.  Unfortunately the White-White hid most of the glitter, but there’s just enough of the teal to provide the glow.  I really wanted to make the water pour from the head’s mouth but chickened out on actually brushing it down the face.  Ah well.

Now on to Pitfall Harry and his perilous predicament.

pitfall lost expedition croc

These stills show both the moment I was recreating (Harry in the croc’s mouth) as well as a clear view of his outfit.fondant figures wip 03

And here’s the final Harry piece.  Henri had complained that I’d given him black hair, and ‘everybody knows Harry has brown hair, Mommy’… so I softened it up a bit.  I also broke a tiny bit of fondant off the front of his chest, because Yannick asked me why Harry’s curves were so… Madonna-esque.  I tried to justify that he was straining, back arched… showed the pic… bent over backwards to show him… but other than laughing at me he wasn’t convinced 😛  I touched up Harry’s details and gave the croc an eye and more depth in his mouth.  The very last thing I did was to add a few more coats of white for the teeth, because White-White has a habit of absorbing base colors.  To make it opaque I actually used a small dab of thinned Betty Crocker icing mixed with the White-White, and that seemed to do the trick.

Now I had my fondant toppers, two cakes, and an ornate stand.  All I had to do was figure out how to put it all together.


2 Comments

Making a Pitfall: The Lost Expedition cake, day 02

Most of the cakes I make are a 2-4 day process.  The final 2 days are always baking 2 nights before the party (so Friday for a Sunday cake) and then decorating on the day before the party (Saturday for a Sunday cake).  I add a few more days prior if I need to make fondant decorations or anything that requires drying time.  This Pitfall cake, for as detailed as it looks, took 3 days.

Day 1: Thursday

When I got home from work I prepared the base stand to get it to look like a brick wall with a cave by covering it with fondant and scribing a brick pattern to match one from the game.

Day 2: Friday

pitfall lost expedition night 1 07

In the morning before leaving for work I gave the stand a quick wash of color.  I needed to fill in the grout lines and give it time to dry before I got home.  In a small cup I mixed together 1 drop of black Americolor food gel, 1 drop of brown gel, and 6 ml of water.  I used a food-only paintbrush to apply the wash to the fondant, not aiming for any sort of pattern, and allowing the color to drip and run a bit before smoothing it around.  I let it set for a minute or two then dabbed at it with a paper towel to remove areas of excess, and then used the same brush with only water to remove even more color.  The goal was not to paint or finish the brickwork but to allow the dark color to seep into the etched lines and provide some aging. 

At this point it looks like a dark, muddy mess.

When I got home from work I rushed to bake the 2 cakes I’d need.  I knew I’d have plenty of time for them to cool before I planned to ice and decorate on Saturday, but I often use the oven for storing fondant bits overnight and didn’t want there to be any residual heat left inside it.

pitfall the lost expedition cake day02 01
pitfall the lost expedition cake day02 02

When the cakes were cooled some I wrapped them in saran wrap to set aside for the night.

Then I prepared the table for getting down to some fondant painting.  These are the supplies I prepared: in the lid of my color box are a smaller box of Americolor icing colors and a bottle of Wilton White-White, then the contents of the case itself is my collection of Wilton icing gels and some regular, grocery-store-type food coloring.  I brought down some cotton balls thinking I might use them for blotting, but testing on a scrap of fondant revealed it stuck terribly to the wet sweet, and I quickly got rid of them.  I’ve got a measuring cup of water for rinsing my brushes, a small cup of water and syringe for adding clean water to my colors if I need to thin them any (the syringe gives you way more precision when working with tiny amounts of color than dropping by spoonful or pouring), and a small cup of the leftover dark wash from the morning that I’d kept moist in a tupperware for the day.  I’ve got a few sizes of food-safe paintbrushes and some paper towels for blotting, and finally at the bottom is my standard palette, left over from an old pack of hors d’oeuvres.

pitfall the lost expedition cake day02 03

That’s the palette I use most often, and it works great with larger quantities of color, like when tinting icing sugar/water for the fondant toppers I make.  However when using tiny bits and blending a lot of shades I find it’s not as practical, and I eventually switched over to an artist’s style palette with small dabs of the gel colors on it, and a small styrofoam tray for blending.  The colors bead up on the tray so I don’t lose any to absorption.

pitfall the lost expedition cake day02 04

I prepared the stand by putting it on my lazy susan., These things are SO useful with decorating and crafting! I’ve actually got three – one wood, one glass, and one plastic, depending on my project needs.  I stuck a tub of icing in there to help weigh it down.  The stand is pretty heavy, especially with the fondant, but that was a precaution.

The first thing I did was to mix up a color that approximated the bricks I was trying to copy.  In the game they look like this:

pitfall lost expedition bricks

Now that I had the general shape scribed in and the darker grout lines, I needed to lighten the bricks to a faded, creamy, beige-ish color.  I began to mix up a color, testing on the paper towel until I had something that looked right.  You can see at the bottom of this next pic where I’d tried out a color that was too pale, and I had to darken it up a bit.  In the end I used some Wilton White-White as a base, then some brown and black Wilton gel colors, a touch of Wilton lemon yellow, and some of the morning’s dark wash water to thin it out.

pitfall the lost expedition cake day02 05

I painted small dabs of the resulting mix onto each brick individually, blending and smoothing until I got rid of the brush strokes and had something that looked like an old brick wall.

For the first time ever I took a short video of my process.  If you find it helpful and want more video tutorials, please let me know in the comments.  🙂

pitfall the lost expedition cake day02 07

After the back was done I moved on to the front.  The small amount of mixed color that you saw in the video was enough to paint the entire back and front.

pitfall the lost expedition cake day02 06

The next step was to add some greenery.  I knew I’d have a lot of grass and vines and leaves in the cake, but wanted to add more depth to the bricks so I used more of the dark wash and deepened it up with Wilton gels (leaf green I think).

pitfall the lost expedition cake day02 08

I used a messy brush to pounce the color in areas where moss would grow, mostly around the bottom of the back piece and around the top and sides of the front.  This is a great reason to keep those brushes that get all messed up, so you don’t ruin good ones!

pitfall the lost expedition cake day02 09

As I added the moss I made sure to keep the brush from being too wet – the effect was supposed to be subtle – and I also periodically touched my brush in different areas of the mix where I hadn’t fully blended, sometimes picking up straight gel from the edge of the palette.  This gave me varying shades of green and a more natural look.

pitfall the lost expedition cake day02 10

Finally I used some White-White and Americolor black and a touch of brown to get a nice varying gray shade for the rock cave.  Again I resisted the urge to overmix the color, so I could get depth to the wall.  Sometimes I touched in a bit more white, which lightened the grays, and then I’d go back in with a more liquid black, getting into the cracks.

pitfall the lost expedition cake day02 11

Here’s the finished support, set aside for the night.  The front (above) and the back (below).

pitfall the lost expedition cake day02 12
This post may contain affiliate links. This means I might make a small commission on purchases made through the links, at no cost to you.


1 Comment

Making a Pitfall: The Lost Expedition cake, day 01

For Henri’s 7th birthday party he wants a Pitfall cake.  As in Pitfall: The Lost Expedition.  As in the old PS2 game all 4 of us at home play, and love.

This gave me a bit of a challenge.  The most iconic visuals from Pitfall are, well, the pits.  And Pitfall Harry swinging on vines.  Pits would be easy enough to make, but vine-swinging?  Hmm.  This required a think.

My first thought was to make a framework that would go over the cake with vines and a little fondant Harry hanging down, but while I poked around at work, looking at unused frame displays, a new idea struck.

I found a 2-level display that got my creative juices flowing.  In order to plan properly (and avoid scale mishaps like in the Diego & Dora cake) I took iPhone pics from a few angles and then printed them out really pale, so I could sketch over them and have a rough idea of what I wanted to do.

It’s difficult to photograph something clear but you can get a rough idea of my process here:

pitfall lost expedition paper demo collage
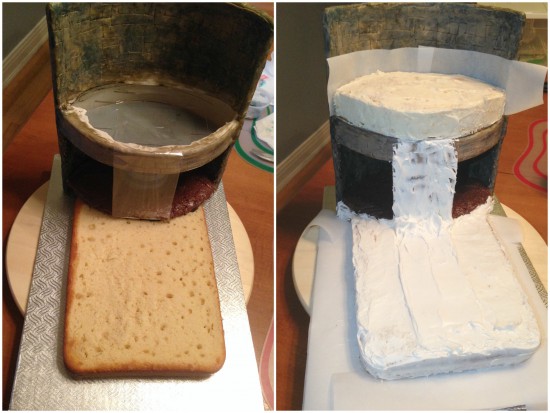
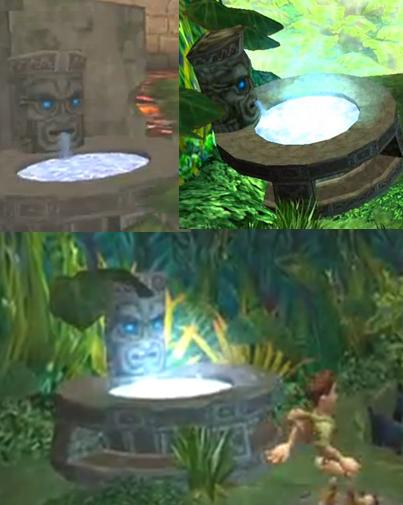
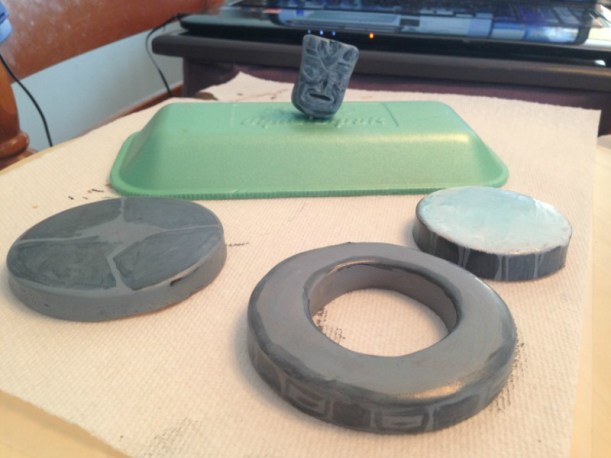
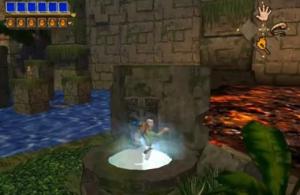
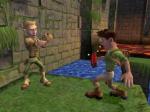
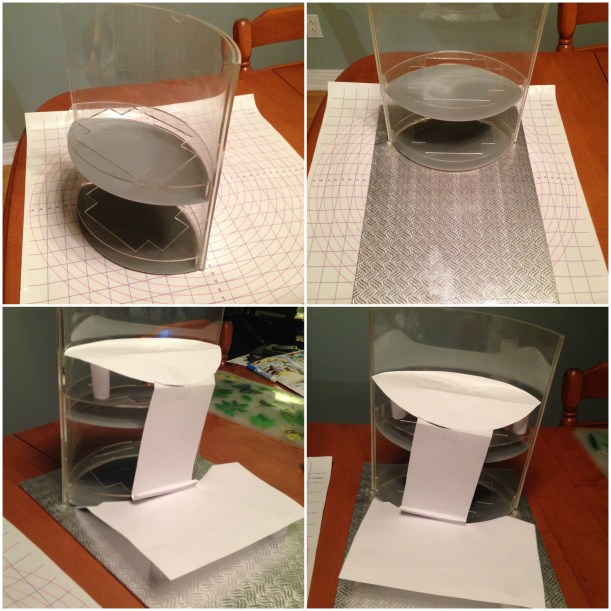
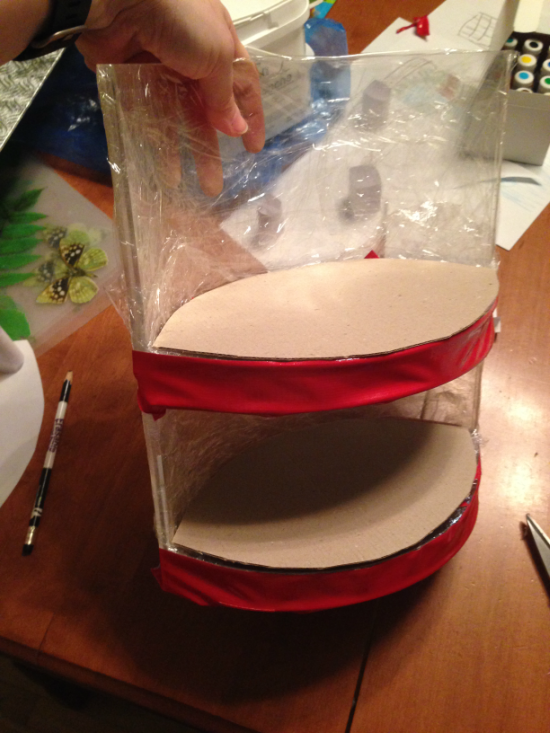
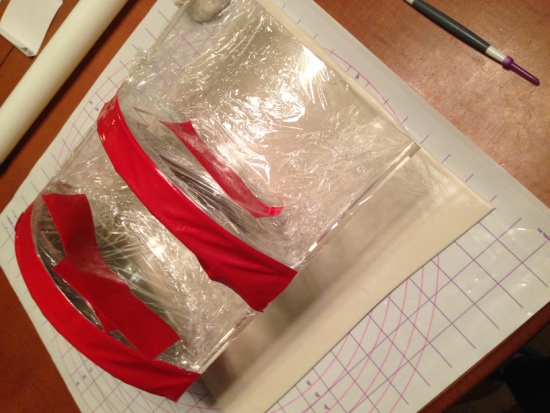
First I sketched my plan onto paper.  You can sort of see in the first image that I have a brick wall with a balcony-like upper tier.  The blue overhang is supposed to be a waterfall that flows down onto the cake below, and it’s not easy to see unless you click, but there’s a healing spring/fountain hidden behind the waterfall.  Once happy with the sketch I needed to see if it would work, conceivably, and so I used some scrap paper and made a quick mock-up of where the actual cakes would go.  There’s one layer of cake on the top tier, the ‘waterfall’ hanging down, and then a layer of cake the same height as the bottom tier, butted right up against it.

Okay… maybe there’s something here.

This was Thursday, and his party would be on the upcoming Sunday afternoon, so I knew I had to get started right away.  After work I stopped at a bulk candy store for supplies like green sprinkles and extra fondant.  I also picked up 2 cake boards.  I usually use trays for my cakes but I didn’t know how well the stand would fit and I didn’t want to be limited by side edges.  I bought 2 so I could ‘glue’ them together with icing, as I didn’t think 1 board would be strong enough to support the heavy cake.

pitfall lost expedition home paper demo collage

Here’s the same paper mock-up at home, on the actual cake boards so I could test for fit.  What I was hoping for, and am happy about, is that the board is long enough for me to extend the lower cake section beyond the paper template.  I plan to have crocodiles in the water but hope for room to put a pit as well, and I think this will give me enough.pitfall lost expedition night 1 01

Next I cleaned the display stand and wrapped it in saran wrap, and used duct tape to block off the two open edges.  I also cut 2 cardboard ovals to fit over the tiers, as they have large cut outs where the products are meant to sit.  The top one will be used as a cake board, and the lower one will merely be covered in icing.

pitfall lost expedition night 1 02

Next I tinted some white fondant to a beige-ish shade and rolled out enough to cover the back of the display…

pitfall lost expedition night 1 03

…and then trimmed it to size.  At this point I realized that even dampened, the fondant did not want to stick to the saran, and I removed all the coverings.  D’oh.  I make the mistakes, so you don’t have to.

Water-dampened fondant DID want to stick to the clean plastic stand just fine, luckily, and I covered the back with the large sheet, smoothing it down well against the back and around the edges, blending it out with my fingers.  I did the same for the larger areas of the front as well, and then carefully wrapped one thick-ish piece around the open edge of the upper tier, smoothing it into place above and below while being VERY careful to not tear through the open front.pitfall lost expedition night 1 04

Once the fondant was secure I used a scoring tool to scribe a brick pattern into the fondant.  I had to be careful to not pierce the open-fronted balcony edge, but for the rest it was all flush against the thick plastic, and I could press pretty hard if I needed.

For the back and the upper tier I did a rough approximation of a brick pattern found in the game, as seen in the background here:

pitfall bricks

I did the back first, then copied the dimensions over onto the front.  For the lower tier, I wanted it to look more like a cave than a brick wall, so I wet the fondant and pressed on little pieces with my fingers, smoothing and adding more until I had something that resembled a natural rocky wall.

pitfall lost expedition night 1 05

I also used the same beige fondant to cut out shapes to let harden.  On the left are a sleeping croc for in the water, round pieces and a tiki head for the healing spring, and a croc’s open mouth with poor Harry struggling to break free.  (Or, what I HOPE will look like that eventually).  I tinted my remaining beige into a few shades of green and used a leaf-press cutter to punch out 2 sizes of leaves, which I set over the edge of a Styrofoam food tray (saved from buying vegetables) to dry.  I also cut a few strands of tall grass but I’m not sure if I’ll end up using them.pitfall lost expedition night 1 06

At this point it was about 1am and I set everything aside to dry by the dehumidifier and went to bed, knowing the next few nights would probably be pretty late ones to get everything done in time.