7 Comments

WIP to FO Challenge- 19 for 2019

It seems like everywhere you look online these days, people are taking stock of 2018 and setting goals for moving forward.  The first few days of the new year tend to be all about making resolutions, and to that end- here’s one of mine:

I resolve to turn the following 19 wips (works in progress) into FOs (finished objects) before the end of 2019.

I’ll write at length about each project when I finish (and post) about them, but for now here’s a short blurb for each:

1. FO Project Jars

wip yearly fo jars

I need to rip out all the individual lengths of yarn (1-10 yards long, each), match them up with what project they were from, and put the separated yarn into jars designated for each year.

2. Harvest Moon Pullover – crochetwip crochet harvest moon

I started this sweater on November 25 2016 as a way to use my adored Noro Silk Garden limited stash on something for myself.  Limited yarn + crocheted pattern with big holes = a sweater that might fit… right?

3. Granny Rectangle Blanket – crochetwip granny rectangle blanket

I started this blanket on August 9 2015 as a way to use up random sock yarns I figured I’d never get around to using for, y’know, socks.  Figured out how to make granny squares as rectangles and then alternated with white for… some reason.

4. & 5. Ralph and Black Sheep’s Sweaters – sewing & cross stitchwip boys toys sweaters

I started these sweaters for the boys’ favorite stuffed animals a few nights before Christmas 2016.  They were intended to be little surprises for them but instead they’ve sat in a bag ever since.  Sadly Jakob is no longer as into iHasCupQuake as he used to be, so I’ll need to rip out the stitching on the front of Ralph’s sweater and hope it doesn’t leave gaping holes in the fleece.  Then I’ll have to figure out new designs to personalize the fronts, find where I put the sleeve pieces, and sew the little sweaters together.

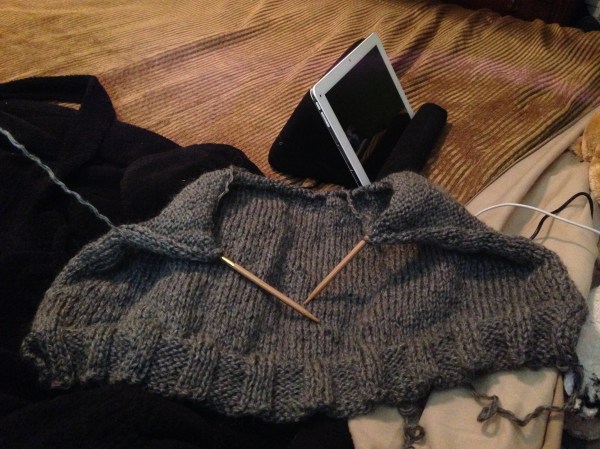
6. Drops V-Neck Pullover – knittingwip drops knit vneck

I started this deep-v sweater somewhere in 2015 or 2016.  It’s slouchy and soft and I want to wear it already.

7. Fluffy Shawl – knittingwip fluffy shawl

I started this shawl on April 6 2015.  It’s been sitting untouched in a bag since roughly that Fall.  I love how the colors blend together (black Sandes Garn Sisu and purple/green Noro Kureyon Sock) and would like it to be done and hugging my shoulders.

8. Comfy Socks – knittingwip fluffy ankleless socks

According to myself, I started these socks 2 FULL YEARS AGO.  They’re supposed to be my ‘take along’ knitting but because I haven’t finished designing the pattern, I never take them with me to work on.  I need them done so I can reclaim the needles and portable hanging knitting bag and start being more productive again.

9. Fun Fur Vest – knittingwip fun fur vest

I started this Bergere de France vest in 2012(!!).  My Ravelry projects page has it listed as completed on Feb 10 2015 but clearly it isn’t.  No ends are woven in, it might need armhole cuffs, and I think I was debating overdying the entire thing black.

10. Doodle Fusion Marco Raffiné Page – coloringwip doodle fusion marco raffine

This page from Doodle Fusion was started last summer (I think) using only my set of Marco Raffiné oil-based colored pencils.

11. Grimm Fairy Tales Alice Page – coloringwip grimm alice in wonderland

This page from Grimm’s Fairy Tales was a test to see if I could get good results using dollar store colored pencils.  I’ve since moved the pencils somewhere else and want to finish the image so I don’t need to dig them out any more.

12. Grimm Fairy Tales Little Red Page – coloringwip grimm little red riding hood

Those of you who follow me on Instagram would have seen this page from Grimm’s Fairy Tales back when I started it in June.  I love how it’s turning out and want to see how well I can complete it.

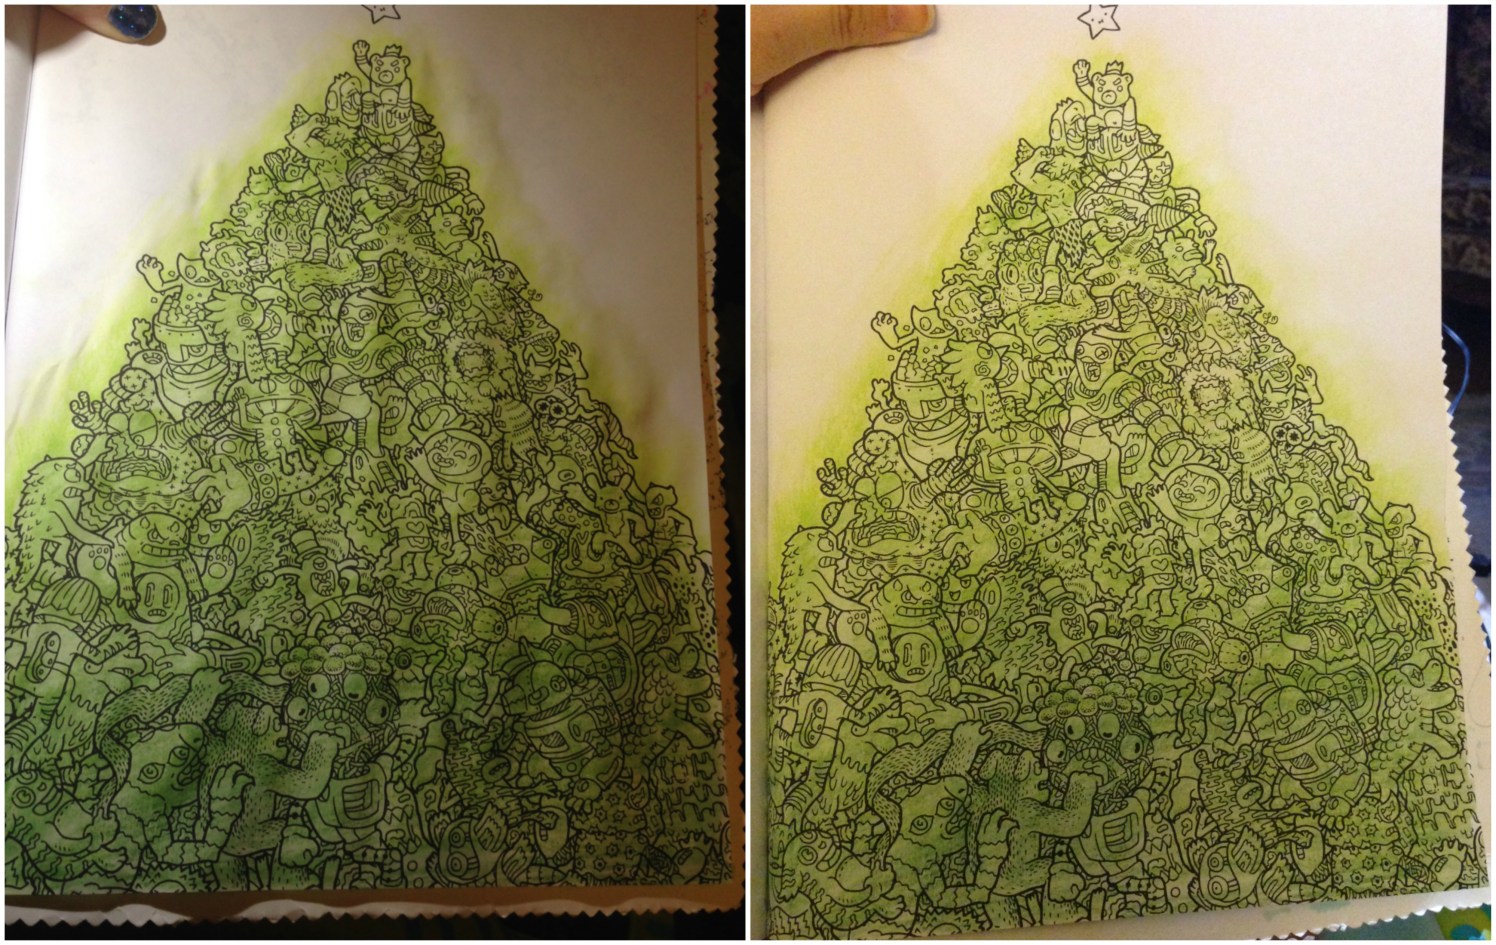
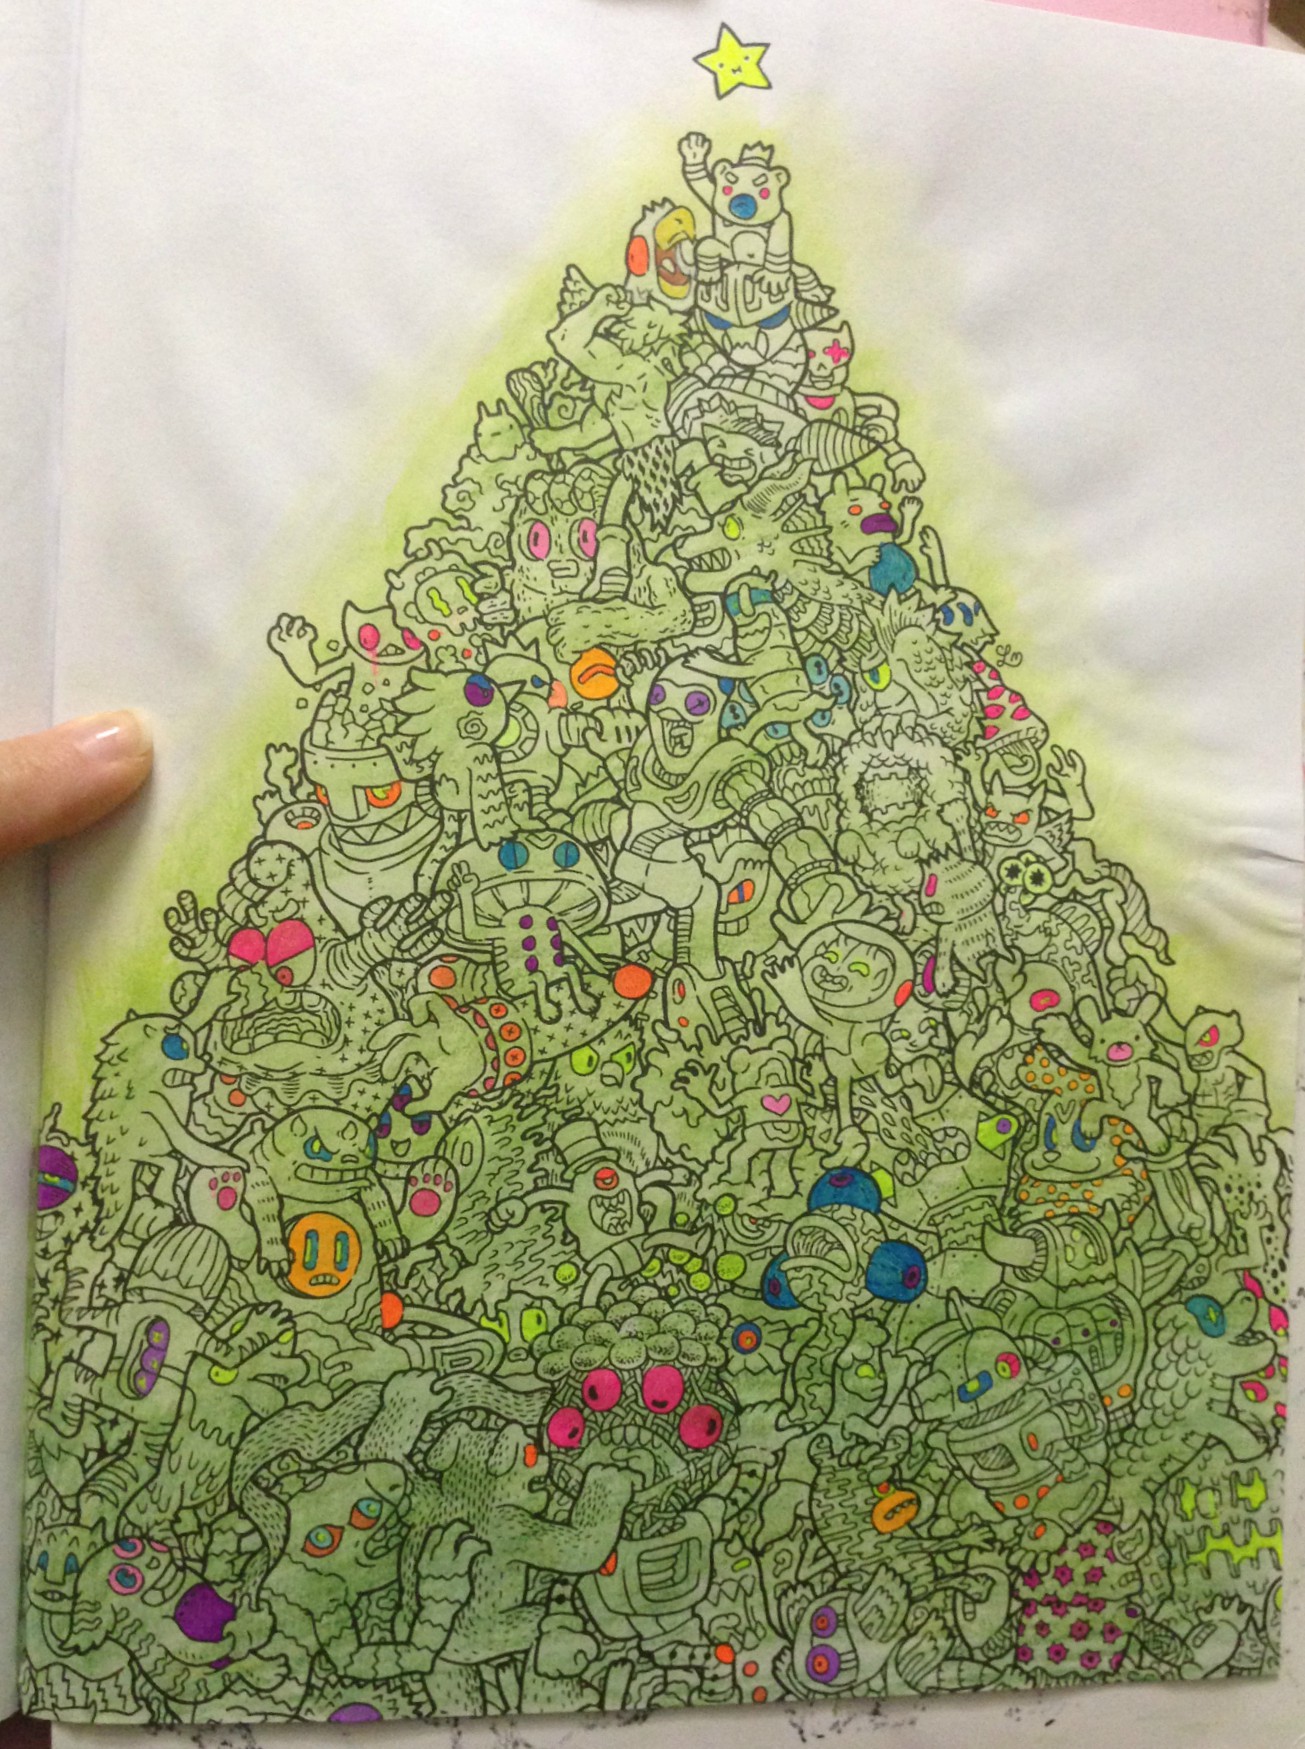
13. Imagimorphia Eagle 2-Page – coloringwip imagimorphia eagle

This double-page spread from Imagimorphia was started in the Fall of 2016.  I loved coloring the tiny rainbows and then lost steam.

14. Imagimorphia Egypt Page – coloringwip imagimorphia egypt

I honestly don’t remember when I started this page.  Luckily I’d blogged about it!

15. The Time Garden Quilt Page – coloringwip time garden pattern page

I don’t recall when I started working on this page in Daria Song’s The Time Garden either but judging from other posts about it I’d made in April 2016, I’m going to guess it was about that time.  I have NO idea, however, why I stopped it so close to being done.

16. The Princess Bride Fred Savage 2-Page – coloringwip princess bride fred savage

This page was blogged when I first started it, way back in March 2017.  I don’t want to move on to another page in the book until this one is done, though, so I need to make the time to finally get it finished up.

17. & 18. & 19. Harley Quinn, Betty Cooper & Teela Wall Hanging Trio – plastic canvas

wip plastic canvas girls trio

I’ve never shown these before, except for the odd glimpse in the background of Instagram pics.  I started this trio of plastic canvas portraits when I moved in August 2017.  While I love how they look in black and white (and blue), I designed them to be in full color and I’d love to see them complete.

Think I can do it?  Want to play along? Use the tag #19WIPtoFO2019 so I can see how many you get through!

ps: As I’m about to post this I just realized that 19 projects means committing to completing more than one per month.  Months that are already pretty busy with Becket, work, kids, commissions and all the new projects I want to work on and might come up over the year… Wish me luck- I’m gonna need it!!

This post may contain affiliate links. This means I might make a small commission on purchases made through the links, at no cost to you.


2 Comments

Crafty Compilation – w/e 01/07/17

2017.  Wow.  I can’t believe I started this blog roughly 13 years ago, nor that some of you have been around since the very beginning.  Whether you’re one of my original few hundred subscribers or one of the couple thousand who discovered my site when looking for my most popular Halloween DIY, hi there, happy holidays, and happy New Year!  I’ve got a lot planned for this little blog over the upcoming year, so if you’re an old friend- thanks for sticking around… and if you’re new- I hope you’ll pull up a chair and stay a while.

Some of you may note that I’ve slowly made changes to the type of content that I post.  I’ve never been a mono-crafty person, and the blog will always adapt to whatever creative pursuits I’m into at the time, whether they’re knitting or crochet, cosplay or cakes.  Coloring books are going to have more of a showing on the blog, as will as a variety of crafts beyond the yarn-based ones.  For the last two years I’ve taken step-by-step photos of all the projects that I’ve made with the intent to focus more on sharing helpful DIYs, tutorials and tips going forwards, instead of merely showing off whatever I’ve made.  I’m going to have more reviews coming up, both sponsored and non, and while there might be affiliate links popping up at the end of some posts, I can promise you that my reviews will always be strictly my honest, unbiased thoughts.

Another feature I’m going to add is a weekly roundup, to both keep track of and hold accountable to the projects I’ve got ongoing.  Not everything needs to wait for a finished reveal, and sometimes quick projects or small pastimes get lost in the shuffle of the day-to-day.  To that end – this is my first Crafty Compilation.  I plan to post these on Sundays and to cover the previous week’s goings-on, but this first one is being posted on Thursday because life LOL.  Amazing how, even when one is off work in post-op recovery, when it comes to crafting, there still isn’t enough time!  This first CC will cover some stuff worked on over the holidays, as well as last week.


Knitting

  • Gift knitting

Over the holidays I knit a special baby hat.  One of Yannick’s closest friends had a baby girl just before the holidays, and when he showed me the gifts he planned to bring for the friend and his other young daughter, I told him I knew just the thing to make for the new arrival.  The little girl’s dad has similar geeky tastes as we do, and I thought this pattern would be perfect.

I’ve knit it once before, back in 2013, as part of a Hallowe’en costume for a baby girl aptly named Leia. This was a pic of Jakob trying it on for me at the time:

jakob-in-leia-hat

and this is a pic of the little sweetheart in her full costume.  Cutest Leia I’ve ever seen!leia-in-princess-leia-hat

The pattern is very well written and it’s a pretty quick knit, even with all the icord.  The hat and the ear puffs each took a night’s worth of knitting to work up, then the assembly took barely an episode of Elementary.

leia hat collage.jpg

Forgive the bad pics, it’s hard to take hat pics without an appropriately-sized head! 🙂 I’m really pleased with how the hat came out, even though I’d knit it before and expected it to look the same.  One thing I love about this pattern vs others out there is how it incorporates ‘bangs’ and the center part (not clearly visible in these photos but seen better in the one of Leia wearing it above).

  • Drops v-neck sweater

I also completely frogged a sweater I’d been working on.  Back in September I’d started a garter-stitch oversized sweater with a lovely gray yarn from my stash.  I’d thought it would be perfect ‘no-look’ movie or tv knitting but after measuring a sweater I own that had the fit I wanted, I realized that what I was making wouldn’t have the proper shape.  Plus I’d been having a nagging feeling that the garter stitch was eating up too much of my limited yarn.  So I frogged it one evening last week and began this pattern instead.  I’m pretty sure I’ll have enough yarn, and if not I’ll work the neckband and/or cuffs in something contrasting.

photo-2017-01-09-11-02-39-pm

So far I’m at about 32cm of the 34cm I need to be at before splitting for the low v-neck.

Coloring

  • Doodle Fusion ‘Christmas Tree’

A few weeks ago I’d taken a page from Dede Willingham and done color washes across a bunch of my coloring book pages.  From what I’ve seen she primarily uses acrylic paints, but I mixed it up a bit, using not only paint, but also my Neocolors (seen previously here, in imagimorphia) and my Inktense (last seen here, also in imagimorphia).  This particular page, from Zifflin’s Doodle Fusion, seems to deliberately invoke a Christmas tree, so that’s how I decided to approach it.  I colored over the whole image with the Inktense in shades of green.  The first pic is immediately after wetting the pencils, and the second is the next day, after the page had dried.

doodle fusion christmas tree 00.jpg

My plan is to color the characters in colored pencil over the Inktense, keeping them muted and dark, but to color all the eyes and anything round-ish in bright gel pens, so they’d (hopefully) look like bright ornaments on the tree.  If you squinted at it.  Maybe.

doodle-fusion-christmas-tree-01

This was after my first pass with the gel pens.  I think I got all the areas I’d wanted, but I’m sure as I work on the figures I’ll find more.  I’m looking forwards to coloring the characters now in dark tones to really make the gel pen pop.

PS- this book is crazy, and I love it.  I’ll be showing a lot more of it in future posts.

I finally finished a page I started coloring back in November in the Disney Villains coloring book Yannick had bought for me, but as this post is getting long I’ll save them for another.  That’s another excellent coloring book that I’ve been working in quite a bit.

UPDATE: those pages are posted here.  🙂

Other Crafts

  • While the boys were off school for Christmas break I tried to keep them occupied with more than just Minecraft, Little Big Planet, or their new Skylanders Imaginators. Every few days we had ‘technology-free’ time during which we’d color, or do pencil puzzle books, and during one of those afternoons I taught them how to make their own stuffies.  However I took a TON of photos and so I’ll share the step-by-steps of their work in another post

Alright, that’s it for this round-up!

 
This post may contain affiliate links. This means I might make a small commission on purchases made through the links, at no cost to you.


1 Comment

Last-Minute DIY Pikachu Costume

All month Henri has been telling me he planned to wear his Creeper costume for Halloween this year.  He’s brought it up many times and even pulled the head out of the dress-up bin in our den to try it on and be sure it still fit.  And then this past Friday his class went to circus school for the day and he came home like this:

photo-2016-10-28-2-50-04-pm

and then told me he wanted to be Pikachu for Halloween.

This guy:

pikachu

Um.  Okay.  We had nothing at home I could use to make a physical costume, but I knew we’d be going to Walmart the next day so I told him if we found a set of face paint, I’d buy it and would paint his face like Pikachu.

Saturday we were at Walmart and found some inexpensive face paint, but then he started complaining that he didn’t have Pikachu’s ears.  I thought about it a little and told him we’d be going to the dollar store next; if he found a headband that fit him I’d buy some yellow felt and make him some ears.  He found a girl’s one with a plastic bow attached, but it was yellow and fit him, and they had a pack of felt with yellow in it so we brought it home and I set it aside.

Yesterday I was at my parents’ house for dinner and Henri made a comment about being excited to wear his Pikachu costume to school the next day and I realized – oh crap, Halloween is tomorrow!

Ahem.  Forgive me, my brain has been a little foggy lately.

We got the kids home and to bed and then I sat down and made Henri’s costume.  It was quick, and it was easy, and it used either dollar store supplies or things you may already have on hand, so if you’re stuck for a last-minute costume, here’s how you can whip  this up in plenty of time to go trick or treating tonight.  Grab a friend who’s dressed like a Pokemon Trainer and you can be your very own live Pokemon Go team.  🙂

Here’s what you’ll need:

post-pikachu-diy-costume-title

The first thing I did was carefully cut off the plastic flower on the head band, then I put it on Henri’s head and marked off where the ears should sit.  As it happens we have a large Pikachu doll that was the right size to trace for the ear shape, but you can just freehand it.

post-pikachu-diy-costume-01

After the ear shape was drawn, I drew a second line about a quarter inch outside it, for a seam allowance.  Then I cut out the shape through all 4 layers of yellow felt.

post-pikachu-diy-costume-02

The next step is to sew the ears together.  I used yellow thread and a simple running stitch since the ears wouldn’t really be under any tension.  I left the open end edges unsewn for about a quarter inch so I had enough fabric open to gather over the heandband.  If you don’t want to sew, you could also glue the sides shut, but if you do make sure to put the ear side that you drew on on the inside to hide the pen markings.

Next I colored the ear tips with a black sharpie.  The mess you see on the right is the transfer of ink from one side when I flipped it over to color the other side.  I’m showing you this so you can be prepared and cover your work surface.

post-pikachu-diy-costume-03

Once the tips were colored I stuffed each ear with some loose batting then sewed them over the sides of the headband where I’d previously marked.  I used a blanket stitch to close the open edge but you can use any stitch you like, or glue them shut as well.

post-pikachu-diy-costume-04

Here are the finished ears.  They look silly off but are kind of cute on.

photo-2016-10-30-9-59-10-pm

(Yes I had to try them).

While I was working on the ears I kept glancing over at the tail on our stuffed Pikachu and realized it wouldn’t take that much more effort to make one too, and surprise Henri.

To start I took some cardboard from our recycling bin and sandwiched it between two sheets of white cardstock with a regular glue stick.  To make sure it dried well I placed it flat on the table and set some heavy books on it.  Once the ears were done the cardboard had fully dried and I was able to trace Pikachu’s tail onto it.

post-pikachu-diy-costume-05

Then I cut out the tail.  I brainstormed a few different ways to attach it to Henri.  I don’t like the idea of sending a 7yo to school with a safety pin on his butt, so I came up with a belt method.  To make it work I carefully pried back about an inch of the tail section and folded the cardstock on each side outwards.

I used my Spectrum Noir markers to color the yellow of the tail and then colored the lower edge with a black Sharpie, completely overlooking the fact that it’s supposed to be brown, because I was working in dim lighting.  D’oh.  You can use any permanent markers, and do the proper colors.  🙂

post-pikachu-diy-costume-06

To make the belt section, I first cut two holes into each side flap.  I then threaded three strands of yellow yarn through each side, made a knot to secure them near the top, and then braided them into belts which I could then slide through the belt loops on his jeans and tie at the front.  I made them longer than needed because I didn’t have his waist with me to try them on, and had planned to cut the excess this morning but we ended up just tucking the ends into his jeans.

post-pikachu-diy-costume-07

And there you have it!  Add in some yellow face paint, bright red cheek circles and a black triangular nose and poof-

post-pikachu-diy-costume-08

You’ve got one happy Pikachu.

Have a happy and safe Halloween!

henri-pikachu-collage-site

—-

Looking for more Halloween costume ideas?  Check out here.

This post may contain affiliate links. This means I might make a small commission on purchases made through the links, at no cost to you.


Leave a comment

The Fix is In!

It’s almost June, and that means a few things; the kids will be in summer camp, I can sleep in on Sundays because swimming lessons pause over the summer, and oh yeah- I have to start working on my cosplay for September’s Montreal ComicCon!

Uh.

Waitaminute.

Three years ago it was in September.  Two years ago it was in September.  Last year I missed, but am pretty sure it was in September, right around Rosh Hashana.

This year it’s in JULY??

*pouts* Not fair.  That’s WAY LESS costume crafting time.

Three years ago I went to my first con.  I went on the Saturday with Jakob, and was blown away.  I guess I hadn’t expected to get the CON experience I’d heard about/seen online, and it was, it truly was.  Jakob was dressed up as a SuperTiger (tiger costume with a superhero cape, his idea) and had a BLAST.

mtlcon1202

He’s not normally shy but he was beyond extroverted, walking right up to people in costume and asking for pics with them, and posing for the many, many pics people asked to take of him.  I think he felt like a mini celebrity- making a “growl” face and batting at people in the crowd with his tail.  mtlcon1204

(Plus the girls loved him.)

mtlcon1201

Happy, tired tiger.

We had SO much fun, in fact, that we went back again on the Sunday, and brought Yannick and Henri.  And this time I had to dress up too.  I borrowed my sister’s Little Red Riding Hood costume (hey, she’s in a ton of media, comics and video games… Uh, Red, not my sister) and though it was a pain navigating the double stroller around, we had a really great time.  (Maybe a bit less for Yannick, who had to keep smiling as he took pics of me with all the people who came up and asked).  Heh.

mtlcon1203

In 2013 I went back again, this time just me and Yannick, no kids.  I did my first ever homemade cosplay, but I still have yet to post pics of it here so instead here’s a quick hint at who I played:mtlcon1301Last year I didn’t go, mostly because life was a bit too hectic, and also because I hadn’t had a chance to make the one cosplay that’s been burning a hole in my brain since I got the idea.

I still haven’t had the time, but I did have another idea, one that I’d first had about two years ago when my kids began playing Skylanders.  I muddled it around last night and think I’ve settled.

Sprocket!

sprocket2

I’ve loved the character since my boys (and I) first started playing the game.  First of all, she’s a girl.  And her element is Tech.  And she’s tough.  And wields a big ass wrench and rides a freaking cannon!

sprocket3 sprocket4

Her official Skylanders bio says:

Personality

Resourceful, Sprocket isn’t one to sit back and let others do the work. She jumps in with both armoured feet, creating solutions for every problem imaginable.[1]

Biography

Sprocket was raised with all the privileges of a rich, proper Golding. But she cared little for fancy things. Instead, she spent most of her time growing up in her uncle’s workshop, learning how to build and fix his many mechanical inventions. But everything changed on the day her uncle mysteriously vanished. When she eventually discovered that Kaos had been behind his disappearance, she constructed a battle suit and went after him, leaving the luxury and comfort of her family’s wealth behind. From that moment on, Sprocket was dedicated to fighting the forces of evil, whilst never losing hope that she would reunite with her beloved uncle.

Awwww yeah!

What officially sold me on the idea, however, was when I hit upon how I plan to make the wrench.  The best part is that not only will it be lightweight, but if it works the way I think it will, it will have an enclosed compartment to hold my phone and wallet and stuff.

I’m not planning on sticking exactly to the costume as shown, though.  I found a Deviant Art drawing someone did of Sprocket, and have asked permission to cosplay as that version instead.  It’s simpler, more realistic, but still identifiable.

The really best part?  One of this year’s con guests is Jewel Staite!!!  I will be going to ComicCon dressed up as a female mechanic and (hopefully) get to meet one of THE most awesome female mechanics – Firefly’s Kaylee!  *kermit arm flail*


6 Comments

how to make a viking vest

Henri has wanted to be a viking for a while now.  Not for Halloween, I mean he wants to be a viking in general.  (It’s either viking or pirate, depending on the day).

Jakob got a light-up viking helmet at the How To Train Your Dragon Live Spectacular, and unfortunately when we brought Henri the next day they were all sold out of helmets, so he got a Toothless plushie instead.  (Jakob, you’ll remember, got the one I knitted for his birthday…which I think I never blogged.  Oops).

The kids share the helmet, and last month when it was time to pick costumes for ComicCon (which I think I also forgot to blog…crap) Henri REALLY wanted to wear the helmet and be a viking, but a quick search through the closets revealed that we didn’t have any viking clothes.  All we had even close to a viking vest (like Hiccup wears in the movie) was a gray zippered sweatshirt-style vest.  The kids dressed as Avengers instead but Henri had it stuck in his mind that that was his viking vest and he has worn it non-stop ever since.  He’s worn it to school on back-to-back days, he’s worn it over his fall jacket, he wears it around the house, and on more times than I can count I check on him at night to find that he’s put it on over his pjs and worn it to sleep.

(Something about a 3 year old with tousled sleep hair in footie-pjs, amirite?)

He stops strangers to point out his “viking vest”, but commented a few weeks ago how “it’s not a REAL viking vest, Mommy, because it has a zipper and REAL viking vests have buttons”.  Oh.  Right.  ‘Cus vikings didn’t have zippers.

I promised I’d make him a viking vest, and yesterday I did just that.  I took photos throughout so if you want to make one, you can too.

I used some fur fabric my neighbor gave me, a sheet of newspaper, a sharpie & a pair of scissors, plus a sharp large-eyed needle, black acrylic yarn and white cotton yarn.  The only other thing you need is a vest that fits your child (or you!).

I started by laying the vest on the paper and traced half of it.  I used my finger to push down then traced to know where the neckline in the middle lined up.

I knew I wanted to add some length to the bottom and the armhole so it would fit him longer, as well as lowering the neckline to a v-neck, so I made those changes on my template.

I cut it out and checked against the vest.

I decided I wanted to make the neckline more sloped so marked off the changes on the pattern…

…then cut it out and checked again.

I was happy with the shape so I traced it onto my fabric.  It’s hard to see, but I traced out the half-vest pattern, flipped it and traced again for the other front, then traced it back-to-back, flipped, for a piece to fit the back.  The only thing I didn’t realize is that the fur fabric had a direction to it in which the fur laid flat.  I tried to be as economical with the fabric as possible so didn’t have a choice, but you would probably rather make sure you’re lying the pieces with the fur running from up to down, like natural fur.

I cut the pieces out on the porch which was a great idea because there were bits of fur flying EVERYWHERE.  I used my fingers to fluff up and pick at all the edges to make sure I’d gotten as many stray cut bits as possible before bringing it into the house.

I used a sharp needle and black chunky acrylic yarn from a big-box store to work a blanket stitch edging around each piece.  I eyeballed it, placing the stitches roughly 0.5″ apart, and 0.5″ down into the fabric.

The simple edging really gave the pieces a finished, yet still “handmade by Vikings” look.  (In this light you can see my fur runs in the opposite direction from how the vest will be worn, oops!)

This is the inside of the pieces, for those who like that kinda thing.  🙂

I used the same black yarn to seam the two sides and the shoulders together.  I did something similar to mattress stitch, butting up the two pieces to be joined and catching a loop from each edge all the way along.

Almost done!

Inside shot.

For a finishing touch I used white worsted-weight cotton yarn (dishcloth cotton) and made large stitches across the joined pieces.  This is purely decorative, but makes it look like Vikings really made it! according to my 3 and 5 year olds, and I trust them.

This is Henri’s final costume- a green long-sleeved tee, brown cords, his new vest and the light-up plastic helmet.  I may make a Viking axe if I have time/remember by Halloween.

Henri the Brave!

Back view.

He thought he was dancing for me.  I just wanted to see the decorative stitches.

That’s one happy Viking!


11 Comments

how to make a poodle skirt

On Tuesday afternoon, my sister Laura called me up out of the blue and asked if I could make her a poodle skirt. No rush or anything…she only needed it by Thursday morning. Being the wonderful, amazing, loving, insane sister I am, I agreed.

The total cost for this project is minimal, about $8 CAD plus the cost of your fabric. I was lucky and happened to be at my cousin Robyn’s place Tuesday night, and she had a huge bolt of pink fabric and I bought some off of her (to be paid for as soon as she tells me how much she wants for it). Your costs may vary depending on the fabric you buy, but the other supplies were cheap. If you already have them at home, it will be even cheaper.

All sewing was done by hand, and the total time for this project was 3 hours.

MATERIALS

1. Fabric. I like the pink poodle skirts with a black poodle, but you can choose whatever color pleases you. White with blue is a nice combination too. The width of your fabric (not the length) will be the diameter of your skirt. Cost- variable. (Here’s something similar on Amazon).

2. Felt. The felt is for the poodle. Choose a piece that is at least as big as the size of the poodle you would like to make. Cost for 1 piece of felt- $0.25 at Dollarama, or get bulk packs

3. Trim. This is for the edging. You can choose whatever kind of ribbon you want, but the wider it is, the easier it will be to apply (it will be used to hide the cut edges of the fabric). The one I chose is slightly elastic, with sequins. It was perfect. You need to buy enough to outline the outside edge of the skirt. To figure out how much ribbon you need, do this formula: measure the diameter of your skirt. Mine was 56″ wide. Multiply this number by pi, or 3.14. I get 175.84″. Convert this amount (inches) into meters or yards, depending on how your ribbon is sold, plus a little extra for insurance. I needed something like 5.6 yards, and my ribbon is sold in packs of 3 yards each, so I bought 2 packs. Cost for 2 packs of trim- $2.00 at Dollarama, or get by the spool

4. Elastic. This is for the waist band. I didn’t buy the really skinny kinds of elastic because I didn’t want the waist band to flip. Buy whatever kind you like, long enough to go around the intended wearer’s waist. Cost for the elastic- $1.99 at BouClair, or get by the spool

5. Thread. For sewing the waist band. I didn’t buy black because I already had, but I didn’t have a pink to match the fabric. Cost for the thread- $1.78 at BouClair or buy an assortment

6. Cord. This is for the leash. You can find all sorts of funky cords at fabric and notions stores. I chose a cord that is actually two thinner cords twisted around each other like a rope. Cost for the cord- $0.39 at BouClair or get a collection of colors

7. Beads (not shown). I chose to make a beaded collar for the poodle, because I have a stash of beads already. Cost for the beads- n/a but if you don’t have any on hand, you can get started with a beading kit

DIRECTIONS

Step 1- Get a Square: Lay out the fabric and find a square. To do this, fold one corner of the fabric up against the other side in a triangle. Cut away any excess fabric, and you will be left with a perfect square (as perfect as the fabric is, anyways).

Step 2- Find the Center: Fold the square back into a triangle, and in half (as a triangle) again. Find the corner where all the folds have in common. With your scissors, make a very small snip off the end of this corner. When you open up your square again there will be a hole in the center of it. This will help you make your circles centered.

Step 3- Trace your Circles: Using 2 pencils and some string, make a homemade compass to trace your circles on the fabric. There are plenty of tutorials on how to do this (here’s one) but long story short is to tie the string to the ends of both pencils, put one on the center hole, and, keeping the string taut, use the other to draw a big circle on your fabric. You want the length of the string to be the length of the radius for your skirt.

For example, my fabric square was 56″ across, so my skirt could have a radius of a maximum of 28″. You can check the length by swinging the pencil around and making sure it doesn’t go off the fabric anywhere. If it does, shorten the string a bit. Once your length is good, draw your outside edge circle. It helps to have someone help you by holding the center pencil in place while you draw.

Repeat this process for the waist band circle. The intended wearer has a 27″ waist (color me jealous) so I calculated what the diameter would be of a circle that was 28″ around (28/3.14=8.917). I added an inch because I wanted the waist band to have a gather. If I would have had wider fabric, I would have added more than an inch so it would hang in nice folds. Anyways, once I knew that my diameter was roughly 9″, I shortened the string to 4.5″ (the radius, or half of the diameter) and drew another circle in the center. At this stage my fabric looked like this:

Step 4- Cut it Out: Using your scissors, cut out both circles. You will be left with a doughnut of fabric.

Step 5- Sew on Trim: I used black sewing thread, and used a simple running stitch to attach the trim around the outside edge of the skirt. This worked great because I didn’t have to hem the edge. All I did was, working on an inch or so at a time, was line up the ribbon over the edge of the fabric with the ribbon centered over the edge. By centering it, even if the edge flipped up a little, no one would see the jagged cut edge of the pink fabric. Don’t worry if your edge is uneven, causing your ribbon to not make a perfect circle around the edge. No one will ever know. Mine wasn’t even at all, and you really can’t tell.

Step 6- The Waist Band: I cut and sewed my elastic into a 28″ circle. I folded the edge of the inner circle over it and sewed it down with the pink thread. I made perpendicular cuts into the fabric at 2″ intervals to give me some slack in turning the fabric back to sew it over the elastic. It gets tight at the end, but simply gather the fabric away from where you are sewing and it will work fine. Once the band is sewn in, adjust the gathers so they are even around the skirt.

Step 7- Poodle: Find a poodle shape that you like, and adjust it to the correct size on the computer. Print the poodle and cut it out. Use a contrasting color (I used an orange colored pencil) and trace the poodle onto your felt. Cut out the poodle from the felt. Find a nice area of the skirt to place the poodle. I used the black thread and a running stitch again to sew down the poodle. I didn’t pin or baste it down first, but you can if you are afraid it will move. I made sure to tuck the end of the cord under the neck first for where I wanted the leash to attach. This hides the end under the poodle.


Step 8- The Leash: There is no set pattern for how to place your leash. You can make it as curvy or as straight as you like. I laid out the cord in a pattern I found pleasing. I used tiny stitches to catch the cord at various spots to hold it in place.

Step 9-The Collar: The collar can be as fanciful as you like. There can be no collar. If you have glitter pens, you can use them for both the collar and the leash, if you like. I had spare beads so I made a beaded collar the width of the poodle’s neck, and sewed that in place.

Et voila- the finished skirt. You can jazz it up with some music notes if you like, and can wear a crinoline underneath it too. For the complete look, wear your poodle skirt with the following:


-white t-shirt, preferably with a collar
-short white socks
-tennis sneakers
-black wide belt over the skirt and t-shirt
-ponytail (you can use some of the excess skirt fabric for a hair bow)
-light pink lipstick
-pale or no eyeshadow
option: tie a short scarf around your neck

Have fun rockin’ around the clock at your next sock hop!

This post may contain affiliate links. This means I might make a small commission on purchases made through the links, at no cost to you.