1 Comment

Cartoon Girls Trio – UPDATE (19WIPtoFO2019)

Back in January 2019 (!) I posted 19 projects I was determined to complete in 2019.  Spoiler alert – I failed – but I have made significant progress on about half of the projects on the list. Inspired by the recent Masters of the Universe and Suicide Squad remakes, here’s the current progress on my trio of 80s cartoon girls.

What I said: I’ve never shown these before, except for the odd glimpse in the background of Instagram pics.  I started this trio of plastic canvas portraits when I moved in August 2017.  While I love how they look in black and white (and blue), I designed them to be in full color and I’d love to see them complete.

What I did: Quite a bit of progress! 

I’d never shown them on the blog prior to that post, so here’s a look back at how they got to where they are now.

I’d moved in 2017 and was really excited to be able to fill my space with all the crafty, nerdy little things that make me who I am. 

Every shelf and table has some item that references my varied interests, and I’ve even used some previous projects as home décor – see the Minecraft heads from my tutorials peeping from above the kids’ desk, along with an as-yet-unshown secret project hidden among the books – so I was really excited to fill a blank wall space in my dining room with a handmade project.

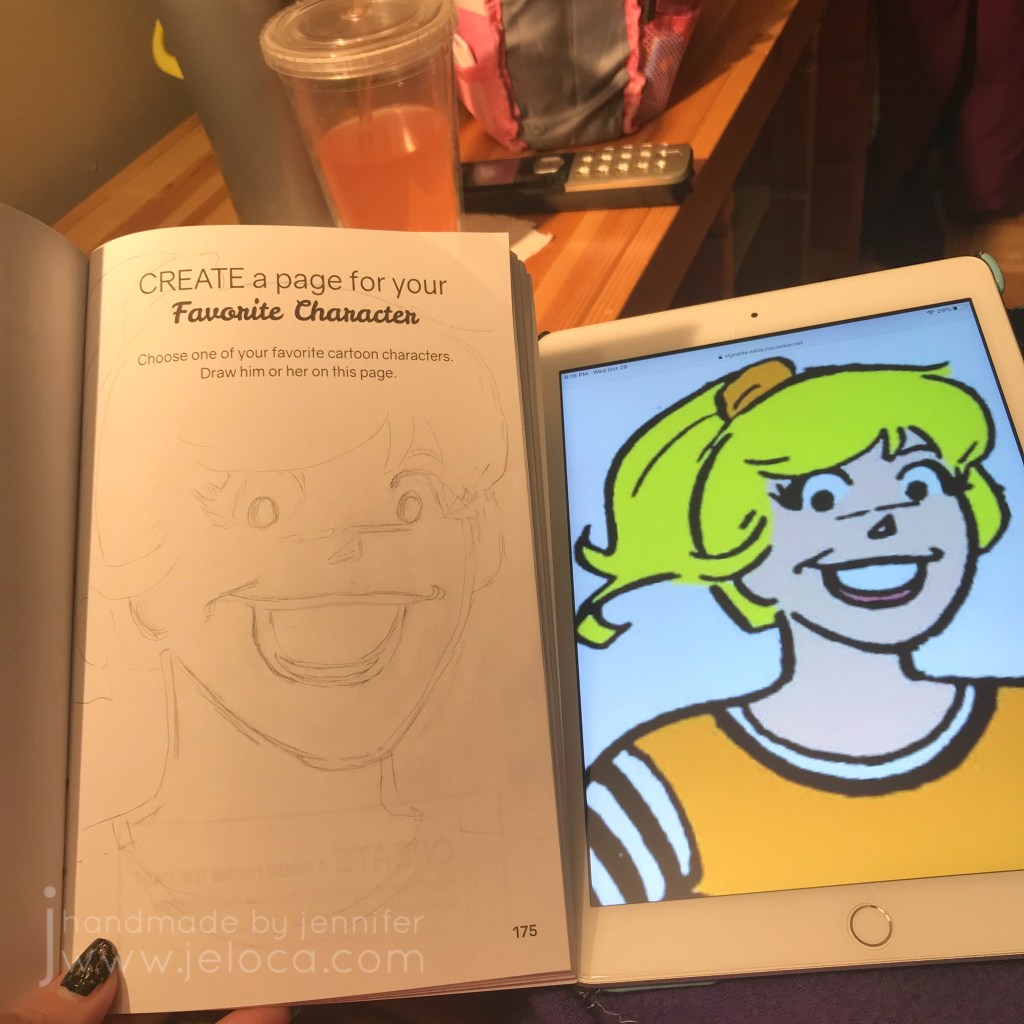
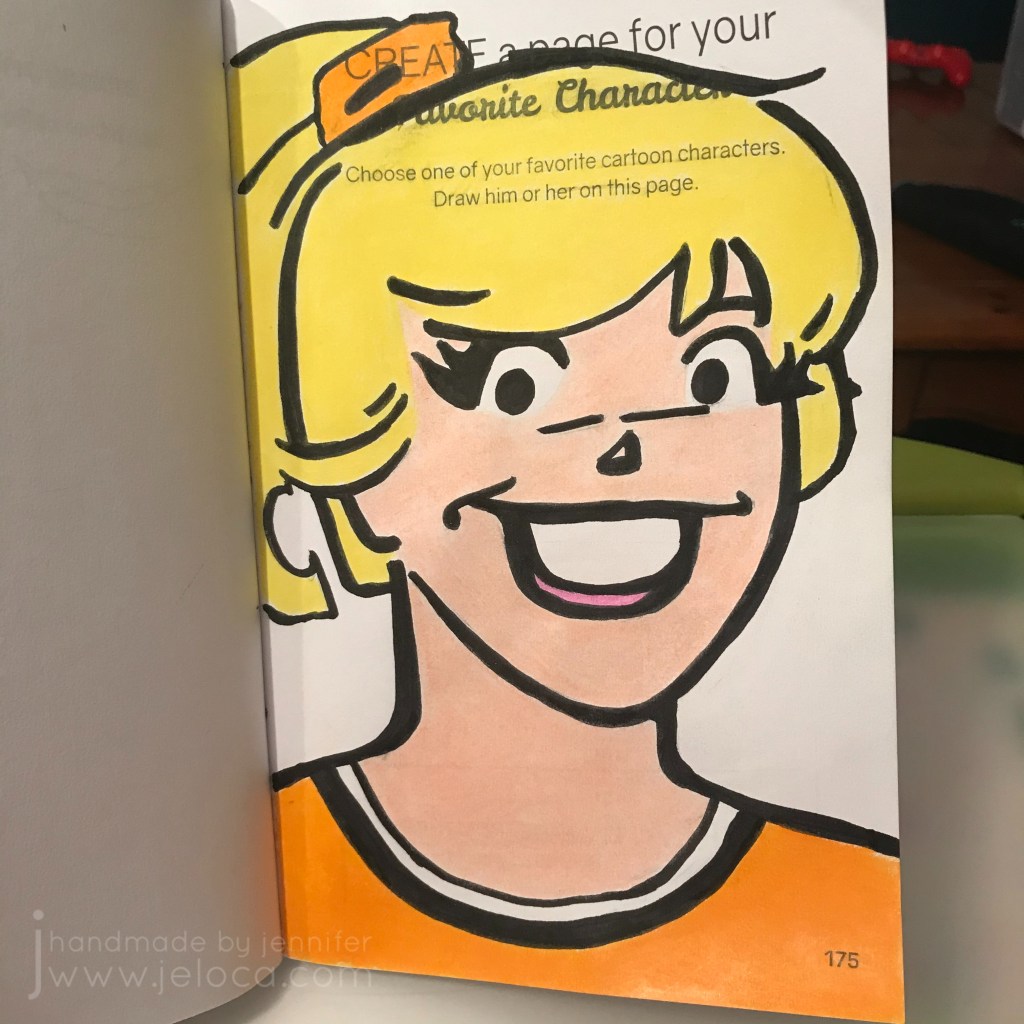
First I purchased three of the largest plastic canvas sheets I could find. When looking for inspiration for what to stitch on them I really didn’t need to look very far. There are Archie comics in nearly every room in my house, thanks to my kids enjoying them as much as I do. In addition to the coloring book from my last post, I’ve drawn Betty on the blog here before, and Henri had drawn Archie a few years back. (He was even an Archie comics character for Hallowe’en last year, and I’ll be sharing that project here in October.) So clearly, Betty Cooper would be one of my cartoon trio.

Initially I drafted up Betty, Archie and Veronica, and planned out a triptych of the three of them, but the more I thought about it the more I realized it was Betty specifically that I like, and that I didn’t care if I saw Archie and Veronica daily, so I scrapped them and looked around for more inspo. As soon as I had the freedom to look beyond Riverdale I knew Harley Quinn HAD to be one of them. I’ve adored her for decades, and she’s featured in assorted places around my house, including in two different spots on this one shelving unit:

Finally, it wasn’t hard to decide on Teela as my third girl. I grew up watching He-Man and playing with the toy sets along with my younger brothers. I don’t know if it’s that she’s a strong, independant woman or if it was because she often wore a cobra headpiece and had a snake staff, and I’ve always adored snakes… but either way she had to be the one to complete my cartoon trio. I’ve shared Teela and a portion of my 80s toy collection on the blog before, and they’ve now found a home in a cabinet along with other childhood relics:

The hard part done, the next step was to create charts for each character. Instead of doing it the easy way and importing reference images into a stitch software, I decided to go the hard route and chart them myself in Excel. I found reference images for each character, adjusted the Excel cells to be square and marked off an area with the same stitch count as my total canvas size. From there it was just a matter of redrawing each girl, pixel-art style, and tweaking the design until they looked right. I’d originally planned to use continental stitch to save time, but quickly realized the angles would be skewed and that cross-stitch would be best, using one stitch for every pixel/cell in my chart.

I ordered a bunch of yarn from Knit Pics, then got started.

Here you can see the initial stages. I didn’t want to have to refer to the charts throughout the entire stitching process so decided to start with the black outlines first, so I could then later fill them in, coloring-book-style. Plus I didn’t know how long they would take to complete into full color and wanted to be able to hang them on the wall in the meantime. Considering I started these in 2017 and I’m typing this post in 2021, I’m glad I had that foresight!!

After finishing most of Betty I moved on to chart HQ next. I bet you’re wondering why I left Betty mostly done instead of finishing the rest of her border? Took me a moment to remember too lol but it’s because I left myself things to work on that didn’t require concentration, so when I had more time I would work on HQ and follow my charts, and when I had the kids with me or was watching something that required more focus I could work on Betty’s border that didn’t require much thought or any chart reference. Basically it was the cross-stitch equivalent of having knitting or crochet projects of varying difficulty levels.

Once the outlining was all done I worked on each of their eyes, as I thought it would look better on the wall, and truthfully HQ was a bit creepy without them. Then, while I still had the blue out, I added Betty’s shirt. Her top was red in my reference image but blue is my favorite color so I swapped it out, plus I liked having a color that was in each of the 3 images, to help tie them together. The middle pic above is the one posted on the blog back in 2019, and where they sat for basically most of the last 3 years. At some point I filled in their mouths and got started on Betty’s skin, and that’s where I’d stopped and moved on to other projects.

Eventually I started working on them again. I’d always had it in mind to work on equal parts of each, so as they hung on the wall they’d look similar in completion. First Betty had the slow progress on her face and neck…

…and then this past summer Teela got the same treatment, using stash yarn so she wouldn’t have the exact same skin tone as Betty’s.

Technically I should have done Harley’s face next, for them to all match, but these sheets are large and get folded up against my body or resting under my arm as I work. Since Harley’s face is white, and clearly a focal point of the image, I decided to hold it off for last so it wouldn’t get dirty or faded, and work on her costume instead.

At that point I was on a roll! The new Netflix Masters of the Universe had just come out, and it was kinda cool to start working on Teela’s tiara while watching the premiere. In fact, I got so into it that I kept watching until I found I’d binged the whole first season!

Spoiler-free take: ignore the men complaining about the show. It’s awesome to see the old gang again, even Stinkor! (Man I can still remember the smell of that toy!) I love the focus on Teela and magic vs tech. Made me think about Skylanders and my girl Sprocket – guess I’m always drawn to my tech girls! Also, as a big Buffy fan, with Sarah Michelle Gellar as the voice of Teela, it’s fantastic to hear Buffy kicking butt again. ♥

This is where the girls are now. I’ll be working on HQ’s white bib and pompom next, to complete her outfit, and that will put me into the home stretch with only 2 sections left on each girl. At the end I’ll have to do one run of border around each one, as the edges are currently unfinished, and then finally attach rings for hanging them properly, as I’m currently holding them to the wall with thumbtacks.

I know it’s not conventional wall art for an adult woman, but I love them.


12 Comments

Create This Book October Challenge

October’s Create This Book challenge page was a fail from the start, because we should have picked a page we could complete with a Halloween theme. Fail #2 was not posting it within the actual month of October. But the page itself isn’t a fail, because I’m really happy with how it came out!

For anyone not following, every month in 2020 my 11yo son Henri and I are choosing a page from Moriah Elizabeth‘s Create This Book (vol 1) and each of us completing the page in our own books. There’s a link to all past pages at the bottom of this post.

For this month Henri picked the “favorite cartoon character” theme on page 175.

Henri’s still on a Henry Stickmin kick and drew a few moments from the game. He traced a glue stick to get perfect circles for Henry, Ellie and Charles’ heads, and then freehanded the rest.

I love how easily he’s able to recreate what he sees freehanded (and often without reference photos), and I especially love the touches he added like the shadow under Ellie.

I was going to sketch up Harley Quinn but decided instead to go with my girl, Betty Cooper (from the comics, not the show). I found an image I liked online, and I’ll be honest- I was going to trace it. I was in the mood to color, but not to draw so I planned to take the easy way out.

And then I decided to draw after all, and accept however it turned out.

I started by sketching the outline of the face and then started blocking in the features.

Thickening the lines to match the widths of the comic really did a lot to make it look more accurate, though it did take me a lot of erasing and redoing until I got it to a point I was happy with.

It’s not quite perfect – her face should be longer so she’s a little squished between the nose and chin… but all in all I’m happy with my accuracy.

I filled in the inking lines with the brush end of my Feela markers. (There will be a full review on those coming soon, I’ve been using them a lot and really love them, especially for coloring book fans). Adding the black lines really helped me to see what worked and what didn’t. It still looks pretty good, but I can still see the shortened face.

The paper in this book is thin, and the water-based marker does bleed and ghost. But the page on the back asks one to “attach” something so I don’t think it will be an issue to cover in the future.

The next step was coloring, which I was really down for. I was watching the Big Brother 22 (All Stars 2) finale and it was something relaxing to do while enjoying the drama on screen.

Betty’s pretty simple, in terms of color. No shading, no highlights, just block color fills in the outlined areas.

I could have left the page as-is, but long-time blog readers will know I’m growing addicted to colorless blenders. I have a bad habit of “saving” things I like and not using them, and I’ve been trying to force myself to USE these things and not worry I’m “wasting” them by using them for their intended purpose. (Plus, it’s 2020. If ever there was a time for enjoying the little things, it’s now!)

Here you can see the difference before and after. Betty’s face was colored only with the Polychromos, but her neck has been gone over with the colorless blender. Just colored as you would normally, only instead of adding pigment, it blends the existing pigment together, smoothing it and filling in the white areas left on the paper. (Effectively, this burnishes the coloring, so you only want to do this after you’re done coloring, because it would be very difficult to lay down any more color afterwards).

Here’s Betty after I’ve blended the whole page. It really transforms the look! I find it makes it look more complete, and more professional. I’m always looking to improve my skills so these blenders are one tool I’m thrilled to have discovered.

Finally, I went back over some of the black lines with the brush end of my marker, to touch up areas where I’d gone out of the lines and the colored pencil showed on top of the borders.

Complete list of 2020 Create This Book Challenge pages:

This post may contain affiliate links. This means I might make a small commission on purchases made through the links, at no cost to you.


7 Comments

WIP to FO Challenge- 19 for 2019

It seems like everywhere you look online these days, people are taking stock of 2018 and setting goals for moving forward.  The first few days of the new year tend to be all about making resolutions, and to that end- here’s one of mine:

I resolve to turn the following 19 wips (works in progress) into FOs (finished objects) before the end of 2019.

I’ll write at length about each project when I finish (and post) about them, but for now here’s a short blurb for each:

1. FO Project Jars

wip yearly fo jars

I need to rip out all the individual lengths of yarn (1-10 yards long, each), match them up with what project they were from, and put the separated yarn into jars designated for each year.

2. Harvest Moon Pullover – crochetwip crochet harvest moon

I started this sweater on November 25 2016 as a way to use my adored Noro Silk Garden limited stash on something for myself.  Limited yarn + crocheted pattern with big holes = a sweater that might fit… right?

3. Granny Rectangle Blanket – crochetwip granny rectangle blanket

I started this blanket on August 9 2015 as a way to use up random sock yarns I figured I’d never get around to using for, y’know, socks.  Figured out how to make granny squares as rectangles and then alternated with white for… some reason.

4. & 5. Ralph and Black Sheep’s Sweaters – sewing & cross stitchwip boys toys sweaters

I started these sweaters for the boys’ favorite stuffed animals a few nights before Christmas 2016.  They were intended to be little surprises for them but instead they’ve sat in a bag ever since.  Sadly Jakob is no longer as into iHasCupQuake as he used to be, so I’ll need to rip out the stitching on the front of Ralph’s sweater and hope it doesn’t leave gaping holes in the fleece.  Then I’ll have to figure out new designs to personalize the fronts, find where I put the sleeve pieces, and sew the little sweaters together.

6. Drops V-Neck Pullover – knittingwip drops knit vneck

I started this deep-v sweater somewhere in 2015 or 2016.  It’s slouchy and soft and I want to wear it already.

7. Fluffy Shawl – knittingwip fluffy shawl

I started this shawl on April 6 2015.  It’s been sitting untouched in a bag since roughly that Fall.  I love how the colors blend together (black Sandes Garn Sisu and purple/green Noro Kureyon Sock) and would like it to be done and hugging my shoulders.

8. Comfy Socks – knittingwip fluffy ankleless socks

According to myself, I started these socks 2 FULL YEARS AGO.  They’re supposed to be my ‘take along’ knitting but because I haven’t finished designing the pattern, I never take them with me to work on.  I need them done so I can reclaim the needles and portable hanging knitting bag and start being more productive again.

9. Fun Fur Vest – knittingwip fun fur vest

I started this Bergere de France vest in 2012(!!).  My Ravelry projects page has it listed as completed on Feb 10 2015 but clearly it isn’t.  No ends are woven in, it might need armhole cuffs, and I think I was debating overdying the entire thing black.

10. Doodle Fusion Marco Raffiné Page – coloringwip doodle fusion marco raffine

This page from Doodle Fusion was started last summer (I think) using only my set of Marco Raffiné oil-based colored pencils.

11. Grimm Fairy Tales Alice Page – coloringwip grimm alice in wonderland

This page from Grimm’s Fairy Tales was a test to see if I could get good results using dollar store colored pencils.  I’ve since moved the pencils somewhere else and want to finish the image so I don’t need to dig them out any more.

12. Grimm Fairy Tales Little Red Page – coloringwip grimm little red riding hood

Those of you who follow me on Instagram would have seen this page from Grimm’s Fairy Tales back when I started it in June.  I love how it’s turning out and want to see how well I can complete it.

13. Imagimorphia Eagle 2-Page – coloringwip imagimorphia eagle

This double-page spread from Imagimorphia was started in the Fall of 2016.  I loved coloring the tiny rainbows and then lost steam.

14. Imagimorphia Egypt Page – coloringwip imagimorphia egypt

I honestly don’t remember when I started this page.  Luckily I’d blogged about it!

15. The Time Garden Quilt Page – coloringwip time garden pattern page

I don’t recall when I started working on this page in Daria Song’s The Time Garden either but judging from other posts about it I’d made in April 2016, I’m going to guess it was about that time.  I have NO idea, however, why I stopped it so close to being done.

16. The Princess Bride Fred Savage 2-Page – coloringwip princess bride fred savage

This page was blogged when I first started it, way back in March 2017.  I don’t want to move on to another page in the book until this one is done, though, so I need to make the time to finally get it finished up.

17. & 18. & 19. Harley Quinn, Betty Cooper & Teela Wall Hanging Trio – plastic canvas

wip plastic canvas girls trio

I’ve never shown these before, except for the odd glimpse in the background of Instagram pics.  I started this trio of plastic canvas portraits when I moved in August 2017.  While I love how they look in black and white (and blue), I designed them to be in full color and I’d love to see them complete.

Think I can do it?  Want to play along? Use the tag #19WIPtoFO2019 so I can see how many you get through!

ps: As I’m about to post this I just realized that 19 projects means committing to completing more than one per month.  Months that are already pretty busy with Becket, work, kids, commissions and all the new projects I want to work on and might come up over the year… Wish me luck- I’m gonna need it!!

This post may contain affiliate links. This means I might make a small commission on purchases made through the links, at no cost to you.