It’s National Homemade Cookie Day in the USA today, and even though I live in Canada, who could say no to cookies? They’re tasty, versatile, and in these mid-pandemic days, a great way to provide individual portions per person.
Here’s an easy way to make a set of fun bowling cookies that you could even bowl with!*

I made these a few years ago for Father’s Day, as bowling has been a family sport since I was a kid. My dad was on a league through until Covid, and most of my siblings and I were on leagues at various times as well.
Back in the blogging heyday I used to follow a handful of cookie decorators (Sweetopia, The Bearfoot Baker and SweetSugarBelle were 3 favorites) and a big lesson I learned was how to use cookie cutters in creative ways. After deciding on “bowling cookies” I went through my bin of cookie cutters and pulled out 3 that would be perfect for this project.

The square cutter is from a nesting set similar to this one. Using it to create the lanes, choose the size that works best to fit as a multiple on the serving tray you plan to use. Rectangles would also work just fine. In my case I used the roughly 2″ square. The circle cutter is from a set similar to these. Used for the bowling balls, choose a size that looks appropriate on your size lanes. Mine is roughly 1″ in diameter. As for the bowling pin, this is where you have an opportunity to be creative! They do make actual bowling-themed cookie cutters, but I don’t have any so I used a Christmas bulb from a set similar to this one.

Step 1: Bake your cookies. You can use your preferred recipe of choice; I used my standard sugar cookie recipe adapted to taste years ago from this old Martha Stewart recipe. You want to avoid your cookies spreading while baking so be sure to chill your dough (before cutting works but after cutting is even better). Make enough squares (or rectangles) to fill the shape of your bowling lanes, plus a few extra to account for breakage. Bowling uses 10 pins so you’ll need to make at least that many, plus again extra to account for breakage. Finally, use the rest of your dough to make as many round cookies as you’d like. You really only need one to be the bowling ball, but I was serving a crowd so I made as many as I could with the dough that remained.

Step 2: Fondant toppers. If you prefer royal icing you could certainly line and flood the cookies and decorate them that way, but I find fondant a quick and easy way to get them done faster. Another example of this technique is here, where I used fondant to turn round cookies into records for a music-themed set.
Roll out white, ivory or cream fondant and use the same square and pin/bulb/etc cutter that you used for the cookies to cut a topper for each one. Moisten the back of the fondant (or the top of the cookie) with a bit of water and press the fondant into place, one topper on each cookie.
The bowling balls are a great place to use up leftover scraps of fondant. Roll out some black fondant then tear little pieces of your other colors and place them randomly on the black. Then roll over it some more to blend out the colors. Once you have it looking the way you like, use the same circle cutter to cut out enough toppers and place them on the ball cookies in the same way as above.

Step 3: Turn your base cookies into lanes. Start by using a yellow, orange or brown edible marker and a straight edge to draw stripes down your lanes to represent the individual planks of wood. I used a yellow Wilton FoodWriter and the edge of my transparent cutting mat. I generally prefer these AmeriColor edible markers so I tend to save them for when I’ll be needing to draw details because the Foodwriters are more broad-tipped.

Step 4: Wood grain, part 1. Using a paintbrush that’s ONLY ever used for food, dip it into a pot of brown icing gel color and blot onto a paper towel to get most of the globs of gel color off. Cheap plastic paintbrushes like what come in childrens’ art kits are perfect for this, but it’s super important that the brushes are reserved strictly for food use. Don’t worry about the messy bristles- the messier the better for this technique! Splotch the brown gel color directly onto the fondant cookie toppers. Try to pounce in a direction in line with the stripes you’d drawn so your wood grain goes in the proper direction. Repeat until you’ve done one full vertical row. In theory you could repeat this process on all the cookies and then move on to the next step, but I didn’t want to take a chance on the gel drying too much to reactivate so to be safe I did one strip at a time.

Step 5: Wood grain, part 2. Dip the same scrappy paintbrush into water and then brush lightly over the cookie to reactivate the brown tint and spread it across the fondant. Ensure to always brush in a vertical direction to create a faux woodgrain texture. Make sure to thin down the color just enough so that the stripes you’d painted earlier just barely show through.
Once you’ve completed the entire vertical stripe, repeat steps 4 and 5 on the remaining stripes of cookies.

Here’s the final look.

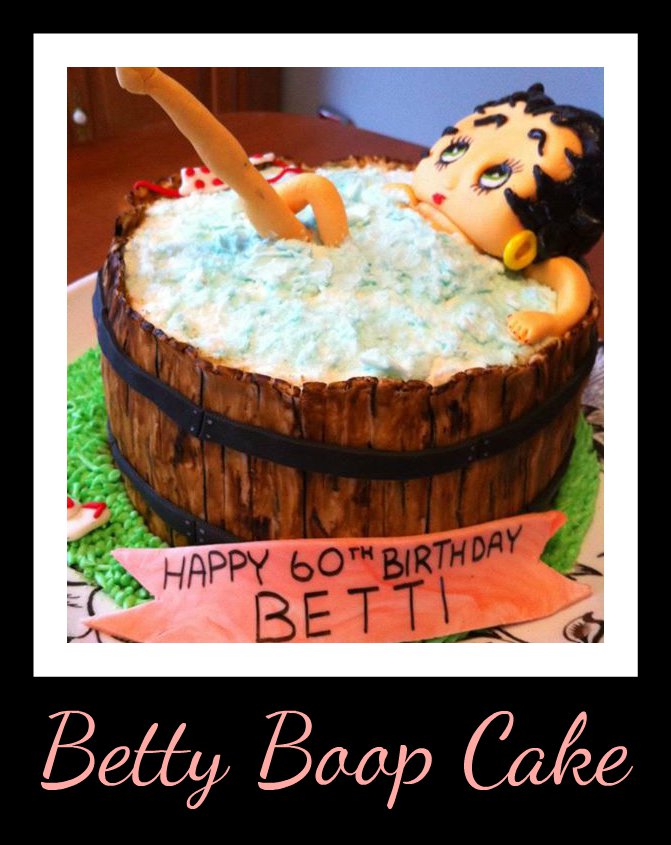
If you’re a longtime follower of this blog you’ll remember I’ve used this technique before, to make the hot tub for the Betty Boop cake for my mom’s birthday.

Step 6: Marker details. Use a red edible marker to add the characteristic stripes on the bowling pins…

…a black marker to add three dots to represent holes on the bowling balls…

…and the red marker again to add the triangular lane markers onto the lanes.

And that’s it! Assemble your pins into place at the top of the lanes and your set of bowling cookies is complete! I added a quick fondant ribbon sign to mark the occasion but that’s completely optional.

*Can bowl with them: If you take “bowl” to mean “stand up the pin cookies and flick a ball cookie at them, hoping to not get caught on the lip of one of the lane cookies”