Jakob was obsessed with Adventure Time when his 6th birthday rolled around* so of course I HAD to make him an Adventure Time-themed birthday cake. (The obsession lasted so long that he had 2 Adventure Time cakes AND Gunter-themed cupcakes for his birthday the following year as well!)
Step 1 was to make a fondant BMO. Luckily I’d already made myself a plastic canvas BMO that I could use for easy reference.
BMO was made out of white fondant tinted with gel colors, and had long toothpick inserted underneath while the fondant cube was still soft. After letting the pieces harden for a few days I drew on them with edible markers for the finer details.
I made the fondant toppers by tinting small amounts of fondant into the appropriate colors then cutting out scaled paper templates of each character. I used a fondant knife to trace and cut the appropriate sections of each color then adhered them with water and a clean food-only paintbrush. The last step was to draw on any fine details with the food markers. I then repeated the same process for the logo/sword, substituting Jakob’s name for the word “TIME” in the title.
I baked, stacked and decorated a cake to look like a lovely day in the land of Ooo then applied all the toppers (except BMO) to the sides of the cake, using the moisture of the fresh icing to adhere them. The pieces were juuuust soft enough to form slightly to the cake’s curves so they wouldn’t pop off.
Because of the weight factor, I waited until just before serving to add BMO on top and insert the number candle.
In 2011 Jakob was all about Pixar’s CARS. CARS toys, CARS books, even CARS bedsheets. So when he turned 4 that year, of course I had to make a CARS-themed cake.
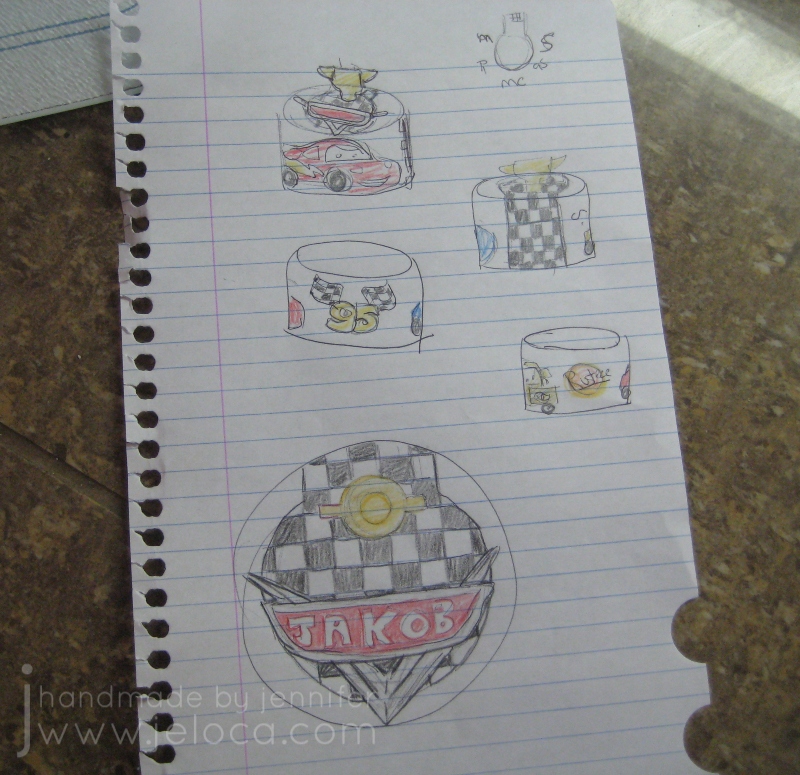
Like most of my cakes, this one started with a sketch.
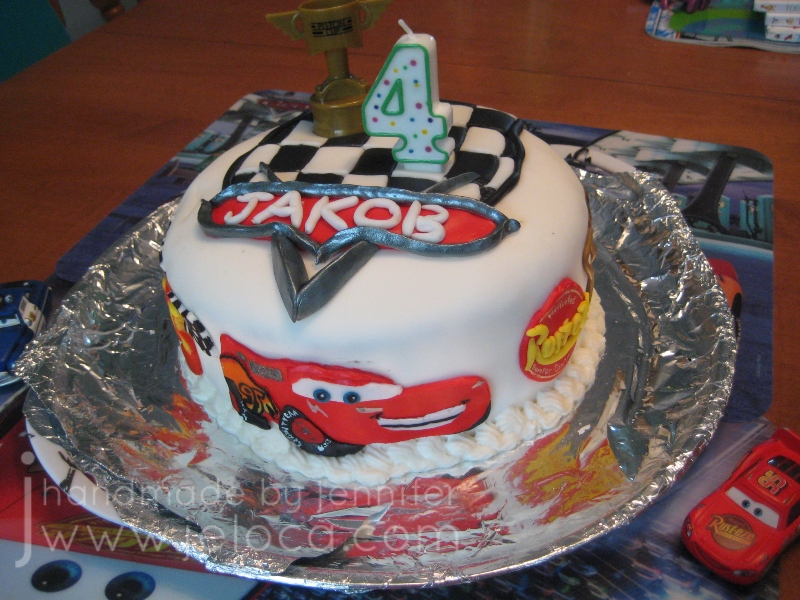
It was box-mix vanilla cake with pudding and egg add-ins, and vanilla icing between the layers. Except for the LEGO Piston Cup and candle, all toppers were handmade with white fondant that I tinted with gel colors.
The silver logo around Jakob’s name was made from black-tinted fondant and painted with silver luster dust mixed with a bit of vodka.
The top and back have a black & white checkered race flag, and the base of the cake is trimmed with icing. I was still learning how to properly prep a cake for fondant and you can see how lumpy the cake is, especially where it is starting to sag in the back. There are also a few cracks in the fondant in places.
The side decors were fun to make! Sally was the easiest- mostly blue fondant with black wheels, a white windshield/eyes and handpainted details. Lightning McQueen and Mater were a bit more involved, having more details to copy. To fill in the sides I also added Lightning’s number and the Rust-eze logo. All painting was done with gel colors mixed with Wilton White-White to be more opaque.
It was one of the first “figure” cakes I’d made and a different challenge than others I’d done at that point. I’m really happy with how it turned out, and the birthday boy loved it.
Today is National Scrabble Day! Occurring annually on April 13, Scrabble Day celebrates the birthday of Scrabble’s inventor Alfred Mosher Butts.
I’m still working through my backlog of cakes and projects I’d never posted, and today is the perfect day to share this Scrabble-themed cake I made all the way back in 2012.
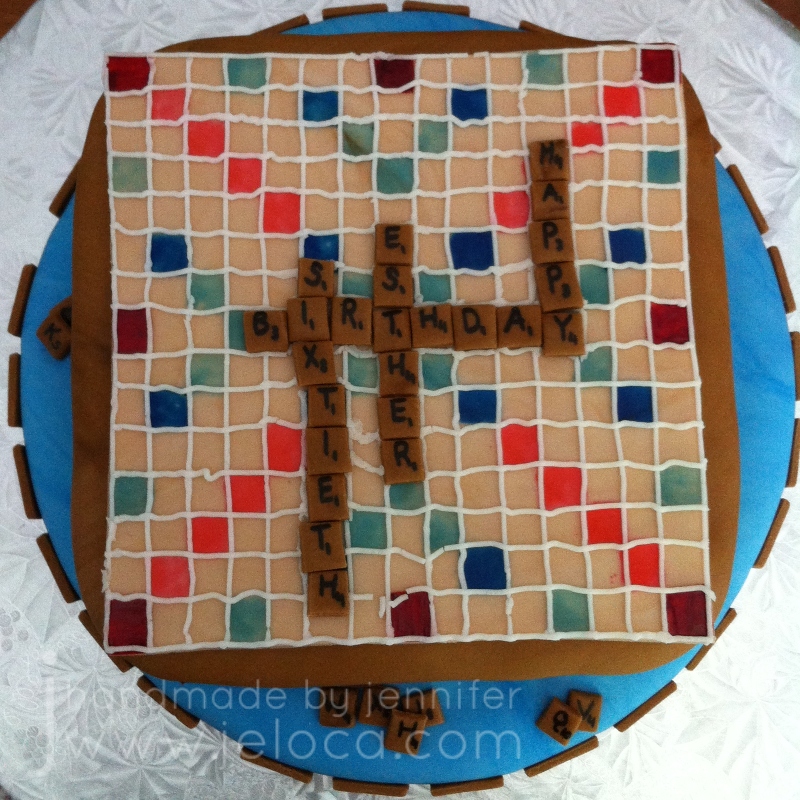
Unfortunately I hadn’t taken progress pics so this isn’t an actual tutorial, though I can talk through the basics. The bottom tier was a chocolate round, with an 8″ vanilla (I think) on top. Both layers were covered with icing then white fondant I’d tinted with gel colors.
The Scrabble board and pieces were made from fondant a few days in advance so they’d have time to harden before application on the cake.
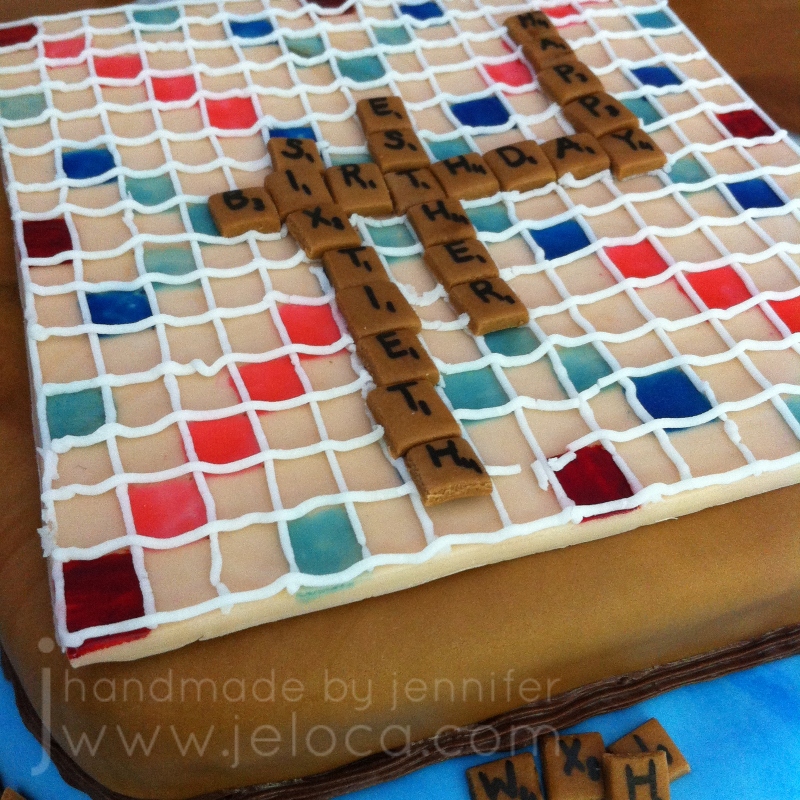
Once set, the tiles were lettered with a black edible marker. Larger tiles around the base spelled out DAUGHTER, SISTER, MOTHER and FRIEND, each with the applicable letter score.
The smaller tiles on the board write out the message for the birthday girl: HAPPY SIXTIETH BIRTHDAY ESTHER.
For the board itself, I’d lightly etched guidelines for the grid and then filled in the colored multiplier squares with more edible markers, before lining the whole grid with royal icing. I’m not thrilled with the lines themselves – I wish they were straighter, but I remember being too afraid to try and remove wonky areas to redo them and risk messing up the colors underneath.
Today’s Henri’s 13th birthday and we’ve made it to his big, first “double-digits” birthday cake. Not only was Fortnite massive at the end of 2018/early 2019, but the Loot Lake cube event had just taken place and when asked what theme he wanted for his cake that year, there was zero hesitation. Easy for him to decide, but I’ll admit it took me a moment to figure out how to put it into action!
In the end I went with a cake that represented Loot Lake with the cube starting to submerge, and one of the wooden panels with Henri’s name on it. If curious about the cubes, you can read up on them here. You can actually watch the cube hit and go under here.
At this point this should be really familiar reading, but once again a few days before his party I baked cakes and prepared them as per my usual method. I also prepared my fondant pieces so they would have time to harden.
For the wooden panel I printed out his name in the Fortnite font and cut a rectangle around it with my dull blade cutter, freehanding the perpendicular planks.
I also cut out 6 1-inch squares to use for the cube. The grid on my measuring mat was perfect for this!
…except that it was too annoying to assemble the panels into a cube so instead I squished them all back together with some extra fondant and cut a 1″ cube out of the larger chunk.
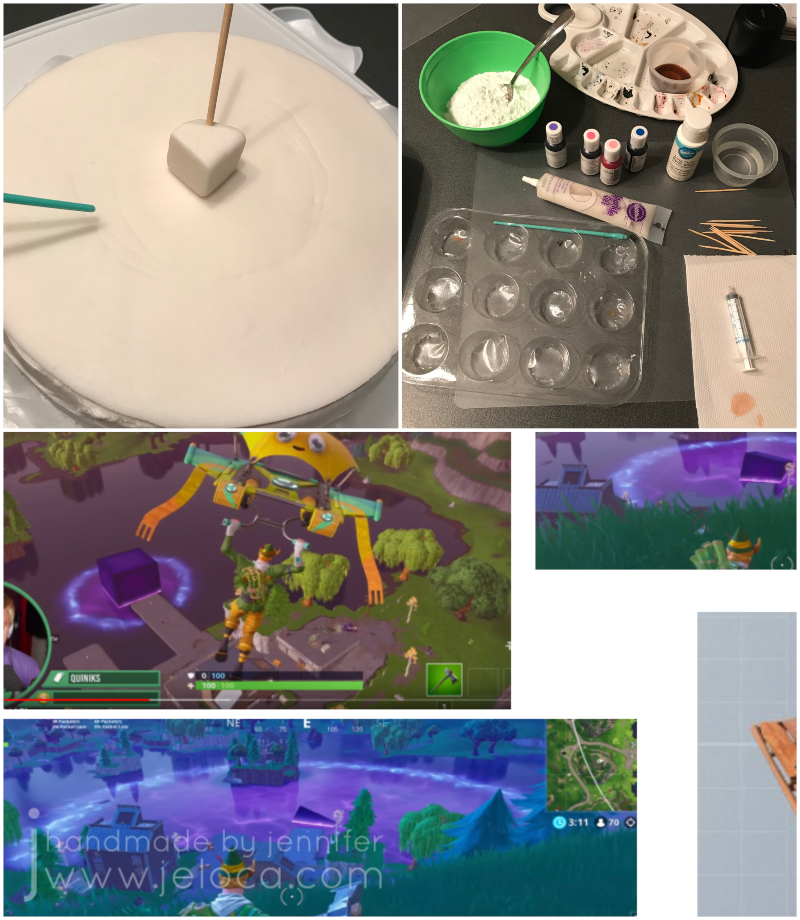
I used my adjustable circle cutter to cut out a disk of fondant the same diameter as the top of my cake. I’d link it but can’t find it for sale any longer. I wonder if that’s because it isn’t that great – and tends to leave unsightly divots in the center of your fondant (like in the above image). You can either freehand cut a circle using a mat with markings like mine, or trace around your cake pan or same-sized bowl and cut that out instead.
At this point I set aside all the fondant pieces to air-dry, turning a few times daily so all sides could dry well.
The night before the party I levelled, torted and crumb-coated the cake as per my tutorial linked above.
While the cake was chilling in the fridge I painted the nameplate with gel colors diluted in vodka, using a quick version of my painting fondant to look like wood tutorial (another version of the wood also found here). I also cut an angled slice off of the cube so it could sit flush against the top of the cake and still look submerged, and inserted a bamboo skewer to help it anchor to the cake later.
The cake got a clean layer of white icing and then the fondant disk was placed on top so it would adhere well.
I used the back of a food-only paintbrush to lightly score demarcation lines for where the cube’s magical effect would spread to, using the game screenshots as color and placement references. (Oh yeah- the cube is magical. It turned the lake bouncy). I also gathered my supplies for food painting: more gel colors in my required colors, white icing tint, sparkle gel, water with a syringe, my gel paint palette, toothpicks, food-only paintbrushes and icing sugar to be the base of my “paint”.
To create the lake I added blue gel colors to some icing sugar and used a syringe to add water until I got a consistency similar to paint. The syringe helps avoid adding too much water at a time, but if it does get too watery you can thicken it back up with more icing sugar. Once it looked right I painted the lake blue, stopping at the demarcation line and feathering slightly over the edge so it wouldn’t be sharp or precise.
I mixed up more of the same color but runnier (similar to flood consistency, if you decorate cakes) and applied it all over the same sections, allowing it to self-level. Then I left the cake to set for 15 minutes.
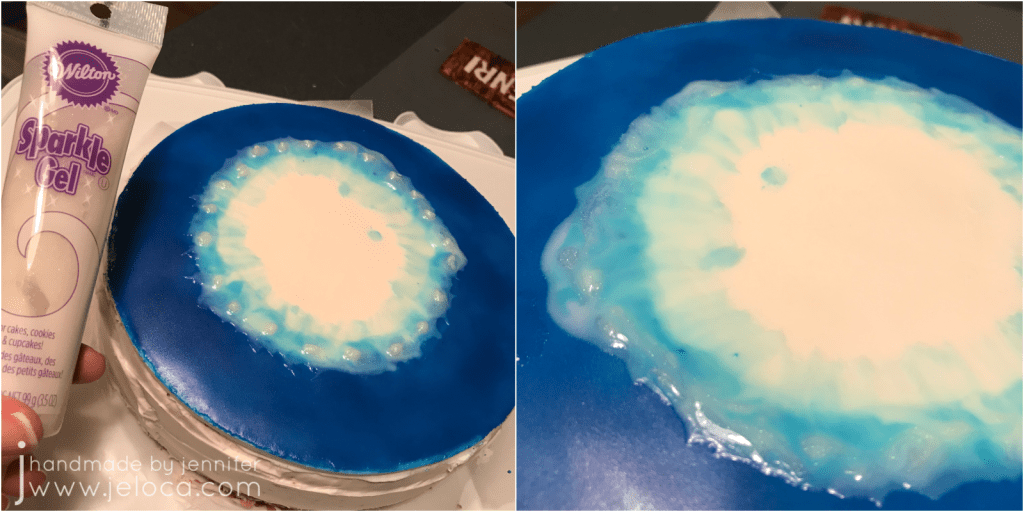
Next I mixed up more icing paint in white and light blue and put dabs of each in an alternating pattern around the inner circle’s edge before using a toothpick to swirl them together. It’s ok if the darker blue bleeds into them a bit, as this was meant to be the edge where the lake water meets the rubberized water and has the magic glow effect.
To add more magical “oomph” I added sparkle gel around the edge, overlapping into the darker blue. Then I set it aside for another 15 minutes.
For the center where the lake has already transformed, first I mixed up a medium purple shade with a lot of the sparkle gel mixed in, as well as a lighter purple and white with sparkle. I filled the center circle with the medium purple and while it was still wet I dripped in the two lighter colors and swirled them gently. Once I was happy with how it looked I set it aside for another 15 minutes.
I tinted some vanilla icing green for the grassy land around the lake and covered the sides of the cake, slightly overlapping the disk on top to hide the fondant edges. I then textured the top bit to look more like grass. You can pipe around the base of the cake if desired (I’d run out of icing, oops).
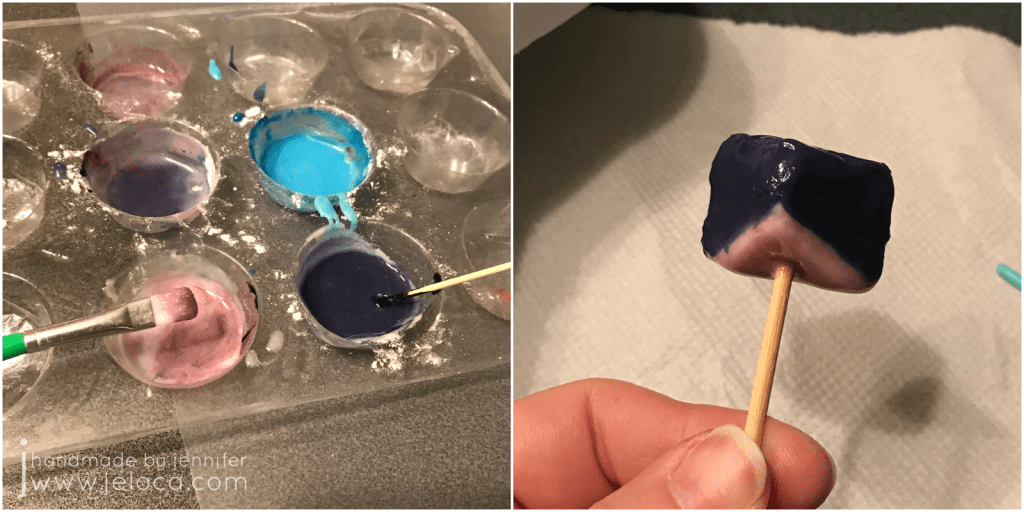
I mixed up a darker purple for the cube and a brighter pink to be the glowing light where the cube touched the water, and painted the cube itself. Allow to dry for 15 minutes by either holding it (and enjoying a little break!) or you can push the skewer into a scrap chunk of fondant or styrofoam.
Tip: Save a bit of the dark purple in case you need to touch up the cube after you stick it on the cake.
Even though my fondant was white to start, I decided to paint over Henri’s name with the Wilton White-White. It doesn’t show much in the pic, but in person it made it much brighter.
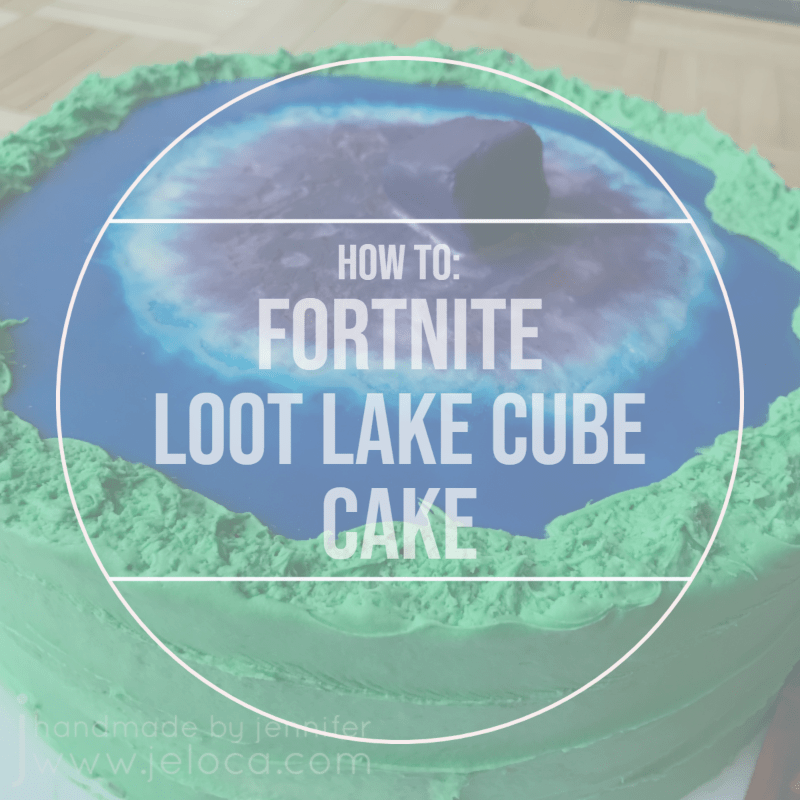
The last step is to push the skewer into the cake and then the Fortnite Loot Lake cube cake is done!
I’d used a bit too much water in one of my purples, so the next day you can see that it cratered a bit when it dried down. But I’m still super pleased with how it turned out! I love the glowy swirl where the lake meets the “magic” and it really does look like the cube is sinking into the water.
Plus Henri was really happy with it, which was the most important part! ❤
I’ve had questions before about whether fondant topper painting adds extra thickness to the top of a cake, and as you can see from the cross-section, it really doesn’t.
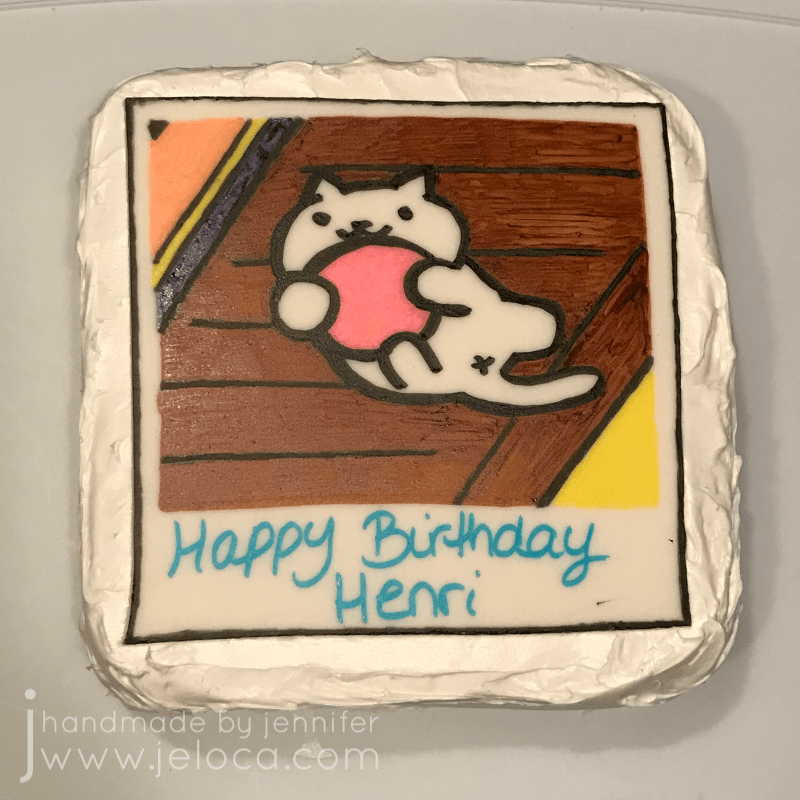
A few years ago one of the games the kids were obsessed with was Neko Atsume. They loved collecting all the little cats and their toys and taking in-game Polaroids of the kitties doing cute things. Snowball was Henri’s favorite, and on his 9th birthday he asked for a Snowball pic cake.
First thing I did, as always, was to bake the cakes a few days before his party.
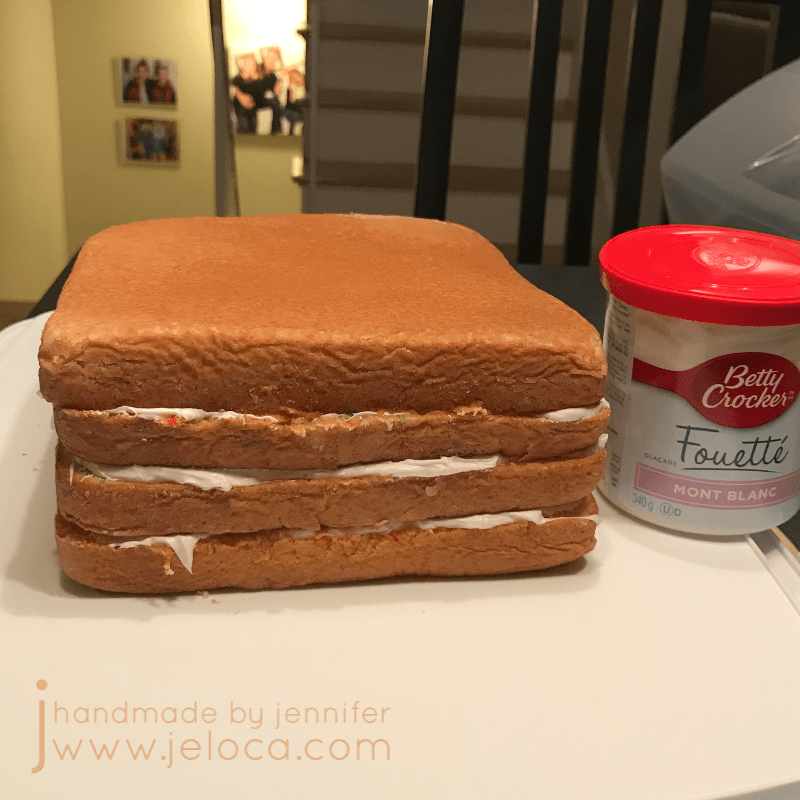
He couldn’t decide between cherry chip or vanilla cakes so I made one of each then set them aside to stay moist until time to decorate.
Next I made the fondant topper. Just as for the Tem Shop cake I like to make my fondant toppers in advance as well so they have time to harden and set before placing on the cake.
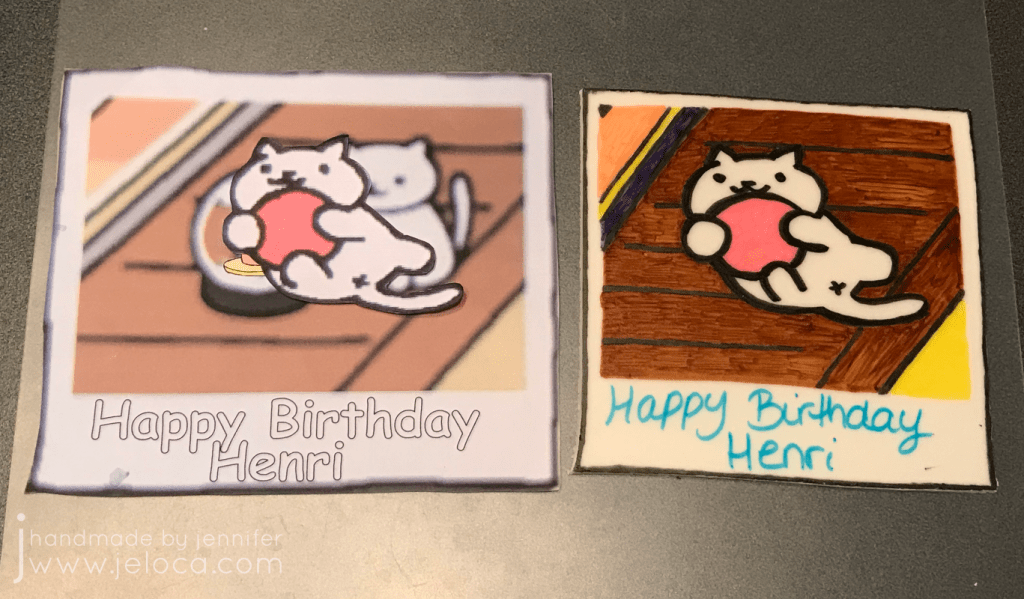
I’m a big proponent of using references, so once again I found a reference image and scaled it to my desired size. I couldn’t find one with the specific pose Henri wanted (Snowball holding the red ball) so I found separate references and combined them myself into one.
On the same day I baked the cakes I also rolled out some white fondant and cut it to the size of my Polaroid. I let it air dry until the night before the party, when I sat down to finish the cake.
I used a pin tool to lightly sketch the cat outline in place by tracing the Snowball cut out onto my fondant. Then I used edible ink markers to color in the image, finishing with black for the cartoon-look outline.
Using a reference image is a really great way to help get a result that you’re happy with!
I set the topper aside so the ink could dry and then it was time to focus on the cake! First step was to levelled and tort each cake, then stack them into place.
The trimmed bits of cake freeze really well for future snacking, or you can crumble them up and mix with your leftover icing to make cake pops (which also freeze well for future snacking!).
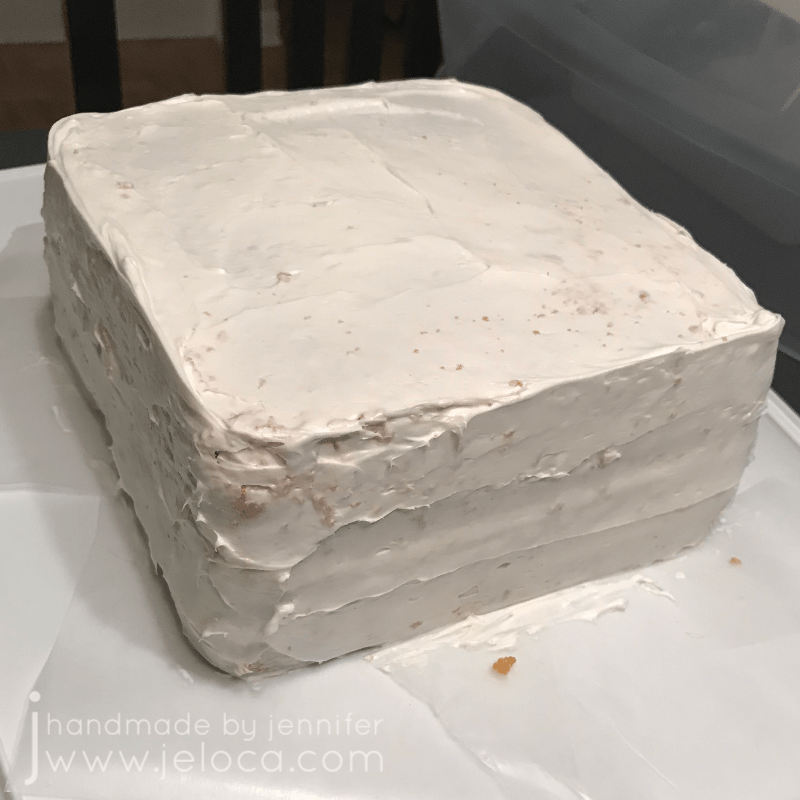
First the cake gets a crumb coat (above) and then later a second, clean layer of icing.
I applied the topper to the still-moist icing and then the cake was done!
The fondant topper doesn’t add too much extra thickness to the top of the cake and does not need to be removed for slicing. It’s also easily removable from the slice for anyone who doesn’t like the taste.
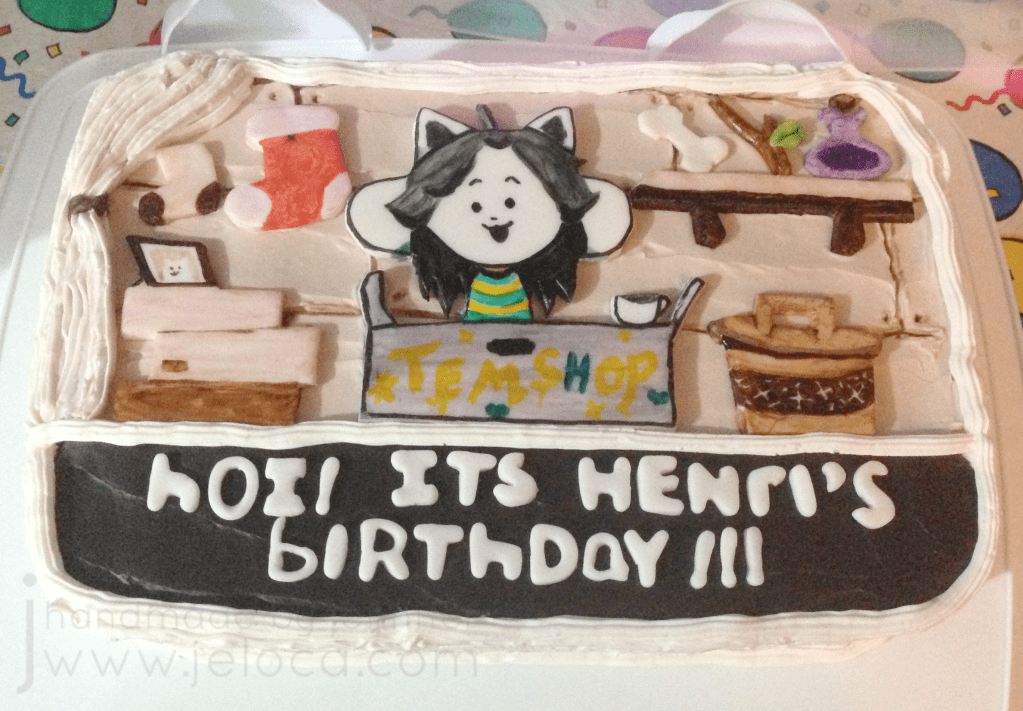
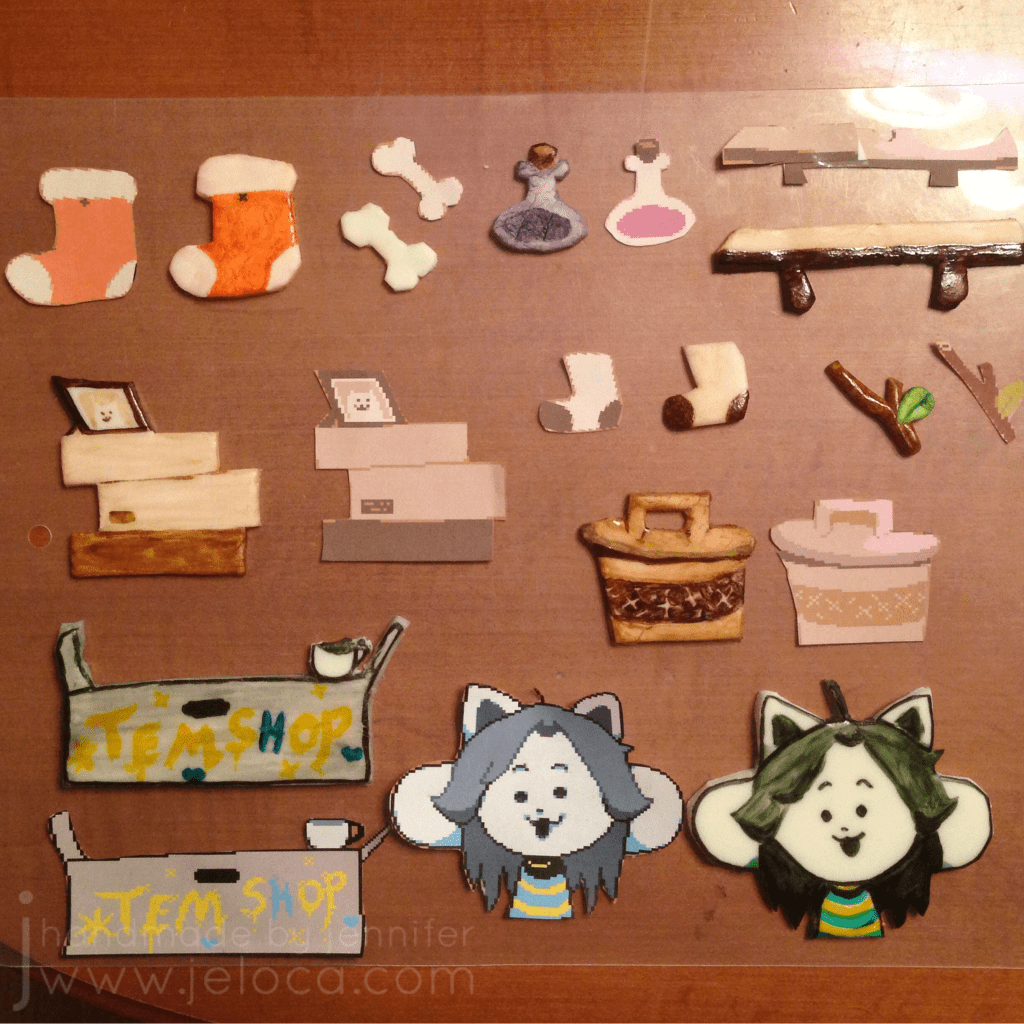
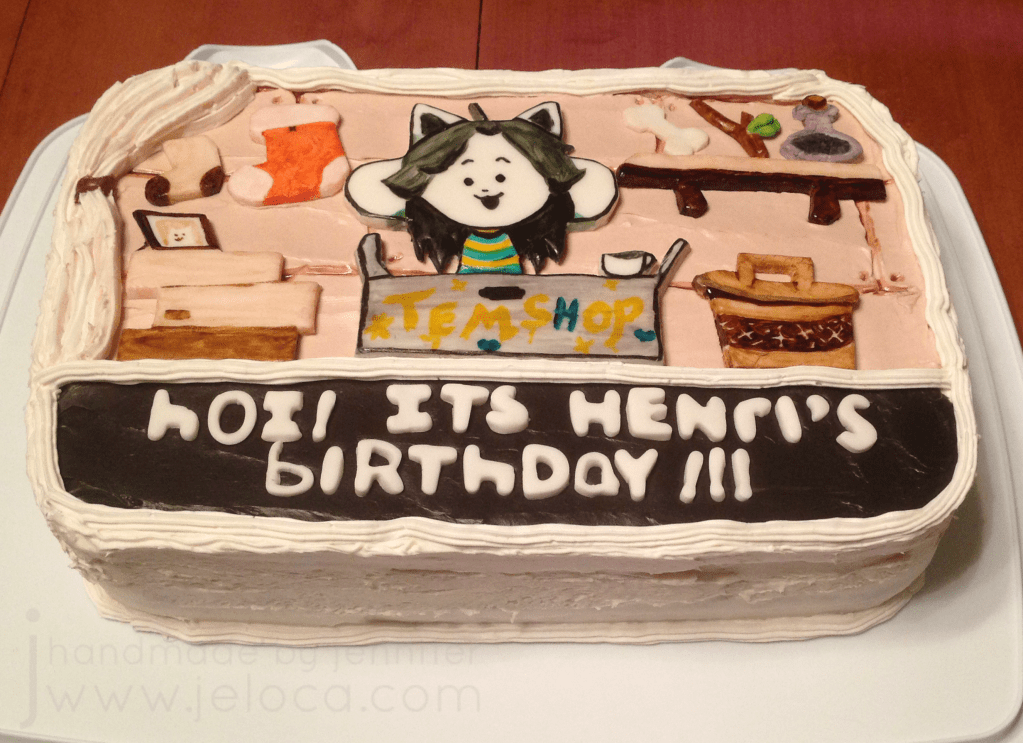
Henri is going to be 13(!!) on Saturday, so between now and then I’m going to share some of his past birthday cakes that haven’t hit the blog yet, with full tutorials for the ones that are possible. First up is this Tem Shop cake from his 8th birthday, back in 2017
The kids (and I, if I’m being honest) were bit hard by the huge phenomena that was Toby Fox’s Undertale. The name “Flowey” instantly evokes a bigger horrorscape than the trippy sequence in Fantasia, we use “determination” in more sentences than appropriate and often have Megalovania and the rest of the incredible soundtrack on repeat. For a while Henri’s favorite character was Temmie and in addition to adding “Hoi!” to nearly everything he said, he was determined to have a Tem Shop birthday cake.
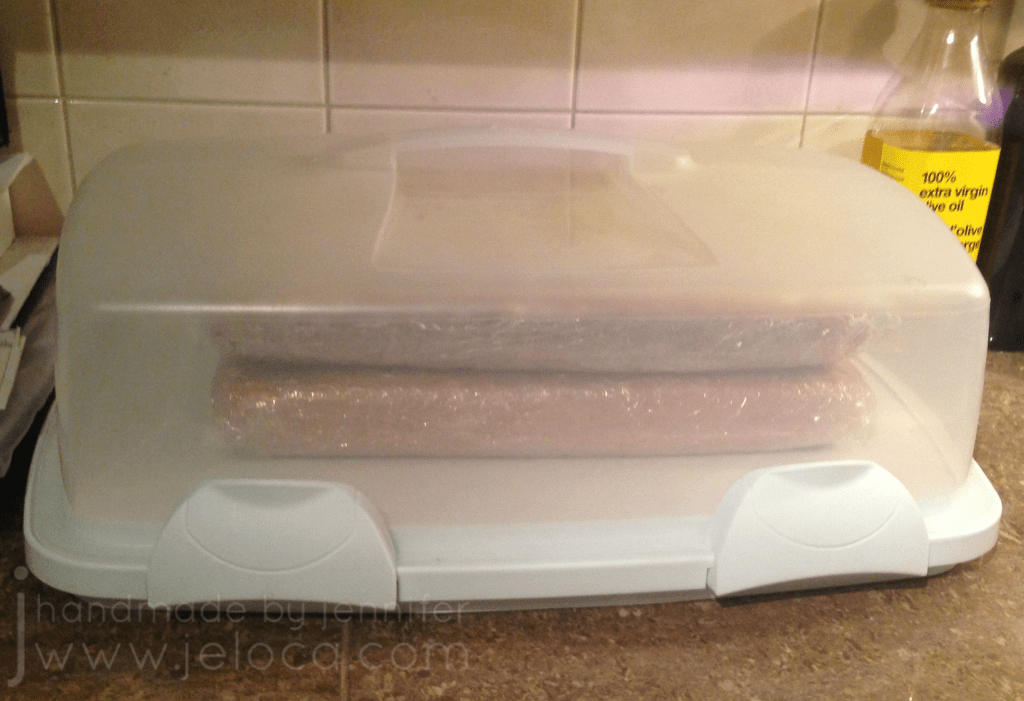
A few days before his party I baked up 2 cakes in my usual way and set them aside so I could work on the fondant toppers.
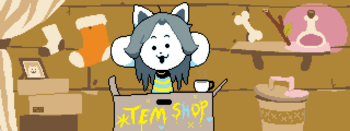
I found a reference image from the game online:
Then I resized it to the scale of my cakes, using the baking dish as a guide.
The bottom third of the cake would be the black text box that’s always present on screen, so I scaled my reference image to fit 2/3 of the cake and printed it out.
I rolled out some white fondant onto my Wilton measuring mat, using my roller with spacers to get an even thickness. Then I used the blade tool from my gum paste tool set to carefully cut out each piece.
I set the pieces aside for a few days, flipping them over about twice per day, so they would harden. The more moisture that gets removed from the fondant prior to painting the better, since painting will add moisture and I don’t want the sugar to melt down.
Anytime I do fondant painting (ex: Minecraft cake, Charlie & Lola cake, Skylanders cookies, Montreal Canadiens cake) I always like to assemble all my supplies within reach. This includes the paintbrushes and palette I use exclusively for food, Wilton and AmeriColor gel colors, a small jar of vodka for diluting icing gels, toothpicks for getting the gels out of the tubs, plus icing sugar for thickening my homemade edible “paints”.
Gel colors dilute super easily, so a tiny dab on a palette is often all you’ll need for beautiful, rich colors.
I painted each piece to match its in-game counterpart. Most are easy enough to eyeball but if ever you’re not sure of dimensions you can sketch lightly over the reference with the tip of a pin and emboss guide lines into the fondant.
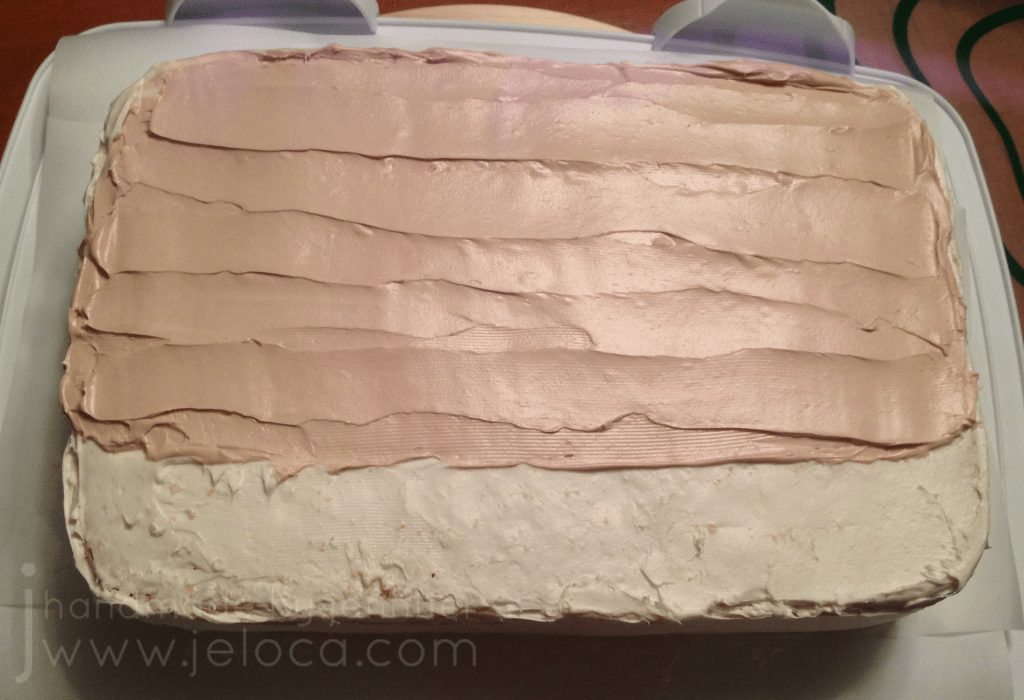
Once the pieces were touch-dry I prepared the cake itself. First I gave it a crumb coat.
Then I tinted some icing to match the wood background of the shop and applied it over the shop section of the cake, making sure to apply it thick enough to lightly carve into without reaching the cake below.
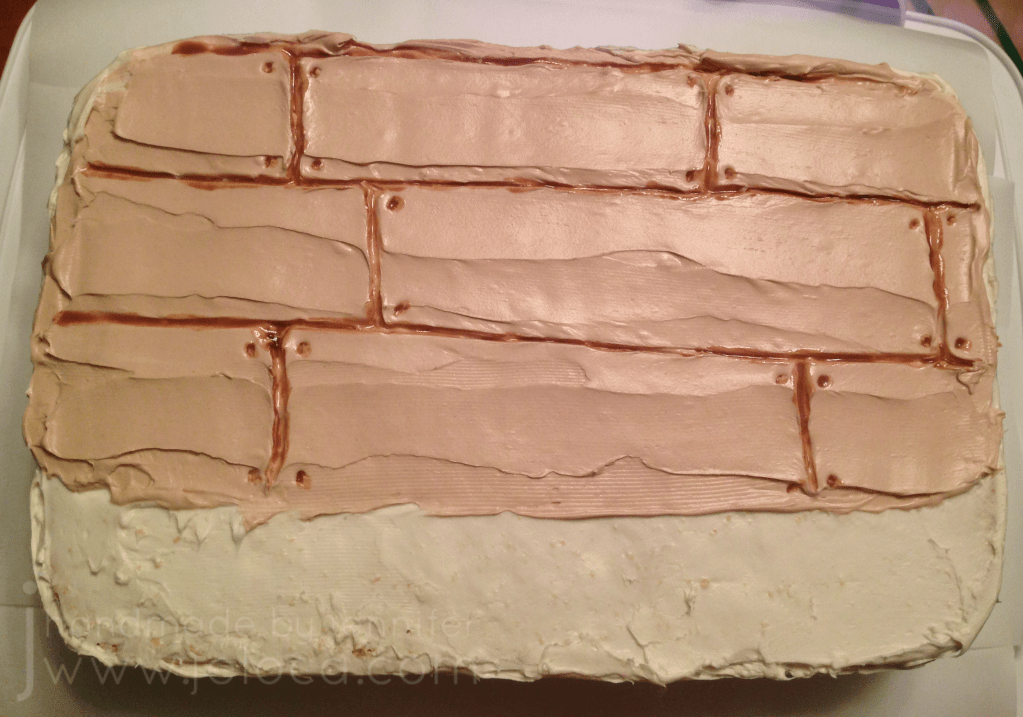
I used a toothpick to score lines for the wood wall then diluted some brown gel color and carefully flooded it into the grooves.
The final touch was to add some nail heads, and the wall portion was done.
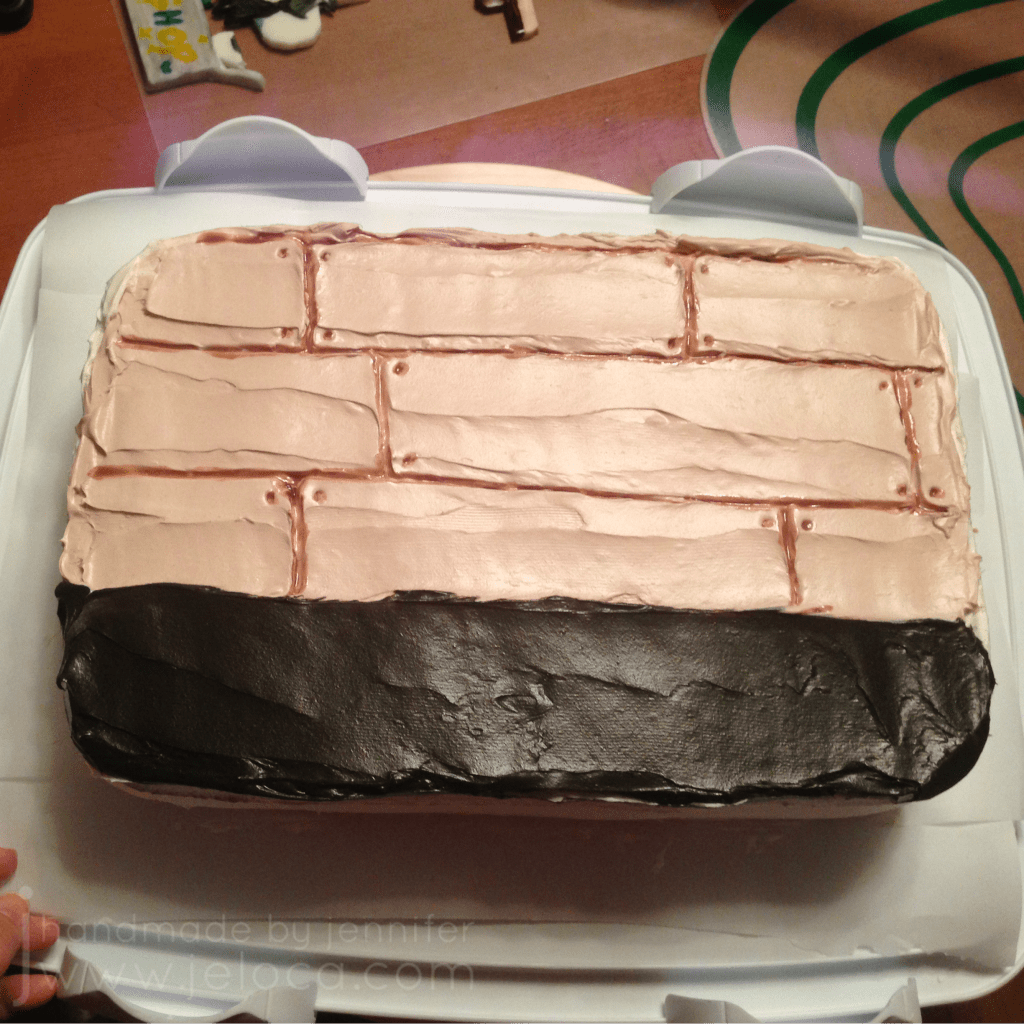
After that I tinted icing black for the text box.
Pro tip: if you start with chocolate icing (instead of white vanilla) you’ll use much less black coloring, which will avoid any bitter taste in the icing.
I covered the remaining part of the cake in black, and then added the figures, and then finished up the outside and edges of the cake with white icing to clean everything up.
If you add the fondant toppers while the icing is still moist, they’ll stick in place without issue. If your icing has already started to crust over then you can paint a little bit of water on the back of the fondant and that will adhere it in place. Try to avoid getting too close to the edges with the water, so it doesn’t leak out around the edges and cause bleeding onto the base icing.
Final step was to use a set of mini alphabet cutters to cut out the message in Temmie’s mixed-caps word style.
Again, for reference, here’s the image of the Tem Shop in the game:
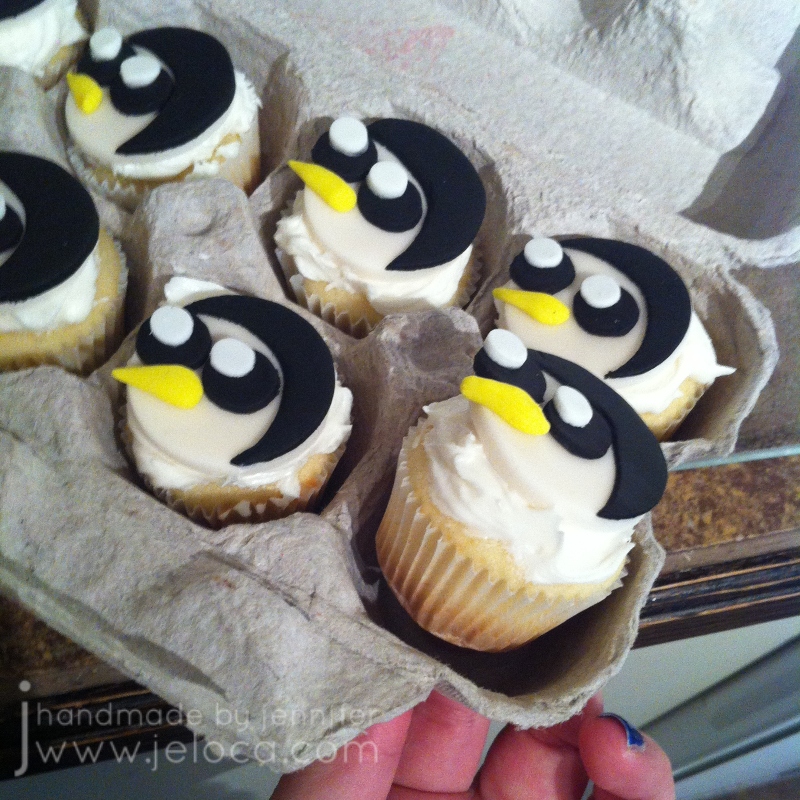
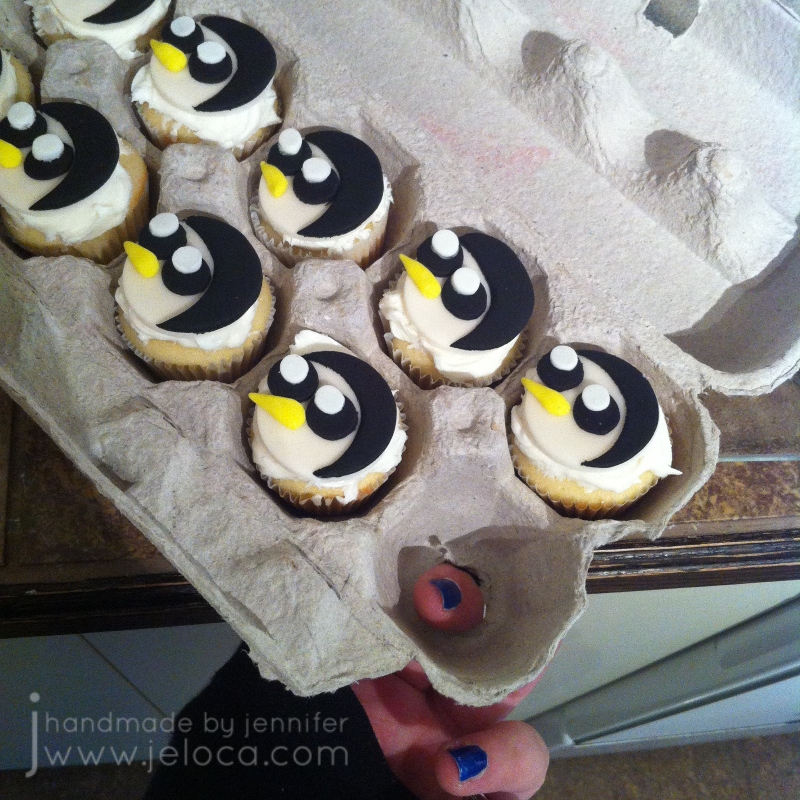
Today, December 15, is one of the many days recognized as “National Cupcake Day”. We’re also halfway to the holidays! In case you’re planning on bringing a little home-baking to your celebrations, here’s a quick and easy little tip to help you out.
Picture it. You’ve baked a dozen (or more) mini cupcakes. They’re all iced and decorated and smelling delicious. But you don’t have a cupcake carrier and your largest Tupperware is already in use! What do you do?
Voila!
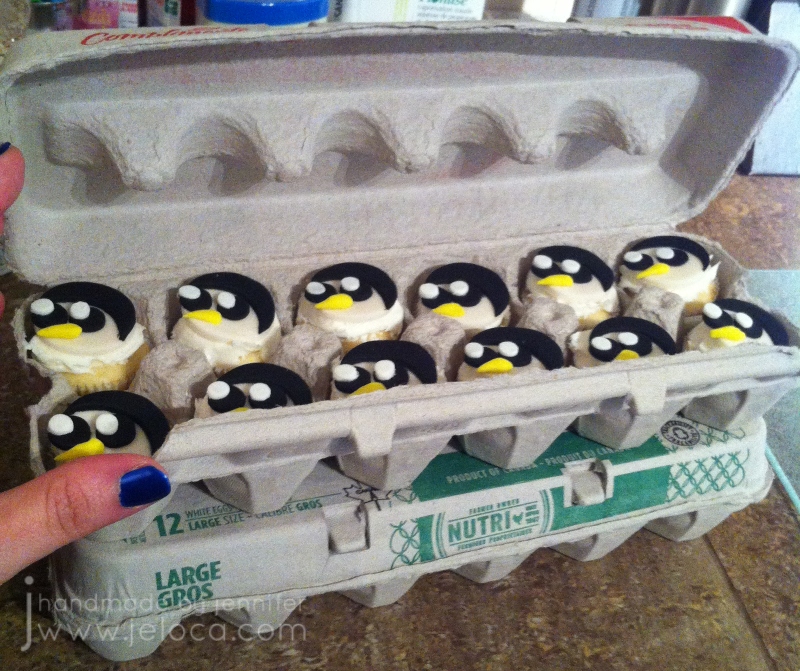
I know what you’re thinking. “If this is about cupcakes, why are you showing me egg cartons?”
Ahhh because those aren’t eggs inside!
Surprise!
Ok ok, so I know what you’re thinking now. “Sure, it’s an easy way to get them to wherever I’m going, but how am I going to get them out afterwards? Won’t I squish the cupcakes? If I tug on the fondant toppers won’t they just pop off the icing? And what if I only have icing on top? I can’t very well grab THAT, now can I?”
Ahh don’t worry, I’ve got you covered! It’s as easy as…
…1…
…2…
…3
Poke!
Of course it does take a quick moment of prep, so let’s rewind.
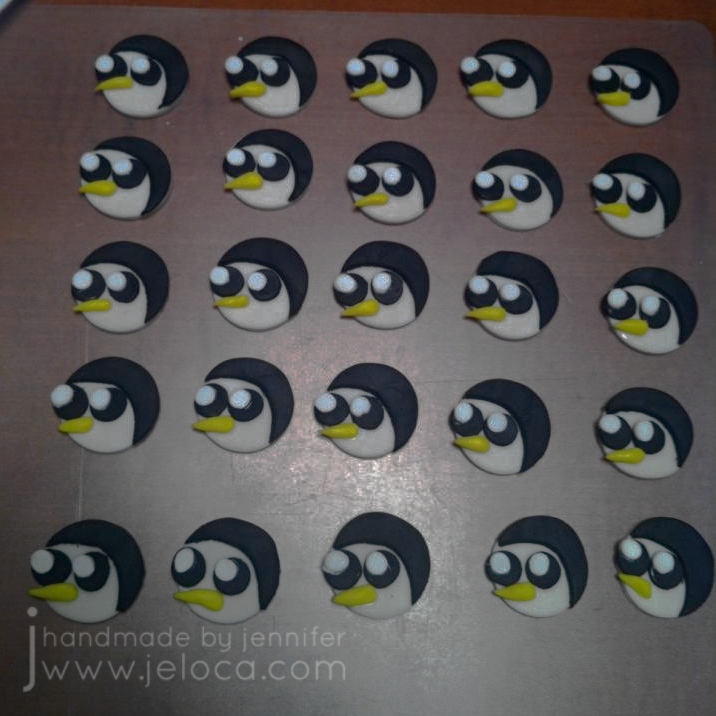
First, make your toppers. These were for Jakob’s 7th birthday, when he was super into Adventure Time. His birthday cakes 2 years in a row were AT-themed, and these cupcakes were a little extra treat to surprise his class at school (back when we were able to do that).
As always when making most toppers (Pitfall cake, Charlie and Lola cake, Minecraft cake, etc) I recommend making them a few days in advance. Not only will this allow the fondant to harden, making placement easier, but it will also help prevent the fondant from absorbing moisture from the icing (or water/fondant glue) and disintegrate on you.
The Gunter toppers are pretty simple to make. Roll out some white fondant and use a circle cutter in your desired size for his face. I went with a cutter the size of the top of my mini cupcakes. I like to use a fondant roller with levelers but you can eyeball it. Roll your white fondant scraps a bit thinner and use your smallest cutter for the eye shine. For my size cupcakes I used a large smoothie straw for the eyes so a regular straw was perfect for the white shiny dots. Set the white circles aside and roll out some black fondant. Use the same cutter as for the head to cut one black circle for each face, and then shift it down a bit and cut away most of it to create a crescent moon-type shape. Use water or fondant glue to attach the black crescent to the white face, and then use the remaining black to cut out his eyes. Attach the eyes to the face and then the eye shine to the eyes. Finally get some yellow fondant (or tint the scraps of your white) and use your fingers to pinch off tiny pieces and roll them into mini cones for his beak. The cutters do the bulk of the work for you and assembly is pretty fast, making this a really simple design.
For reference, here’s Gunter in the show:
Next, bake your cupcakes. I didn’t take progress pics of this part but it was a basic vanilla cake recipe and a swirl of store-bought icing.
Bonus tip: empty your icing tub into a bowl and whip it up a bit with a hand or stand mixer. Not only will it be a lovely consistency for piping lush swirls but the air added to the icing will increase the volume, getting you more mileage out of what you’ve got.
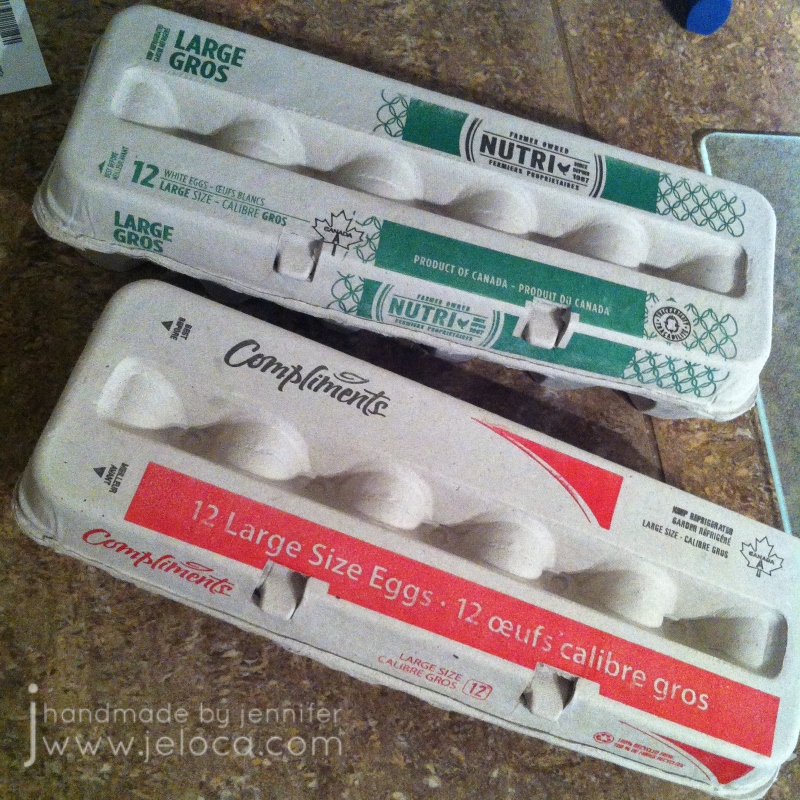
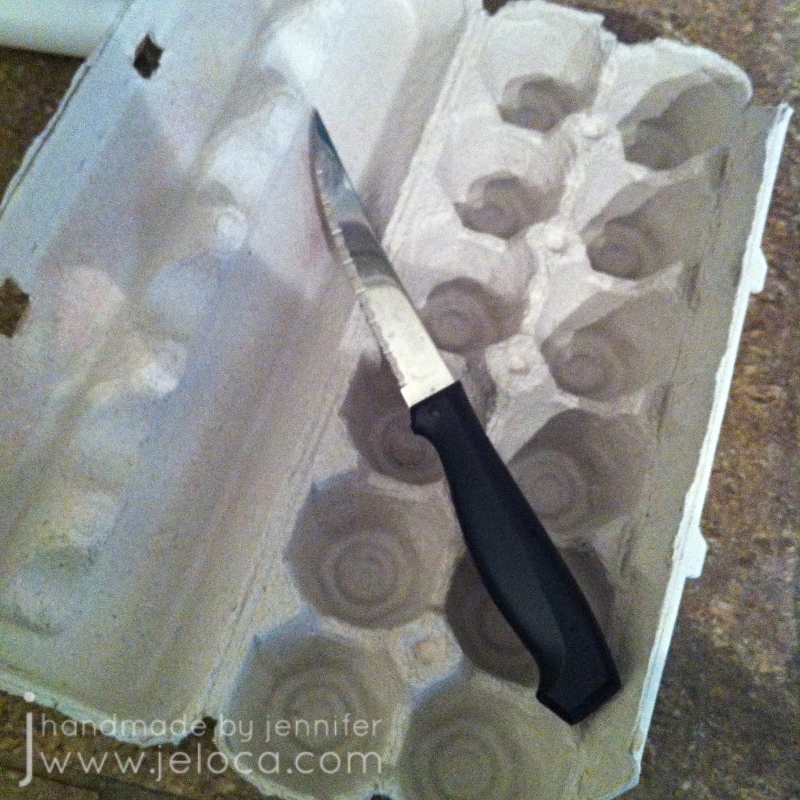
While your cupcakes are cooling you can prepare their carriers. Each egg carton will hold 1 dozen cupcakes (obv) and you’ll need something sharp for cutting out the bottoms. I found a knife/blade worked much better than scissors for this.
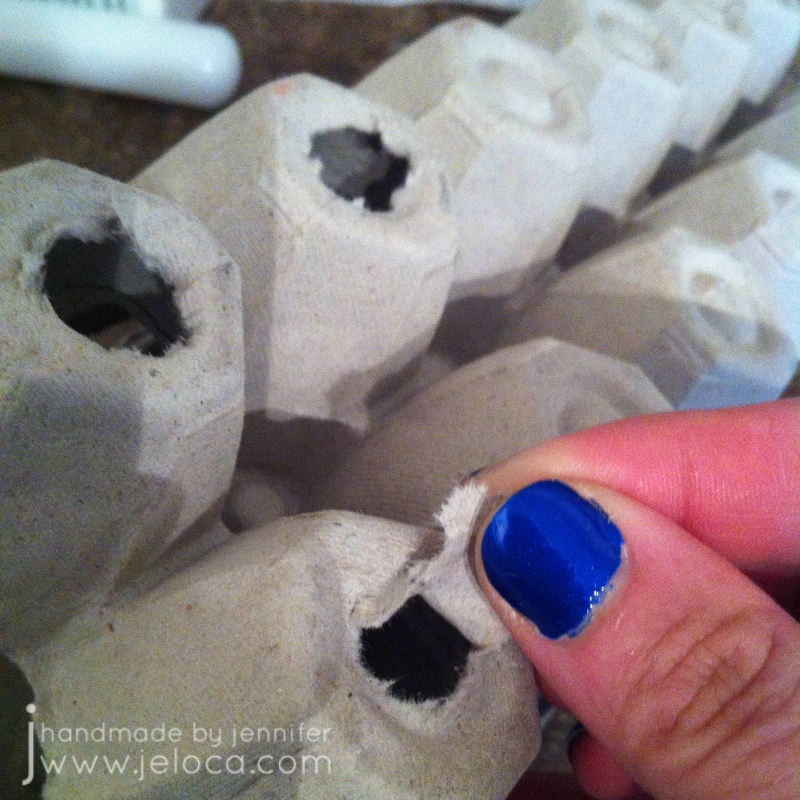
The easiest method was to cut around the carton’s own indent. Imagine the circle was a square and insert the knife straight down into 3 of the 4 “sides” of the circle. Then you can tear off the little flap this creates.
Give a little wiggle to push the cut edges to the inside. This will make it more comfortable for you later, and the raised little bits will also give the cupcake a bit of a shelf so it doesn’t fall too tightly into the hole and get stuck.
And that’s all it takes! Super easy, using something you’ve probably already got on-hand.
This post may contain affiliate links. This means I might make a small commission on purchases made through the links, at no cost to you.
Two weeks ago I shared the cake I made for my sister’s bridal shower. As the saying goes, first comes love, then comes marriage, then comes Mommy with the baby carriage.
Sure enough, about a year later I got to make a baby shower cake for my first niece*!
This post isn’t going to be a full walkthrough, but rather a look at the process for designing and making a baby shower cake. As explained in my “how to bake a cake” post, it’s important to do as much prep as you can in advance. Not only do cakes need time to cool fully before you start to decorate, but some decor pieces need time to dry or set up.
My cakes always start with a sketch and some research. In this case I knew the number of people it would be serving, and that it was for a baby girl, but the rest was up to me. I decided on a layered cake with some kind of topper, and after looking at sample cakes online I vetoed a crib in favor of a baby on top of the cake.
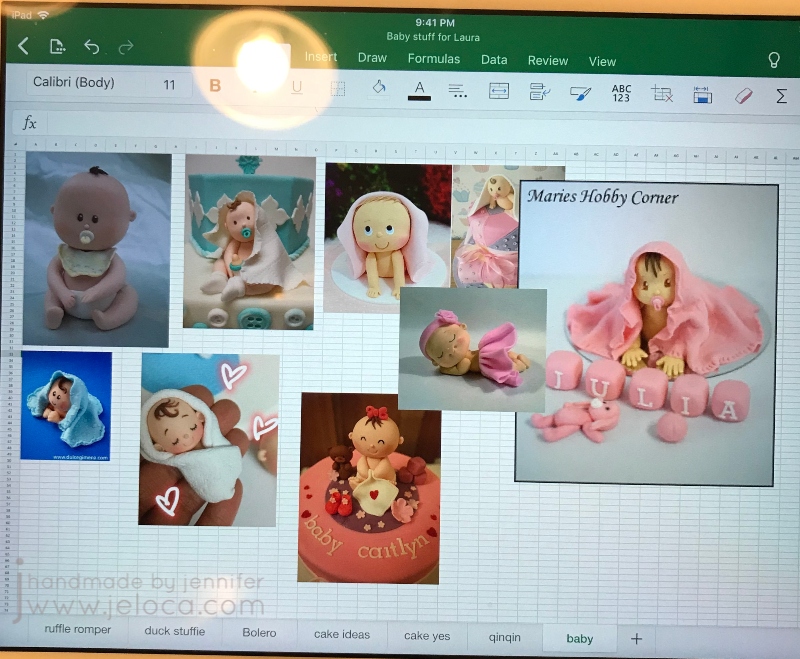
I always make an Excel file with inspiration samples. The goal is not to straight copy anything you find, but to have a sense of what’s possible. At the time I didn’t yet have a baby mold so since I’d be hand-sculpting I collected an assortment of toppers that looked like something I could do.
I’d enjoyed texturing the fondant into ribbons for Laura’s bridal shower cake and so to tie the two cakes together I chose to make a sort of flower shape by flanging out the edges of pre-cut circles. The only thing I had to decide was if I’d color the edges or the centers of the flowers. I also had to make the fondant topper so it would have time to solidify before setting atop the cake.
The baby shower was on a Saturday and I still had residual exhaustion from finishing her last cake at 5am the morning of her party, so I got started early – on Wednesday.
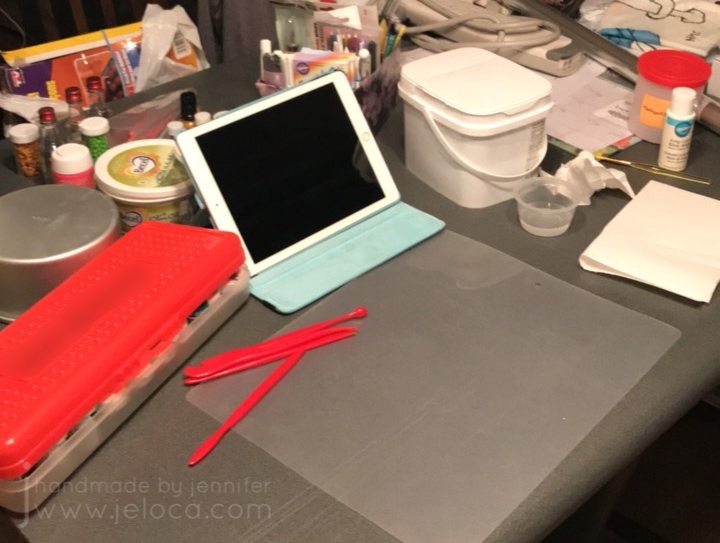
I always like to assemble my supplies before I start. There’s a tub of white fondant, fondant shaping tools, my organized container of tools, paintbrushes and edible markers, my collection of gel colors, water, mini vodka bottles (for fondant painting), paper towels for blotting, and most importantly – the cake tin I’d be using for the top tier (so I could scale my topper appropriately. Plus my iPad for both inspiration and entertainment while working.
To make the flowers I used my fondant roller and silicone mat to roll out some fondant to about 2mm thick. I used a 1.5″ circle cutter to cut out 3 circles for each flower sample and flared out the edges by rolling over them with a ball tool on a foam mat. Using a food-only paintbrush and some pink edible color dust, I brushed the center of 3 of the disks and the edges of the other 3, and then loosely squished each circle with my fingers and pressed them together. I much preferred the pink-center version, so now I was able to make a proper sketch and decide on my topper (as I still wasn’t sure if I wanted a seated figure or the laying-down-with-blanket style.
A sketch really helps to visualize your plans. Once I saw how busy the cake would look with the lower tier covered in flowers I decided the blanket baby would be too much.
Next was to make the baby. In my research I found that the creator of the first baby in my inspo pic had a full YouTube tutorial available. Don’t shy away from tutorials, that’s what they’re there for! I keep up this blog specifically so my tutorials can help others, and to share what I’ve found. Here is the designer’s website with instructions on making the baby boy, and the video I followed for the baby girl:
How could I not recommend it? Look how cute it turned out!
Seriously, I love her!! My only mistake was in laying the head down while I worked on the body. Unfortunately it flattened out and I didn’t want to mess up the face by trying to round it out again. So my figure looks great from the front but her head is clearly a little squished from a side view – oops! I’d recommend perhaps laying the head in a bowl of icing sugar, flour or corn starch to hold it without applying pressure to any of the sides.
On the Thursday night I baked 2 cakes, and prepped them to cool as per my post linked above. Then Friday night was for putting it all together.
First I covered each tier in fondant – white for the flower base and a pink matching the baby diaper for the upper tier.
Knowing how heavy the solid-fondant baby figure was, I inserted a wide straw (ones for slushies are perfect) and cut it to be flush with the top tier. This would provide support and hold the weight of the figure so the cakes wouldn’t compress.
Next was to make more flowers. As for my sample, I rolled out a workable section of fondant, cut a bunch of circles, added some color to the center then squished the sides in. Be careful to not roll out more than you can handle at a time, so they don’t harden before you can flare the edges and squish them into shape. The flowers were applied to the cake with a bit of water on the cake and the adjacent petals. If necessary hold into place for a few seconds until it stays. Cover the entire base.
Remember to look at your cake from different angles. I hadn’t – I remained seated the entire time – and so I didn’t realize until I was looking at it later from above that there was a gap along the edge of the top cake where you could see the unfinished edge. Had I noticed in time I’d have pushed the top edge of petals up higher to fully encircle the top tier.
I had a few extra flowers in the end so I placed them around the baby figure, though that’s completely optional.
And there’s the finished cake! I absolutely love how it turned out. The flowers/petals give a great visual payoff that belies how EASY they are to make. Looks great and easy to customize with your choice of colors – I highly recommend!
And just as for her bridal shower cake, here’s a bonus pic of the mom-to-be with her baby shower cake. ❤
*whose arrival was followed immediately after – as in, less than 24 hours later!! – by my second niece! ❤
This post may contain affiliate links. This means I might make a small commission on purchases made through the links, at no cost to you.
It’s National Cake Decorating Day today so I’ve decided to share a project from my personal archives along with a tip to help you level up your cake decorating skills.
A few years ago I made this baby shower cake for one of my sister’s friends.
I didn’t take too many progress pictures so I can’t share a visual step-by-step, but the process is pretty similar for most of my cakes. A few days before the event I bake the cake(s) and then wrap them in saran while still warm to trap in the moisture while they cool down.
The step that took the longest with this cake was to create the fondant topper. The dad-to-be is a hockey player so I was asked if I could create a baby ice skate for the top. It’s fully fondant except for the lace, and I made it about a week in advance so it would have plenty of time to dry out and harden before the party. I wanted the skate on a long skewer to make it easy to slide securely into the cake after delivery so I put the skate and blade together while soft so I could slide the skewer in and make sure the holes were lined up, but then I took them apart to dry separately. I didn’t want the weight of the skate to distort the blade before it was fully set up.
When there is going to be a lot of weight on a cake it’s important to have enough support in the lower layers so the cake doesn’t sag. First I covered the lower layer in a base of baby blue and then I broke a dowel into 5 pieces to create a support to hold the weight of the upper tier. I didn’t want to take a chance on any splinters getting into the cake so there’s a cut length of straw around each dowel. I also made a note for the recipient letting them know how many supports there were so there would be no chance of a guest receiving more than they bargained for on their plate.
I don’t have progress pics of the decoration itself but it’s fairly simple – the base tier was covered in strips of fondant in various shades of blue and white and then topped with a disk of gray on top to clean up the edges and hide the supports. The top tier was covered with white fondant and then fondant circles of blues and gray in assorted sizes. To get the smaller circles I used an assortment of cookie cutters as well as straws of varying thicknesses.
This is where the tip comes in! When creating a fondant pearl border for the cakes the easiest way to make sure you get all your balls the same size is to use a cutter to cut out identical pieces of fondant before rolling. You can use a straw for really small pearls or a cookie cutter like I did to get larger ones, or any size in between! It’s super fast and easy and eliminates the guesswork of judging how large a piece of fondant you’ll need to roll. You can use the same tip for clay work as well!
As you can see with my pearls, there’s still a tiny bit of variance. This is because I didn’t roll my fondant to the same thickness each time. I’d advise using guide rings on your fondant roller to get the same thickness every time.
I added 2 more circles of blue on top to give a contrast for the skate, and then the cake was ready for pick-up.
My box wasn’t tall enough for the cake so I used 2 skewers to hold the lid in place, and set the skate in a bed of paper towel in the plastic container from a package of strawberries. The holes in the plastic were perfect to slip the skewer that was inserted in the skate through.
Here’s the finished cake. I’m really pleased with how it turned out!
I also really love this image I was sent of the cake in place among the other desserts at the shower. ♥
Here’s an easy-to-pin reference image for those who don’t already follow me on Pinterest. 🙂
Hopefully this little trick will help out the next time you’ve got to make a whole bunch of identically-sized fondant (or clay) balls!
Note: Today is also World Mental Health Day. This year’s Mental Health campaign is focused on showcasing the efforts various countries have made to bring mental health care to their populations, especially during the pandemic. For more information about the campaign, please click here, and if you’d like to donate to the World Federation for Mental Health you can do so here.
This post may contain affiliate links. This means I might make a small commission on purchases made through the links, at no cost to you.
It’s been brought to my attention (*cough*Michelle*cough*) that I never finished posting Henri’s Pitfall cake. That is correct… February sort of got away from me, so I’ll take care of that right now. This post will cover the final details of finishing the cake the night before the party, and my next post will show the final cake at the party, complete, and enjoyed. 🙂
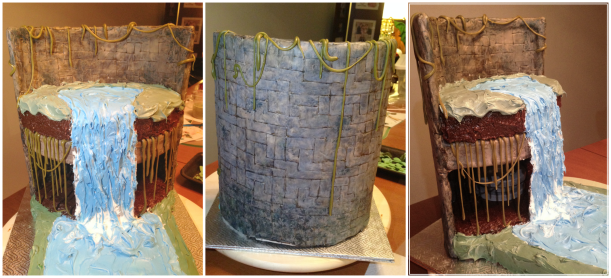
In my last Pitfall cake post I left off with the cakes assembled and dirty-iced. I set them aside for a little bit so the icing could crust and mixed up some green for the grass. I deliberately gave it a bit of an aged, almost faded color so it would match the tones of the fondant leaves and the brick wall. The wall was so dirty and stained/old-looking that a bright, primary-colored grass base would have looked really, really out of place.
I covered the top cake with the same cake-filled chocolate icing as I used on the lower base, blocking out an area for the small pool at the top of the waterfall. Then I used green icing to block out the larger pool at the bottom. Once the brown and green were done I used more white icing to thicken the base coat on the various water areas.
Then I realized that the pool I’d created wasn’t wide enough to fit the crocodile I’d already made. Oops! So I used more white icing to widen the water.
My cakes are often like this. Very rarely is something sprung to life, fully formed, exactly as it was in my head. It might be close, in the way this cake very closely resembles my initial sketch, but the actual details in the getting there are always very fluid, and often borne of the desperation and delirium that comes from cake decorating in the wee hours of the night when stores are closed and coffee is cooling.
Next I mixed up some blue for the water and layered it on over the white. I didn’t worry so much about the edges where the water and grass meet as I knew I’d be placing leaves there, and I deliberately left it choppy on the waterfall where I wanted it to look like there was some motion and churning. I also played with swirling my knife around to make the water look a bit rough because the waterfall would prevent it from being a clear, calm pool. Above you can see the cake as I worked on it (with the parchment protection) and then how it looks once I removed the parchment. I always keep the parchment in place until I’m ready for the finishing details as it’s much easier to remove dirty parchment from around a cake than icing from the cake board.
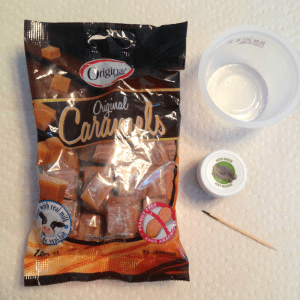
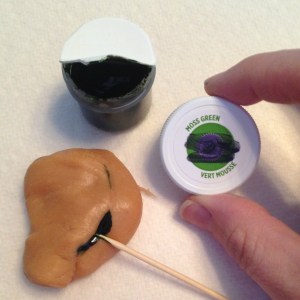
One of the things I’d been thinking about in the days leading up to D-day (decorating day) was how to make vines. I figured I’d just roll out some fondant pretty thin and hope it wouldn’t crack once it dried. But when at the dollar store that afternoon during my unexpected child-free time I hit on the idea to try using caramels.
I figured they were already pliable, and edible, just like fondant… but had a better stretch. Hmmm…could this work?
I’d decided to do a quick test before going to pick up the kids from the party. I softened 2 caramels in the microwave and then when they’d cooled enough to touch, added a touch of green food gels. I kneaded it together just like dough/fondant and was thrilled that the caramel took the color evenly, with no streaking or dissolving from the added moisture. I quickly rolled out a quick, curly vine and set it aside to dry while I was out.
This is what I came home to (above). A perfect, jungly-green colored, held-its-shape vine that was smooth, crack-free and best of all, delicious. (Okay, there had been 2. Yum.)
Sweet!
(Pun intended).
For my Pinterest friends, here’s a graphic for you!
Now that I knew I had the solution for the perfect vines, I got to work. I wanted to set the vines in place before finishing the grass because I knew working on one could destroy the other.
I rolled and rolled and rolled and rolled and rolled, placing each vine in place before rolling out the next one. The vines that draped around the wall stuck pretty well with a tiny touch of water, only on places where I wanted a curl or end to stay up. For the most part, though, I left them unstuck so gravity would work on the caramel and make it look more natural.*
I had an image in my head of vines hanging down like curtains, helping to hide the secret healing spring. So for those vines, as I made each one I used the tip of a knife to lift the cake board that the top cake was sitting on, just enough to wriggle the end of the caramel underneath, and poking it in with a needle tool if I had to.
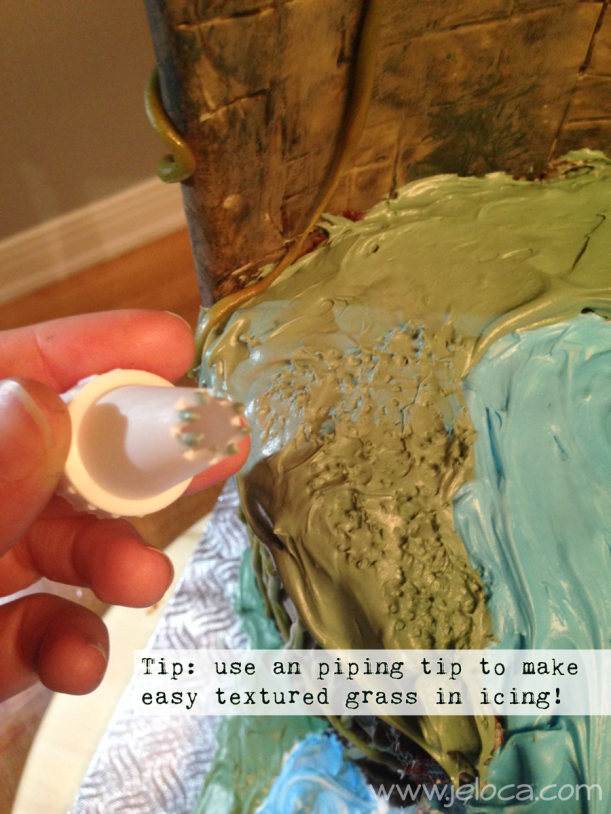
After the vines were done I tackled the grass. My first thought was to use my grass tip and pipe out the grass like I’d done around the Betty Boop cake. Only problem was I knew I was going to use my remaining green icing to do grass around the edges of the cake where it met the board and I didn’t think I had enough icing left. I was tapping some piping tips against my palm, trying to figure out if I had enough icing mixed up for all the grassy areas, when I looked at the marks I’d left on my skin and got another bout of inspiration. (My pain = cake gain).
I used an open star tip and basically poked the hell out of the grass areas. My icing had crusted enough to be an ideal surface, but if your icing is still soft I’d stop every now and then to clean your tip, as the grass effect works better with smaller pokes vs larger flat areas. It was remarkably convincing for grass, and I’m really, really happy with how it came out.
Plus it left me with enough green icing left to pipe long, marshy grass/weeds around the base of the cake. I did that, then stuck down the leaves I’d darkened, then decided to call it a night.
In the back you can see the remaining leaves I didn’t end up using. Don’t worry, they didn’t go to waste. The kids ate them all over the next few days. 🙂
I tried to vary the lengths of the grasses to make it look more natural than an even, trimmed border.
In these final two pics you can see the two sides of the cake, and the finished vines and grasses. I’d added some long grass to overhang the vines as well.