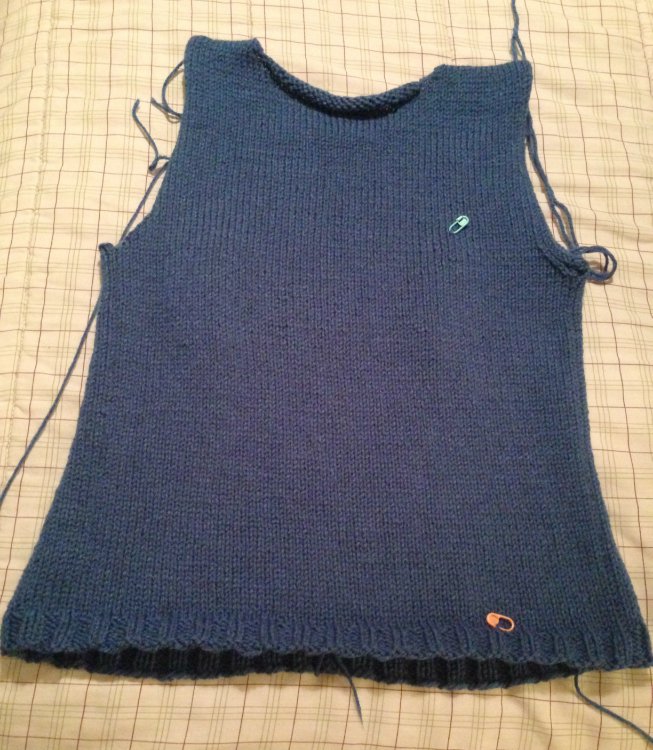
It’s done! On Tuesday I finished the vest, and was able to move on to the next part of the Sprocket cosplay.
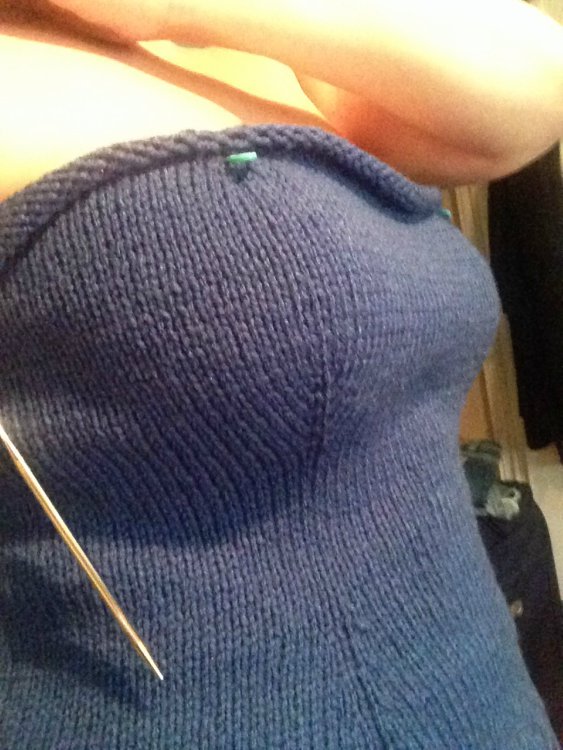
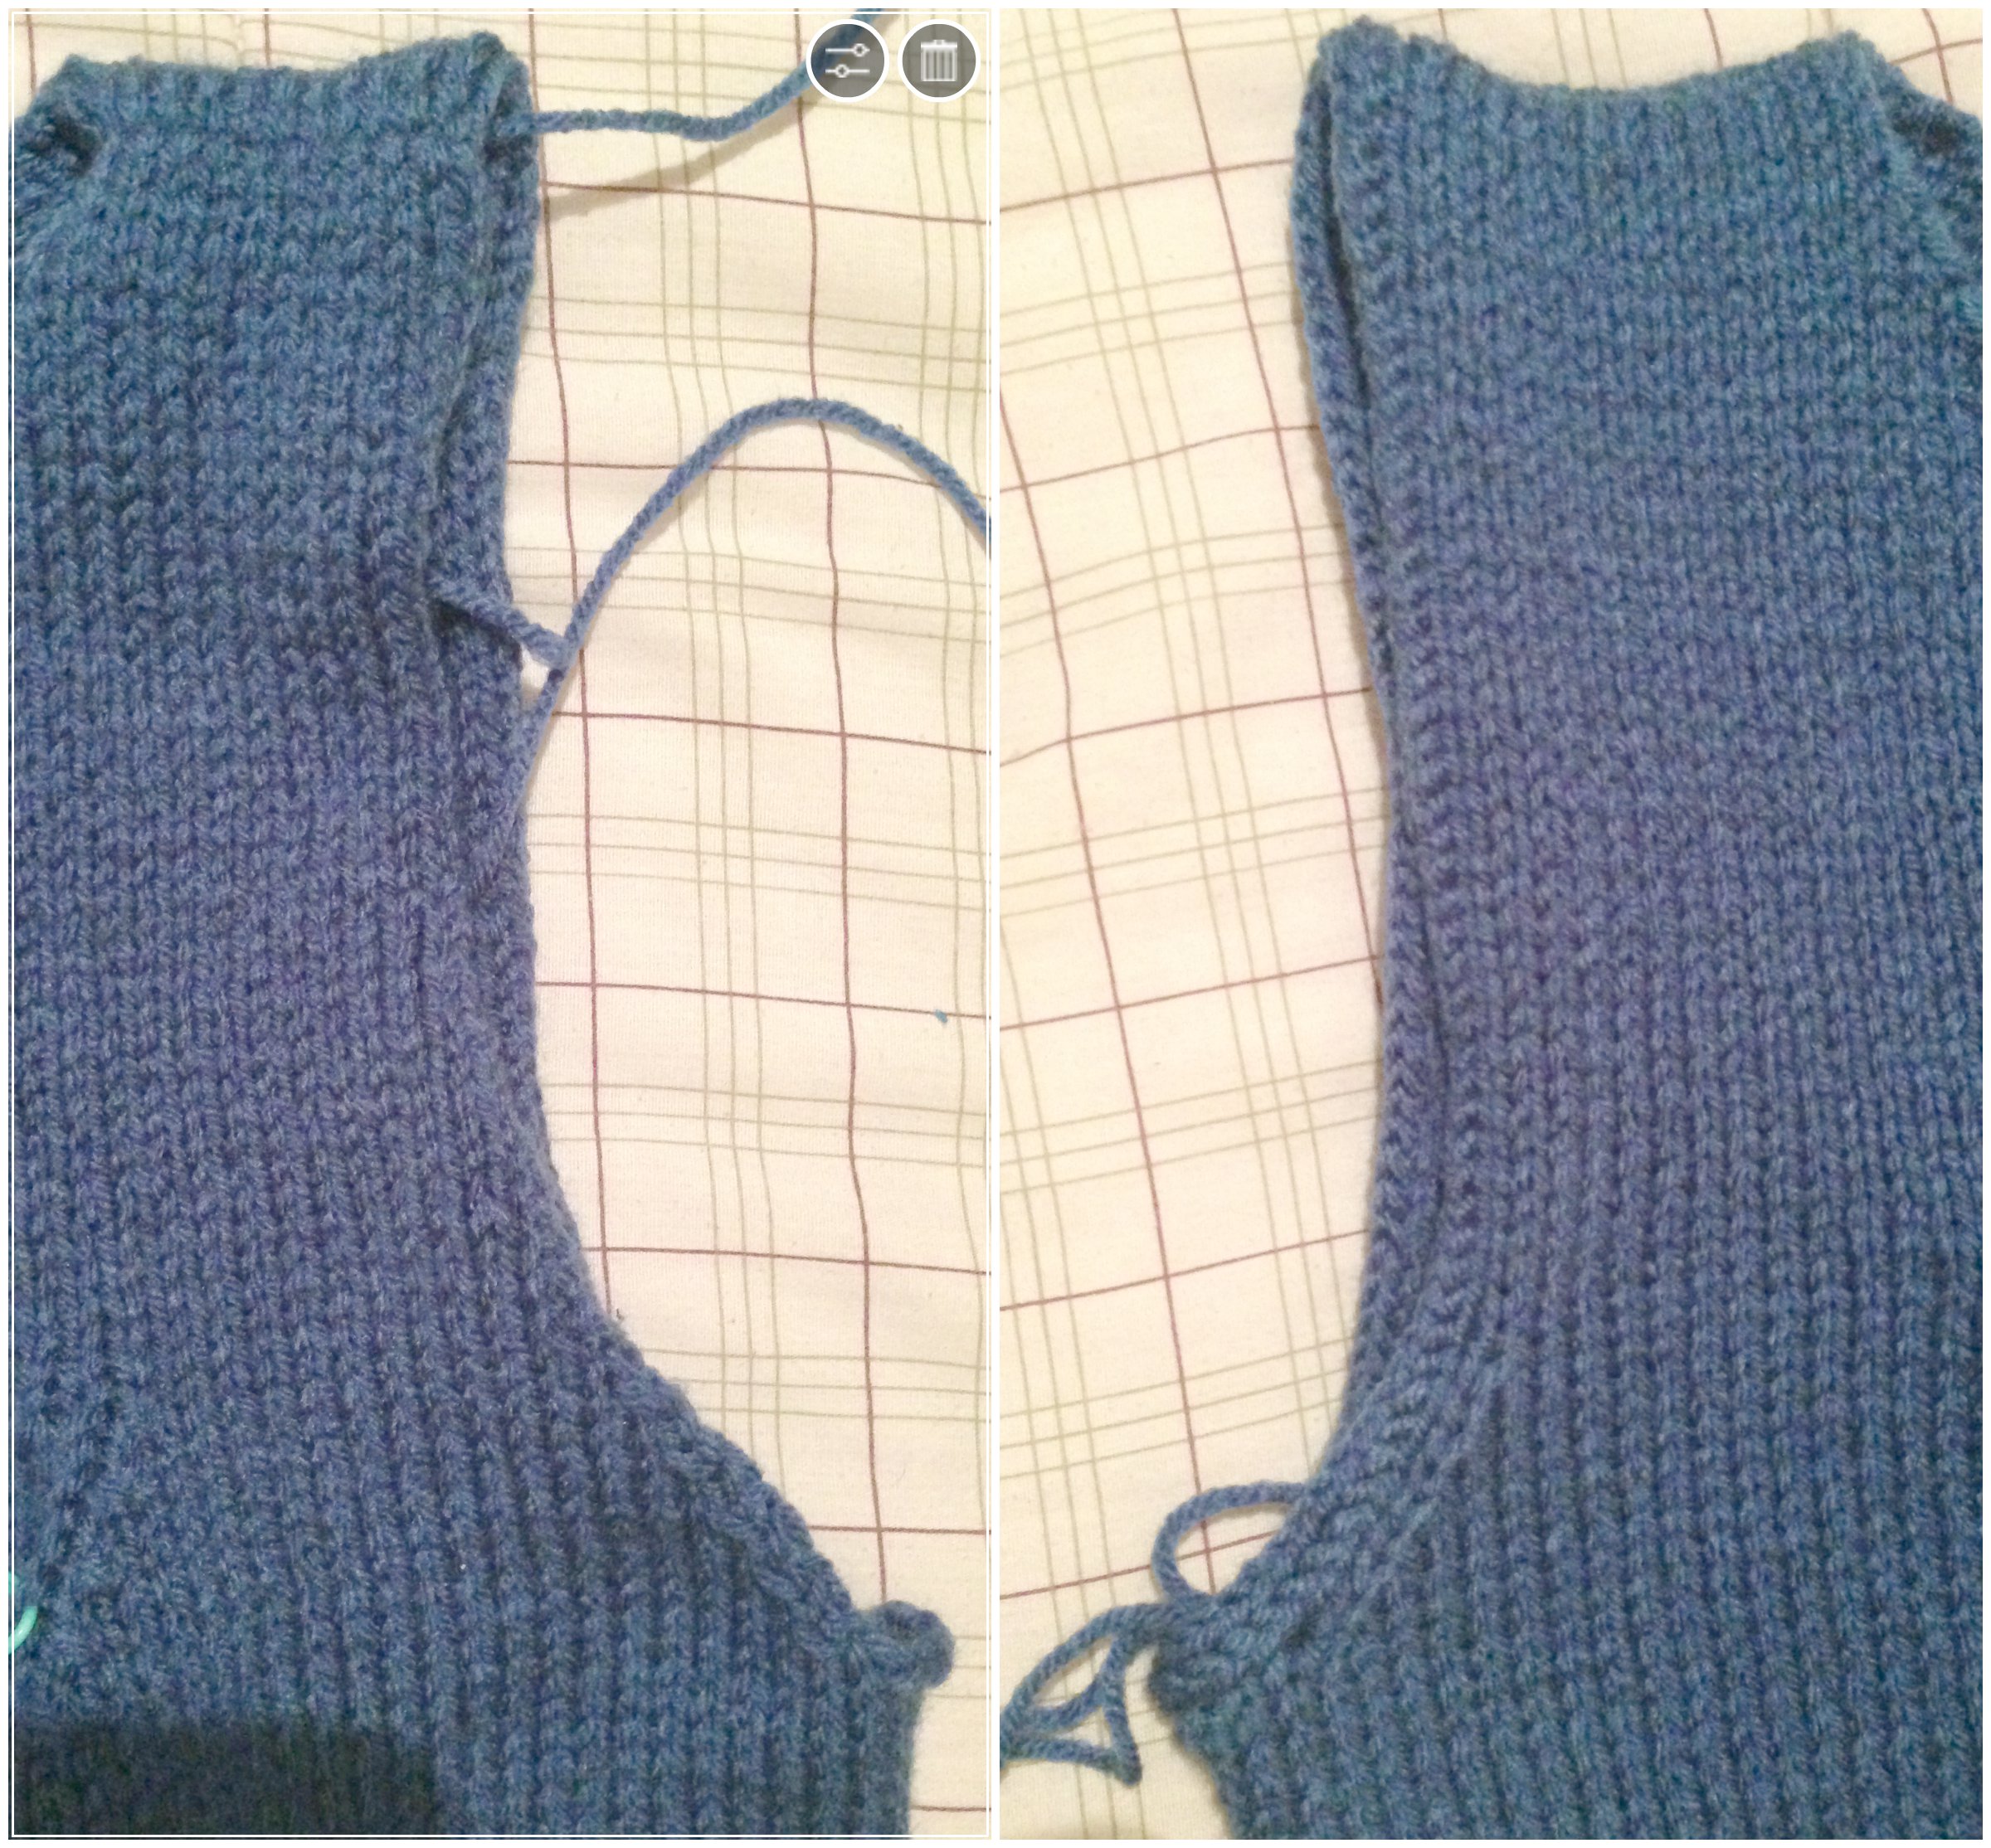
I ended up picking up stitches around the armholes then working a 3-st, i-cord BO/applied i-cord around the edge, grafting the ends together. I didn’t bother with a provisional CO, I just used the yarn tail to duplicate stitch the join so it looked flush. In this image you can see the difference between the before (left) and the after (right).
I did the same thing for the neckline, with one minor tweak. The edges were curling, and I preferred the lower edge. So when I picked up the sts I picked up about 3 rows down in the flat sections, turning that extra fabric to the back. After working the i-cord I took another length of yarn and tacked that little flap down on the insides.
You can just barely see it on the inside, and see a slight ridge on the outside, but I don’t mind.
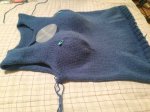
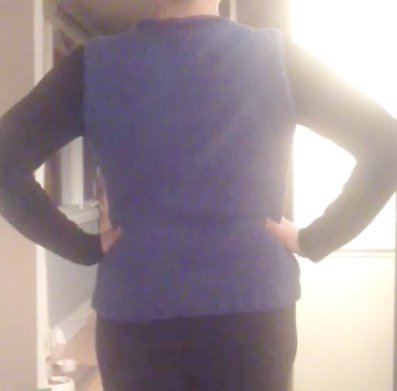
The lighting in my kitchen sucks, but here’s the back…
… and the front. And Sam, for some reason.I’m wearing it over the shirt and pants I bought for the costume, so this is the best progress pic so far. 😀
Plus- it fits!Cosplay progress completed parts to-date:
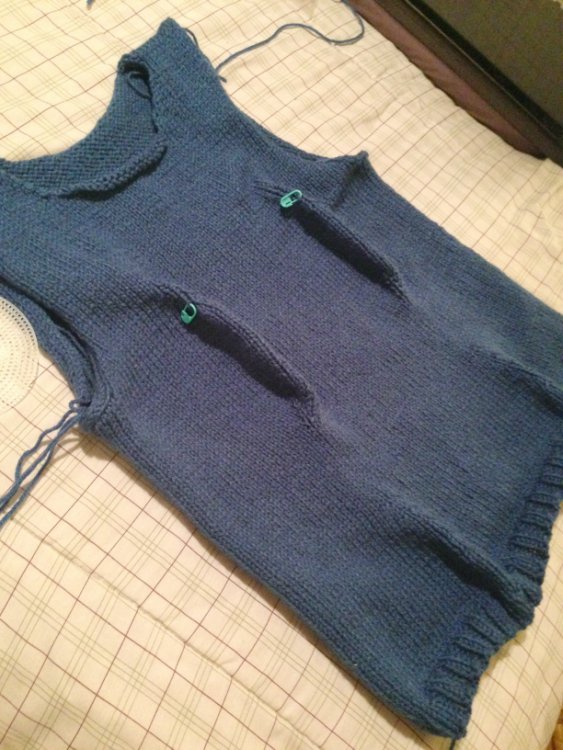
The back, after seaming the sides and shoulders……and the front.
Heh. Those darts look rather silly when laid flat like that, don’t they? As soon as I realized that I slipped a bra inside to help, erm, fill things out a little.
That’s better… if a little scandalous-looking.
At some point I will be making the gauge Sprocket wears on her chest, and I wanted to make sure I had enough room to place it flat on my chestbone. I do, and discovered that the neckline was actually a little higher than I needed. I prefer it falling as low as it is curving, not where it would be if the bound-off sts were actually laying flat.
This was where I set it aside for the night. I wanted to look up armhole finishing techniques, and was unsure if I wanted to do an icord BO/applied icord around the exposed edges, or pick up, knit a few rows and bind off, leaving a curled edge. It was late, so I decided to sleep on it.
The back of Sprocket’s vest complete, it was time to design the front. Sunday morning we slept in after a lovely and decadent family wedding, and then while Yannick mowed the lawn I drank some coffee and did maths.Before even beginning to decide how to tackle the front, I wanted a map of exactly how many rows my back piece was. I wasn’t concerned about matching width, but it would sure suck to start seaming the sides and realize my rows were way off. I pinned the back out to a blocking board, double-checked my hasty pattern, and filled in my sketch.
Now I knew I had 140 rows total for the front, and to make them even I could ‘spend’ 6 rows on the lower ribbing, 78 rows making my way to the armhole decreases, then jigger the bust however it took as long as I squished it all into 56 rows. On the width issue, my only requirement was that I finish the shoulders at 16 sts each, so I could do a 3ndl bind off on them later.
By this point Yannick had come inside to join me, and was playing Mario Kart while I did more maths. Which led to way more maths and a minor tease of a headache.
But in the end I figured it out. I would cast on enough sts for my belly, and work the rib to match the back. Mosey my way up to my waist, working darts to decrease towards my narrower point, and then after a bit worked even I’d re-increase along the same dart lines to fit my bust. More working even, and that should get me to the armholes. Then I’d decrease for the armholes AND the top of the bust darts at the same time, narrowing the whole top to the same 15″ across as the back. Work the straps, ending with 16 sts each. Easy peasy lemon squeezy, as Henri would say.
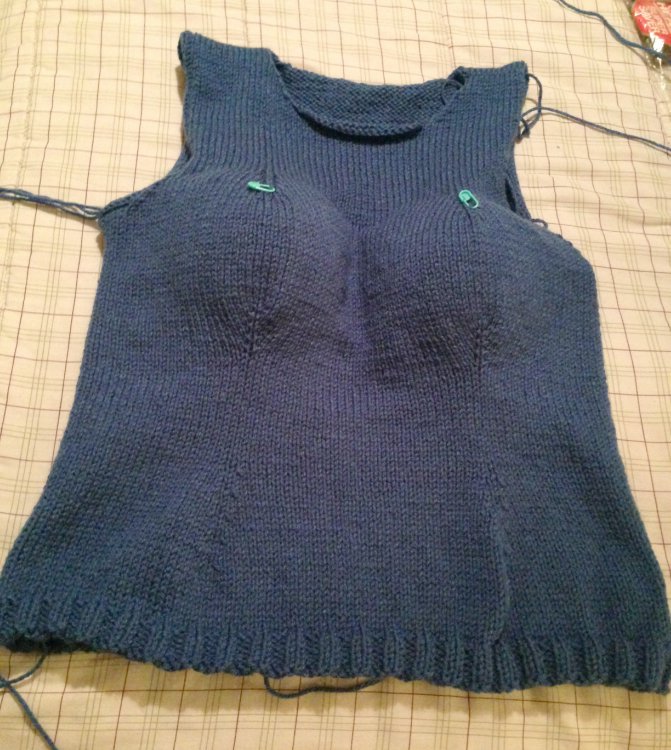
And?
It worked! I got all the way up to the bust increases done on Sunday and after brunch with friends on Monday morning I came home and seamed the sides so I could try it on.
After trying this I have to say I’m hooked on darts. I think any knitted top that isn’t complicated by patterning, that I want to be somewhat fitted, will now have waist and bust darts. Or at least bust darts. The difference they make is astounding.
In my last post I explained how to calculate yarn yardage needed for plastic canvas stitching. Here’s the breakdown of how that applies to my project, Sprocket’s wrench.
The following chart shows each piece I’ll need to stitch, its dimensions, and what the resulting area is (in ‘holes’).
All that figuring tells me I need 189.18 yards of yarn to stitch the wrench NOT counting any edging or whipstitching to join. Sadly I only had 160y of my first choice yarn, a skein of gray acrylic from my stash. I went stashdiving (virtually, thanks to a long weekend spent entering everything into Ravelry) and discovered 2 other possible gray yarns. Briggs & Little’s Tuffy in Smoke, of which I have 10 skeins, and the gray localspun wool from my frogged Linden. I went initially to the localspun but in the light the natural wool, blended from assorted animals, was overall too creamy for this project. There were a lot of beige tones that wouldn’t work well to represent metal. I’d been hoping to avoid breaking into the Tuffy so I could keep the lot for some other project, but I realized that I’d been holding onto it, unused, for about 10 years now. Time to use it.
I’ve been toting around my bag of project pieces everywhere I went, using every minute of available time to stitch. It’s dawning on me just how close July 4th is, and how ambitious my version of this costume is, and I’m realizing I might have to cut corners somewhere, but using spare time wisely will help me get the most done. So whether I’m waiting for my kids at daycare or sitting in a waiting room or in line at the grocery store, I’ve been pulling out a piece of canvas and stitching wherever I was.
And it paid off. As of yesterday, June 12, the wrench pieces are complete.
All that remains now is to stitch them together into the assembled, 3D wrench/purse.
And then make a vest, goggles, wig, gauntlets, chest plate, belt and boots.
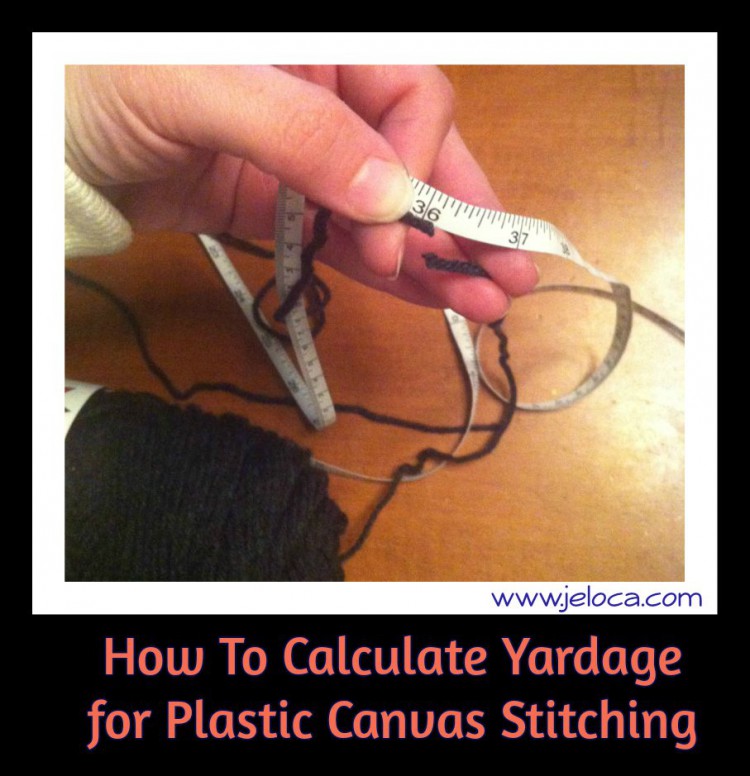
Sometimes you have a project in mind, and yarn on hand, and boy it sure would suck to get mostly completed and realize you don’t have enough yarn to finish. In my case, I’m impatient. Sunday night I had one hank of appropriately-colored gray yarn, and a gray wrench to stitch, and I would have loved to get started… but first I needed to know if I had enough yarn to fully cover the entire thing.
Here’s how you figure it out.
Step 1- Cut a set length of yarn. In my case I cut a strand of yarn that is 36 inches long. A few reasons for this- 1) my measuring tape is in inches, making that a convenient measure, 2) 36 inches = 1 yard, and yarn labels list yardage, so I won’t have to do any conversions, and 3) 36 inches is a comfortable working length for when actually stitching, so my beginning and ending tails can be reasonably included in these figures.
Note- this will only be a helpful estimate if you use yarn that is the same, or at least the same thickness, as the yarn you plan to use in your project.
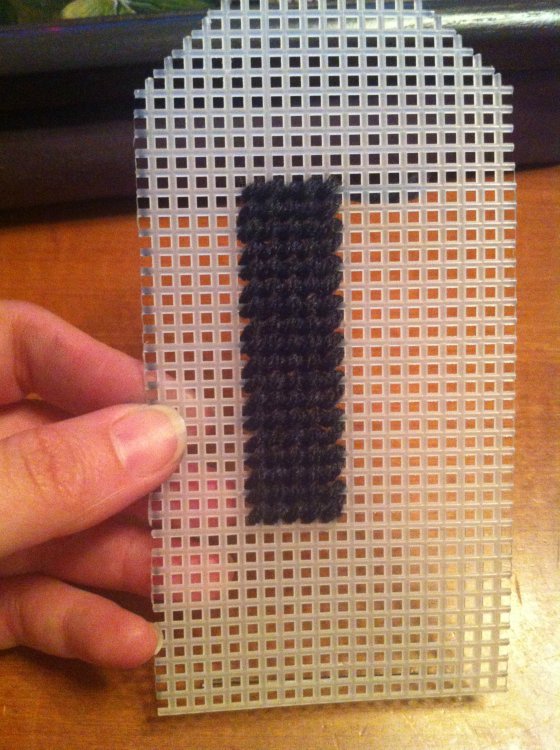
Step 2- Take a scrap piece of plastic canvas, the same gauge as your project, and begin stitching.
Make sure to use the same stitch you will be using in your project, as some stitches take up more yarn than others, for example cross-stitch uses more than Continental.
Keep going until the yarn is nearly done, and fasten off as usual.
Step 3- Do some math. My 36″ of yarn allowed me to fill an area that was 6 holes wide by 19 holes high. Yes, I’m counting in HOLES, not stitches. Why? Because some of my pieces are oddly-shaped and the stitches I’m using are slanted and I don’t feel like having to figure out how many stitches will fill irregular areas. Counting the holes is simply faster for me. You can count stitches if you prefer as long as you make sure to count total STITCHES needed later.
So. 1 yard (36″) of yarn will allow me to stitch an area comprised of 114 stitches.
Then all you have to do is count the number of holes in the project (or stitches, if you’re doing it that way), divide that by your swatch yardage (in my case: 114) and the result will tell you how many yards of yarn you need to fill it.
To that resulting number I would pad it based on certain factors- areas where you have to cut excess away, areas where you accidentally used too much to tie-on and get a few stitches short on that piece, etc. So for smaller projects I’d say this is a good way to know if a finite amount of yarn will work. For larger projects I’d say this was a good way to estimate the minimum amount of yarn you’d need.
Make sense?
If you were going to purchase yarn for this project and the count you end up with gives you the yardage of just UNDER a ball of your required yarn, I’d spring for an extra ball. Best case scenario: you don’t end up using it and can return it. Middle-of-the-night-likely scenario: you remember you have that second ball once you run out of yarn. For Sprocket’s wrench, I’m trying to avoid buying yarn. I have two different yarns in an appropriate gray that I can use, but one of them only has one, already-started, skein. I’d prefer to use that one, but I don’t want to risk running short. So I’ll count up how much my pieces will use without padding for any extra. If I see it’s pretty close to the amount of my preferred yarn I have I won’t bother starting with it, and I’ll use the other one instead.
Note– this method does NOT include yardage for whipstitching the edges together. That’s fine with me, because some of my edges are joined with a different color, of which I have plenty, and if I run out of my gray for the sewing-up I don’t mind using a slightly different shade for the assembly.
More progress on Sprocket’s giant wrench. First I traced out the shape for the smaller set of jaws by placing plastic canvas directly on top of my to-size sketch. The resulting shape isn’t completely round, but I’m ok with that, considering my medium. Plus I’m getting a slight Millennium Falcon vibe I’m completely cool with. 😀
I cut out that piece and then traced it onto more plastic canvas so I’d have an exact duplicate.
I used a dollar store permanent marker to do my tracing. It didn’t rub off while I worked, either on the plastic or my hands, which was a welcome surprise. I didn’t want to risk it showing through the stitching later, so I tested out removing it with some water and a Q-Tip I had handy. When I saw it would work I moved to the sink and most of it came off quite easily with a quick scrub under running water.
There are five more pieces needed to complete the smaller jaw- two 3 hole by 10 hole rectangles (to connect the top and bottom at the flat ends where the jaws are open), and three strips, one for each outer edge and one for the inside curve of the jaws.
I wasn’t quite sure how long they would be. I guessed it would be one square long for each square around, but I didn’t want to assume that, cut and stitch them, and find they didn’t perfectly fit when eased around the curves. Plus, being familiar with knitting and easing neckbands and sleeves into curves, I know sometimes you need a bit extra to ease into place. The answer?
Pac Man!
Basting, actually. Starting with the inner piece, I cut my 10-hole-wide strip longer than I needed and basted it in place, starting with the center 4 holes and working out to either side.
Voila. A strip I know fits because it, well, fits.
😀 Amazing how that works! Hehe.
It turned out to be 10 holes wide by 62 holes long. Last thing for the smaller jaws was to use the same basting technique to figure out how long to cut the 2 strips for the outsides of the jaws, and they turned out to be 10 holes wide by 47 holes long.
On to the larger jaws…but first… cutting plastic canvas leaves a lot of smaller pieces, many of which can be saved and used in other projects. The problem with keeping all the cut-offs is that they can get easily confused with the pieces I do need.
To minimize confusion, I ran a length of waste yarn through the good pieces, keeping them grouped by section so I didn’t risk mixing anything up. Once that was done and things looked a little less messy, I moved onto the larger jaws. I worked them the same as the smaller- tracing the shape onto plastic canvas, then cutting it out.
Instead of tracing the cut shape for my duplicate, this time I tried tracing the uncut shape and it worked just fine. (Laying a fresh piece of plastic canvas over the one with the dark outline). Then I cut the 2 3 hole by 10 hole pieces for the two narrow tips.
I did the same trick of basting in longer pieces to figure out how long a strip to cut for the lining of the inside of the jaws (10 holes wide by 88 holes long) and for the jaws’ outside curves (2 strips each 10 holes wide by 73 holes long.)
I completely forgot to take pics of the large jaws so picture the exact same process as the smaller ones, but… uh, bigger.
Technically I’m done, but I want to give it a little more stability on the inside, so I cut some spacers, 20 holes long by 10 holes wide, that I can tack into place along the inside of the wrench’s handle.
The last pieces to calculate and cut are the decorative trims…except…
This is where I stalled.
Because I had an idea and I wasn’t sure how to execute it.
See I figured… I’m gonna be in full costume, carrying around a giant wrench, and there was only one spot in the outfit that might work to incorporate pockets. So between my phone, my ID, money (cus shopping!), and the entry program, I’d have ‘stuff’. Plus I’d likely accumulate more ‘stuff’… business cards and things. But I really don’t want to have to carry a purse. So what if… I mean, I’m carrying around a giant, hollow object…
See where I’m going with this?
😀
The wrench is going to be my purse.
The 17″ wide handle is perfect, giving me a 5″ section I can keep my phone and ID in, and a 12″ section plenty big enough to hold a rolled-up program or any art I might get. (I’m hoping to get something Archie-related).
The only thing giving me a hard time was how to handle the closure. I spent some time drawing sketches and ruling stuff out, then when I hit upon a possible solution I made a little swatch to try it:
What I wasn’t sure of was whether or not a hinged lid with a stitched lip would stick out over a stitched base. Seeing how well it lays flush over an unstitched base, I’m going to go with that. I showed my sample to Yannick and he suggested flipping it on its side, so the handle opens along its narrow end. I told him I’d already thought of that and discounted it because I couldn’t figure out how to not make the sealing flap look silly. He suggested hiding it along the decorative trip that would already be visible.
And just like that, it clicked.
Here’s what I’m planning:
Kinda like this. Ish.
I re-cut and adjusted the top of the handle to reflect that, and then cut the 2 small and 2 large decorative trims for the jaws.
With that, I think all the strips (except the velcro lining bits) are cut. Next post- how to calculate how much yarn I’ll need.
First came the Minecraft lootbags, then the Minecraft fondant toppers, and then the Minecraft cake. Now’s where it all came together – the final Minecraft birthday party.
Once again, this was Henri’s 6th birthday party, from back in January. Jakob just had his own Minecraft party but I didn’t change much except for the cake, and that will get its own post shortly.
There are a lot of ways you can incorporate Minecraft ‘foods’ into your own party. A quick look through Google images or Pinterest will show idea after idea, I pulled some of them out and added my own to get what worked for the small group of kids we had. If you’re having a larger party, or its for a gaggle of teens, you can really go all out with some creative food arrangements. I’ve seen everything from pretzel-grid trap doors to a soda maker doubling as a brewing station!
I didn’t go quite so elaborate. Only 10 kids, a few lingering adults, and I knew the children would be rushing through the food to get back to playing video games (we were at an arcade). The place provided pizza, so I added a quick veggie side dish to the table.
Clear enough? 🙂
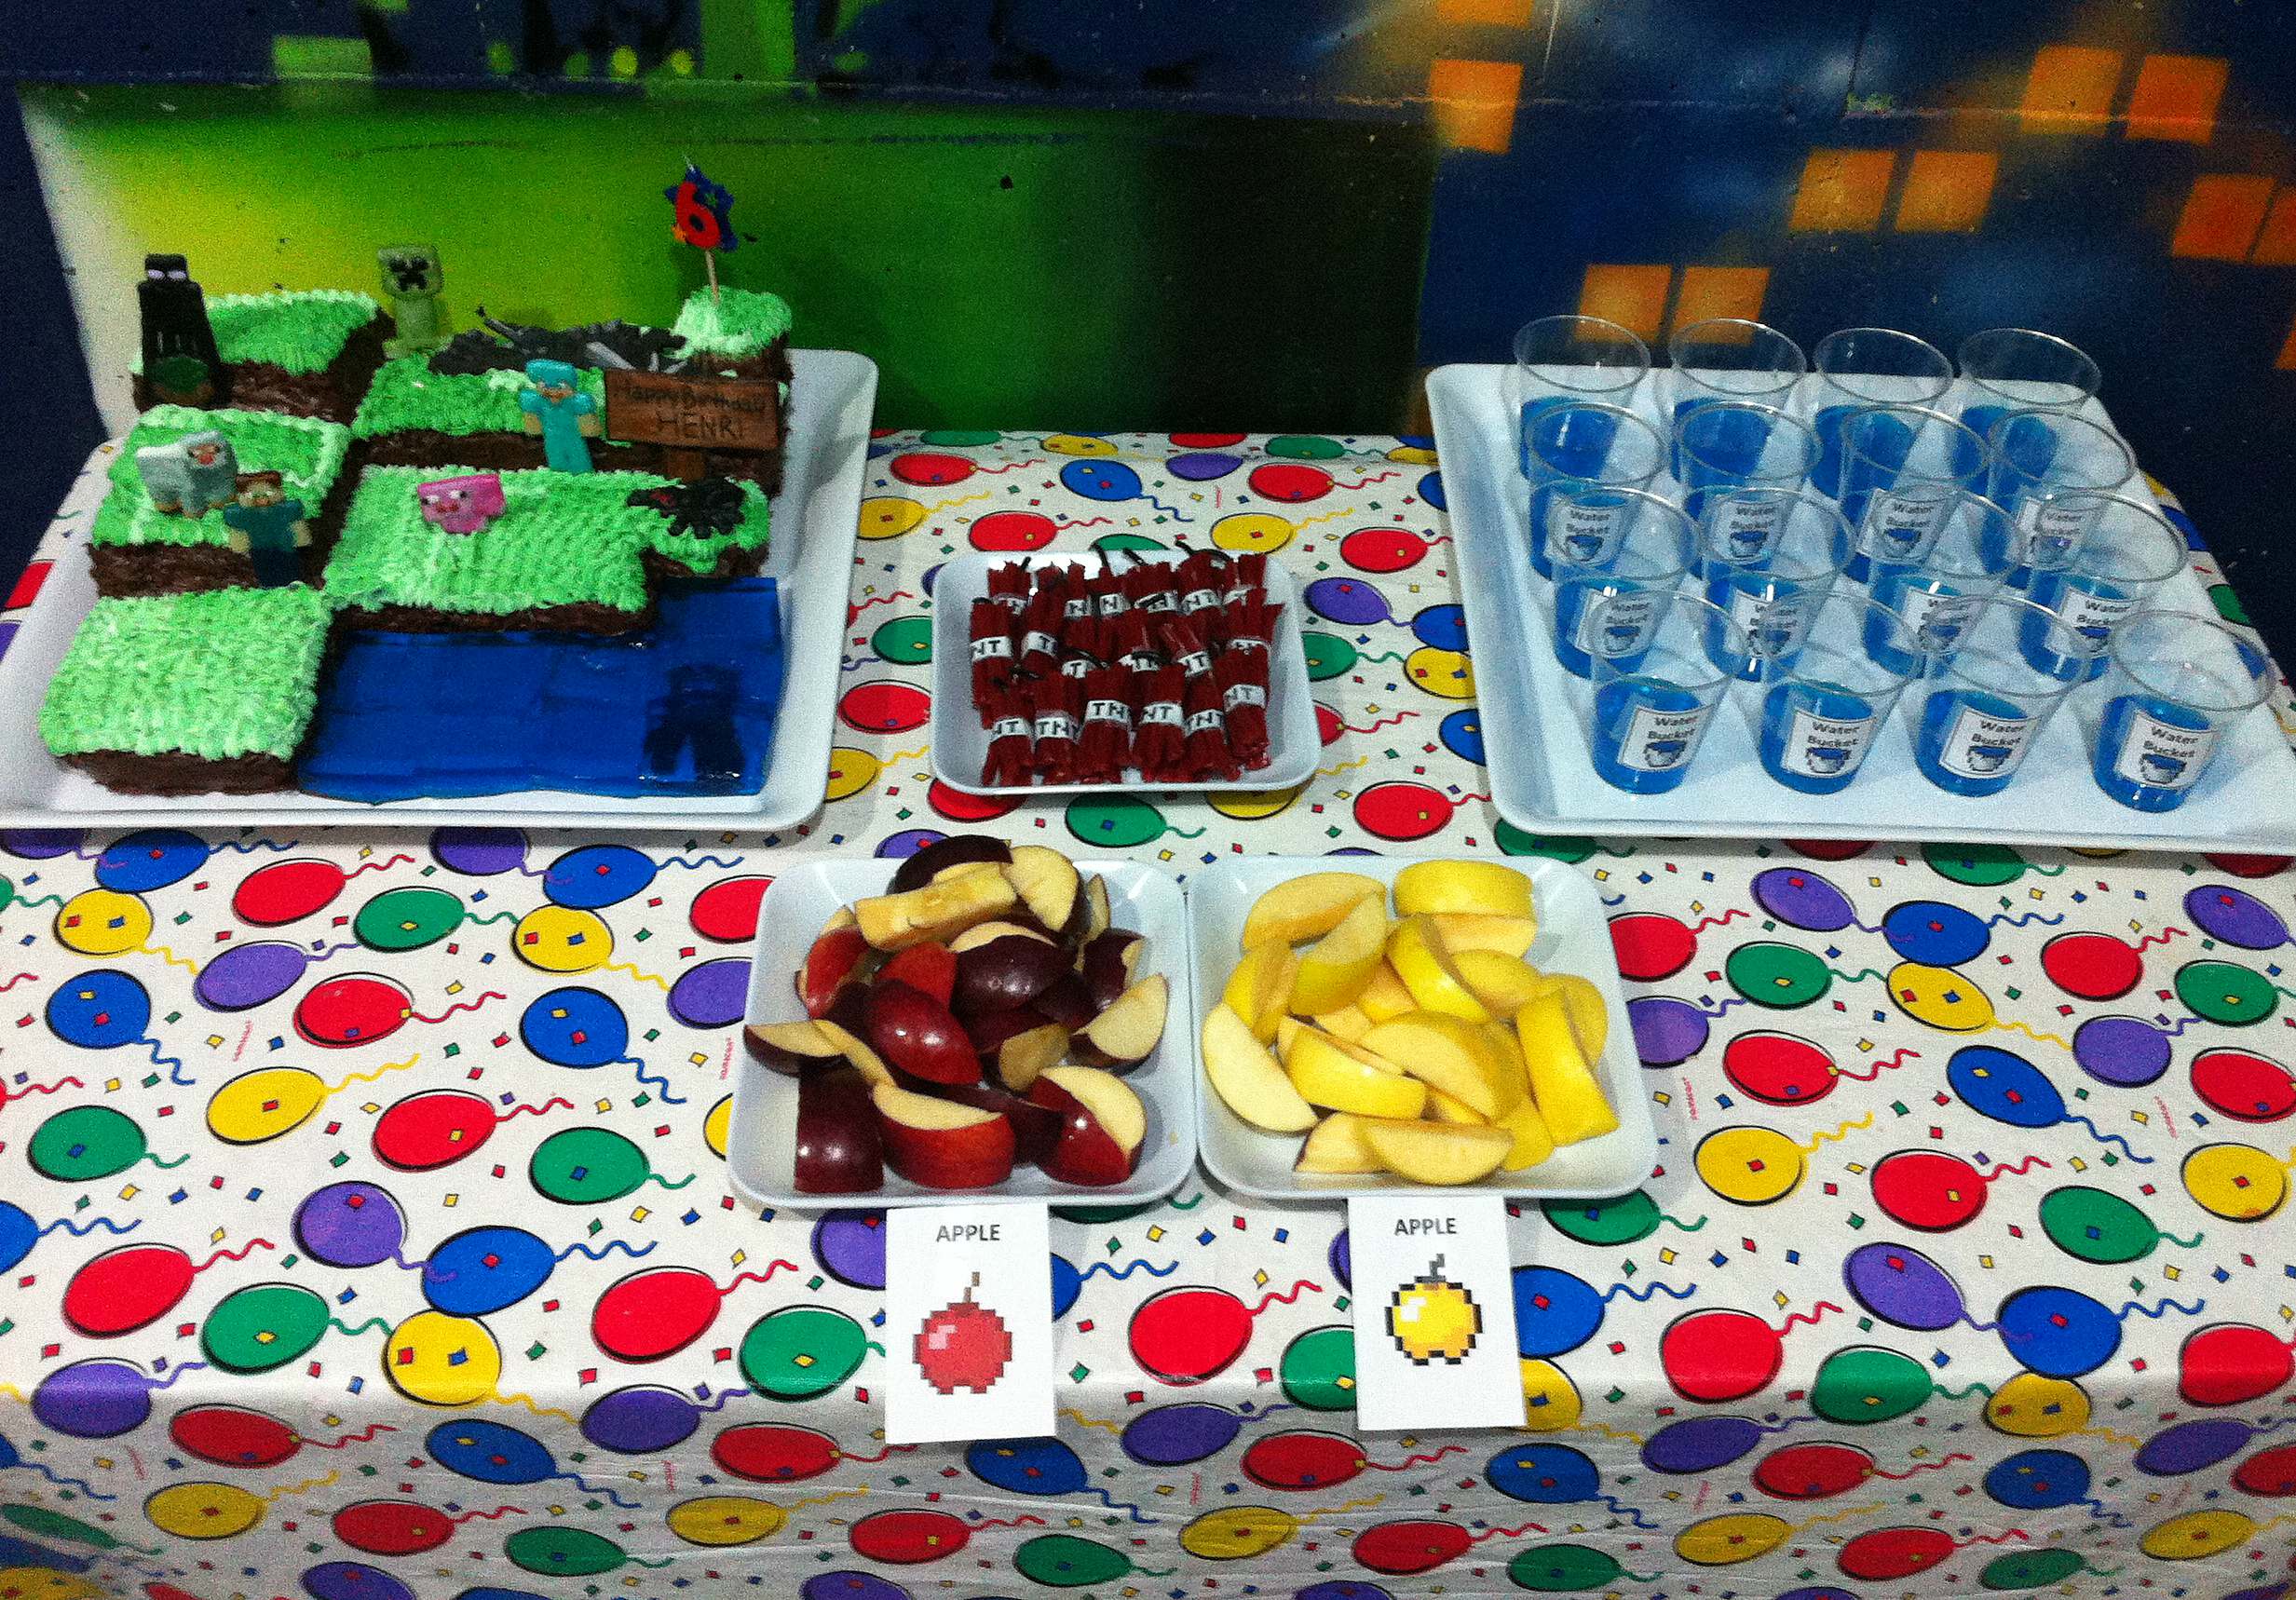
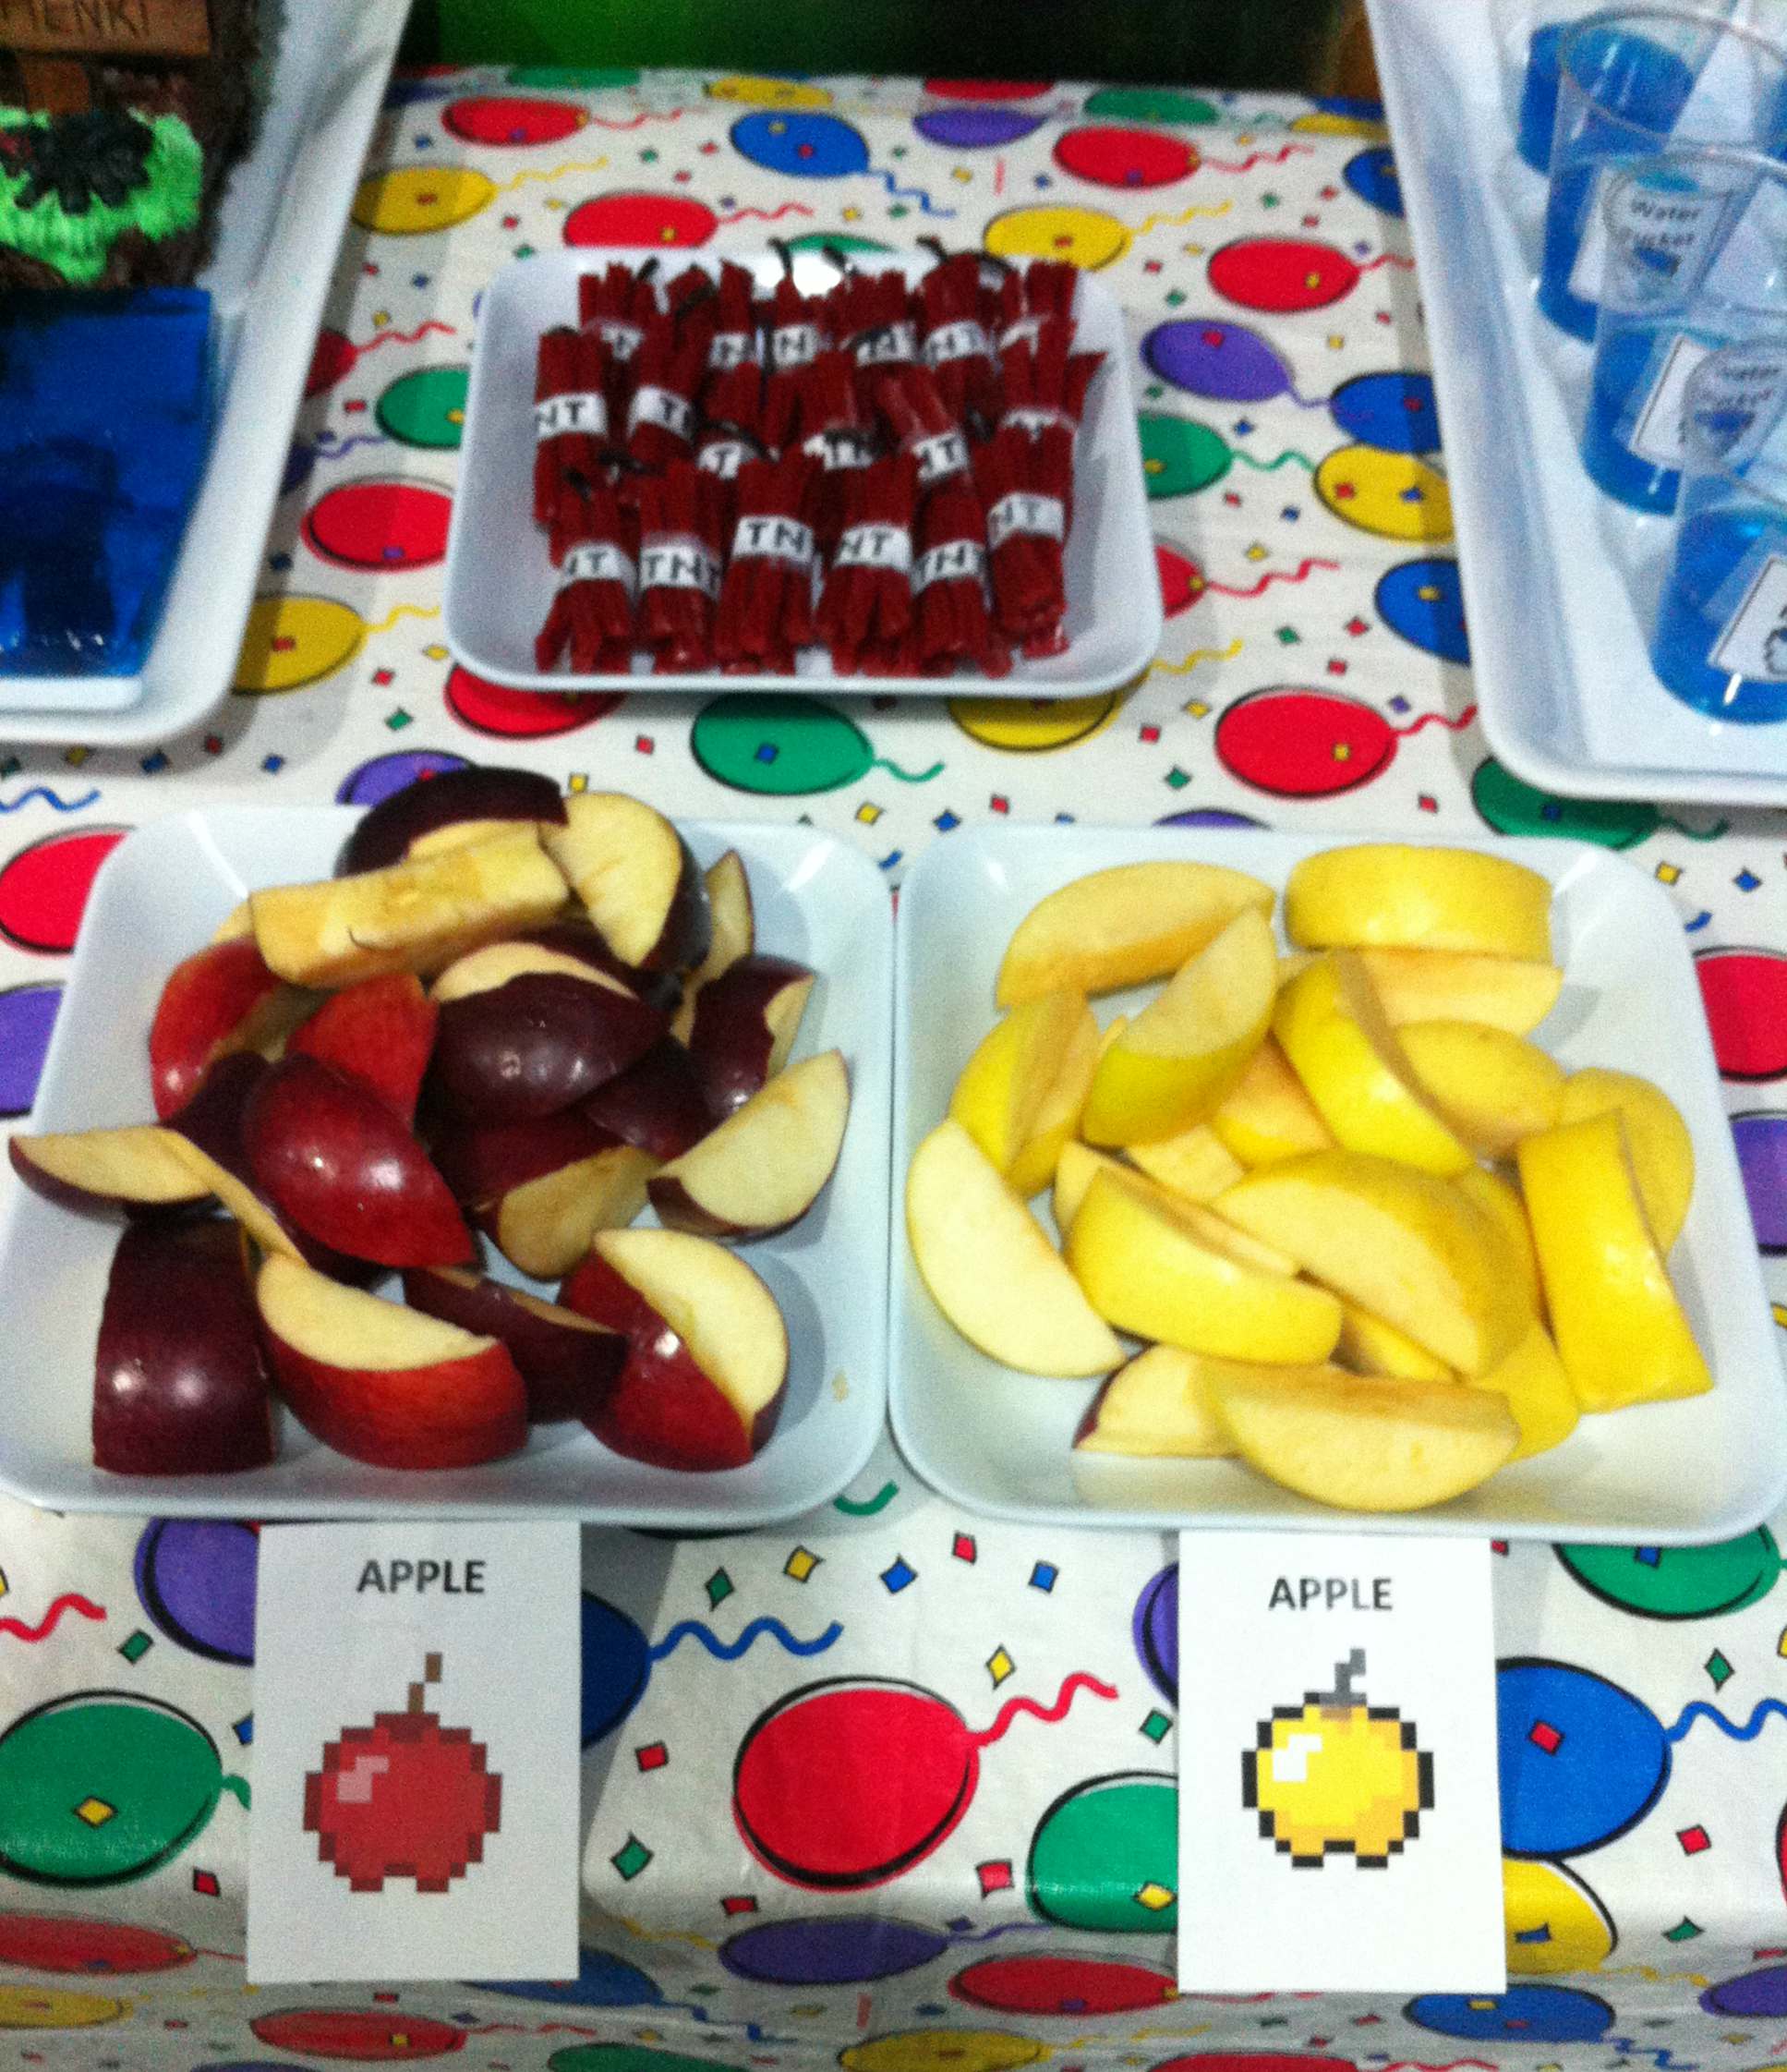
I had a little more fun preparing the dessert table…
Regular and Golden Apples…
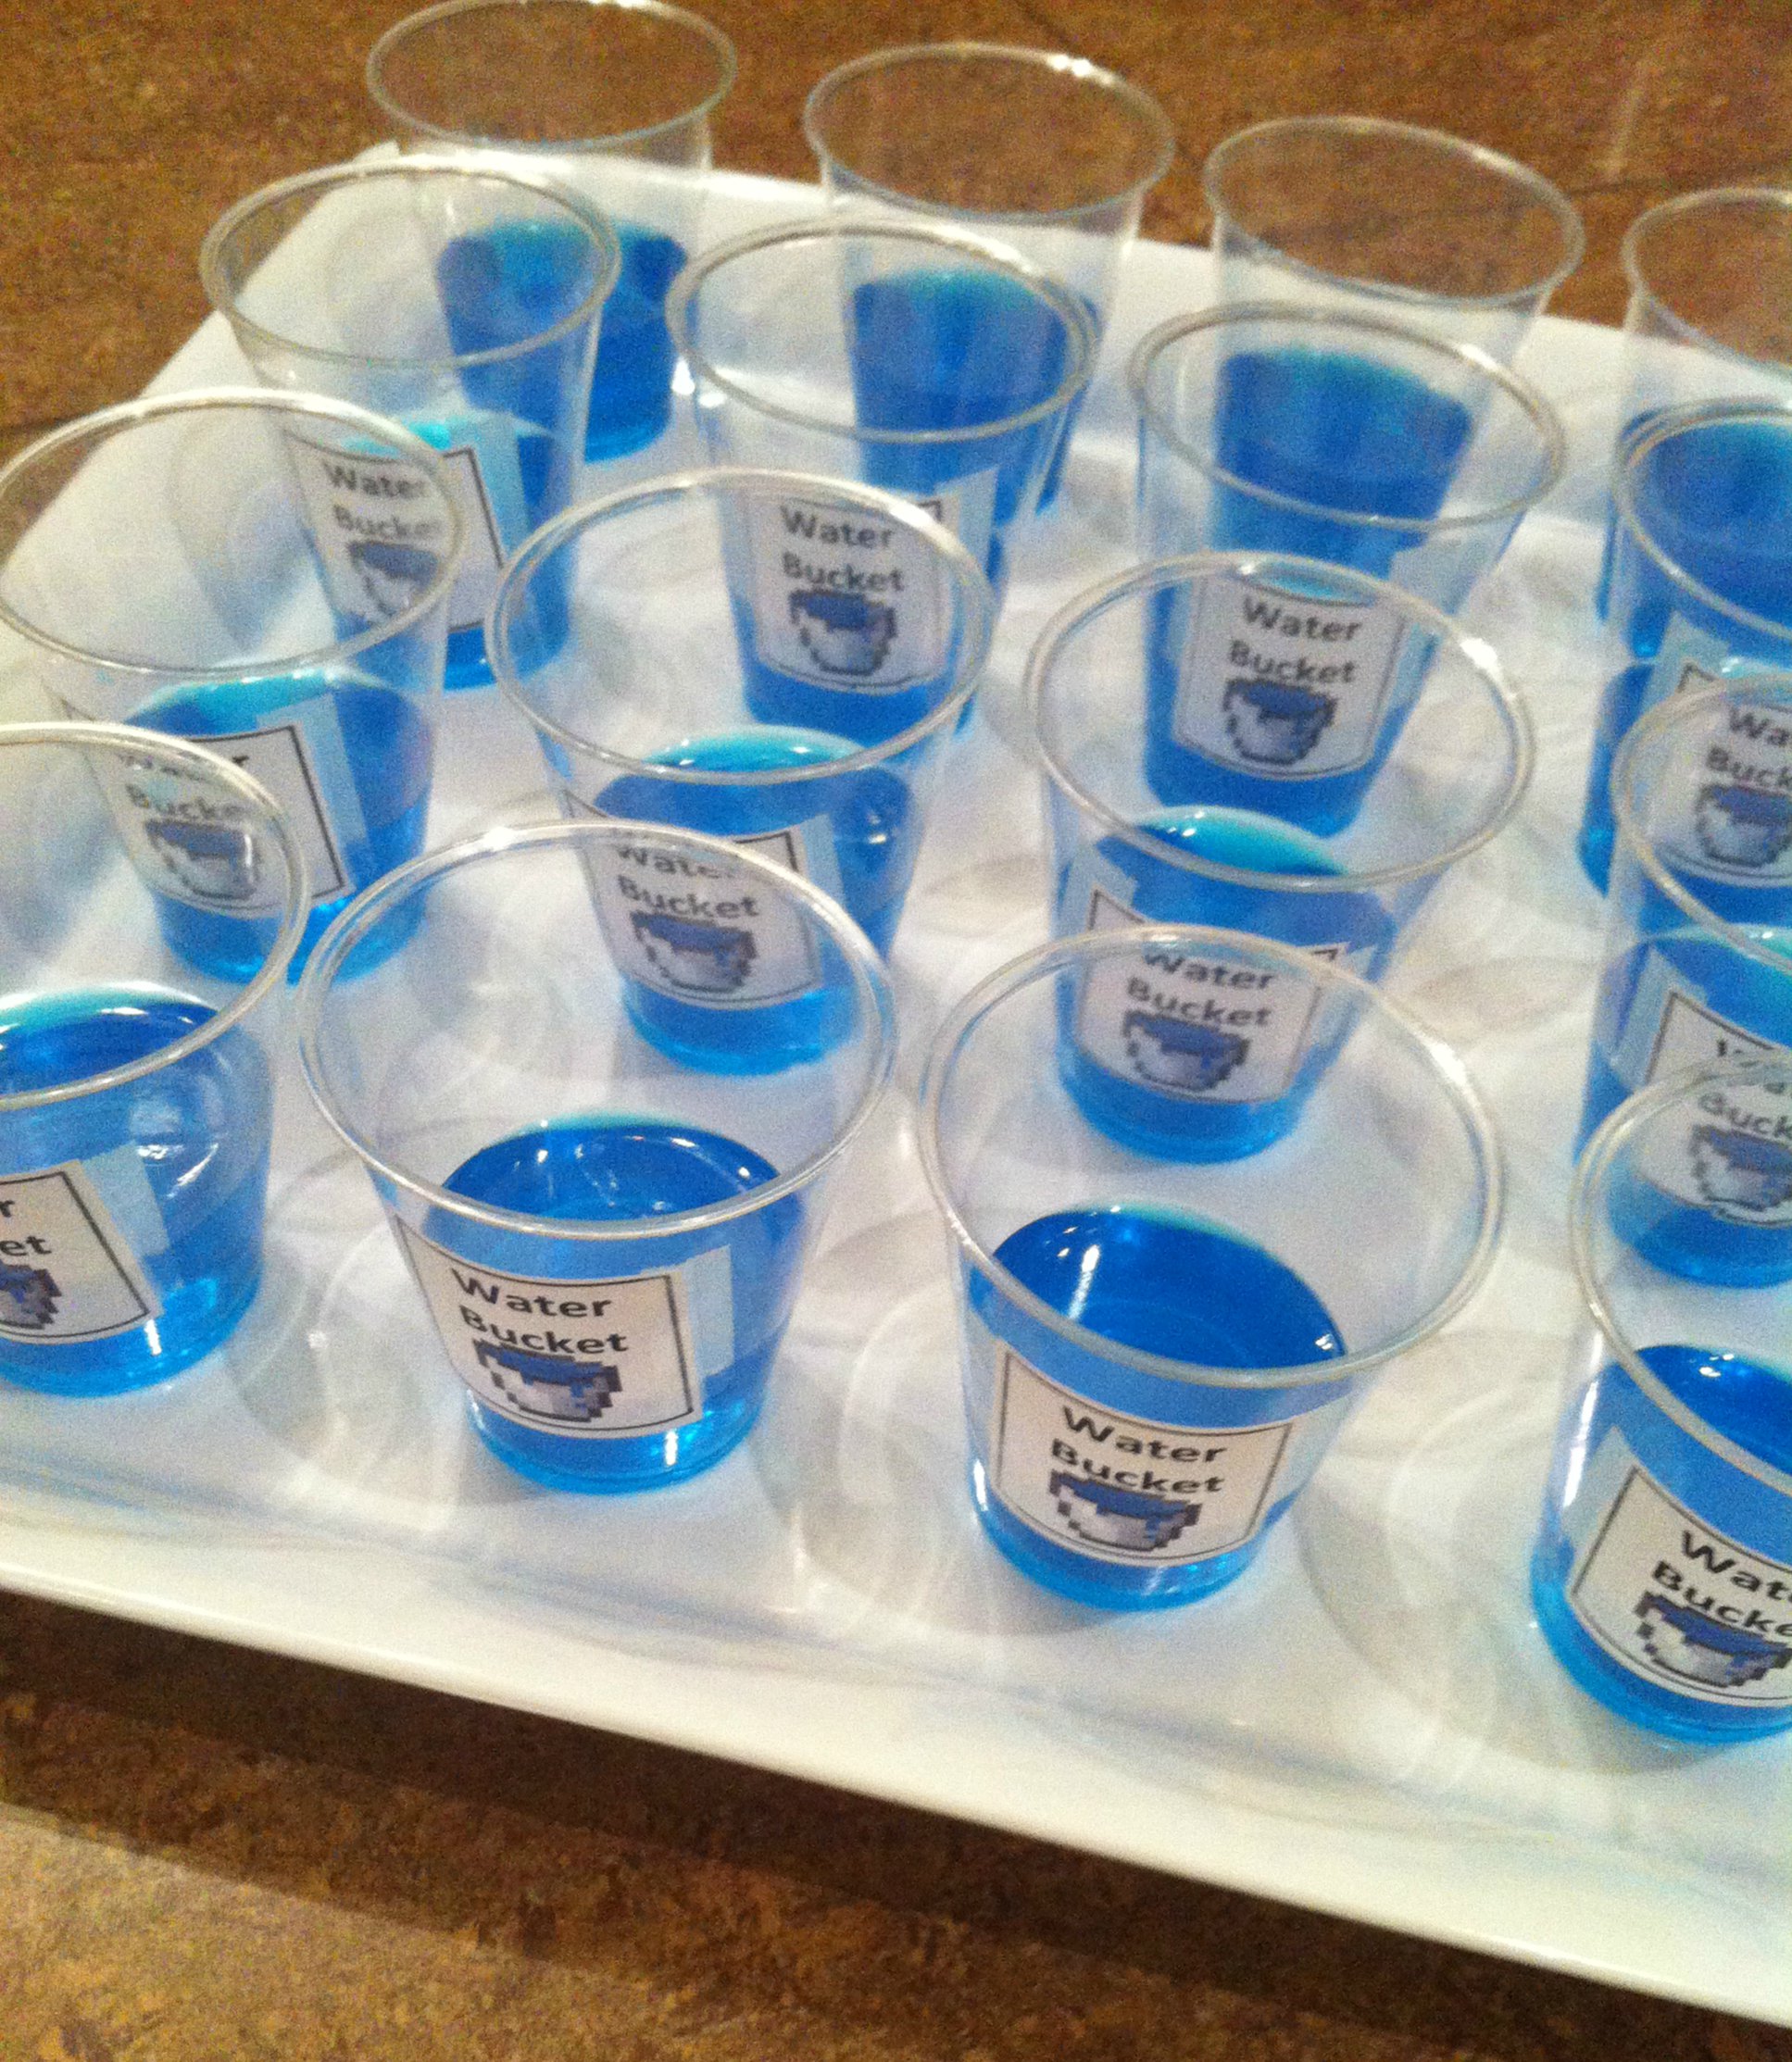
…Water Buckets… (blue raspberry Jell-O… would have been cuter in plastic shot glasses if I’d thought about buying some in time)…
…and TNT (red licorice bundles with black licorice whip wicks).
Combine these with the Minecraft lootbags the kids got when they left, and it made for a party they could all dig. (Get it?) 😉
Can I just say that I love the dollar store square dishes and platters? Love them.
Henri really enjoyed his 6th birthday party, and I had a lot of fun putting everything together for it.
–
You can download and print the images below to make your own Minecraft party. I copy/pasted a bunch onto an Excel spreadsheet so I could fit as many to a page as I needed. The TNT strips were sized at 3″ tall by 5″ wide (the block of 10 strips), the water bucket graphic is 1.75″ wide by 2″ high, and the apples and carrots were 2.25″ by 3″.
The kids were remarkably cooperative in going to bed on time last night so I was able to whip through the stuff I had to do (finish making Jakob’s birthday party loot bags) so I could get to what I wanted to do: start my cosplay!
For assorted reasons involving the late hour, my inability to leave my sleeping children home alone while I went out shopping, and the contents of my craft stash, process of elimination led me to start with what I had the materials for- Sprocket’s big-ass wrench.
The first step was figuring out how big it actually is. I started by using the official Skylanders image:
and then doing some calculations. First I measured the width of her right hand’s fingers, as they appear on my screen, where they’re gripping the wrench. I got roughly 0.5″ (adjusted for the angle). Then I measured the wrench itself, and got roughly 5.5″. Basic math says that her wrench is 11 times as long as the width of her knuckles. Next I measured my own knuckles, and got 3″. Multiplying my own knuckle width by the same 11 times gives me an estimate that my wrench should be roughly 33″ long. Using those two sets of numbers I was able to do math (yay math!*) to figure out how large to scale up the measurements I took off my computer screen and figure out some decent approximate dimensions.
Once I had my numbers I could start to plot it out. I taped together a few sheets of my kids’ construction paper and began to sketch out the wrench’s shape.
I didn’t think they’d miss the pink.
I sketched in pen ‘cus it was handy and I was on a roll so when I was done I went over the final shape with a colored Sharpie to make sure I used the correct outline when tracing the plastic canvas.
Oh. Yeah. Did I not mention that? This is going to be an entirely YARN-BASED cosplay.
*grins*
My plan is to stitch the whole thing in gray yarn with a 2nd layer for the detailing, and to join them with darker gray yarn to give the outline detail.
First up- cut my pieces. Since the prop is going to be three-dimensional I need to cut the top, bottom and sides, plus the inside of the jaws, and then probably a few inner bracers for support. Unfortunately my largest sheets of plastic canvas aren’t quite long enough to cut the whole length from one sheet, so I’m going to get around that by having my joins where the jaws begin, so any structural weakness will be compensated for (and any visible joins hidden by) the shape change.
I have a bunch of packs of plastic canvas but only one sheet long enough to span the spanner (heh) without a join. Luckily it’s wide enough to give me all four sides.
The top and bottom are each 3″ wide by 17″ long, which translates to 20 holes by 113 holes, the sides are 1.5″ wide by 17″ long so that becomes 10 holes by 113 holes. All the depth-giving pieces will be 10 holes wide by whatever length needed to fit easily around the curves.
I stopped at that point so I could go to bed. Next will be the socket’s jaws and the decorative overlay, and then swatching to see how much yarn I’ll need.
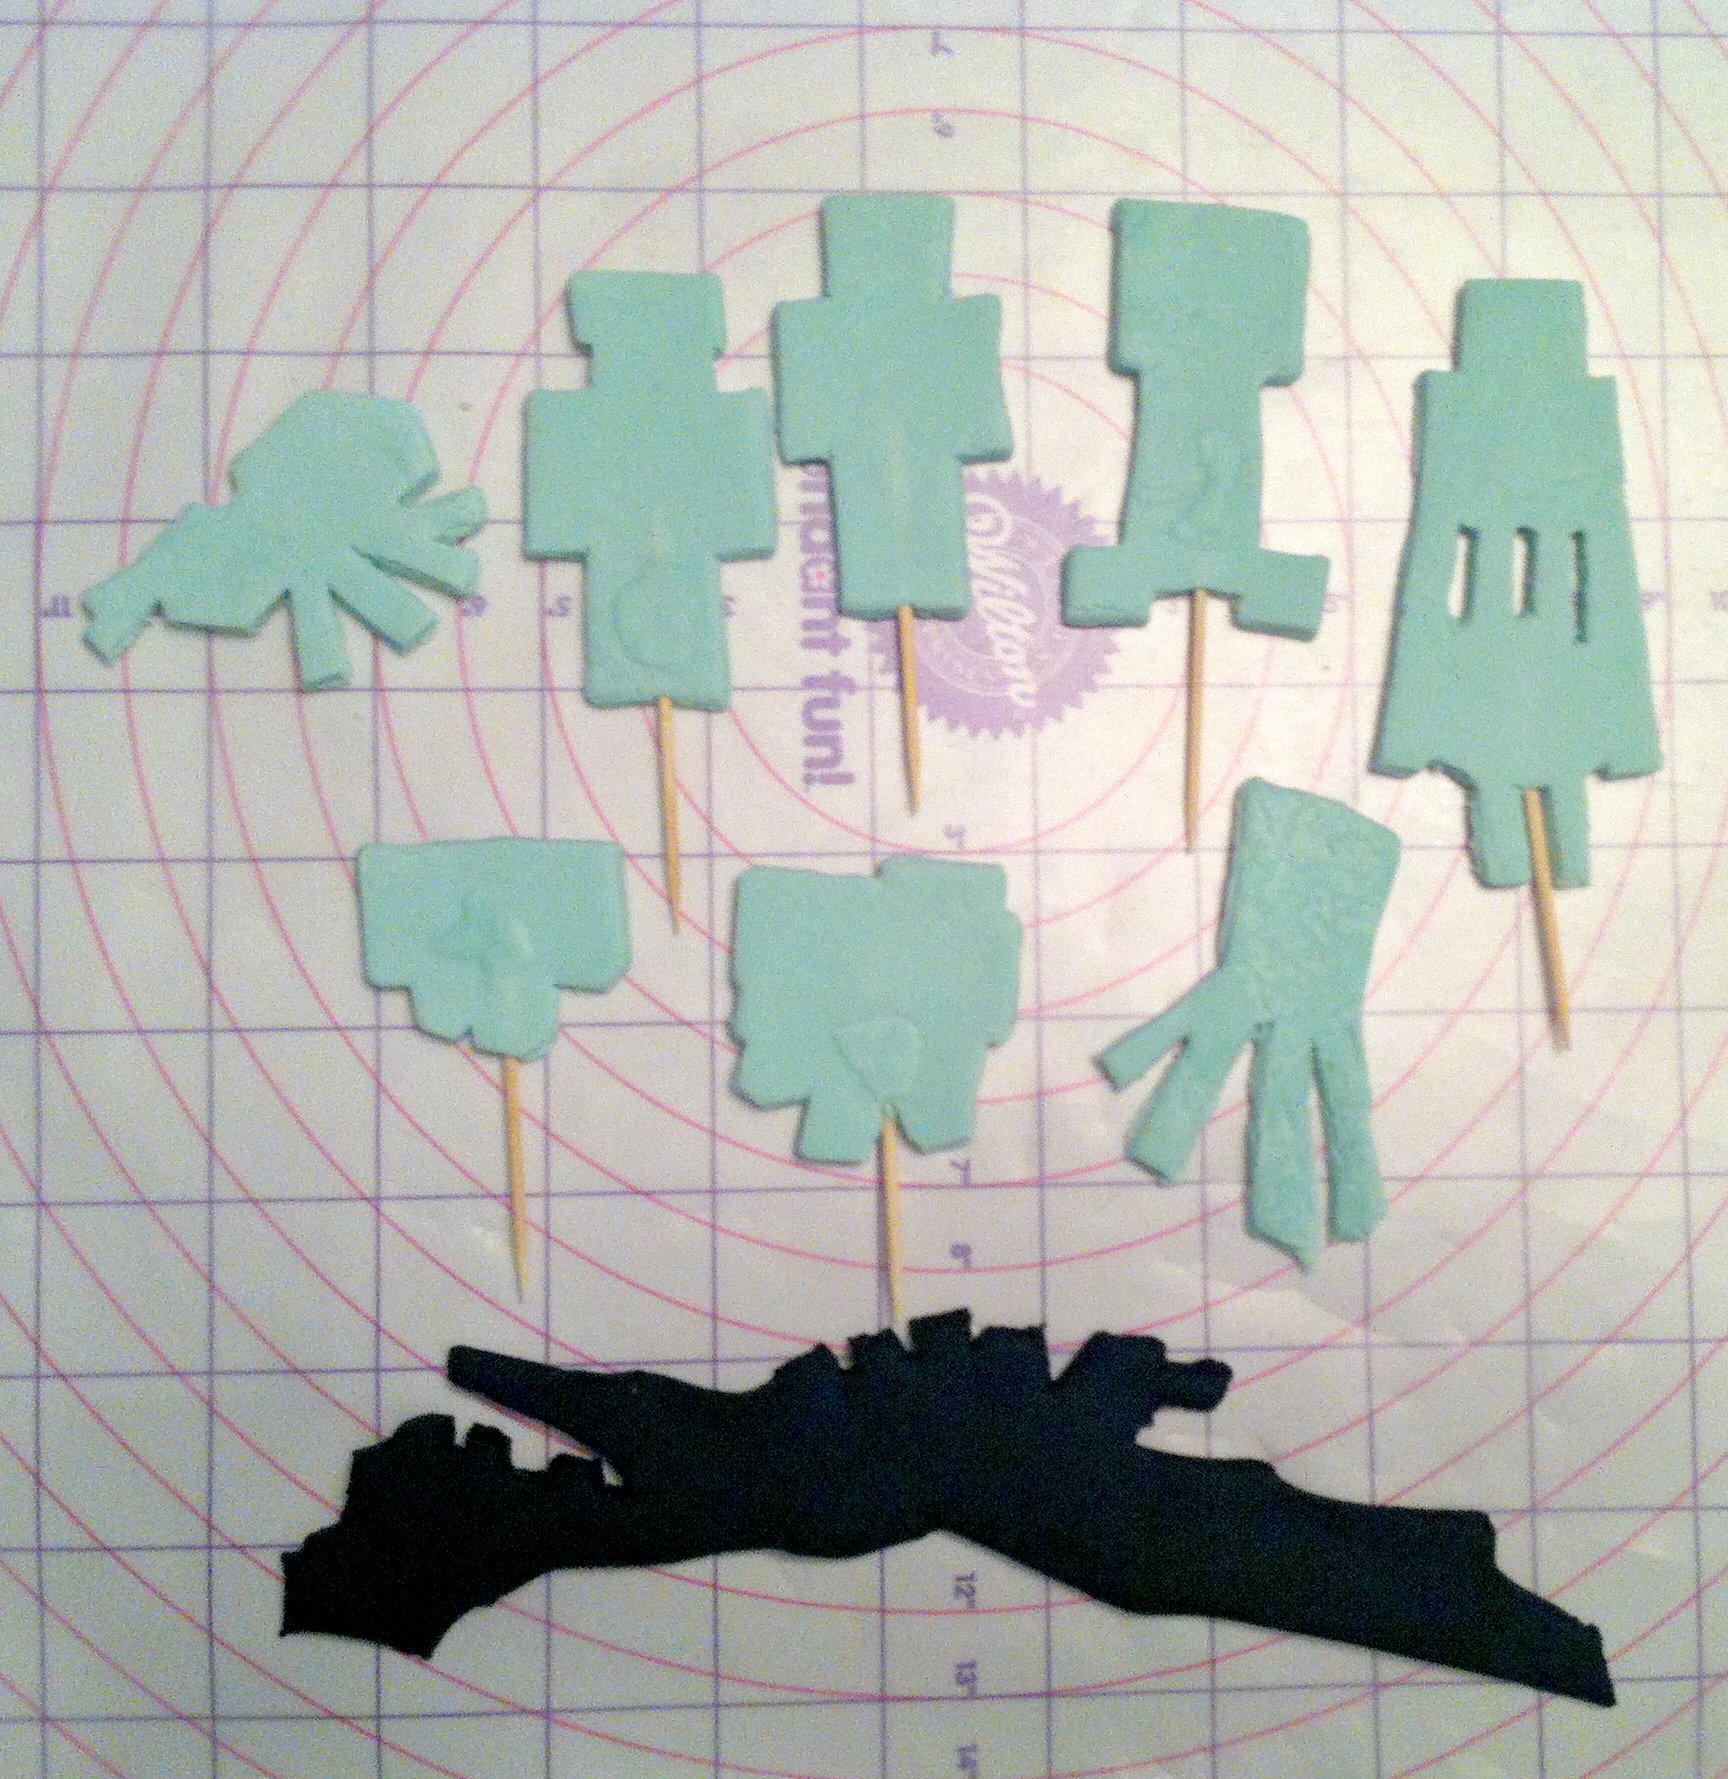
I wasn’t sure what I was going to do for the cake itself, but I knew I wanted to have a bunch of Minecraft mobs scattered about. I didn’t feel like having to prepare enough fondant in the assorted colors, nor did I really want to start sculpting, so I turned to my current favorite technique- hand-painted toppers.
I’ve used this on a number of cakes, which I’ll link to once I post them. With one exception, Nick’s Star Wars cookies, I always painted with thinned-down color gels, and had great results… (especially the Jake & the Neverland Pirates figures) but there were some flaws. The painted pieces too much longer to dry, making it more difficult to do finishing touches, the “paint” was often very wet, which could cause the fondant base to soften and/or get slimy, and sometimes the piece would crack as it dried (like in the Charlie & Lola cake).
For some reason I switched techniques when making Sean’s last Goalie cake, I tossed in some icing sugar to give my white coloring some opaqueness, and then I recalled painting with icing on the Star Wars cookies. It was a duh moment, and I’ve stuck with that ever since. It’s easier (for me), faster (for me), and it dries quicker, so I can add eyes or other details MUCH faster. Plus, because icing is thicker than water, I can play with layers and build up dimensions, if I want, similar to decorating cookies with royal icing.
My first step is to cut out the topper shapes from fondant (or if you’re painting on cookies, bake them and let them cool until there is no heat left inside, I’d wait overnight if possible). You can use cookie cutters or freehand it, I am not above tracing. I’d printed out the mobs (it stands for mobiles for those of you who don’t play… all the moving characters in the game) I wanted to use and scaled them all to the rough sizes I wanted.
I rolled out some scrap teal fondant left over from Jakob’s 2nd Adventure Time cake, the B-MO & Gunter cakes. The thickness of the fondant depends on the intended use of the piece. In my case I needed something thick enough to stand up, and also be thicker than a toothpick. For something that will be laying flat on a cake you can go thinner, and if it was meant to be a plaque that would stand upright or lean at a diagonal I’d go thicker, so there would be a solid base.
Lay the paper templates out on the fondant and cut it up into manageable sizes, then use a knife or your preferred cutter to trace around the templates. In the pic above you can see I’ve almost finished cutting out Diamond Steve. Keep your fondant scraps and store them properly for next time.
Here are all the mobs cut out. I slid a toothpick into most of them while the fondant was still soft, and reinforced where necessary with more fondant. I wasn’t worried about the smaller fondant blobs showing because I knew I’d be painting with icing, which is thick, but if you’re painting with straight color gels you’d rather have a flat surface.
The next step is to let the pieces dry. I mean really dry. At least a day. Two is better. The longer you can wait, the more in-advance you can get them cut and set them aside, the better, because fondant will wilt and melt when it gets wet, and there is a lot of moisture in the icing. Also, larger pieces will take longer to dry through than smaller ones. The Jake & the Neverland Pirates gang were dry enough to paint after 2 days left exposed to the air. I hadn’t given myself enough time with the Charlie & Lola toppers, they were so big and still flexible after 2 days. Or maybe my house was more humid at the time. Either way, they ended up spending 24 hours in a bed of icing sugar to draw out as much moisture as I could get.
Once the pieces are firm, not floppy, they’re ready to paint.
I didn’t take any in-progress painting shots. You can use whatever you like as a palette as long as it’s food-safe and not used for any non-food purpose. (I also keep my cake stuff away from peanut and nut products because I make 3 nut-free cakes every year). I mostly paint with toothpicks but I have some food-only paint brushes I’ll use from time to time, and I use repurposed apple sauce cups for extra water and icing sugar. There are a bunch of tricks I use, like using a medicine dropper to add water to thin the icing if necessary vs a spoon, so I have more control over how much I add, and using those sewing pins (in the tracing pic) to help mark out any details on the fondant cut-outs, in addition to “drawing” on them before I paint.
These are the non-hostiles- a sheep, Diamond Steve, regular Steve and a pig. I chose some of my kids’ favorite characters, leaving out only the Mooshroom because I knew I already had plenty to cover the cake. Plus if I’d kept going they also wanted an ocelot, and a dog, and a bat, and a spider jockey, and zombies, and…
I didn’t plan too far ahead on each piece, though I do try to work in a way that makes sense. Whenever possible I work backwards in color, to minimize icing waste. For example, I didn’t want to have to re-mix black, so planned to work with it last, and do any details if necessary then, at the end. I started with the Steves, and mixed up their skin color (though now they look like Zombie Steves), then added a touch more brown and used the same icing for the sheep’s face and the lighter areas on his hooves. A touch more brown and it was used for the darker areas of the hooves and Steve’s hair.
The same blue used for Steve was also used for the squid’s face, then darkened for his body, and eventually darkened further for the black.
Just like when painting with real paints, when I mix colors I don’t always blend it all in, so if I’m adding more pink to do some shading on the pig, I only mix it into half of the icing, so I still have some light pink to play with.
The hostile mobs- the Ender Dragon, a spider, a creeper, an Enderman and a squid (who probably isn’t technically ‘hostile’). I don’t know why the Enderman’s eyes don’t look purple, I think the light washed it out ‘cus in person they did. The splotches on the spider were made by mixing in some white while the black was still wet, and most of the details on the Ender Dragon were dry-brushed for shading, since I didn’t have to actually paint him black to start.
The final touch was to make a wooden sign and then the gang was all done, ready to set aside somewhere safe to dry (and avoid being eaten) until the party.
With Jakob’s 8th birthday coming up, and likely another Minecraft-themed event, I realized I never posted any of the pics I took from Henri’s 6th birthday, also Minecraft-themed, back in January. I hadn’t returned to blogging then, so they obviously weren’t here, but I also never posted them on my Facebook, Instagram or Twitter accounts, which all link to each other.
I figured it would be fitting for an inaugural post to break in the ‘new’ blog, as well as officially link everything all together.
–
So. When Henri had told me he wanted a Minecraft party I a) wasn’t surprised, because my house is ALL about Minecraft (I play too, my mansion has a giant working waterslide, thankyouverymuch), and b) wanted to go a little beyond just making a cake. I generally try to tie in the invitations and the lootbags, for example, a pirate-themed party had eye patches and gold hoop earrings and spyglasses. So I went looking around online.
I wasn’t completely sure what I wanted to do for the cake yet, and Henri kept wavering on if he wanted a giant Creeper, or an Ender Dragon, or a giant Creeper covered in smaller Creepers… so I put the cake off until it got closer to actually having to bake it. I decided to start with the loot bags and get them ready and set aside.
There are a LOT of great ideas online. I took a look at them, and went to a few stores to see what was available to me. I ended up getting stuff at my local Dollarama, a grocery store, and Papillon (a Bulk Barn-type store), because 2 of those 3 are in the same mall and I had limited time/desire to run around. I found graphics of the Minecraft inventory items online and knocked them together in Word, putting a frame around them only so I would cut them all out the same size. I have included the graphics at the end of this post, feel free to download them and use them for your own projects!
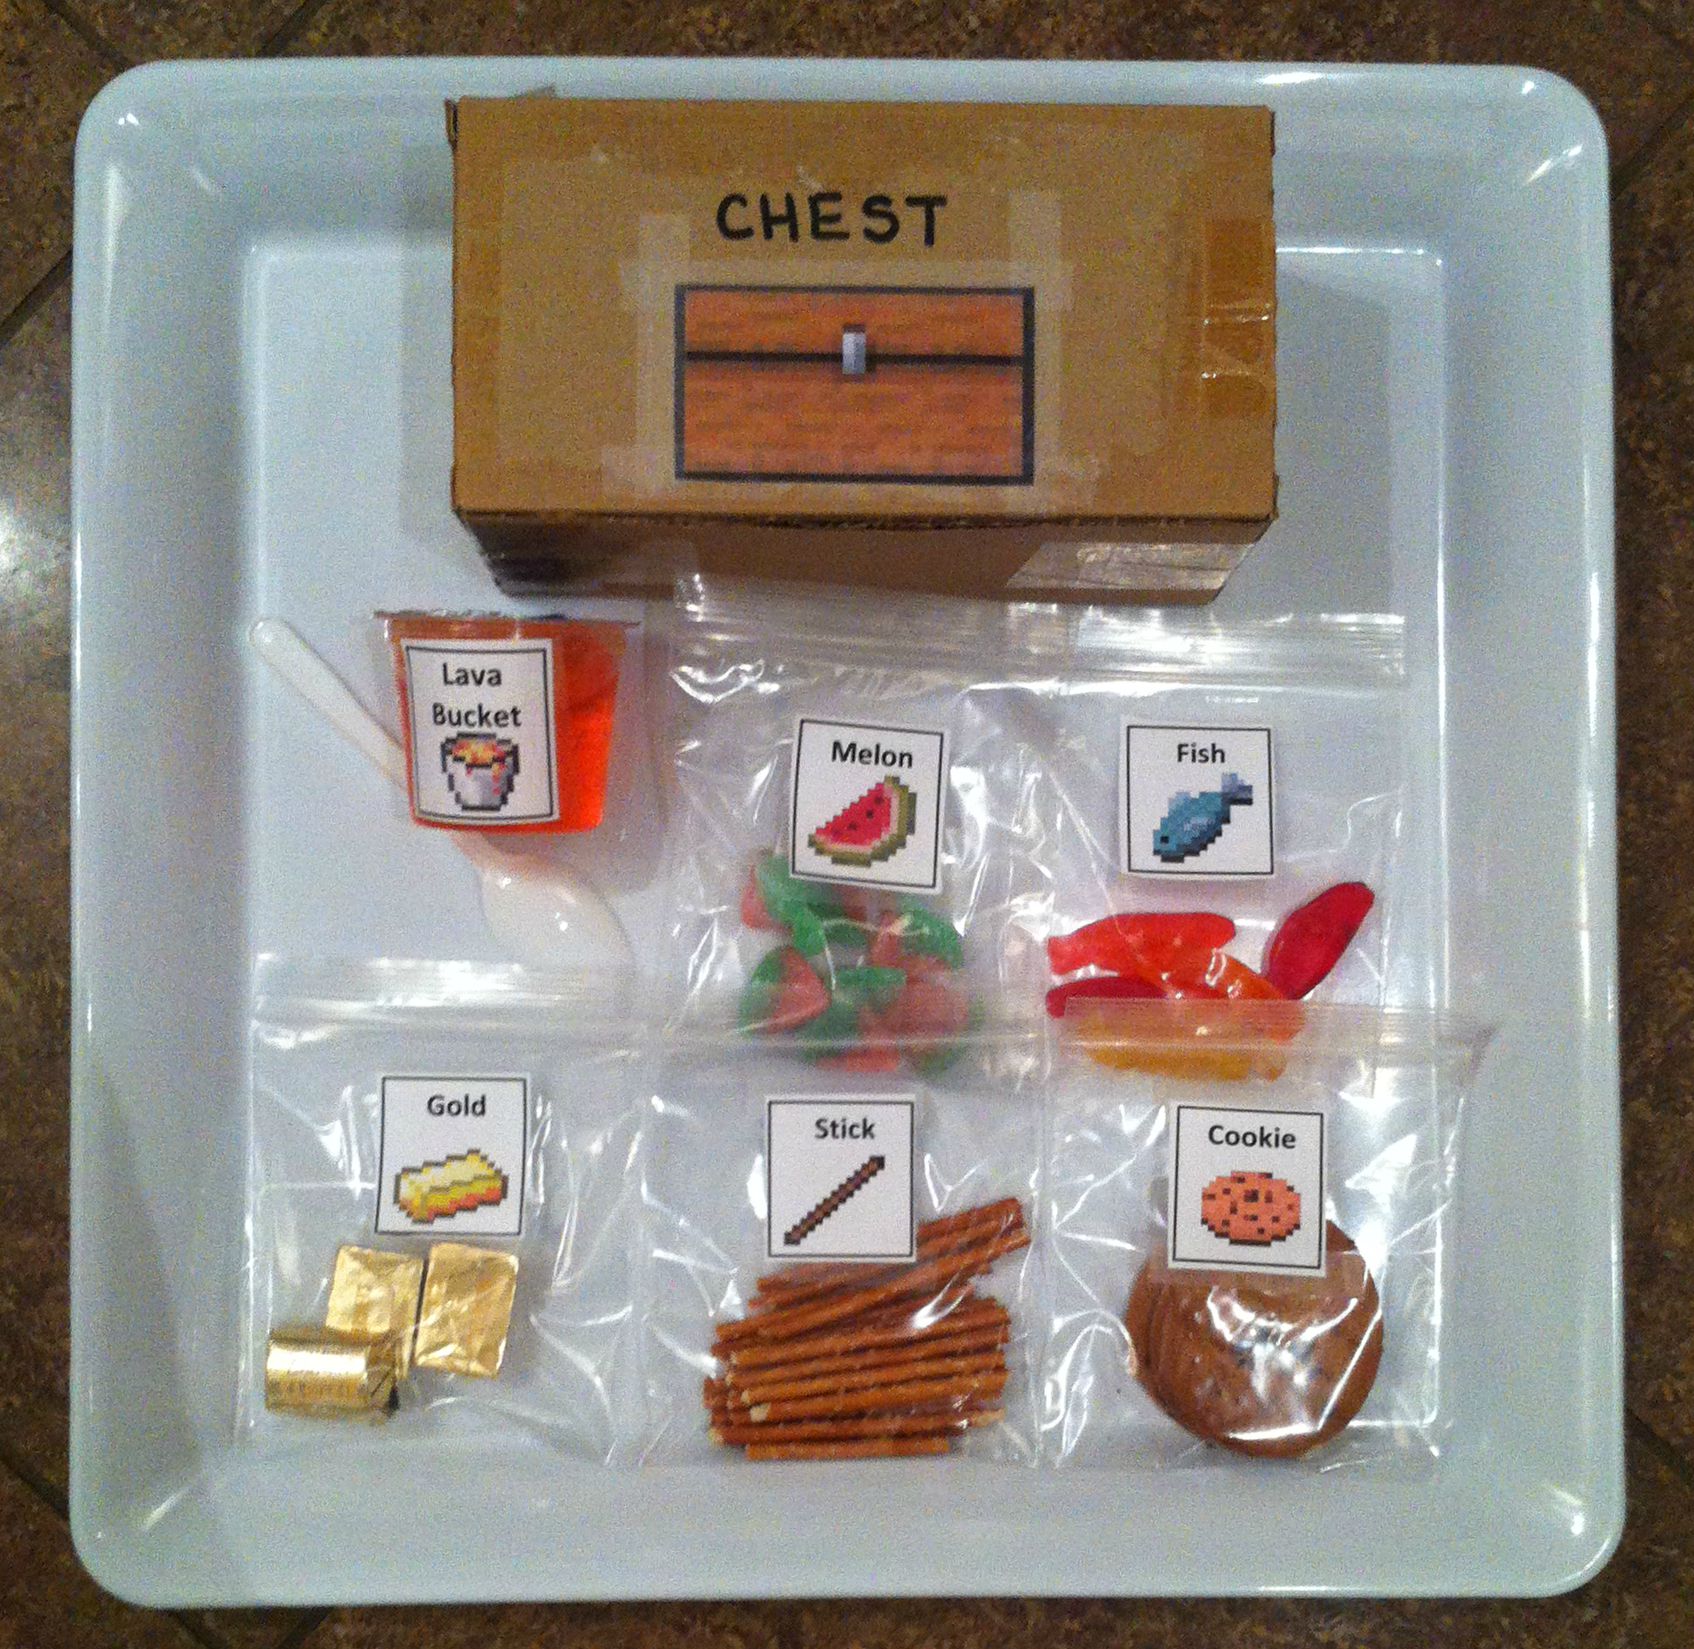
Putting everything together, here’s what I came up with:
The lava buckets had me running around to a few stores. My local Dollarama had a mixed-pack of mini Jell-O knock-offs, but only half the pack was orange or red. I was really hoping to find red/orange (for lava buckets) and blue raspberry (for water buckets… which I had printed and managed to salvage at a later point). In the end I found Jell-O cups at my grocery store, and used those.
The small plastic zip-top bags that the rest of the treats are in are craft bags from the dollar store too, and even the tape used to affix the images was from there. Gotta love when you can find supplies as inexpensively as possible! 😀
The melon slices are sour gummies from the bulk store.
The fish gummies are also from the bulk store. For all the inexpensive candies I just grabbed a few handfuls and portioned them out evenly once I got home.
The ‘gold bars’ are Hershey’s Gold Nuggets. They’re a little more expensive so I counted those out. (Plus, um, 2 for quality control… in my mouth).
The sticks are pretzel sticks. Surprisingly my dollar store didn’t have any, so I bought them at the bulk place and eyeballed ‘even’ amounts.
I’d been planning to get the cookies at the bulk store, they have the Voortman’s ones that you can buy individually, but I found a pack of chocolate chip cookies at the dollar store so that turned out to be cheaper, and each kid got 2 (only because there weren’t enough for each to get 3 in the pack).Initially I wasn’t certain how to package everything together. Then I remembered these boxes we’d had laying around at work. They’re supposed to open the other way- the short ends. So I ripped the glued sides open and re-taped them up with packing tape (ALSO from the dollar store) so they opened like a chest would. If I’d planned that in advance I’d have made the chest graphic large enough to cover the whole side, and printed the word “chest” for the top. But, in a pinch, this worked.
Everything fit nicely inside and I heard the kids loved their “inventory packs”. If you try this yourself and can’t get ahold of boxes, brown paper lunch bags would be fine, or if you wanted to go EXTRA fancy you could get each child their own actual chest from the dollar store.
You can download and print the above images to make your own. I copy/pasted a bunch onto an Excel spreadsheet so I could fit as many to a page as I needed. The bag graphics were sized at 2″ tall by 1.75″ wide, and the chests were 2.25″ by 3.25″.


 I’m wearing it over the shirt and pants I bought for the costume, so this is the best progress pic so far. 😀
 Cosplay progress completed parts to-date: