1 Comment

Making a Pitfall: The Lost Expedition cake, day 01

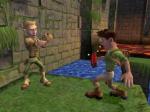
For Henri’s 7th birthday party he wants a Pitfall cake.  As in Pitfall: The Lost Expedition.  As in the old PS2 game all 4 of us at home play, and love.

This gave me a bit of a challenge.  The most iconic visuals from Pitfall are, well, the pits.  And Pitfall Harry swinging on vines.  Pits would be easy enough to make, but vine-swinging?  Hmm.  This required a think.

My first thought was to make a framework that would go over the cake with vines and a little fondant Harry hanging down, but while I poked around at work, looking at unused frame displays, a new idea struck.

I found a 2-level display that got my creative juices flowing.  In order to plan properly (and avoid scale mishaps like in the Diego & Dora cake) I took iPhone pics from a few angles and then printed them out really pale, so I could sketch over them and have a rough idea of what I wanted to do.

It’s difficult to photograph something clear but you can get a rough idea of my process here:

pitfall lost expedition paper demo collageFirst I sketched my plan onto paper.  You can sort of see in the first image that I have a brick wall with a balcony-like upper tier.  The blue overhang is supposed to be a waterfall that flows down onto the cake below, and it’s not easy to see unless you click, but there’s a healing spring/fountain hidden behind the waterfall.  Once happy with the sketch I needed to see if it would work, conceivably, and so I used some scrap paper and made a quick mock-up of where the actual cakes would go.  There’s one layer of cake on the top tier, the ‘waterfall’ hanging down, and then a layer of cake the same height as the bottom tier, butted right up against it.

Okay… maybe there’s something here.

This was Thursday, and his party would be on the upcoming Sunday afternoon, so I knew I had to get started right away.  After work I stopped at a bulk candy store for supplies like green sprinkles and extra fondant.  I also picked up 2 cake boards.  I usually use trays for my cakes but I didn’t know how well the stand would fit and I didn’t want to be limited by side edges.  I bought 2 so I could ‘glue’ them together with icing, as I didn’t think 1 board would be strong enough to support the heavy cake.

pitfall lost expedition home paper demo collage

Here’s the same paper mock-up at home, on the actual cake boards so I could test for fit.  What I was hoping for, and am happy about, is that the board is long enough for me to extend the lower cake section beyond the paper template.  I plan to have crocodiles in the water but hope for room to put a pit as well, and I think this will give me enough.pitfall lost expedition night 1 01

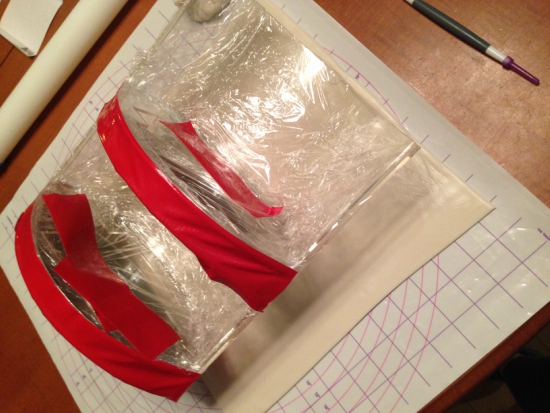
Next I cleaned the display stand and wrapped it in saran wrap, and used duct tape to block off the two open edges.  I also cut 2 cardboard ovals to fit over the tiers, as they have large cut outs where the products are meant to sit.  The top one will be used as a cake board, and the lower one will merely be covered in icing.

pitfall lost expedition night 1 02

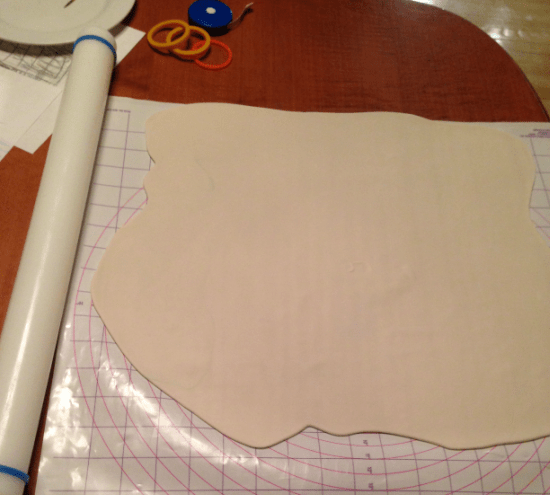
Next I tinted some white fondant to a beige-ish shade and rolled out enough to cover the back of the display…

pitfall lost expedition night 1 03

…and then trimmed it to size.  At this point I realized that even dampened, the fondant did not want to stick to the saran, and I removed all the coverings.  D’oh.  I make the mistakes, so you don’t have to.

Water-dampened fondant DID want to stick to the clean plastic stand just fine, luckily, and I covered the back with the large sheet, smoothing it down well against the back and around the edges, blending it out with my fingers.  I did the same for the larger areas of the front as well, and then carefully wrapped one thick-ish piece around the open edge of the upper tier, smoothing it into place above and below while being VERY careful to not tear through the open front.pitfall lost expedition night 1 04

Once the fondant was secure I used a scoring tool to scribe a brick pattern into the fondant.  I had to be careful to not pierce the open-fronted balcony edge, but for the rest it was all flush against the thick plastic, and I could press pretty hard if I needed.

For the back and the upper tier I did a rough approximation of a brick pattern found in the game, as seen in the background here:

pitfall bricks

I did the back first, then copied the dimensions over onto the front.  For the lower tier, I wanted it to look more like a cave than a brick wall, so I wet the fondant and pressed on little pieces with my fingers, smoothing and adding more until I had something that resembled a natural rocky wall.

pitfall lost expedition night 1 05

I also used the same beige fondant to cut out shapes to let harden.  On the left are a sleeping croc for in the water, round pieces and a tiki head for the healing spring, and a croc’s open mouth with poor Harry struggling to break free.  (Or, what I HOPE will look like that eventually).  I tinted my remaining beige into a few shades of green and used a leaf-press cutter to punch out 2 sizes of leaves, which I set over the edge of a Styrofoam food tray (saved from buying vegetables) to dry.  I also cut a few strands of tall grass but I’m not sure if I’ll end up using them.pitfall lost expedition night 1 06

At this point it was about 1am and I set everything aside to dry by the dehumidifier and went to bed, knowing the next few nights would probably be pretty late ones to get everything done in time.


16 Comments

How to Make Minecraft Steve and Creeper Heads

Update: This tutorial is now also available as a downloadable PDF here. More details at bottom of this post.

It’s October!  That means it’s okay to start talking about Halloween, right?

It is according to Henri- when I woke him up for school this morning he gazed up at me sleepily and grinned “It’s October 1st.”  When I asked why that mattered he smiled even more adorably and said “Because now it’s almost Halloween.”

‘Almost’ is relative.  (He clearly gets his awareness of time from his father).  However his mention of it reminded me that I never showed last year’s costume.  So.  Now, with plenty of time to get ready for this year’s holiday… here’s how I made the boys Minecraft Steve and creeper heads, and how you can too!

how to make minecraft steve and creeper heads

The boys decided for Halloween they wanted to dress up as their favorite Minecraft characters.  They do sell ready-made cardboard heads in stores but they are expensive, and there are a ton of tutorials online.  I looked at a few, then worked things out with what I had on hand, and what I was able to find at the dollar store.

What you’ll need:

minecraft heads wip 01

1. Yannick came home with 2 small boxes he’d found somewhere.  Grocery stores often have ones you can ask for, or as a last resort you can buy boxes.

2. I used two-sided tape to tape the outer flaps to the inner ones (not shown) so the inner flaps wouldn’t drop down onto the kids’ heads.  Then I used masking tape to fully tape over the top seam, both to securely close one end of the box, and to make the seams less visible once they were painted.

3. I cut the lower flaps off the boxes and then used the same masking tape to cover the exposed edges.  It would gave a cleaner look, vs the rough look of cut corrugated cardboard, plus was less likely to catch and tear, which could potentially pull off the paint.

4. I divided the 4 sides and top into even grids.  I looked at pictures of the characters online and mapped out roughly how many squares per color/face, and then used a ruler to divide the front (face side) into the grid.  Once the face was set, I carried the markings around the sides of the boxes, and finally the top.  Because the boxes are taller than wide, the top has fewer squares than the sides do.  That’s not what the characters SHOULD look like, but I didn’t think the kids would mind.

minecraft heads wip 02

5. Once the boxes were plotted I used a cutting blade (also from the dollar store) to slice out the eyehole sections.  For Steve, only the dark pupil area was cut out.  For the creeper it made more sense with where Henri’s face was to cut out the larger nose/mouth section.  After removing those areas I covered the exposed edges with masking tape.

minecraft heads wip 03

6. Finally it was time to start painting.  The paints and brushes were from – you guessed it – the dollar store.  The advantage with the Minecraft characters is that if you have to custom mix your paints to get the right colors, it doesn’t matter as much as it would in most projects if you have enough to complete your painting or if you need to mix more and risk not matching quite right.  The goal is to have an assortment of shades, so blending colors works perfectly.

That said, if you prefer a more accurate version, I have compiled this tutorial into a downloadable PDF (linked at the bottom of the post) which includes full-color screen-accurate charts for both characters, including the hex codes for each color so you can color-match accurately.

minecraft heads wip 04

Here’s the four sides of the painted creeper head.  I set the boxes to dry on a paper towel roll to hold them off my counter until the lower edge was dry.  (I held them up the same way while painting too).

minecraft heads wip 05

Same goes for our buddy Steve here.  I’d only had three shades of brown paint on-hand to work with, so I blended them together with some black for the hair, and then lightened with some white and a touch of red for the face.  (I’d actually done the face/neck/ears first, so then I could re-use the same paints but darken them for the hair.  That avoided any waste and kept the same unifying overall color tone for the head.)

minecraft heads wip 06

I had them both on the counter while I cleaned up the dining room table of all my painting gear.  Couldn’t resist this dramatic shot.  Look out!  He’s behind you!

minecraft heads wip 07

7. The next step was to seal the heads with an aerosol can of clear sealant.  I didn’t know what the weather would be like on Halloween and didn’t relish the idea of my hard work being ruined by a few drops of rain or thick snow settling on the kids’ heads.  I moved the heads into the garage and set them on some newspaper to protect the floor as I sprayed, and did a few coats, allowing each one to dry for about 20 minutes in between.  If you have a dry, open area outside or good, even weather you could do this next step outside, but here there was nowhere I could leave them unattended, so I had my garage door open the entire time I sprayed, and then left it about a foot open during the drying time between coats.  Once they were properly sealed and dry to the touch I brought them inside and allowed them to dry for a full day before the final steps. 

minecraft heads wip 08

The last bit in getting the masks ready to wear was to block out the open areas.  I bought a gauzy sheer black scarf (also at the dollar store!) and cut off squares large enough to fully cover the open areas.

8.  Using the same double-sided tape I secured the black fabric down around the cut areas.

9. Finally I covered all the exposed edges of the cloth with masking tape, making it doubly secure and hiding any rough, cut edges so they wouldn’t catch or fray.

With that, the masks were complete!  The black gauzy fabric looks opaque from the outside but from the inside it’s so sheer that it’s quite easy to see through it, making it perfect for this project.

From idea to finished product this project took about 4 days.  Halloween was on a Friday last year and Yannick brought me home the boxes on Monday night.  Tuesday I did everything up to/including painting.  On Wednesday night I sprayed the clear coat, and then on Thursday night I stuck the black fabric in.

They were pretty darn excited!

Halloween night they posed for a quick picture inside…

minecraft heads wip 10

…then it was time to go trick-or-treating.

minecraft heads wip 11

Can’t you almost hear the tick…tick…tick…BOOM? The heads held up beautifully and the boys felt like mini celebrities as they walked down the street and people from all over, even in passing cars, yelled out “Steve!” and “Creeper!” and gave them high-fives.  The heads have now become part of our dress-up box and are still in great condition, and they wore them for ‘Halloween Day’ at their camp this summer.

*Update in 2020: the heads are still going strong! The boys outgrew them of course, but we keep them as nerdy shelf displays and they look exactly the same as they did back when I made them.

minecraft heads wip 12

I hope this post shows you how easy and fast it can be to make your own Minecraft Steve and Creeper heads!

You can adapt the tutorial to make any Minecraft mob, and I’ve got an assortment compiled for you here.

As mentioned above, if you’d like an easy-to-print-and-save PDF version of this tutorial, I have made it available on Etsy here. The 9-page PDF includes full instructions with additional details, clear photographs, as well as game-accurate full-color numbered charts for all 5 sides of both character’s heads along with their hex codes for perfect color matching.

————-

More Minecraft-themed fun:

How to make a Minecraft Enderman head and diamond block trick-or-treat basket

How to make Minecraft Lootbags

How to make Minecraft Mob fondant cake/cupcake toppers

How to make a Minecraft cake

Throwing a Minecraft birthday party

Minecraft Zombie Charts

Minecraft Jack-O’-Lantern Charts

This post may contain affiliate links. This means I might make a small commission on purchases made through the links, at no cost to you.


Leave a comment

undateable

In this post: the cast of an NBC sitcom surrounding me as they hold stitched samples of their likeness.  In other words, just a normal Thursday…

Ha!

First, a brief apology.  After the rush and whirlwind of finishing my Sprocket costume I took a little break from crafting, and blogging.  Took advantage of not needing to stay up until 3am to crash early, or do other things that didn’t involve math, or thinking.  Couple that with an onslaught of weather-induced migraines, and I’ve been getting a lot more rest lately, but it means the blogging has suffered.  :/

So.  A few weeks ago I got word that I’d be able to attend a Just For Laughs panel involving the cast of Undateable.

undateable_ver2

I knew that since it would be a con-style panel, vs a stand-up-type comedy show, there was a chance the audience might be able to meet the cast.  And I decided I wanted to do something for them.  While I enjoy the show, I didn’t do it because I’m the ohemgee number one fan!!! nor to get a chance to potentially meet them.  I just thought it would be nice.  🙂

I hit upon the idea of doing something in cross stitch right away.  I knew it was easy and portable and something I could likely finish in time (I had less than a week until the panel).  I’ve had transactions in the past with an etsy vendor called weelittlestitches and I absolutely love her work*, and immediately I thought of contacting her to commission a custom pattern of the cast.  Unfortunately I didn’t think the timing would work out, so I ended up designing them myself.

I did an image search for each character and put together a little file for each one, giving me the gist of that character’s ‘look’.  At the same time I also pulled out some quotes from each episode so I could add a funny line for each character.

“Justin”, played by Brent Morin

undateable justin pic

Photo 2015-07-23, 11 29 44 AM“I’m kind of like Spanx.   I’m there to support you wherever you need it.”

  “Burski”, played by Rick Glassman

undateable burski pic

Photo 2015-07-23, 11 31 06 AM

“Dibs.”

“Leslie”, played by Bianca Kajlichundateable leslie pic Photo 2015-07-23, 11 30 21 AM

“One-night-stands are like fast food- sure you feel guilty the next day

but sometimes you just need something cheap you can enjoy in your car.”

“Danny”, played by Chris D’Elia

undateable danny pic Photo 2015-07-23, 11 32 21 AM

“Change is hard, Baby Bird, but I’m gonna help mend those broken wings.

I’m gonna be the father bird and just feed you knowledge.”

“Candace”, played by Bridgit Mendler

undateable candace pic

Photo 2015-07-23, 11 33 50 AM

“All I have is a scrawny little white-girl butt… There are people out there who like those too, right?”

“Brett”, played by David Fynn

undateable brett pic Photo 2015-07-23, 11 33 16 AM

“I’ve had sex with a lot of ladies.”

And finally “Shelly”, played by Ron Funches… who wasn’t there, but I hope his got to him anyways.

undateable shelly pic

Photo 2015-07-23, 11 31 45 AM

“I identify with piñatas.  I’m also adorable and full of candy.”

Once at the panel my mom and I were seated pretty close.  Like…

Photo 2015-07-23, 3 52 27 PM

My feet were about 2 feet from the stage.

…really close.  So close in fact that when the cast came out and Rick was using his phone to stream the panel for Periscope, I jokingly offered to hold it for him and he leaned over and handed it to me.  (So if any of you reading this were watching the panel, I’m sorry for swinging it around and possibly making you nauseous before I realized where it was actually aiming).Photo 2015-07-23, 4 45 52 PM

Brent answering a question, possibly about the little gnome in his butt (you had to be there), while David, Rick, Bianca and Bridgit look on and feign amusement.

Photo 2015-07-23, 4 45 47 PM

The other side of said gnome-butt convo, egged on by Chris and more feigned amusement on behalf of Adam Sztykiel and Bill Lawrence, along with the panel moderator (who I think was from Mashable?).

Towards the end of the panel they took audience questions and I got the last one, asking, rather awkwardly, “I, um, made you guys something.  Can I give it to you?”  (Not my finest moment).  Luckily they said yes, and I got to give each one their framed portrait.  At one point Chris asked if it was called needlepoint, and started calling out, all Oprah-esque, “YOU get a needlepoint!  And YOU get a needlepoint!  Aaand YOU get a needlepoint!”.

Photo 2015-07-23, 4 59 58 PMThere was a funny/sad moment towards the very end when they were all looking at each others’ and then Bill put out his hands and looked around like “Where… where’s mine?”  I offered him a hug instead but he didn’t take me up on it.

Then the panel was over, and I thought that was the end of it.  Instead, however, David jumped right down and came and gave me a hug and said thanks.  Bianca did too, before walking away.  Brent came by, and suddenly I turned around and the whole cast (minus Bianca and the absent Ron) were standing right behind me.  My mom had been taking pics the whole time, so I wound up with this:

Photo 2015-07-23, 5 47 43 PM

Yep.  That’s me looking all dork-tastic.  🙂

Mom and I had barely made it to the elevator when my phone buzzed, and I saw this Tweet:

Photo 2015-07-23, 5 42 47 PMPhoto 2015-07-23, 5 42 43 PM

Awwww! 😀

* If you’re into cross stitch, or pop culture, or any combination thereof, go check her stuff out, it’s amazing.  😀


3 Comments

Featured on KnitHacker.com!

Whoa… exactly what it says up there.  Thanks to a shout out from Laura on Twitter, my Skylanders Sprocket cosplay was featured on KnitHacker this morning, with dings going off on my Twitter, Facebook and Instagram all about it.

I’m so thrilled people like the costume.  I spent so much time working on it, staying up til 2-3am every night for 5 weeks… even bringing pieces to stitch while I waited at the daycare for my kids, or sneaking in a line or two in traffic.  With all that work it was still 2am the night before the con and I had no gauntlets/gloves, and I was feeling so dejected, like the whole thing would be a waste because of not enough time.  I ended up staying up til 4am knitting a quick set of fingerless mitts, and was so tired the following night I was asleep by 6:45.  😛  It wasn’t complete, it was far from perfect, but to see that it’s appreciated by more than just myself for my crazy efforts… it’s really awesome.

To anyone who stumbles this way and finds this: all the rest of the tutorials and step-by-steps are coming.  I have all the pics and just need to put them into a cohesive order.

You can check out the write-up here.  Thanks so much Laura, and thank you Danielle for posting it!

kroon skylanders sprocket(Also thanks to Jenna at Kroon Designs for the great pic!)


Leave a comment

Post-Con Blues

skylanders sprocket post con blues

There’s a letdown that comes after 5 weeks of non-stop rushing.  Instead of reaching for my project bag I’m avoiding it ‘cus it’s only filled with the left-over odds and ends that need sorting and putting away.  My thumb has a sore spot from forcing my needle around awkward angles.  I have this weird amount of this strange thing called time.

I’m putting the time to good use, sorting through all my pics to prepare coherent posts.  I’ve got all the rest of the step-by-steps and a ton of completed pics from the con itself and afterwards.  I’ll probably post the rest of the WIP stuff first, then close with the FOsskylanders sprocket teaser

If you’re in Montreal, and have some free time today, I highly recommend checking out the final day of Montreal Comiccon 2015!


Leave a comment

Skylanders Sprocket Cosplay – getting down to the wire

sprocket progress 02

Montreal ComicCon is in 2 days.  Well it starts earlier, but I’m only going on Saturday.  Forgive the lack of updates, I’ve been working my fingers off til roughly 3am every night the last few weeks, hoping to be done on time.  (I’ve been taking progress/step-by-step pics but those posts will have to wait until AFTER the Con).  With only 2 days to go, here is my current progress.

Cosplay progress completed parts to-date:

  • shirt
  • pants
  • vest
  • wig
  • wrench/purse
  • goggles
  • gauge

Cosplay wip:

  • belt/peplums – 80% complete
  • boots – 40% complete
  • gauntlets/gloves – 0% complete


Leave a comment

Skylanders Sprocket Cosplay – Vest Part 4

It’s done! On Tuesday I finished the vest, and was able to move on to the next part of the Sprocket cosplay.

I ended up picking up stitches around the armholes then working a 3-st, i-cord BO/applied i-cord around the edge, grafting the ends together.  I didn’t bother with a provisional CO, I just used the yarn tail to duplicate stitch the join so it looked flush.  In this image you can see the difference between the before (left) and the after (right).

skylanders sprocket vest fo 01

I did the same thing for the neckline, with one minor tweak.  The edges were curling, and I preferred the lower edge.  So when I picked up the sts I picked up about 3 rows down in the flat sections, turning that extra fabric to the back.  After working the i-cord I took another length of yarn and tacked that little flap down on the insides.skylanders sprocket vest fo 02

You can just barely see it on the inside, and see a slight ridge on the outside, but I don’t mind.

The lighting in my kitchen sucks, but here’s the back…

skylanders sprocket vest fo 03

… and the front.  And Sam, for some reason.skylanders sprocket vest fo 04I’m wearing it over the shirt and pants I bought for the costume, so this is the best progress pic so far.  😀

Plus- it fits!skylanders sprocket vest collageCosplay progress completed parts to-date:

  • shirt
  • pants
  • vest

sprocket progress 01


Leave a comment

Skylanders Sprocket Cosplay – Vest Part 3

By Monday night I had a complete vest.

skylanders sprocket vest wip2 01The back, after seaming the sides and shoulders…skylanders sprocket vest wip2 04…and the front.

Heh.  Those darts look rather silly when laid flat like that, don’t they?  As soon as I realized that I slipped a bra inside to help, erm, fill things out a little. skylanders sprocket vest wip2 02

That’s better… if a little scandalous-looking.

skylanders sprocket vest wip2 03At some point I will be making the gauge Sprocket wears on her chest, and I wanted to make sure I had enough room to place it flat on my chestbone.  I do, and discovered that the neckline was actually a little higher than I needed.  I prefer it falling as low as it is curving, not where it would be if the bound-off sts were actually laying flat.

This was where I set it aside for the night.  I wanted to look up armhole finishing techniques, and was unsure if I wanted to do an icord BO/applied icord around the exposed edges, or pick up, knit a few rows and bind off, leaving a curled edge.  It was late, so I decided to sleep on it.


Leave a comment

Skylanders Sprocket Cosplay – Vest Part 2

The back of Sprocket’s vest complete, it was time to design the front.  Sunday morning we slept in after a lovely and decadent family wedding, and then while Yannick mowed the lawn I drank some coffee and did maths.skylanders sprocket vest sketch 02Before even beginning to decide how to tackle the front, I wanted a map of exactly how many rows my back piece was.  I wasn’t concerned about matching width, but it would sure suck to start seaming the sides and realize my rows were way off.  I pinned the back out to a blocking board, double-checked my hasty pattern, and filled in my sketch.

Now I knew I had 140 rows total for the front, and to make them even I could ‘spend’ 6 rows on the lower ribbing, 78 rows making my way to the armhole decreases, then jigger the bust however it took as long as I squished it all into 56 rows.  On the width issue, my only requirement was that I finish the shoulders at 16 sts each, so I could do a 3ndl bind off on them later.

By this point Yannick had come inside to join me, and was playing Mario Kart while I did more maths. skylanders sprocket vest sketch 03Which led to way more maths and a minor tease of a headache.

skylanders sprocket vest sketch 04

But in the end I figured it out.  I would cast on enough sts for my belly, and work the rib to match the back.  Mosey my way up to my waist, working darts to decrease towards my narrower point, and then after a bit worked even I’d re-increase along the same dart lines to fit my bust.  More working even, and that should get me to the armholes.  Then I’d decrease for the armholes AND the top of the bust darts at the same time, narrowing the whole top to the same 15″ across as the back.  Work the straps, ending with 16 sts each.  Easy peasy lemon squeezy, as Henri would say.

And?

It worked!  I got all the way up to the bust increases done on Sunday and after brunch with friends on Monday morning I came home and seamed the sides so I could try it on.

skylanders sprocket vest wip 02After trying this I have to say I’m hooked on darts.  I think any knitted top that isn’t complicated by patterning, that I want to be somewhat fitted, will now have waist and bust darts.  Or at least bust darts.  The difference they make is astounding.


1 Comment

Skylanders Sprocket Cosplay – Vest Part 1

With last Friday bringing Sprocket’s wrench to a place where seaming was all that remained, I needed to keep going and come up with a new portable part of the project.  I knew I’d be going to see a movie that night and was loath to give up on the possible knitting time, so I hurried to sketch up a quick plan of attack.

sprocket2My working model of Sprocket is going to be a mix of the original (above) and this drawing I found on DeviantArt:

sprocket devartI contacted the artist, DizPlicity, on Facebook, and got permission to work from her design.  Yay!

In both cases Sprocket wears a blue ‘vest’ over black long sleeves and black pants.  A few weeks ago I went to Value Village and picked up those two items, so I tried on the top over the bra I planned to wear and took a few measurements.

The first thing I realized was that knitting the vest in the round would not work without some serious math.  I have a lot more…uh… mass in the front than I do in my back, and simply measuring around my body and dividing in 2 would result in a front that pulls, and a back that sags and bunches.  I had an idea for knitting the front in a way to incorporate bust darts for some serious shaping, but hadn’t quite figured out how to do that, so the easiest thing would be to start with the back.

My back, both in real life and for the back of the vest, is pretty straightforwards.

skylanders sprocket vest sketch 01I knocked out a fast sketch of the shape and dimensions I wanted.  I swatched my yarn (Red Heart Super Saver in Blue Suede, and 5mm Addi circs) and once I had my gauge I plopped those numbers into Excel and did the maths to write up a pattern for the back.  I decided to work from the bottom up so I could have a ways to go before getting into any shaping – perfect for darkened theater knitting.

skylanders sprocket vest wip 01

This, in case you’re wondering, is how much knitting one can get done during Avengers: Age of Ultron.  I knit the ribbing before leaving and all the rest during the movie.  By the time I got home I was only 10 rows short of my armhole decreases. skylanders sprocket vest wip 03And here’s the completed back.  Next up, the hard part – the front.