1 Comment

Making a Pitfall: The Lost Expedition cake, day 03 part 1- Pitfall Harry, crocodiles and a healing spring

Saturday morning I woke up bright and early to- *coughs* actually no.  Saturdays I sleep in.  But I did wake up somewhere around the crack of 10 or so and debated how to plan my day for the cake.  I had 2 hours until I had to leave to take Henri to a birthday party, then had some shopping to do with Jakob, and then would have to go back out to pick Henri up, so didn’t think I’d get any more progress done until once I’d returned at the end of the day with both kids.  But that was getting close to supper time, which would require clearing the table, so I wouldn’t want anything in progress that would dry up or break if I tried to move it or put it away for a few hours.

Hmmm.

The first thing I did was run downstairs and take a peek at the brick wall/cake stand to make sure nothing crazy happened over night, like the entire back sagging off or something.  Luckily, it was fine.  I did realize the colors were much more desaturated and ‘natural’-looking, vs the bright greens of the sprinkles I’d bought to use for grass, and the fondant leaves I’d made.  Hmmm.  They wouldn’t quite go together.  So the next thing I did was to thin some of the leftover dark green from the moss (this is why you save your palettes) and brush it over all the leaves that had stems.  I later wished I’d done them all, but at the time I figured I’d do the ones I knew I’d use, and come up with some way to salvage the smaller ones later on if necessary.  I ignored the long grass strands, having already decided I wasn’t going to use them.

leaves wip

I calculated that I’d have enough time to paint a first coat on the fondant pieces before leaving for the party.  Mostly to just block in the colors and give it a chance to dry while I was out.

fondant figures wip 01

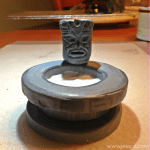
The healing spring got a base coat of gray made by mixing Wilton White-White with Americolor black gel, first a quick base and then lightly tapping on some darker areas.  For the center of the spring I used White-White with a bit of Americolor teal.  The crocs got brownish green base coats made mostly by mixing up some of the previous day’s colors together.  It’s hard to see from this pic, but before painting the full croc I used a scribing tool to mark a scale pattern into the hardening fondant.  For the open-mouth one I blocked in some areas of white and red for the inside of his mouth.  I didn’t touch the struggling Pitfall Harry in between his jaws, not thinking I had enough time to pay attention to it before having to stop, get dressed, wrap the gift and shuttle Henri out.

palette

This was the state of my palettes when I left.  The artist’s-style one has pure gel colors that I could dab from as needed.  (The smear at the top was to help me identify which color was which… the darker ones are difficult to tell apart when in one small glob).  The styrofoam piece is what I was really working from, and the plastic hors d’oeuvres palette was there mostly because it still had quite a bit of white left over from the prior day, and a decent amount of brown that was still usable.

Had a minor change in plans – the birthday boy invited Jakob to stay as well, which gave me a few hours of time in the afternoon that I hadn’t expected.  I took full advantage, slapping some more paint down so it could dry.  The main hazard of painting fondant pieces with this White-White/gel colors mixture is that if you apply it too thickly, the White-White forms a latex paint-like ‘skin’ on the work.  If you touch it while it’s tacky (which can last a few days) not only can you leave fingerprints in the work, but I’ve had entire sections of color lift off completely.  Not fun.fondant figures wip 02

Here you can see more of the texture in the croc’s back.  You can also see the other colors added to make it look more natural and create the illusion of shadowy, raised eyes.  I deepened the detail inside the open croc mouth and blocked in Harry’s colors, getting a base coat down so I could finish it with details later.pitfall lost expedition fountain

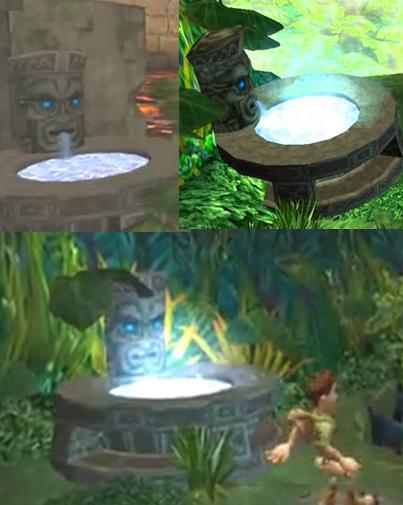
These are the healing springs from the game.  Of course it was only on day 3 that I realized I’d forgotten to make the little side braces that decorate/support the top and bottom.  Ahh well.  Creative license.  healing spring wip 02

Using the game stills as a guide I darkened the gray with more black and roughed in the decorative areas.  The base had its 4 quadrants, the middle bit got some stripes, and I copied the box pattern around the top slab.  I did my best to copy the dark areas on the face too, as well as I could with my fondant carving.  I left any smudges/smears and added some around the top to make it look aged, like it had been sitting in a jungle for years.healing spring flash

Once the pieces were dry enough to handle I added teal eyes and jammed the head toothpick down through the other pieces.  A tiny dab of water was enough to stick them together.  Looks horrible with flash but it was the only pic that showed the eyes.healing spring no flash

Here’s a shadowy shot that looks most like the game’s version, I think.healing spring fo collage

And some final beauty shots, because once it goes in the cake it won’t really be seen.  For the ‘water’ I mixed together a few large dollops of Wilton clear glitter gel icing, a drop or so of White-White, and a touch of teal.  Unfortunately the White-White hid most of the glitter, but there’s just enough of the teal to provide the glow.  I really wanted to make the water pour from the head’s mouth but chickened out on actually brushing it down the face.  Ah well.

Now on to Pitfall Harry and his perilous predicament.

pitfall lost expedition croc

These stills show both the moment I was recreating (Harry in the croc’s mouth) as well as a clear view of his outfit.fondant figures wip 03

And here’s the final Harry piece.  Henri had complained that I’d given him black hair, and ‘everybody knows Harry has brown hair, Mommy’… so I softened it up a bit.  I also broke a tiny bit of fondant off the front of his chest, because Yannick asked me why Harry’s curves were so… Madonna-esque.  I tried to justify that he was straining, back arched… showed the pic… bent over backwards to show him… but other than laughing at me he wasn’t convinced 😛  I touched up Harry’s details and gave the croc an eye and more depth in his mouth.  The very last thing I did was to add a few more coats of white for the teeth, because White-White has a habit of absorbing base colors.  To make it opaque I actually used a small dab of thinned Betty Crocker icing mixed with the White-White, and that seemed to do the trick.

Now I had my fondant toppers, two cakes, and an ornate stand.  All I had to do was figure out how to put it all together.


3 Comments

Hockey Goalie cake

Coming off the Montreal Canadiens’ win last night, I figured the timing was good to post another cake I’d never posted at the time.  The closest I’ve come to HABs cakes have been the 2 hockey goalie cakes I made for my cousin’s son Sean’s last two birthdays, and this is the first one, from back in January 2014.

2014-01-11 hockey goalie cake title


This cake started, like a lot of them do, with a fondant topper.  I sketched up the design using clip art, coloring books and player images (for the uniform details) and worked up an image I liked.  Then I traced the outside edge onto some ivory fondant with a knife, cutting away the excess.

2014-01-09 hockey goalie cake plaque step 1

I don’t have better pics of the next step, but it’s one of the methods I use when transferring images.  Sometimes I use push pins to poke holes where my lines need to go, in this case I needed a more accurate, detailed transfer.  First I held my image up to a window and traced it on the back of the paper, so I had a reverse copy.  Then, using black gel icing and a toothpick, I lightly traced over those lines.  When I was done I carefully turned the image right-side up, and set it down carefully onto my fondant, basically using the original sketch as a stamp, and stamped the gel-drawn image onto the fondant.

2014-01-09 hockey goalie cake plaque step 2

That left me with a pretty good outline of what I wanted to paint.  Next was to start painting.  I also didn’t take many progress shots back then, but you can see how I worked upwards.  First I did a base layer of the different colors, then a second layer to create the shaping/dimensions.  For example: the red outline of the goal has only one layer (it looks lighter and flatter) but the uniform/helmet already had 2 coats.2014-01-09 hockey goalie cake plaque step 3

The finished plaque.  I’ve added a second coat to all areas and worked the outlines with an edible ink marker.  Once the whole thing had dried for a day, I added the “CH” logo.  All the painting was done with a small paintbrush and a toothpick.

2014-01-10 hockey goalie cake plaque final

The finished cake.  A simple layer of vanilla icing (over a chocolate 2-layer 9×11 cake), trimmed with blue and red Smarties, and the birthday boy’s name.  I lightly dabbed the plaque with a bit of water on a Q-Tip to moisten the 4 corners, so it would stick well, as the icing had already crusted over.  I didn’t want to attach it while the icing was still damp because I was afraid the colors along the edges would bleed into the cake, so I made sure it was really, really dry first.

2014-01-11 hockey goalie cake 01


4 Comments

Charlie and Lola cake

Instead of cakes, or knitting, the projects I’ve been working on lately have been for the upcoming show I’m a part of.  I’ve joined the Becket Players this year, and we are getting right down to the crunch before the show starts.  (Literally… “Hell Week” starts tonight).

Actually, come to think of it I did make cookies, and knit something for the show, but that’s not the point.  I’ve been taking step-by-step pics of the props so I can make tutorial posts, but I want to wait to post them after the show has finished the run.  Not for EVERY prop I made, however… today I made some fake money for one scene and somehow I don’t think it’s a good idea to post a tutorial on “How To Print Money” 😛

So since I can’t show you that stuff yet, I’m going to continue posting cakes and projects from the past.  Today it’s the Charlie and Lola cake.charlie_and_lola_cake_title

When I was asked to make this cake for Quentin’s birthday, all the way back in November 2013, I had no idea who Charlie and Lola were.  Actually, I still don’t, beyond that link.  So I went online and found this image to use as a reference:

Charlie_and_lola_orig

charlie_and_lola_cake_04

Nailed it! 😀

About a week before the cake was due I cut out the letters for the name from yellow fondant, and set them aside to dry.  I also cut out the figures from ivory fondant, tracing the images I’d printed off the internet, as I discuss here.  I also set those aside to dry, and discovered that larger shapes take longer to dry.  I knew that already with sculpted pieces, but was surprised that after 2 days of sitting out at room temperature these figures were still floppy.  I tried moving them downstairs and had them spend the night on the washing machine, in front of the dehumidifier, but they still slowly sagged when I held only one end.  Shoot.

A baker friend suggested submerging them in a bed of cornstarch to draw out moisture.  Great- except I had none.  So I set them for 24 hours in a bed of icing sugar instead.  They weren’t as dry as I’d like, nowhere near the “ready-to-snap” aridity of the Jake figures, but dry enough to risk painting.

Overall, I’m happy with how these came out…mostly.  I think they look like who they’re supposed to be, but there are some flaws that bug me when I look closely.

charlie_and_lola_cake_charlie

Not bad, right? Good from far but…

So much bothers me with this technique, and is the reason why I’ve switched to painting with icing instead of straight gels.  The visible “skin tone” of the figures is the ivory fondant.  The “paint” used was Wilton gel colors thinned with water, and a drop of Wilton White White to help it be opaque.  On very small items, like the Jake figures, it covered well, dried fast, and was manageable.  But these figures were almost the size of a 9×11″ cake, and it took a lot more “paint” to cover them.

charlie_and_lola_cake_charlie_closeupThe first day, as I painted, they looked good.  The yellow hair was brighter, and the white shirt seemed solid.  The next day is when the flaws started to come out.  The hair dried patchy, in some of the spots the gel color almost seemed to separate from the water.  The painted areas were still glossy and tacky 2 days later, the longest I could wait to do the outlining and details, as it was the day of the party.  As you can see, especially on the right eye and the shirt, the white was still not dry enough in the centers, and cracked and bled when I drew on it with my edible ink pen.

charlie_and_lola_cake_jeans_closeup

I was MUCH happier with the lower half.  For his jeans, I painted the pants first with blue, then pounced/dry brushed blue, blue/black mix and straight black icing gels.  The cuffs were scribbled just like the source drawing, and I really like the way they, the shoes and pants came out.

charlie_and_lola_cake_lola

I had the same issues with Lola.  I was quite happy with how her dress came out, not as much with the hair/eyes, mainly because of the color drying/bleeding.charlie_and_lola_cake_lola_closeup

The dress was a lot of fun to do.  I put a base layer of white, then took advantage of the bleeding attributes to dot in the flowers (groupings of 4 or 5 dots).  Once they’d had a chance to set up a bit I added the flower centers, and finally the leaves.  If I’d been painting with real paint, or working with icing, I’d have started with the leaves, and built up, but that wouldn’t have worked here.

charlie_and_lola_cake_dress_closeup_01

A little outlining at the end gave the finishing touch.

charlie_and_lola_cake_dress_closeup_02

The cake itself was a chocolate 2-layer cake, iced and filled with vanilla icing.  While the icing was still wet I put a row of purple Smarties around the base.  The day of the party I attached the figures to the top with a little bit of icing, and added the name.

charlie_and_lola_cake_01


7 Comments

betty boop cake

Remember back in October I showed a pic of my mom’s birthday cake?  And said how I would post more on it later?  It’s later!

bettyboopcake

(Today was actually a pretty fun and busy day.  I stayed home while Yannick took the kids to swimming, and started cooking the food/making dip/etc for Henri’s 3rd bday party tonight.  Once again I only used my camera, not cell phone camera, and don’t have it handy or the pics uploaded.  At least this post is about another birthday, and another sweet treat.)

This is the cake my sister Laura and I made for Mom’s 60th birthday.

I made the cake part, then Laura helped to decorate.  First I baked 2 (9″?) round cakes, both vanilla but one tinted red.  I wanted them a bit more dense than a regular box mix, so while I did use Betty Crocker mixes, I doctored them with less oil and added instant pudding mix.  That was on the Thursday before the party (Sunday).  On Friday I made a batch of buttercream, leveled the cakes, torted them (sliced them in half widthwise) and iced in between, stacking them, from the bottom up, red, icing, white, icing, red, icing, white.  I wanted a white layer as the top so none of the red would show or seep through the top layer of icing, just in case.  I then gave a quick crumb-coat over the whole cake.

I had more time that afternoon, so I started decorating.  First I took some of my leftover icing and tinted it a pale blue, then set it aside.  I rolled out white fondant until I had it almost long enough to go around the cake.  It took me 2 strips to go around the width, but I made the seams look like seams in the wood, so you can’t tell.

I dabbed the back of the fondant lightly with a q-tip in water, and pressed onto the sides of the cake, smoothing well to remove any air bubbles.  I put the cake in the fridge for a bit to set up.

Once the icing had crusted over I went back over it with the blue icing, mixing the two with my knife as I went, and chopping it up a bit so it looked frothy and bubbly.  Then I sat down to do the wood grain.

First I went around the cake, using a sharp knife to score the fondant lightly to look like the individual wood slats.  I went around the top edge and made little cuts as if the wood was weathered and beat up.  I went around the cake again with a black edible ink marker, randomly making little lines and drawing knots in the wood.   Then I used a food-only paintbrush, some water, and some brown icing gel and covered the sides and top completely.  First I’d use almost a 100% concentration of gel to go over the score marks, then I’d blend it out with the water, and some gel-tinted water.  I made sure to have it darker in some areas, lighter in others, and tried to make it look old and used.  The way the water reacts with the fondant leaves it glossy, so it looked like it has been shellacked.


Two black fondant “bars” with silver “nails” finished up the hot tub, and then I used some green icing in a squeeze bottle-thing to individually pipe each and every blade of grass to decorate my dollar-store platter.

Laura came over late that night once she got home from work, and she made Betty Boop’s head while I made the legs, arms and accessories.

The bikini and flip-flops were planned, but the boobs were a last-minute addition ‘cus she didn’t look properly “settled” in the tub without them.  🙂

And that was Mom’s cake.  We had made it secretly and Yannick delivered it to the brunch her friends were throwing, and she had no idea it would be there.  I heard it was a big surprise, and a big hit.  They were almost against cutting into it, but they did, and they ate it, and even saved me a nice, tall slice.