Leave a comment

dyeing my hair – going from brown to PINK!

For those of you who follow me on Facebook, Instagram or Twitter, this is old news already, but it occurred to me yesterday that I’d never posted about it here.  Back in November, I dyed my hair… PINK!  (Ok, technically magenta, but it looks pink in most light).

Anyone who’s followed me for a loooong time might remember that I used to have long blonde hair, and when Henri was little I’d added a blue streak under one ear.

Photo 2013-01-28 1 41 45 PM

(Very few pics actually show it, this was the best I could find)

I’ve always missed having colored hair, and gaze longingly at all the purple, blue and other brightly (or pastel-y) colored tresses I see online.  Finally I decided to take the plunge again- I decided to dye the underneath of my hair blue.  Not the ends, ombre-style, but the underneath half of my hair, figuring that it would be cute but subtle, so I’d still look ‘professional’ enough for work or being a mom or whatever kind of grown up I’m supposed to be.

Then I told Yannick my plan.  Found him pics online… and he was not impressed.  He didn’t like the idea at all, and suggested dyeing my entire head.  “But… I don’t want to dye my whole head blue,” I protested, “It will fade to green and I don’t think that would suit me.”  “Then don’t go blue,” he said, “go red or pink or something.”  I decided to call his bluff and Googled crazy hair colors, opening up a ton of tabs to show him the ones I thought were pretty.

Surprisingly, we both liked magenta.  So… before I could change my mind and chicken out, I called my hairdresser the next morning and booked the appointment.

Photo2015-11-0635458PM

This was my last pic with brown hair before leaving for the appointment.  When I got there I looked through the color samples book.colorswatches

I’d brought in a picture of the color I had in mind, and it looked closest to the color “orchid” above, however once there we decided to mix a little “magenta” in to brighten up the color a bit.  Now that I was actually there I decided to forgo any attempt at subtlety (I’d thought the orchid color might pass as brown in dim light) and just GO FOR IT! 😀step 1 blonde collage

The first step to any of the ‘crazy’ colors is to lighten, so for the first time in at least 4 years I got to see how I’d look as a blonde again.  (Not a fan, tbh).  You can see the variation in my hair color, that’s because my hair has had brown dye in it for the last 4 years, as I’ve been dyeing it darker than my natural color… whatever that is.  (I’ve never dyed my eyebrows, so I’m guessing something like that).step 2 pink collage

In the top left image you can see the samples we played around with.  Kristin, my stylist extraordinaire, had taken an extension in a similar color to my now-blonde hair and dyed it with the orchid, the magenta, and a mix of the two.  The color we both liked best was the mix, and so that is what we did.  I got my first glimpses of how my hair would look as the color sat on my scalp.  No turning back now!step 3 pink collage

And here’s the final result, the first 3 pics taken at the salon, and the 4th in my front hall as soon as I’d gotten home.  Verdict?  I F’ING LOVE IT!!!step 4 pink shades

One thing that amazes me is how different it looks in different lighting.  These aren’t the best pics to show it, but contrary to what it would appear in this post I don’t run around taking selfies of myself all day hahahahaha.  Sometimes it appears pink, other times an almost neon purple, and in dim lighting it can go raspberry.Photo 2015-11-25, 9 28 27 AM

I’ve since gone back to have the color touched up, because sadly these kinds of colors fade pretty quickly.  I’ve managed to keep it vibrant by following the tricks I’ve read up about – washing with cold water, minimal shampooing, using a cuticle sealant, avoiding heat styling… but because the roots didn’t have brown dye they remained more vibrant a purple color, and the ends faded to a kind of red-wine shade, so I went back to have the opposite colors put on each section so they would match better.  Eventually as my hair grows out and I trim off the previously-brown ends it will be easier to have a more even color everywhere.

Photo2015-12-2385318AM

This is the result of the last color- even color from root to end.  In my bedroom it takes on this reddish hue, almost veering towards The Little Mermaid.  At Hebrew school pick up last week I was told it was almost glowing purple in the lights.  😀 It’s like mood hair!

The most surprising thing to me has been the reaction.  I’d thought my family would berate me for it but the reaction was overwhelmingly positive.  My kids love it.  Strangers stop me on the street with compliments.  I’ve had senior citizens pull me aside to tell me they love it and little children tug my arm to ask if I was a princess.  And me?  I feel like a superhero.
final brown to pink collage

Before                              ~                              After


Leave a comment

Welcome, 2016

Before I can properly say goodbye to 2015, let’s do a little visual recap the last few months.

Photo 2015-11-05, 3 48 29 PM

In November Jakob had 3 teeth extracted, his top two front teeth and an extra tooth (mesiodens) that was growing down from his palate, right behind them.Photo 2015-11-05, 4 21 21 PM

You can see here the missing front two teeth (one of his adult teeth had already started growing in) and the larger dark spot is the hole from where the extra tooth was.  Similar to when you have your wisdom teeth pulled, the extraction leaves a hole that closes up in time, only with this there were no stitches required.Photo 2015-11-05, 4 27 54 PM

Look at that thing!  The two baby teeth are on either side, and an area the size of those smaller teeth is what had grown out, of the extra one.  Aaaaaaall the rest of it was up in his palate, like his very own in-mouth unicorn horn.  We couldn’t believe it was so long!Photo 2015-11-06, 4 12 27 PM

My monkey-see/monkey-do kids really do behave like twins, even though they’re 19.5 months apart, and Henri managed to lose 2 teeth (one upper, one lower) in the same week that Jakob had his 3 pulled, so they looked like a pair of little bruisers.  🙂Photo 2015-11-14, 11 39 53 AM

If you follow my instagram you’ll have noticed a little cosmetic change I made, that will have its own post coming up- I dyed my hair pink!  The boys were jealous, so one weekend I used some hair chalk and gave them each a blue streak.Photo 2015-11-18, 10 13 15 AM

I worked on a bunch of crafts as the year drew to a close, and besides the annual teacher gifts and some cakes and things, I knit up a bunch of polar bears for a charity project organized by my cousin Robyn.Photo 2015-11-22, 1 02 35 PM

The bears were basically garter stitch with some mild shaping, and I knit really fast, and without looking, so as I had a bunch of doctor’s appointments in November, I agreed to knit up as many as I could, and then pass them along to be sewn and stuffed.  I think when it was all said and done I’d knit 10 bears- the 8 shown here and 2 others I’d already handed in.

Photo 2015-12-13, 1 29 29 PM

Henri must have been paying attention to Yannick’s morning routine… or television commercials… because one afternoon he came up to me with a Lego creation and told me it was a razor, so now he could shave like a grown up.  😀Photo 2015-12-13, 1 30 17 PM

Also in November we had a Hanukah gift exchange with my family.  Yannick drew my brother’s name, and decided to be creative and hide his gift inside a wooden log.  He cut a branch into pieces and drilled in a few holes and I made a little sign inspired by Ren & Stimpy…Photo 2015-12-13, 3 46 56 PM

By sheer coincidence when Mike held the log up so I could take a pic, it was perfectly placed to look like Yannick was suddenly in Groot costume LOLPhoto 2015-12-14, 5 03 58 PM

The boys only get access to our spare iPhone at doctor’s appointments or other public waiting areas, and it always makes me proud to see how well they get along, sharing and playing together with minimal fighting or frustration.  This pic was taken at the first of many visits we had in December, going back every 2 days as Jakob’s fever and cough just would not go away.Photo 2015-12-16, 4 19 39 PM

Finally he had an xray done, and after missing a week and a half of school and being up through most of the nights, we had an answer- he had pneumonia.  Luckily antibiotics did the trick and he was feeling better just in time for Christmas.Photo 2015-12-21, 6 41 27 PM

Much better.  And somehow also managed to become a teenager…?!Photo 2015-12-25, 8 46 19 AM

The boys were very excited Christmas morning to open their gifts, starting with their stockings.Photo 2015-12-26, 10 52 54 AM

Later on during the holidays I introduced them to some good classic movies (Phantom Tollbooth) and not-so good ones (The Phantom Menace).Photo 2015-12-26, 11 48 05 AM

Not staged at all, this truly is how my boys watch movies.  Or tv.  Or play video games.  One is almost always cuddling with the other.Photo 2015-12-27, 11 26 24 AM

Just before New Year’s we FINALLY got some snow… emphasis Henri’s, not mine.  (He was overheard telling my mom that this was the ‘worst Christmas of his entire life’ because of the lack of snow).

And now here we are, over a week into 2016 already.  The last few weeks have passed by in a blur, not because I’ve been so busy, but quite the opposite- I’ve done almost nothing.  Right before our annual New Year’s getaway with friends got sick.  Spent the entire ‘vacation’ in the hotel room in bed, nearly delirious with 102 fever and the chills and cough, only to get home and discover that I, too, had pneumonia.  It’s draining, to be sure, and is the reason why it’s already 9 days into the New Year and I feel like I haven’t been my usual crafty productive self.

One thing it has given me, however, is time.  I’ve been (re)learning a hobby I picked back up just before the holidays, doing more reading, catching up on my YouTube subscriptions and clearing room on my PVR, and doing a lot of thinking and planning.

One of the things I’d like to work on this year is this blog.  I have a huge backlog of tutorials and posts I want to share, so I will be working on ways to get that done.  I’ve noticed in my stats that my Minecraft posts are pretty popular, the cake-related ones especially.

If there are ever any questions or tutorial requests that you’ve got, Minecraft-related, cake-related, knitting… anything really, please comment or message me and let me know.  I’m trying to focus more on explaining how I make the things I do, vs simply showing the end results, but there may be steps I overlook, or techniques that I assume are common knowledge.  If ever there’s anything you want a hand with, please don’t hesitate to reach out!


1 Comment

Decoration Station

A little while ago I finished a long-visualized project to organize my cluttered, messy dining room desk/hutch/thing into something functional for more than merely depositing random stuff into piles.

This past week I had some cake-related projects to complete, and it was the first chance I had to test out whether having everything set up in a clear, organized way would actually make my process smoother and faster than having things a bit all over the place (though I knew where everything was).  (Spoiler alert- it did).  😛

desk after

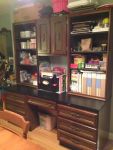
As a reminder, here’s the new after.  The right side holds assorted kid crafts and home stuff, like batteries and a few tools we use often.  The drawers on that side are Yannick’s, and the middle of the desk holds a caddy with all the kids’ coloring books and drawing papers and markers and pencils and the like.  The rest?  Mine… all mine!  😀

The first thing I did was organize the drawers, because they had been crammed full of the small toys and things the kids get in loot bags, assorted scraps of paper, and other randomness.  Now they’re organized.  The long drawer holds the battery chargers, my tape gun, and little trays with pens and pencils.  The side drawers are organized with the kids’ school papers and saved art, plus a drawer for me to keep some craft stuff upstairs but out of sight.

I forgot to take a pic of the inside of the top middle section, but it’s mainly storage.  I keep the foam trays that veggies come on and use them as palettes, so I’ve got assorted sizes stacked up there, along with a few cookie cutter sets that were too big to fit in my box down below.

Now, onto the rest: the cake decorating supplies!

desk after detail01

Now, I’m a home baker.  I don’t do this professionally, it’s a sweet hobby (ha!) so I can get away with not having a whole kitchen’s worth of supplies.  Most items I’ll replace when they run out, vs keeping extra on-hand, so this amount of space works for me, and I still have room to grow.

I mean… *technically* I can take over the ENTIRE hutch… but let’s not think of that (and worry my husband) right now.

🙂

desk after detail04

The top shelf is where I keep my fondant.  I have, and do, make and use my own MMF, but I also have no problems with store-bought.  I like the taste, myself (except Wilton’s), and I very rarely use it to cover kids’ cakes, because kids don’t really like it, so I use icing for them.  On adult cakes I find that most adults peel the fondant off anyways so the taste isn’t an issue regardless of the brand.  I’ve always got white fondant on-hand, and red and black are the only colors I’d buy pre-mixed, because of the taste and pain in getting those myself.  So on the left is a tub each of black and red.  I’ve never compared, but haven’t noted a taste or texture difference between Satin Ice or Virgin, so I use whichever one is sold where ever I happen to be when I run out.  🙂

I ALWAYS keep the leftovers after I color fondant.  Even the tiniest of scraps can become pupils for eyes or detail on something or other, and even if you think it’s hardened beyond use it’s amazing what 15 seconds in the microwave can do.  The blue-lidded tub holds colored fondant, wrapped up airtight in ziplocks and saran wrap and there’s even another container inside that one holding what’s left of my last batch of MMF.

Finally, the red-lidded container on the very top has a small palette of silver dust, for decorative work.  I hydrate the dust with vodka or vanilla to use it as paint, and then when the alcohol evaporates there’s still dust residue left on the small cup I use.  Rather than waste it I let it dry fully then store, re-wetting with more liquid next time I need it.

The second shelf has my white fondant (and, yes, a small box of Wilton white because I was stranded without access to anything else).  The fondant tub with the post-it label is full of sugar pearls and candy beads and dragees, I’d found a sale at Michael’s and bought assorted colors.  Next to that are a bunch of containers I salvaged by washing out the icing tubs after making cakes in the past.  The top row are from dollar store icing, and are opaque white.  The red-lidded Betty Crocker ones are semi-translucent and the covers seal nicely and they make great food-safe containers.  I wouldn’t quite trust them with my lunch, I’m not sure how well the cover would stay on when tossed in a bag, but definitely reuse them for something!  I used them to sort my small bits that were previously in ziplocks and shoved loose into my toolbox.  They hold things like toothpics, q-tips, the levels for my fondant rolling pins, icing tips, small sets of mini fondant push-cutters, etc.  The 4 at the back are empty, waiting until I need them.desk after detail05

The next shelf down has all my ‘stuff’, the things I use most often when actually *making*.  Okay, I lie.  The purple flower-print box in the center has everything I use most often.  But the rest is stored here too.  🙂  The lower box on the left holds icing tubes.  I make my own icing usually, but I like the premade gel kinds for simulating water (you’ll see that soon in the water mixing cups for a Paint Nite cake I made recently) and I use black gel icing as a transfer medium.  The bin above it has tools like a Wilton fondant cutter and ribbon rollers and cake level markers…

You know, I’ll be honest – I never use that stuff.  Like, ever.  I bought it, so I have it, in case one day… but for anyone starting out decorating, DON’T spend the money on that kind of stuff.  The ribbon rollers… meh.  A cake leveler?  Garbage.  There are a few things I’ve found worth the money, like a fondant roller.  Moving from working on my table with a rolling pin to a gridded mat with a fondant roller was a revelation in ease and speed, and the rolling pin levels (differing thicknesses of elastic bands) are very practical.  But until you see what you need for the kinds of things you’ll be making, don’t bother.  You can cut ribbon shapes with a knife.  I used my kitchen knives for almost everything, from leveling cakes to icing them to cutting out fondant, and only just switched to using a smaller cutter because it came in a set with another tool I needed.

The red flower box has things that didn’t really fit anywhere else at the back, like cupcake stencils, and at the front has some items I reach for regularly, like a measuring tape, dressmaker’s pins, and a pen.

The green box has my icing bottles in assorted sizes, and my caulk-style icing guns.

The purple box… that’s where the good stuff is.  🙂

Oh- and those boxes by the way?  More repurposed items.  They’re tissue boxes with the tops cut off, and then I used additional cardboard and paper rolls to sort like items together.  Super easy, super cheap (free!) caddy.

desk after detail02

So what’s in this one?  At the back are my brushes, the ones strictly kept for food projects.  I have assorted sizes for everything from broad to detail work.  In the middle is a foam mat for fondant/gumpaste work and a set of food markers (I love these!).  Then there’s a small size fondant roller and a bunch of fondant/gumpaste shaping tools.  These are a recent purchase, most from the dollar store (except the 2 taller ones) and I’m not sure yet how helpful they will be, seeing as I’ve managed the last 8 years without them.  That said, I used to do scuplting with clay, and I know the right tools can make a big difference, so I wanted to give them a try, and the price was great.  The two taller ones are Wilton and were more expensive, I think they were on sale at $6 for the two, but I’ve found them to be a valuable addition.  The wheel has 2 sizes pinwheels for docking and fabric looks (though I achieved the same look recently using a sewing pin) and the capped tool has a needle on one end and a knife at the other, and I found it came in very handy (pun intended) this past weekend when doing some fine letter work with fondant.  The rainbow-lined packs are more food markers, thick ones mostly left for the kids to use, then a 2 pack of my preferred brand in black, and then a bottle of Wilton White icing whitener which I use CONSTANTLY when making my icing ‘paints’.

My favorite kinds of cake toppers are when I can sit down and ‘paint’ something fun, and this caddy will allow me to pull down the one box, and my icing colors, and get to work.  desk after detail03

The lowest shelf isn’t really a shelf, it’s the tablet of the desk itself.  I keep these things here right now, but I might reorganize one day if the kids get more nosy, as the idea of them having free access to the dyes and sharp tools above isn’t one I’m crazy about.  In the meantime, though, the lower tablet has the red-topped pencil case that holds my food-coloring dyes and Wilton pots of icing gels, and in front of them are the box of AmeriColor ones.  Love.  Love love love my icing dyes.

The blue-lidded box holds straws and bamboo skewers for cake support as well as icing/piping bags.  The two jars to the side hold mini and large cupcake liners, and the photo album has all the cakes and cookies I’ve made, a sort of gallery of foodstuffs made for when I visited a local cake guild one night.

Finally, for real this time, the storage bin on the floor under the table holds all my cookie cutters, sorted by shape and theme.

There are a few things not stored here, mainly due to size… my large fondant roller, the cutting mat, my turntables… plus other things I find indispensable for cake decorating, like my dollar store thin mats and saran wrap and parchment paper and scissors.  But the bulk of the stuff is here, and easy to access and find, and I’m really happy having a functional item of furniture.

(I’m also really happy to note that it’s been about 3 weeks since the cleanup was done and the desktop is STILL spotless!)

Who’da thunk?

This post may contain affiliate links. This means I might make a small commission on purchases made through the links, at no cost to you.


1 Comment

challenge complete

I managed to finish my dining room desk overhaul and whoa what a difference it makes!  A main benefit is supposed to be when I work on my next project… having all my supplies organized and at-hand… but an important EXTRA benefit is that now the desk is clean… which means Yannick no longer tries to avoid looking in the dining room’s general direction.  😉

The before can be seen in my previous post…and here’s the after:

desk after

What a difference, no?  All that space… just waiting for me to pile stuff on it… hehehe


.


1 Comment

self-imposed challenge, accepted

So many blog drafts, so little time.  😦 I have so much I want to share and yet keep finding my nights kept busy by more projects that require my hands… which means they can’t be on the keyboard, editing pics and writing up posts.  However, one project is trumping all the others today.

I recently tackled cleaning my office, and have been greatly enjoying the convenience of being able to walk in, immediately grab what I need from it’s appropriate, labeled container, and then leave, without having to trip over supplies or dig through stacks.  Craft stuff lives (mostly) downstairs, but cake stuff hangs out in assorted places in the kitchen and dining room.  When I first started, 7 years ago, a small tupperware sufficed.  Two years ago that tupperware grew into a toolbox, but now, sadly (?) I’ve outgrown that as well.

I always decorate cakes and cookies in my dining room, and quite a few times I’ve looked up at the hutch right in front of me and thought how great it would be to transform it into some kind of giant decorating center.  It’s a convenient space and Yannick and I each have our own ‘sides’, plus it’s where we keep drawing and craft materials for the kids, so converting my side into something useful would make sense.  Plus, until recently, my side was crammed full of books, old magazines and photo albums, none of which had been touched in at least 5 years.

The books were moved somewhere more appropriate and the magazines donated, and the craft supplies that should be moved down to my office were tucked into a Costco box with the intent to (eventually) bring them downstairs.  Since then, with each new food project, I’ve slowly moved assorted containers and supplies up into the now-empty shelves.

Not organized, of course.  THAT would have been to easy.

Well, that’s my plan for today.

messy desk dining room

Organize this space.

And drink coffee.  Lots of coffee.


2 Comments

on the way to Hogwarts

Those who follow me on Instagram/FB got a sneak peek at Henri’s Halloween costume this year.  The boys fell hard into the world of Hogwarts when we began showing them the films this year, though we stopped after the 5th one because they were getting a bit too dark.

Jakob wants to be Draco Malfoy.  It was his original costume choice, now possibly swapped out for a Minecraft Enderman, but in general, he wants to be a Slytherin.  He thinks Harry was put in the wrong house, and that Slytherin is where it’s at.  It’s less to do with the negative traits or a penchant for the color green, than it is that, as he likes to remind me, “We love snakes, Mom.“.  Yes.  Yes we do.

FullSizeRender
Jakob, age 4, with friend.

The Snake is my Chinese sign and a long-favored creature of mine, and that love transferred down to my oldest.  In fact, we’d have a pet snake at home if it weren’t for 2 things: 1. I would be too heartbroken to feed it mice, and 2. my father-in-law would never visit again.

In any case, if ever he were to dress up as anything from the Potterverse, it would be in Slytherin colors.  But Henri?  He’s Gryffindor all the way.

IMG_7913

Doesn’t he even LOOK like a young Harry???

We bought those glasses and wand last weekend at the local Halloween store, and my mom lent us a black grad gown that is PERFECT for his robes.  I’d like to find time to make a crest for the robe, but the main finishing touch for his costume is the scarf, so I decided to get on that last night.

IMG_8044

The burgundy isn’t quite right, but I’m working with stash yarn and I don’t think he’ll mind too much.  The pattern is my own, such as it is.

CO 30 sts with burg yarn.  Work 1×1 rib for 30 rows.  Change to yellow, work 1×1 rib for 30 rows.  Repeat, ending after a burgundy section.  Add fringe.

I decided against working stockinette because I really didn’t feel like taking the extra time to make it doubled or in the round, and a flat panel of st st would curl like crazy.  1×1 rib contracts enough to look almost like stockinette and won’t curl, making it quicker and easier for a 6yo’s Halloween costume.  🙂

UPDATE AFTER HALLOWEEN: Here’s Henri’s final costume!


3 Comments

SuperBaby, revisited

The boys keep talking about what they want to be for Halloween this year, and it has me reminiscing about Jakob’s first Halloween, and one of my very first designs.

Here’s a repost, coming to you from all the way back in 2007.  Lookit how wittle he was!!

~~~~~~~

From November 2007: May I present…

SuperBaby!

SuperBaby’s special powers include drowning his adversaries in massive amounts of drool, and the ability to shove anything into his mouth. Foes are often foiled in their plots by his awesome cuteness which requires all who pass to stop, come closer, and kiss him.

SuperBaby also managed to stand by himself (leaning on the sofa) for the purposes of taking this photo.
His detachable cape is this season’s “in” accessory. No SuperBaby would be caught dead without a cape this year, and we hear that shiny red is the new black.

The pattern is my own, for both the outfit and the cape. I had Yannick’s help in creating the baby, and the Superness is all his own. 🙂

By the way, these are the pumpkins that Yannick bought for outside our house. Should I be insulted that the “Daddy” and “Baby” pumpkins are perfect, and the “Mommy” pumpkin is all lumpy and deformed?

~~~~~~~~~~~

Heh.

My brother Aaron edited that pic up there and now SuperBaby looks right at home, defending the city.

2746303239_dd66905612_n

He wore the outfit again for Purim too.  🙂

jakobsuper

A little while later I’d contacted DC inquiring about permission to write up and publish the pattern.  (They, duh, refused me).2746347727_708f81ccb0_n

So… I modified it into a generic superhero instead, and now anyone who wants to can knit up their very own!

myfirstcostumesuperhero

The pattern is written for ages 6-12 months [12-18 months], and includes full instructions and charts for the costume, the two shown chest shields, and the cape.  There is also a blank chart with instructions on how to design your own shield, in case you want to personalize it with your favorite SuperBaby’s initial.

It’s on Ravelry here.


16 Comments

How to Make Minecraft Steve and Creeper Heads

Update: This tutorial is now also available as a downloadable PDF here. More details at bottom of this post.

It’s October!  That means it’s okay to start talking about Halloween, right?

It is according to Henri- when I woke him up for school this morning he gazed up at me sleepily and grinned “It’s October 1st.”  When I asked why that mattered he smiled even more adorably and said “Because now it’s almost Halloween.”

‘Almost’ is relative.  (He clearly gets his awareness of time from his father).  However his mention of it reminded me that I never showed last year’s costume.  So.  Now, with plenty of time to get ready for this year’s holiday… here’s how I made the boys Minecraft Steve and creeper heads, and how you can too!

how to make minecraft steve and creeper heads

The boys decided for Halloween they wanted to dress up as their favorite Minecraft characters.  They do sell ready-made cardboard heads in stores but they are expensive, and there are a ton of tutorials online.  I looked at a few, then worked things out with what I had on hand, and what I was able to find at the dollar store.

What you’ll need:

minecraft heads wip 01

1. Yannick came home with 2 small boxes he’d found somewhere.  Grocery stores often have ones you can ask for, or as a last resort you can buy boxes.

2. I used two-sided tape to tape the outer flaps to the inner ones (not shown) so the inner flaps wouldn’t drop down onto the kids’ heads.  Then I used masking tape to fully tape over the top seam, both to securely close one end of the box, and to make the seams less visible once they were painted.

3. I cut the lower flaps off the boxes and then used the same masking tape to cover the exposed edges.  It would gave a cleaner look, vs the rough look of cut corrugated cardboard, plus was less likely to catch and tear, which could potentially pull off the paint.

4. I divided the 4 sides and top into even grids.  I looked at pictures of the characters online and mapped out roughly how many squares per color/face, and then used a ruler to divide the front (face side) into the grid.  Once the face was set, I carried the markings around the sides of the boxes, and finally the top.  Because the boxes are taller than wide, the top has fewer squares than the sides do.  That’s not what the characters SHOULD look like, but I didn’t think the kids would mind.

minecraft heads wip 02

5. Once the boxes were plotted I used a cutting blade (also from the dollar store) to slice out the eyehole sections.  For Steve, only the dark pupil area was cut out.  For the creeper it made more sense with where Henri’s face was to cut out the larger nose/mouth section.  After removing those areas I covered the exposed edges with masking tape.

minecraft heads wip 03

6. Finally it was time to start painting.  The paints and brushes were from – you guessed it – the dollar store.  The advantage with the Minecraft characters is that if you have to custom mix your paints to get the right colors, it doesn’t matter as much as it would in most projects if you have enough to complete your painting or if you need to mix more and risk not matching quite right.  The goal is to have an assortment of shades, so blending colors works perfectly.

That said, if you prefer a more accurate version, I have compiled this tutorial into a downloadable PDF (linked at the bottom of the post) which includes full-color screen-accurate charts for both characters, including the hex codes for each color so you can color-match accurately.

minecraft heads wip 04

Here’s the four sides of the painted creeper head.  I set the boxes to dry on a paper towel roll to hold them off my counter until the lower edge was dry.  (I held them up the same way while painting too).

minecraft heads wip 05

Same goes for our buddy Steve here.  I’d only had three shades of brown paint on-hand to work with, so I blended them together with some black for the hair, and then lightened with some white and a touch of red for the face.  (I’d actually done the face/neck/ears first, so then I could re-use the same paints but darken them for the hair.  That avoided any waste and kept the same unifying overall color tone for the head.)

minecraft heads wip 06

I had them both on the counter while I cleaned up the dining room table of all my painting gear.  Couldn’t resist this dramatic shot.  Look out!  He’s behind you!

minecraft heads wip 07

7. The next step was to seal the heads with an aerosol can of clear sealant.  I didn’t know what the weather would be like on Halloween and didn’t relish the idea of my hard work being ruined by a few drops of rain or thick snow settling on the kids’ heads.  I moved the heads into the garage and set them on some newspaper to protect the floor as I sprayed, and did a few coats, allowing each one to dry for about 20 minutes in between.  If you have a dry, open area outside or good, even weather you could do this next step outside, but here there was nowhere I could leave them unattended, so I had my garage door open the entire time I sprayed, and then left it about a foot open during the drying time between coats.  Once they were properly sealed and dry to the touch I brought them inside and allowed them to dry for a full day before the final steps. 

minecraft heads wip 08

The last bit in getting the masks ready to wear was to block out the open areas.  I bought a gauzy sheer black scarf (also at the dollar store!) and cut off squares large enough to fully cover the open areas.

8.  Using the same double-sided tape I secured the black fabric down around the cut areas.

9. Finally I covered all the exposed edges of the cloth with masking tape, making it doubly secure and hiding any rough, cut edges so they wouldn’t catch or fray.

With that, the masks were complete!  The black gauzy fabric looks opaque from the outside but from the inside it’s so sheer that it’s quite easy to see through it, making it perfect for this project.

From idea to finished product this project took about 4 days.  Halloween was on a Friday last year and Yannick brought me home the boxes on Monday night.  Tuesday I did everything up to/including painting.  On Wednesday night I sprayed the clear coat, and then on Thursday night I stuck the black fabric in.

They were pretty darn excited!

Halloween night they posed for a quick picture inside…

minecraft heads wip 10

…then it was time to go trick-or-treating.

minecraft heads wip 11

Can’t you almost hear the tick…tick…tick…BOOM? The heads held up beautifully and the boys felt like mini celebrities as they walked down the street and people from all over, even in passing cars, yelled out “Steve!” and “Creeper!” and gave them high-fives.  The heads have now become part of our dress-up box and are still in great condition, and they wore them for ‘Halloween Day’ at their camp this summer.

*Update in 2020: the heads are still going strong! The boys outgrew them of course, but we keep them as nerdy shelf displays and they look exactly the same as they did back when I made them.

minecraft heads wip 12

I hope this post shows you how easy and fast it can be to make your own Minecraft Steve and Creeper heads!

You can adapt the tutorial to make any Minecraft mob, and I’ve got an assortment compiled for you here.

As mentioned above, if you’d like an easy-to-print-and-save PDF version of this tutorial, I have made it available on Etsy here. The 9-page PDF includes full instructions with additional details, clear photographs, as well as game-accurate full-color numbered charts for all 5 sides of both character’s heads along with their hex codes for perfect color matching.

————-

More Minecraft-themed fun:

How to make a Minecraft Enderman head and diamond block trick-or-treat basket

How to make Minecraft Lootbags

How to make Minecraft Mob fondant cake/cupcake toppers

How to make a Minecraft cake

Throwing a Minecraft birthday party

Minecraft Zombie Charts

Minecraft Jack-O’-Lantern Charts

This post may contain affiliate links. This means I might make a small commission on purchases made through the links, at no cost to you.


Leave a comment

you say it’s your birthday…well it’s my birthday too, yeah

I’ve been complaining lately about not finding making the time to post.  I have a backlog of images that I want to share, tutorials and baked goods and crafty things of all sorts.

Today’s my birthday.

IMG_7172To celebrate, I’m gonna do it (post, you pervs LOL) and share some of the things that have been keeping me busy the last month.

IMG_5997Henri finished his first, then his second chapter books.

He won’t go to bed without a book and a flashlight.  (He gets that from me).IMG_6067Jakob discovered Grumpy Cat.

IMG_6262I’ve been hooking.  (Heh).

IMG_6446I caught a toad and the boys got to hold it.

IMG_6449Doesn’t it look like he’s almost posing?  (The toad).

IMG_6612We finally assembled the boys’ beds into a bunk bed in Jakob’s room…

IMG_6642…and Henri got bunk beds too (I forgot to take a better ‘after’ pic)…

IMG_6628…so of COURSE the first thing they did was have a sleepover.

IMG_6635They became ninjas (or rappers, I can’t quite tell which)…

IMG_6739…and climbed trees…

IMG_6818…and did shadow-puppet shows…

IMG_6821…and dressed themselves with no regards for color or pattern.

Finally the summer drew to a close, and they had their first day of school.IMG_6881They kissed each other goodbye (I couldn’t resist this pic!!)…

IMG_6886…and then Mr. Grade 3 went off on his way…

IMG_6891…followed not long after by Mr. Grade 1.

In what may be the BIGGEST surprise of the summer, I managed to transform my office from this:

IMG_6952(Don’t judge me)

…to this:

IMG_7174

(I KNOW, right???)

IMG_7061

Funny, I always thought he was priceless.

And that works us back to today.

IMG_7173

This is what 38 looks like.

Have a great weekend!


Leave a comment

undateable

In this post: the cast of an NBC sitcom surrounding me as they hold stitched samples of their likeness.  In other words, just a normal Thursday…

Ha!

First, a brief apology.  After the rush and whirlwind of finishing my Sprocket costume I took a little break from crafting, and blogging.  Took advantage of not needing to stay up until 3am to crash early, or do other things that didn’t involve math, or thinking.  Couple that with an onslaught of weather-induced migraines, and I’ve been getting a lot more rest lately, but it means the blogging has suffered.  :/

So.  A few weeks ago I got word that I’d be able to attend a Just For Laughs panel involving the cast of Undateable.

undateable_ver2

I knew that since it would be a con-style panel, vs a stand-up-type comedy show, there was a chance the audience might be able to meet the cast.  And I decided I wanted to do something for them.  While I enjoy the show, I didn’t do it because I’m the ohemgee number one fan!!! nor to get a chance to potentially meet them.  I just thought it would be nice.  🙂

I hit upon the idea of doing something in cross stitch right away.  I knew it was easy and portable and something I could likely finish in time (I had less than a week until the panel).  I’ve had transactions in the past with an etsy vendor called weelittlestitches and I absolutely love her work*, and immediately I thought of contacting her to commission a custom pattern of the cast.  Unfortunately I didn’t think the timing would work out, so I ended up designing them myself.

I did an image search for each character and put together a little file for each one, giving me the gist of that character’s ‘look’.  At the same time I also pulled out some quotes from each episode so I could add a funny line for each character.

“Justin”, played by Brent Morin

undateable justin pic

Photo 2015-07-23, 11 29 44 AM“I’m kind of like Spanx.   I’m there to support you wherever you need it.”

  “Burski”, played by Rick Glassman

undateable burski pic

Photo 2015-07-23, 11 31 06 AM

“Dibs.”

“Leslie”, played by Bianca Kajlichundateable leslie pic Photo 2015-07-23, 11 30 21 AM

“One-night-stands are like fast food- sure you feel guilty the next day

but sometimes you just need something cheap you can enjoy in your car.”

“Danny”, played by Chris D’Elia

undateable danny pic Photo 2015-07-23, 11 32 21 AM

“Change is hard, Baby Bird, but I’m gonna help mend those broken wings.

I’m gonna be the father bird and just feed you knowledge.”

“Candace”, played by Bridgit Mendler

undateable candace pic

Photo 2015-07-23, 11 33 50 AM

“All I have is a scrawny little white-girl butt… There are people out there who like those too, right?”

“Brett”, played by David Fynn

undateable brett pic Photo 2015-07-23, 11 33 16 AM

“I’ve had sex with a lot of ladies.”

And finally “Shelly”, played by Ron Funches… who wasn’t there, but I hope his got to him anyways.

undateable shelly pic

Photo 2015-07-23, 11 31 45 AM

“I identify with piñatas.  I’m also adorable and full of candy.”

Once at the panel my mom and I were seated pretty close.  Like…

Photo 2015-07-23, 3 52 27 PM

My feet were about 2 feet from the stage.

…really close.  So close in fact that when the cast came out and Rick was using his phone to stream the panel for Periscope, I jokingly offered to hold it for him and he leaned over and handed it to me.  (So if any of you reading this were watching the panel, I’m sorry for swinging it around and possibly making you nauseous before I realized where it was actually aiming).Photo 2015-07-23, 4 45 52 PM

Brent answering a question, possibly about the little gnome in his butt (you had to be there), while David, Rick, Bianca and Bridgit look on and feign amusement.

Photo 2015-07-23, 4 45 47 PM

The other side of said gnome-butt convo, egged on by Chris and more feigned amusement on behalf of Adam Sztykiel and Bill Lawrence, along with the panel moderator (who I think was from Mashable?).

Towards the end of the panel they took audience questions and I got the last one, asking, rather awkwardly, “I, um, made you guys something.  Can I give it to you?”  (Not my finest moment).  Luckily they said yes, and I got to give each one their framed portrait.  At one point Chris asked if it was called needlepoint, and started calling out, all Oprah-esque, “YOU get a needlepoint!  And YOU get a needlepoint!  Aaand YOU get a needlepoint!”.

Photo 2015-07-23, 4 59 58 PMThere was a funny/sad moment towards the very end when they were all looking at each others’ and then Bill put out his hands and looked around like “Where… where’s mine?”  I offered him a hug instead but he didn’t take me up on it.

Then the panel was over, and I thought that was the end of it.  Instead, however, David jumped right down and came and gave me a hug and said thanks.  Bianca did too, before walking away.  Brent came by, and suddenly I turned around and the whole cast (minus Bianca and the absent Ron) were standing right behind me.  My mom had been taking pics the whole time, so I wound up with this:

Photo 2015-07-23, 5 47 43 PM

Yep.  That’s me looking all dork-tastic.  🙂

Mom and I had barely made it to the elevator when my phone buzzed, and I saw this Tweet:

Photo 2015-07-23, 5 42 47 PMPhoto 2015-07-23, 5 42 43 PM

Awwww! 😀

* If you’re into cross stitch, or pop culture, or any combination thereof, go check her stuff out, it’s amazing.  😀