6 Comments

how to make a viking vest

Henri has wanted to be a viking for a while now.  Not for Halloween, I mean he wants to be a viking in general.  (It’s either viking or pirate, depending on the day).

Jakob got a light-up viking helmet at the How To Train Your Dragon Live Spectacular, and unfortunately when we brought Henri the next day they were all sold out of helmets, so he got a Toothless plushie instead.  (Jakob, you’ll remember, got the one I knitted for his birthday…which I think I never blogged.  Oops).

The kids share the helmet, and last month when it was time to pick costumes for ComicCon (which I think I also forgot to blog…crap) Henri REALLY wanted to wear the helmet and be a viking, but a quick search through the closets revealed that we didn’t have any viking clothes.  All we had even close to a viking vest (like Hiccup wears in the movie) was a gray zippered sweatshirt-style vest.  The kids dressed as Avengers instead but Henri had it stuck in his mind that that was his viking vest and he has worn it non-stop ever since.  He’s worn it to school on back-to-back days, he’s worn it over his fall jacket, he wears it around the house, and on more times than I can count I check on him at night to find that he’s put it on over his pjs and worn it to sleep.

(Something about a 3 year old with tousled sleep hair in footie-pjs, amirite?)

He stops strangers to point out his “viking vest”, but commented a few weeks ago how “it’s not a REAL viking vest, Mommy, because it has a zipper and REAL viking vests have buttons”.  Oh.  Right.  ‘Cus vikings didn’t have zippers.

I promised I’d make him a viking vest, and yesterday I did just that.  I took photos throughout so if you want to make one, you can too.

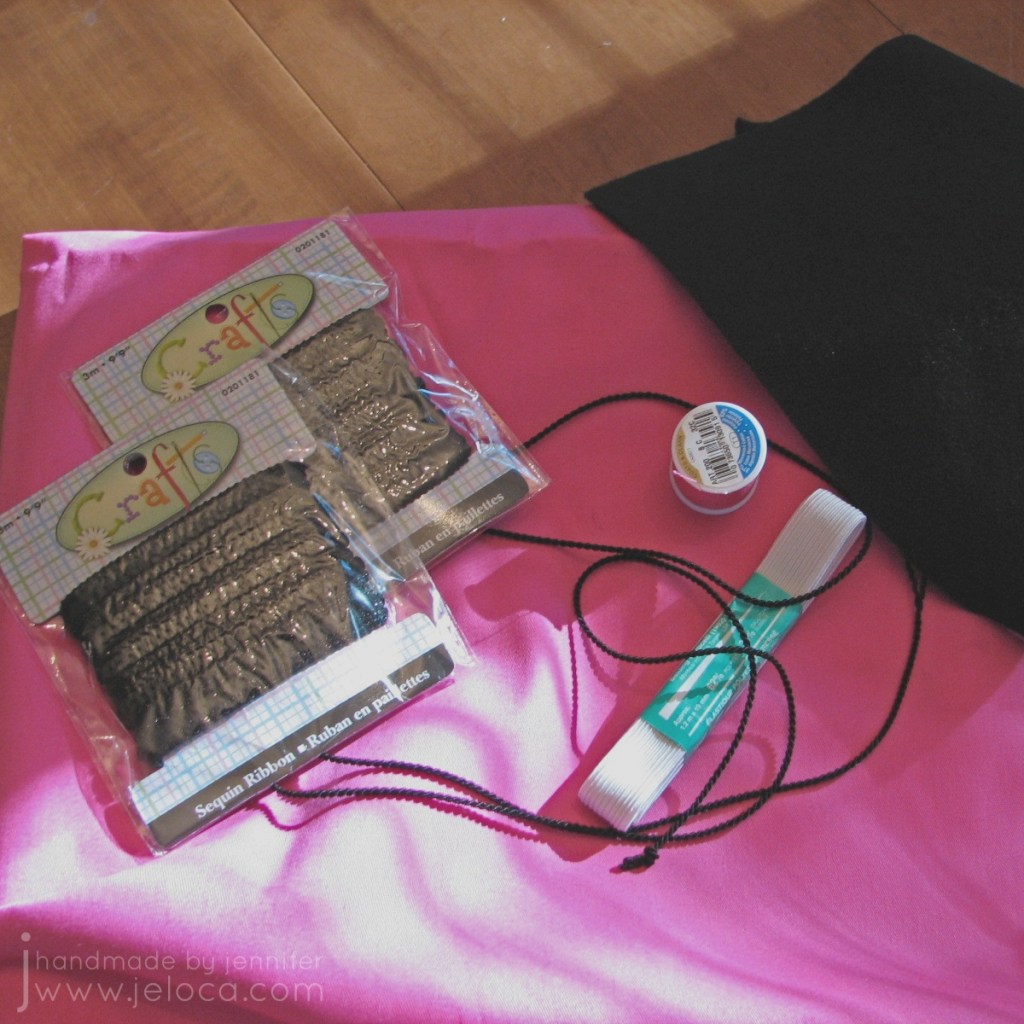
I used some fur fabric my neighbor gave me, a sheet of newspaper, a sharpie & a pair of scissors, plus a sharp large-eyed needle, black acrylic yarn and white cotton yarn.  The only other thing you need is a vest that fits your child (or you!).

I started by laying the vest on the paper and traced half of it.  I used my finger to push down then traced to know where the neckline in the middle lined up.

I knew I wanted to add some length to the bottom and the armhole so it would fit him longer, as well as lowering the neckline to a v-neck, so I made those changes on my template.

I cut it out and checked against the vest.

I decided I wanted to make the neckline more sloped so marked off the changes on the pattern…

…then cut it out and checked again.

I was happy with the shape so I traced it onto my fabric.  It’s hard to see, but I traced out the half-vest pattern, flipped it and traced again for the other front, then traced it back-to-back, flipped, for a piece to fit the back.  The only thing I didn’t realize is that the fur fabric had a direction to it in which the fur laid flat.  I tried to be as economical with the fabric as possible so didn’t have a choice, but you would probably rather make sure you’re lying the pieces with the fur running from up to down, like natural fur.

I cut the pieces out on the porch which was a great idea because there were bits of fur flying EVERYWHERE.  I used my fingers to fluff up and pick at all the edges to make sure I’d gotten as many stray cut bits as possible before bringing it into the house.

I used a sharp needle and black chunky acrylic yarn from a big-box store to work a blanket stitch edging around each piece.  I eyeballed it, placing the stitches roughly 0.5″ apart, and 0.5″ down into the fabric.

The simple edging really gave the pieces a finished, yet still “handmade by Vikings” look.  (In this light you can see my fur runs in the opposite direction from how the vest will be worn, oops!)

This is the inside of the pieces, for those who like that kinda thing.  🙂

I used the same black yarn to seam the two sides and the shoulders together.  I did something similar to mattress stitch, butting up the two pieces to be joined and catching a loop from each edge all the way along.

Almost done!

Inside shot.

For a finishing touch I used white worsted-weight cotton yarn (dishcloth cotton) and made large stitches across the joined pieces.  This is purely decorative, but makes it look like Vikings really made it! according to my 3 and 5 year olds, and I trust them.

This is Henri’s final costume- a green long-sleeved tee, brown cords, his new vest and the light-up plastic helmet.  I may make a Viking axe if I have time/remember by Halloween.

Henri the Brave!

Back view.

He thought he was dancing for me.  I just wanted to see the decorative stitches.

That’s one happy Viking!


4 Comments

no tapestry needle? no problem!

notapestryndlpin

http://www.youtube.com/watch?v=oYuydpcXbc4

The above is a video I made quite a while ago.  Some of you will recognize the project in my hands – it’s Kate Gilbert’s Papa Bunny that I had made to send to a friend’s daughter in 2008.

This video shows what to do when a pattern asks for a common technique – but you don’t have the right equipment with you.  The last row of the directions said to “thread the live sts onto the working yarn with a tapestry needle and pull tight to gather”.  The only problem was that I didn’t have a tapestry needle with me.  I didn’t like the idea of pulling the stitches open with my fingers so I could get the yarn through easily, as it would distort them.  I came up with this idea instead.  It might be familiar to some of you, or it might be new to you.  Either way, it helped me and I hope it helps you too!  If you’d prefer a photo tutorial (vs the video above) let me know in the comments and I’ll make it happen. 🙂


4 Comments

How to Magic-Loop (video)

I was discussing the Magic-Loop technique with my cousin Amy the other day, and I realized that it is a technique I use quite a lot.  In fact, with the exception of 2(!) projects I can think of in my years of knitting, I have always used a longer needle than called for.  Only twice (my stalled “Perfect Knitting Bag” and the Spiral/Pinwheel Baby Blanket) did I use a needle smaller than the circumference of the knitting so I could knit around uninterrupted.

That being said, I know some people are mystified by the whole “Magic-Loop” idea.  I taught myself by following a photo-based tutorial online, but without needles in hand, even photos can be hard to figure out.

I put together a little video to show how I work Magic-Loop.  It’s not the best as I filmed it myself while knitting and talking, but at least the house was quiet and I think there is enough light to see what I’m doing.  I hate my voice in videos, but there’s nothing I can do about that!


If you have any questions, please ask!


3 Comments

just a typical saturday night

Any major knitterly repairs had to wait until tonight, since we had a birthday party this afternoon. One of my best friends’ son turns 2 this week, and our little family was invited to his party. I’m not going to post photos of them since I forgot to ask permission, but I am going to post a different photo (hi Debbie!) to my friend Debbie who is one of the very few non-knitters who reads my blog.

Jakob’s friend Taylor was at the party too, since we’ve known her father since high school, and her mom for the last few years. Taylor is exactly one day older than Jakob.
Hey baby…come here often?
After supper tonight I decided to brave the Superman repairs. I took photos and will break down what I did, step-by-step. It turns out that while I’ve councelled others to do this same repair, I don’t think I’ve actually done it myself before. It was much easier than I’d thought!
First I took a circular needle and wove it through the stitches, making sure to pick up the left bar of every stitch, and verifying that I had the correct number of stitches on the needle. You can also pick up the right bar, it doesn’t matter as long as you consistently pick up the same side of each stitch.
Next, I grabbed a dpn and “picked up” stitches 2 rows below the one on the needles. I only picked up 6 sts at a time so the fabric wouldn’t pull too tightly. Once I had the first 6 sts on the needle, I CUT one stitch on the middle row…the one in between the two rows on needles. I used a spare needle to unpick the yarn from those 6 sts, then took another needle and picked up the next 6 sts, unpicked the middle row, etc… (Yes, I left the scissors in the photo on purpose. Looks ominous, huh? LOL).

Once I’d done that all the way around the row I had the two parts of the leg separate. I was then able to add another 12 rows (1.5″) in length to the foot part of the leg.
With the knitting done, I “tidied” up the two parts by arranging them on 2 dpns each, making sure that I had the front and back aligned properly (wouldn’t want to sew the foot on crooked!). I left a really long tail for grafting, then cut the yarn.
Finally, I Kitchenered (grafted) the foot part to the leg. You can kinda see here how much length was added. I’m breastfeeding (and don’t drink anyways) so I had a cup of Earl Gray as my fortification instead of the typical glass of wine. 😉 I was about to do the second leg when Yannick suggested that I wait until after Jakob wakes up tomorrow so that I can try it on him first and be sure that I didn’t add too much…or need to add more.
So there you have it. One leg lengthened by an inch and a half, with my first not-too-sucky graft. One more leg to go.

You can use this type of repair for any knitting that’s too short and you want to add length, OR you can use it for knitting that is too long.  Follow the same steps to separate the work into two pieces and then unravel the side that goes in the opposite direction of your knitting for the required length, plus one row.  If using my costume leg as an example, I wouldn’t be able to unravel the top piece without picking out each stitch one by one, as I’d be unravelling in the same direction as I’d knit and it would be very time consuming.  I would unravel down the lower (leg) piece as that would be going opposite the knitting and would frog easily.

So if I had a leg that was 10 rows too long, I would separate the work onto two sets of needles and then unravel until I’d removed 11 rows.  The grafting row will account for the difference, “putting back” one row as it joins the two halves together.


Leave a comment

Elphie Custom Camera/Phone Case

Update: see end of post for information about a downloadable pattern pdf

Hey guys! Even with my hands usually full of baby lol I managed to finish and write up a pattern!

After my son Jakob was born I told my husband we had no choice but to buy a new camera.  Our existing camera was huge- larger than an 80’s cell phone!  It was the kind of camera I couldn’t even bring to social events like a wedding or shower as it would have required its own carrying bag and I would have looked like overdressed paparazzi.  Now that we had a child, I insisted, we needed a camera small enough to keep in the diaper bag or in my pocket.  There was no way I would miss those special first moments!

Buying the camera didn’t solve all of my problems, however.  The camera didn’t come with a case- only a thin tufted slip of paper that it fell out of easily.  Friends and family of mine have knitted themselves camera cozies, but all had the same basic design; a tube with one closed end and one ribbed end.  While you could knit it as tightly as you’d like, there was nothing to officially stop the camera from falling out.

I was determined to remedy that.  Buttons and Velcro were out.  I knew the camera would end up in my pocket and with my luck the flap wouldn’t be properly closed and the rough Velcro side would scratch the screen, or the button would cause worse damage.  There had to be a better way…

And there is!

Elphie!

Presenting Elphie– a camera case that will fit any flat camera.  Don’t worry about knitting to a particular gauge- this worksheet will accommodate any yarn and any size needles.  The case has built-in, double-layer protection over your camera’s exposed screen area and a cover that stays on and CAN’T come off, all without any snaps, ties or Velcro.  Oh, and did I mention that it’s seamless?  Mine were designed to fit my Canon Digital Elph camera- hence the name.

Want to make one for yourself? Here’s how!

The first thing you’ll need to do is measure your camera, so get a measuring tape and paper and pencil/pen. And the camera of course! On the paper write “A”, “B”, “C”, “S” and “R” with a dash after each. We’ll be filling in those values as we go.

Step 1

Measure your camera and fill in the values for A, B and C on your paper, in inches.

Knit a 4″ x 4″ gauge swatch with your desired yarn and needles. Measure the swatch and figure out the number of stitches (S) and number of rows (R) for 1 (one) inch. Fill in the values on your paper.

Step 2

Multiply your stitch gauge by the width (C) of your case.

S_____ x C_____ = CO_____ sts. (If this results in an even number, add 1 to get an odd number of sts.

Begin knitting:

The case starts at the flap, knitted flat in Moss Stitch, then stitches are cast on for the body of the case which is knit in the round in ribbing.

Cast on the resulting CO value you obtained above.

Multiply your row gauge by the depth (A) of your case.

R_____ x A_____ = D_____ rows.

Work in Moss stitch for half this number of rows (D_____/2).

Next row: work in Moss Stitch until halfway across the row, BO 2 sts, then continue in Moss Stitch (paying attention to the pattern as established) to the end of the row.

Next row: Work in Moss Stitch until the gap created by the bound-off stitches, CO 2 sts, then continue in Moss Stitch (paying attention to the pattern as established) to the end of the row.

Continue working in Moss Stitch until your knitting reaches the length of A+B+A.

A_____ + B_____ + A_____ = _____inches.

Multiply your stitch gauge by the full measurement of your case.

S_____ x (C_____ + A_____ + C_____ + A_____) = M_____

Adjust this new number to the closest lower number that is a multiple of 4. AM=____

(For example, if your M = 28, the closest lower number below that which is divisible by 4 is 24, so your AM would = 24).

Subtract the number of sts you cast on from the adjusted measurement.

AM_____ – CO_____ = _____

Place a marker at the beginning of the next row, work in Moss Stitch across the row, then CO the resulting number of sts you just got after the last equation. Your total stitch count should now equal AM_____

NOTE: if you prefer a snugger case, subtract 4, 8 or 12 from the number of sts to cast on in the previous instruction.

Join in the round, being careful not to twist. Your stitch marker will serve as the beginning of each round.

Work in 2×2 rib until the tube portion of the case measures the length of B and half of A.

B_____ + (A_____/2) = _____ inches.

Make sure your stitches are evenly arranged on 4 needles, with 1/4 of the sts on each needle. (For example, if your AM = 24 sts, then you would have 6 sts on each of the 4 needles).

Decrease round: Ndl 1: ssk, k to 1 st before the end of needle, BO 1 st. Ndl 2: BO 1 st, k to 2 sts before end of needle, k2tog. Ndl 3: ssk, k to end of needle. Ndl 4: k to 2 sts before end of needle, k2tog.

Next round: Ndl 1: k to the end of the needle, CO 2 sts, Ndls 2-4: knit across

Continue in stockinette stitch until, counting from the decrease round, you have knit 2 rows less than D_____/2.

Finishing

Turn your work inside out and work a 3-Needle Bind-Off on the remaining stitches. Weave in all ends.

How To Use

To place the camera in the case, pull your camera’s strap through the hole at the bottom. Insert camera fully into case positioned so that the long flap folds over the screen area of your camera, providing it with a double layer of protection. Pull the camera strap through the hole in the flap to secure the flap shut.

And there you have it!

Feel free to knit as many of these as you like, and you can even sell items made from this pattern as long as you credit me as the designer of the pattern.

Update!

This pattern is on Ravelry here.

This pattern is provided free above, but if you’d prefer an easy-to-print PDF version, I have made it available here for a very small fee. The PDF includes the full instructions in an easy-to-follow worksheet, the definition of all abbreviations used in the pattern, yardage requirements, as well as instructions on the Moss Stitch, Ribbing and 3-Needle Bind-Off used in the pattern.

*Updated January 2020


4 Comments

my own provisional or invisible cast on alternative

Sometimes a pattern will call for an invisible cast on. An invisible cast on is when you cast on with your yarn and a waste yarn (usually a smooth yarn like cotton in a contrasting color). The way you twist the yarns as you cast on will result in giving you the “backs” of the stitches to pick up later. This means that if you cast on 40 sts, you will have 40 sts ready with your working yarn to knit up right away, and then later when you unpick the waste yarn you will have 40 more sts waiting for you to slip on a needle and begin knitting in the other direction.

This can also be called a “provisional” cast on, and the directions can call for you to crochet a long chain and knit your first row into the back “bumps” of the chain. When you use this method the crocheted chain holds your first row “live” and you can “unzip” the crochet chain later and put the freed stitches back on the needle to knit in the other direction.

I’ve had to use this many times-
– my favorite toe-up sock pattern has you start with an invisible cast on, knit the toe section, then put the other half of the cast on sts on two more needles so you can start knitting the foot in the round.
a gift scarf I knit once had you start with an invisible cast on, knit half of the funky cable pattern, bind off, then put the other half of the cast on sts on the needle so you could repeat the scarf for the other side, ensuring that both halves of the scarf were the same and knit in the same direction (instead of casting on at one end, knitting to the other end, then binding off).
the Samantha baby sweater dress I had knit for my friend’s daughter also has you cast on with an invisible cast on, work a picot edging, then later release the other half of the live cast on sts to hem them up by folding along a turning row and then sewing the hem in place.

It’s that last one that led to my latest ah-ha! unvention. I had decided early on that I was too lazy to sew the bottom hem up later, when I could easily knit it in as I went. Instead of waiting until the piece was done, undoing the waste yarn, threading the long tail on a needle and sewing down each loop of live stitch, I would instead work the hem as directed, but once I’d worked to a point even with the length of the hem (for example 8 hem rows, turning row, 8 body rows) I would release the waste yarn sts to another needle and knit them together with the next body row. This works much as one would do a 3-needle bind off, except you don’t bind off. You just knit a stitch from each needle together.

That worked perfectly, except for one thing: I hate picking out the waste yarn from when you do a typical cast on of this type. Because the only thing done in the waste yarn was to cast on there is only that bottom edge of a contrast, and it is not always easy to find the stitches of your first actual row. I always feel like I’m going to lose a stitch, especially the end ones.

So I came up with an easier idea. In my case I’m going to show you how to use it to knit in a hem, but you can skip the hem part and just use the technique to have your stitches ready to knit your ribbing or hem later if you’re not sure what you want to do yet, or to knit in the other direction (like a scarf or shawl).


I still cast on with waste yarn, only this time I knit a row or so. Enough to give you a row of knit stitches that you can see easily.


Then switch to your pattern yarn and work as you like until the point where you want to knit in the hem. (In this example, I think I’d knit 5 rows, purled a row as a turning row, then knit 5 more rows).

Many times I have been in the middle of a project when I notice an error that can’t be corrected by dropping down just a few stitches. In these cases, instead of just ripping back I sometimes like to insert the needle into the knitting first, then rip. This way I can’t rip too far, and all the sts end up sitting there on the needle for me. This works the same way.

Insert a second (slightly smaller) needle into one half of each of the sts in the first row of your pattern yarn. Make sure you have done this for all the sts (if your row has 32 sts make sure you pick up half each of 32 sts).

Cut the waste yarn in a few random spots in the first row. Make sure to not cut the pattern yarn!


This shows the cut end starting to be unpicked from the knitting.


Use a needle or the points of your scissors to help you pick out the first row of waste yarn.


This leaves the pattern yarn sitting there on your needle, all the stitches looking pretty and ready to knit! This gives you the same result as the traditional invisible cast on, without the fiddly cast on itself and the trial-and-error I always experience when picking out the waste yarn.

And that’s all there is to it! Now the cast on row is ready to do whatever you want. Again, in my case I have done it after some extra hem rows because I will be turning the hem and knitting it in, but you could easily have done this just at the beginning of your regular knitting pattern and then the stitches would be ready to knit your ribbings, lengthen your garment, knit in the other direction, graft something, or do whatever you like!

I’m going to continue the directions for how to knit in the hem for those of you who would like to try this.


Then, to knit in the hem as I did, all you need to do is fold it up and knit a stitch from each needle together. Once that’s done, you just keep knitting your pattern as usual.


This shows the front of the hemmed piece after the hem was knit in and I’d knit about 5 more rows. The turned edge is nice and flat because of the turning row (you can also use a picot edge or anything you like). The bottom is thicker and doubled with a nice, sturdy hem that will not unravel, and the two sides are open so you can insert an elastic if you like. If not then the sides will close when you seam the piece, or you can just seam them shut later.


This shows the back. You can see the stockinette section at the bottom which is the folded hem, and then the reverse stockinette section which is the back of the right-side stockinette part. It’s neat and simple!

This method can be used in any instance where an invisible or provisional cast on is required.

I really got this idea because I have no problem picking up one side of each stitch when ripping back, and that helps me often. I thought, “wouldn’t that be easier than picking out a cast on row and trying to find the sts?” For me, this was much easier, I didn’t need directions on how to cast on, nor a crochet hook. Quick, simple and painless. Hope this helps someone like it did me!


11 Comments

how to make a poodle skirt

On Tuesday afternoon, my sister Laura called me up out of the blue and asked if I could make her a poodle skirt. No rush or anything…she only needed it by Thursday morning. Being the wonderful, amazing, loving, insane sister I am, I agreed.

The total cost for this project is minimal, about $8 CAD plus the cost of your fabric. I was lucky and happened to be at my cousin Robyn’s place Tuesday night, and she had a huge bolt of pink fabric and I bought some off of her (to be paid for as soon as she tells me how much she wants for it). Your costs may vary depending on the fabric you buy, but the other supplies were cheap. If you already have them at home, it will be even cheaper.

All sewing was done by hand, and the total time for this project was 3 hours.

MATERIALS

1. Fabric. I like the pink poodle skirts with a black poodle, but you can choose whatever color pleases you. White with blue is a nice combination too. The width of your fabric (not the length) will be the diameter of your skirt. Cost- variable. (Here’s something similar on Amazon).

2. Felt. The felt is for the poodle. Choose a piece that is at least as big as the size of the poodle you would like to make. Cost for 1 piece of felt- $0.25 at Dollarama, or get bulk packs

3. Trim. This is for the edging. You can choose whatever kind of ribbon you want, but the wider it is, the easier it will be to apply (it will be used to hide the cut edges of the fabric). The one I chose is slightly elastic, with sequins. It was perfect. You need to buy enough to outline the outside edge of the skirt. To figure out how much ribbon you need, do this formula: measure the diameter of your skirt. Mine was 56″ wide. Multiply this number by pi, or 3.14. I get 175.84″. Convert this amount (inches) into meters or yards, depending on how your ribbon is sold, plus a little extra for insurance. I needed something like 5.6 yards, and my ribbon is sold in packs of 3 yards each, so I bought 2 packs. Cost for 2 packs of trim- $2.00 at Dollarama, or get by the spool

4. Elastic. This is for the waist band. I didn’t buy the really skinny kinds of elastic because I didn’t want the waist band to flip. Buy whatever kind you like, long enough to go around the intended wearer’s waist. Cost for the elastic- $1.99 at BouClair, or get by the spool

5. Thread. For sewing the waist band. I didn’t buy black because I already had, but I didn’t have a pink to match the fabric. Cost for the thread- $1.78 at BouClair or buy an assortment

6. Cord. This is for the leash. You can find all sorts of funky cords at fabric and notions stores. I chose a cord that is actually two thinner cords twisted around each other like a rope. Cost for the cord- $0.39 at BouClair or get a collection of colors

7. Beads (not shown). I chose to make a beaded collar for the poodle, because I have a stash of beads already. Cost for the beads- n/a but if you don’t have any on hand, you can get started with a beading kit

DIRECTIONS

Step 1- Get a Square: Lay out the fabric and find a square. To do this, fold one corner of the fabric up against the other side in a triangle. Cut away any excess fabric, and you will be left with a perfect square (as perfect as the fabric is, anyways).

Step 2- Find the Center: Fold the square back into a triangle, and in half (as a triangle) again. Find the corner where all the folds have in common. With your scissors, make a very small snip off the end of this corner. When you open up your square again there will be a hole in the center of it. This will help you make your circles centered.

Step 3- Trace your Circles: Using 2 pencils and some string, make a homemade compass to trace your circles on the fabric. There are plenty of tutorials on how to do this (here’s one) but long story short is to tie the string to the ends of both pencils, put one on the center hole, and, keeping the string taut, use the other to draw a big circle on your fabric. You want the length of the string to be the length of the radius for your skirt.

For example, my fabric square was 56″ across, so my skirt could have a radius of a maximum of 28″. You can check the length by swinging the pencil around and making sure it doesn’t go off the fabric anywhere. If it does, shorten the string a bit. Once your length is good, draw your outside edge circle. It helps to have someone help you by holding the center pencil in place while you draw.

Repeat this process for the waist band circle. The intended wearer has a 27″ waist (color me jealous) so I calculated what the diameter would be of a circle that was 28″ around (28/3.14=8.917). I added an inch because I wanted the waist band to have a gather. If I would have had wider fabric, I would have added more than an inch so it would hang in nice folds. Anyways, once I knew that my diameter was roughly 9″, I shortened the string to 4.5″ (the radius, or half of the diameter) and drew another circle in the center. At this stage my fabric looked like this:

Step 4- Cut it Out: Using your scissors, cut out both circles. You will be left with a doughnut of fabric.

Step 5- Sew on Trim: I used black sewing thread, and used a simple running stitch to attach the trim around the outside edge of the skirt. This worked great because I didn’t have to hem the edge. All I did was, working on an inch or so at a time, was line up the ribbon over the edge of the fabric with the ribbon centered over the edge. By centering it, even if the edge flipped up a little, no one would see the jagged cut edge of the pink fabric. Don’t worry if your edge is uneven, causing your ribbon to not make a perfect circle around the edge. No one will ever know. Mine wasn’t even at all, and you really can’t tell.

Step 6- The Waist Band: I cut and sewed my elastic into a 28″ circle. I folded the edge of the inner circle over it and sewed it down with the pink thread. I made perpendicular cuts into the fabric at 2″ intervals to give me some slack in turning the fabric back to sew it over the elastic. It gets tight at the end, but simply gather the fabric away from where you are sewing and it will work fine. Once the band is sewn in, adjust the gathers so they are even around the skirt.

Step 7- Poodle: Find a poodle shape that you like, and adjust it to the correct size on the computer. Print the poodle and cut it out. Use a contrasting color (I used an orange colored pencil) and trace the poodle onto your felt. Cut out the poodle from the felt. Find a nice area of the skirt to place the poodle. I used the black thread and a running stitch again to sew down the poodle. I didn’t pin or baste it down first, but you can if you are afraid it will move. I made sure to tuck the end of the cord under the neck first for where I wanted the leash to attach. This hides the end under the poodle.


Step 8- The Leash: There is no set pattern for how to place your leash. You can make it as curvy or as straight as you like. I laid out the cord in a pattern I found pleasing. I used tiny stitches to catch the cord at various spots to hold it in place.

Step 9-The Collar: The collar can be as fanciful as you like. There can be no collar. If you have glitter pens, you can use them for both the collar and the leash, if you like. I had spare beads so I made a beaded collar the width of the poodle’s neck, and sewed that in place.

Et voila- the finished skirt. You can jazz it up with some music notes if you like, and can wear a crinoline underneath it too. For the complete look, wear your poodle skirt with the following:


-white t-shirt, preferably with a collar
-short white socks
-tennis sneakers
-black wide belt over the skirt and t-shirt
-ponytail (you can use some of the excess skirt fabric for a hair bow)
-light pink lipstick
-pale or no eyeshadow
option: tie a short scarf around your neck

Have fun rockin’ around the clock at your next sock hop!

This post may contain affiliate links. This means I might make a small commission on purchases made through the links, at no cost to you.


Leave a comment

The Vegas Scarf (AKA The Knitting Game)

Update: see end of post for information about a downloadable pattern pdf

A knitting game, you ask? Is such a thing possible?

“Yes!” I say.

This game evolved from a challenge I was given in my knitting class to knit a “random” scarf- we had to select a bunch of varying yarns in colors we liked and work them in knit and purl rows to form a scarf. It was to be an exercise in the textures you can achieve with those two little stitches.

Ahem. I can’t do “random”.  I needed to come up with a way to be random with as much control as possible…and the Knitting Game was born.

It’s so easy to play along! All you need is 6 balls of yarn, 1 die, 1 coin, and a long circular knitting needle that is a bit larger than the average thickness of your chosen yarns. I used a 9 US/5.5mm but if you are using mostly aran weight and thicker, you might want to choose something bigger.

On a piece of paper, assign each of the 6 skeins to a number 1 through 6.

Also assign the “heads” and “tails” of the coin to knit and purl (not necessarily in that order).

You also need to decide how long to make the scarf. I wanted mine about 6′ long including a 4″ fringe at each end, so I cast on enough sts to be about 5′ long.

Now the fun part!

Step 1: Roll the die to get a number.  Cast on with the yarn that matches that number.  Cut yarn, leaving a 4″ tail.

Step 2: Roll the die to get a number.  Toss the coin to get “heads” or “tails”, and depending on what you designated “heads” or “tails” to be, it tells you to knit or purl that row.

Follow the directions of fate across the row using the yarn that matched the number you rolled on the die.  Make sure to start with a 4″ tail left loose, and cut the yarn at the end of the row, leaving a 4″ tail.

The 4” of loose yarn at the beginning and end of the row will become your fringe.

Step 3: Repeat step 2 until the scarf reaches your desired width.

Step 4: Once the scarf is the width you would like, roll the die to get a number and bind off with the yarn matching the number you rolled.  Don’t forget to leave a 4″ tail when you cut the yarn.

Knot the yarn ends together in groups of 2-5 strands to secure, and trim if necessary.

Voila! A completely random scarf that fulfills any need for control while leaving things totally up to chance! The coolest part is that no two scarves will ever be alike! 😀

Update!

This pattern is on Ravelry here.

This pattern is provided free above, but if you’d prefer an easy-to-print PDF version, I have made it available here for a very small fee. The PDF includes the full instructions in an easy to read layout with full color images.

This pattern was also published in the 2006 Knitting Pattern-A-Day calendar and has been featured in an assortment of guild newsletters as well as been used to run knitting classes/workshops. Future newsletter/class/workshop permissions are granted provided the pattern copies are purchased through me and all credit is given to me as the creator/designer.

*Updated January 2020