Last night I finished the left front of my Linden jacket. I remember reading on Ravelry that people said to not continue the cables in the collar shaping, so when I got to that part I was careful to pay attention, looking to see why so many made mention of the collar directions being difficult or to avoid the cable crossings within the shaping, etc.
End result? I have no idea why so many people had problems with it. The directions are all there, nothing is omitted or unsaid, if only you know how to read it properly.
Here’s how it works, and hopefully this will help others who haven’t knit this yet but wanted to, and maybe were nervous they wouldn’t “get it”.
After the majority of the front is complete, the st st portion of the front is decreased away then bound off completely, and the cable is worked on alone until it is long enough to reach up around the back of your neck. There are short rows worked 4 times to make the collar curve nicely over your shoulder and around your neck.
I don’t want to write out the actual directions here, because it’s part of pattern copyright. But I think I can be vague enough to not infringe, while still being helpful.
The cables are on a 16-row repeat, with the cable crossings themselves on rows 7 and 15.
The collar shaping instructs you to work 5 rows of short row shaping, then 7 rows in est pattern, and then to repeat these 12 rows 3 more times. Only the first 4 of the collar shaping rows are partial (short) rows, the 5th row (a ws row) has you working back across the complete row. The pattern also has you only start the collar shaping once you’ve done a cable cross row, either row 7 or 15, depending on the size you are knitting.
For my size, I started the collar shaping after working a row 7 cable row.
I think what’s throwing people off is that they are looking at the 12 rows you work 4 times, and are thinking it doesn’t work out within the cable crosses. What’s being overlooked is that you’re not working 12 COMPLETE rows in the cable. You can ignore the first 4, and only count the 5th row, because that’s the only one that is actually worked across the whole row.
Collar Shaping Row 5 – WS – counts as cable row 8 (or 16, but I’m working with my size here. You can adjust the row numbers for where you ended before “Shape Collar”).
And that’s the first repeat. Then you do it 3 more times.
How this works out is that you have some short row shaping (the first 4 partial rows), then 7 full rows of stockinette stitch, then a cable crossing row, 4 times total.
It’s actually really smart how the short-row shaping was worked into the cables without actually affecting them at all, and hopefully this will help anyone having trouble figuring it out.
–
My mother-in-law called this weekend to say that we’d be celebrating Thanksgiving next Monday at my sister-in-law’s place, and wouldn’t it be nice if I were to surprise B with her long-awaited pillows? Hmmm. Subtle. So unfortunately I’m going to have to put Linden on partial hold while I work on the pillows. It’s frustrating because I’m seeing it progress so fast, but I think I’ve figured out a way to work on both, by bringing Linden as my “take-along-knitting” for the appointment I’ve got later this week, but keeping the pillows (and their accompanying “designing”) as my night-time knitting.
The above is a video I made quite a while ago. Some of you will recognize the project in my hands – it’s Kate Gilbert’s Papa Bunny that I had made to send to a friend’s daughter in 2008.
This video shows what to do when a pattern asks for a common technique – but you don’t have the right equipment with you. The last row of the directions said to “thread the live sts onto the working yarn with a tapestry needle and pull tight to gather”. The only problem was that I didn’t have a tapestry needle with me. I didn’t like the idea of pulling the stitches open with my fingers so I could get the yarn through easily, as it would distort them. I came up with this idea instead. It might be familiar to some of you, or it might be new to you. Either way, it helped me and I hope it helps you too! If you’d prefer a photo tutorial (vs the video above) let me know in the comments and I’ll make it happen. 🙂
Week 18 brought Jakob’s birthday and a fun little party at his school, then a fun little party at my parents’ house since they would be out of town on the day of, then a fun little party (with a trip to the pet store to look at the animals) on his actual birthday. I miss such celebrations for MY birthday! Thanks to Daycare Disease we were all sick around here, and those of you with husbands know there’s nothing more pitiful than a hubby who is sick. When Mommy is sick the world doesn’t stop turning, and every little sniffle isn’t cause to down a bottle of Advil Cold & Sinus…I’m just sayin’. Anyhoo…the colds eased up and just in time, ‘cus week 19 was crazyness around here!
I was busy knitting non-stop for the 2 weeks, but couldn’t show any photos ‘cus my swatches were for submissions to the Winter Twist Collective. I don’t know if I’ll get accepted, but keep your fingers crossed for me!
Once the submissions were in I got down to work on the plans for Jakob’s party this past weekend. We were doing a party for his friends (ok, our friends and family with kids the same age) at a local play area, followed by lunch and dessert here at our place for our close family. That way those without young kids didn’t have to hang around at the kids’ playground, bored.
I whipped up a batch of cupcakes and debated how to decorate them. We’d sent out pirate invitations for Jakob’s party, and my mom had found similarly-themed table cloths, napkins, plates, etc. I knew I wanted to do pirate cupcakes and for a long time the plan was to ice the cupcakes then put some white icing in a bag and pipe a skull & crossbones onto each one. Thank god I talked to my friend Jessa who quickly extolled to me the joys and wonders of working with fondant. I am now a convert!
I picked up some supplies at our local bulk/baking store: 1 box of Wilton’s pure white rolled fondant, 1 box of Wilton’s bright colored rolled fondant (contains a pack each of red, yellow, blue and green), some black gel icing tubes, and a tube of sparkly-yellow gel icing. I took it easy for my first time and stuck with simple techniques.
What do you think?
Pirate Fondant Cupcakes
First I baked the cupcakes and let them cool, then did a crumb coat of thin icing
I iced them properly with chocolate frosting (store bought)
I rolled out some white fondant and cut the circles with a cookie cutter. I placed a white “face” onto each cupcake and smoothed it in place
next I cut green circles with the same cookie cutter, and cut them in half. Using a Q-Tip and a glass of water, I put a bit of water on the back of the green semi-circle and stuck it in place for the bandana. I used the green scraps to make little twists for the bandana ties, held in place with another little dab of water.
the face was drawn freehand with the black gel icing, followed by a quick dot of the sparkle yellow for an earring.
I made 42 of them, and they seemed to be a big hit at the party.
Jakob really enjoyed chowing down on his first of many desserts that day! He blew out his candle by himself and polished off the entire cupcake before getting into the other desserts and fruit.
Henri couldn’t have any dessert so he spent the time hanging out with his uncle Mike. I love this outfit on him- doesn’t he look like he just got back from a round of golf? I swear, he does NOT look like a 4-month-old!
Not our best shot, but here’s one of our little gang.
Mommy with Henri at 19 weeks old.
I’m a few days late for that photo, but we’ll pretend it was taken on Thursday, m’kay?
After the playground we came back to the house to prepare for the onslaught of family (and I mean that in a good way!). There was much (more) food and laughter and meowing from Sam who was locked in the basement. When it was time for dessert (again!) I brought out Jakob’s cake.
I’m so proud of this one! My first official fondant cake, and I LOVE how it came out! It was so much fun and so easy to do! Here’s what I did:
Pirate Fondant Cake
I baked the cake and let it cool, then did a thin crumbcoat. I actually left it in the fridge overnight at this point because I did the cupcakes that night (Friday night). I only decorated the cake on Saturday night (his party was Sunday morning). Before putting it in the fridge I lifted the edge of the cake (I had baked it in a springform pan, so the bottom pan was still under the cake) and put a big dab of icing. When I put the cake back down and pressed lightly the icing acted as a glue to hold the cake in the center of the yellow platter. Once it had been cooled in the fridge over night the cake was going nowhere!
I re-iced the cake giving it a generous coat and making it as smooth as possible. I even used a piece of carton at one point as a smoother.
While the icing set (firmed up a bit) I rolled out a big chunk of the white fondant. My cake was about 9″ in diameter plus 2″ high, so since 9+2+2=13, I rolled out a circle-ish shape about 15″ in each direction. I centered it on the cake and went around slowly, smoothing it into place and easing it gently around the edges.
Next, with a sharp knife, I cut away the excess. Everything I read online said to use a serrated knife, but I used a regular flat one (like a sharp butterknife) and had no problems.
To make the bandana, I did the same think as for the white face, only at just under half the height. I cut a straight edge with the knife then placed it on the cake, dabbing a few edges with the wet Q-Tip to “glue” it in place. Once I had it smoothed nicely I cut away the excess.
Once I knew where the face would go I used a small ball of white fondant to make the nose by squishing it with my fingers into a triangular shape. I glued it in place with some water. I used 2 balls to make the ears and glued them with the water, but since they were raised from the surface of the platter I stuck a small ball of fondant under each ear to support it.
I didn’t have any black fondant and didn’t want to use my gel icing to draw a face on. I ended up making some black fondant by squirting a big dollop of store-bought black icing from a tube into a little ball of white fondant. I kneaded it a lot to mix it all together. Ugh- it was the right color, but incredibly gloppy and slimy. When you work with fondant you use icing sugar instead of flour to flour your surface and rolling pin, so I kept mixing some icing sugar into my black fondant mess until it was a workable texture. Luckily the icing sugar didn’t cause the black to get pale.
I used a cookie cutter for the eyepatch, squashing the top of the circle somewhat to make it flat. I put it in place first, gluing with water. Then I rolled out a long, skinny snake and glued that into place for the band.
I used the same cookie cutter as for the cupcake faces to cut circles from my leftover green and glued them down with water to decorate the bandana. The small circles were cut out with a drinking straw.
I rolled out a thick rope of the red fondant and made an actual knot with it, then glued it to the side of the bandana, over the ear. I stuck on a few random bits of green so it would look like an actual fabric.
I rolled a thick snake of the yellow fondant and glued it in place around the other ear for an earring. Once it had set I took some of the sparkle gel icing and smoothed it over the earring to add a sparkly, shiny sheen. It took a long time to dry and always remained tacky, so I wouldn’t do that on an area that needed more work.
Small bits of the black and white were used for the face.
I thought I was done, but last-minute I decided to add a skull & crossbones to the eyepatch. I made 2 small white snakes and used the knife to make a cut in the end of each. I pushed the cut open and pinched the middle of each “bone” so they could overlap eachother without having a lot of bulk in the center.
The skull is just a small ball of white formed with my fingers. I indented the eye sockets with the dry end of the Q-Tip I was using to “glue”.
Finally I decorated 4 cupcakes to go around the cake. I didn’t want to stick a candle in the pirate’s face so I made the cupcakes to say “Happy”, “birthday” and “Jakob”, and added a “nd” next to the “2” candle I stuck in the 3rd cupcake. So all together they said “Happy 2nd birthday Jakob”.
And that’s it! It took me about 2-3 hours from the second coat of icing on the cake to “gluing” the 4 cupcakes onto the platter with dabs of leftover frosting. It was totally easy and a very rewarding experience. Plus a little fondant goes a LONG way, and I have a bunch left over so I am already planning to make more cakes!
I couldn’t believe Jakob polished off another cupcake, and some fruit, plus a cookie, all after having lunch when we got home after the first party where he’d ALREADY eaten an early lunch and had dessert. No wonder the kid never napped that day! He was wound up on a sugar high and exhausted, but we were so proud of both he and Henri. They were both so well behaved at both parties! Even though there were over 40 adults and 25 kids running around, neither one freaked out or had a meltdown. Jakob was polite and didn’t grab at the food or the toys, and even when sleepy later he just lay on the couch next to us commenting excitedly about his new stuff as we opened his gifts with him. They truly are great kids (ok, I’m biased) and they made us really proud.
Dianne is having a contest over on her blog, and is looking for your favorite tips or techniques. Here’s one of mine!
One of my favorite knitting tips that makes my knitting life easier is how to calculate how much yarn you’ll need for a long-tail cast-on. How many times have you ended up with a tail that is much too long, or run out right towards the end? Here’s an easy way to know how much yarn you need:
Let’s say you need to cast on 100 sts. Cast on 10 sts then unravel your cast on and see how much yarn it took. Multiply that length by 10 (10 x 10 = 100) and that will show what length yarn you need. Add a few inches for weaving in (or a longer length for seaming, if necessary), and that’s it!
(Obviously you need to multiply the 10-st-co length by whatever number it will take to give you the number of sts YOU need to cast on).
(If you decide to enter, please leave in the comments that I referred you. Thanks!)
Any major knitterly repairs had to wait until tonight, since we had a birthday party this afternoon. One of my best friends’ son turns 2 this week, and our little family was invited to his party. I’m not going to post photos of them since I forgot to ask permission, but I am going to post a different photo (hi Debbie!) to my friend Debbie who is one of the very few non-knitters who reads my blog.
Jakob’s friend Taylor was at the party too, since we’ve known her father since high school, and her mom for the last few years. Taylor is exactly one day older than Jakob. Hey baby…come here often?
After supper tonight I decided to brave the Superman repairs. I took photos and will break down what I did, step-by-step. It turns out that while I’ve councelled others to do this same repair, I don’t think I’ve actually done it myself before. It was much easier than I’d thought!
First I took a circular needle and wove it through the stitches, making sure to pick up the left bar of every stitch, and verifying that I had the correct number of stitches on the needle. You can also pick up the right bar, it doesn’t matter as long as you consistently pick up the same side of each stitch.
Next, I grabbed a dpn and “picked up” stitches 2 rows below the one on the needles. I only picked up 6 sts at a time so the fabric wouldn’t pull too tightly. Once I had the first 6 sts on the needle, I CUT one stitch on the middle row…the one in between the two rows on needles. I used a spare needle to unpick the yarn from those 6 sts, then took another needle and picked up the next 6 sts, unpicked the middle row, etc… (Yes, I left the scissors in the photo on purpose. Looks ominous, huh? LOL).
Once I’d done that all the way around the row I had the two parts of the leg separate. I was then able to add another 12 rows (1.5″) in length to the foot part of the leg. With the knitting done, I “tidied” up the two parts by arranging them on 2 dpns each, making sure that I had the front and back aligned properly (wouldn’t want to sew the foot on crooked!). I left a really long tail for grafting, then cut the yarn. Finally, I Kitchenered (grafted) the foot part to the leg. You can kinda see here how much length was added. I’m breastfeeding (and don’t drink anyways) so I had a cup of Earl Gray as my fortification instead of the typical glass of wine. 😉 I was about to do the second leg when Yannick suggested that I wait until after Jakob wakes up tomorrow so that I can try it on him first and be sure that I didn’t add too much…or need to add more. So there you have it. One leg lengthened by an inch and a half, with my first not-too-sucky graft. One more leg to go.
You can use this type of repair for any knitting that’s too short and you want to add length, OR you can use it for knitting that is too long. Follow the same steps to separate the work into two pieces and then unravel the side that goes in the opposite direction of your knitting for the required length, plus one row. If using my costume leg as an example, I wouldn’t be able to unravel the top piece without picking out each stitch one by one, as I’d be unravelling in the same direction as I’d knit and it would be very time consuming. I would unravel down the lower (leg) piece as that would be going opposite the knitting and would frog easily.
So if I had a leg that was 10 rows too long, I would separate the work onto two sets of needles and then unravel until I’d removed 11 rows. The grafting row will account for the difference, “putting back” one row as it joins the two halves together.
Sometimes a pattern will call for an invisible cast on. An invisible cast on is when you cast on with your yarn and a waste yarn (usually a smooth yarn like cotton in a contrasting color). The way you twist the yarns as you cast on will result in giving you the “backs” of the stitches to pick up later. This means that if you cast on 40 sts, you will have 40 sts ready with your working yarn to knit up right away, and then later when you unpick the waste yarn you will have 40 more sts waiting for you to slip on a needle and begin knitting in the other direction.
This can also be called a “provisional” cast on, and the directions can call for you to crochet a long chain and knit your first row into the back “bumps” of the chain. When you use this method the crocheted chain holds your first row “live” and you can “unzip” the crochet chain later and put the freed stitches back on the needle to knit in the other direction.
I’ve had to use this many times-
– my favorite toe-up sock pattern has you start with an invisible cast on, knit the toe section, then put the other half of the cast on sts on two more needles so you can start knitting the foot in the round.
– a gift scarf I knit once had you start with an invisible cast on, knit half of the funky cable pattern, bind off, then put the other half of the cast on sts on the needle so you could repeat the scarf for the other side, ensuring that both halves of the scarf were the same and knit in the same direction (instead of casting on at one end, knitting to the other end, then binding off).
– the Samantha baby sweater dress I had knit for my friend’s daughter also has you cast on with an invisible cast on, work a picot edging, then later release the other half of the live cast on sts to hem them up by folding along a turning row and then sewing the hem in place.
It’s that last one that led to my latest ah-ha! unvention. I had decided early on that I was too lazy to sew the bottom hem up later, when I could easily knit it in as I went. Instead of waiting until the piece was done, undoing the waste yarn, threading the long tail on a needle and sewing down each loop of live stitch, I would instead work the hem as directed, but once I’d worked to a point even with the length of the hem (for example 8 hem rows, turning row, 8 body rows) I would release the waste yarn sts to another needle and knit them together with the next body row. This works much as one would do a 3-needle bind off, except you don’t bind off. You just knit a stitch from each needle together.
That worked perfectly, except for one thing: I hate picking out the waste yarn from when you do a typical cast on of this type. Because the only thing done in the waste yarn was to cast on there is only that bottom edge of a contrast, and it is not always easy to find the stitches of your first actual row. I always feel like I’m going to lose a stitch, especially the end ones.
So I came up with an easier idea. In my case I’m going to show you how to use it to knit in a hem, but you can skip the hem part and just use the technique to have your stitches ready to knit your ribbing or hem later if you’re not sure what you want to do yet, or to knit in the other direction (like a scarf or shawl).
I still cast on with waste yarn, only this time I knit a row or so. Enough to give you a row of knit stitches that you can see easily.
Then switch to your pattern yarn and work as you like until the point where you want to knit in the hem. (In this example, I think I’d knit 5 rows, purled a row as a turning row, then knit 5 more rows).
Many times I have been in the middle of a project when I notice an error that can’t be corrected by dropping down just a few stitches. In these cases, instead of just ripping back I sometimes like to insert the needle into the knitting first, then rip. This way I can’t rip too far, and all the sts end up sitting there on the needle for me. This works the same way.
Insert a second (slightly smaller) needle into one half of each of the sts in the first row of your pattern yarn. Make sure you have done this for all the sts (if your row has 32 sts make sure you pick up half each of 32 sts).
Cut the waste yarn in a few random spots in the first row. Make sure to not cut the pattern yarn!
This shows the cut end starting to be unpicked from the knitting.
Use a needle or the points of your scissors to help you pick out the first row of waste yarn.
This leaves the pattern yarn sitting there on your needle, all the stitches looking pretty and ready to knit! This gives you the same result as the traditional invisible cast on, without the fiddly cast on itself and the trial-and-error I always experience when picking out the waste yarn.
And that’s all there is to it! Now the cast on row is ready to do whatever you want. Again, in my case I have done it after some extra hem rows because I will be turning the hem and knitting it in, but you could easily have done this just at the beginning of your regular knitting pattern and then the stitches would be ready to knit your ribbings, lengthen your garment, knit in the other direction, graft something, or do whatever you like!
I’m going to continue the directions for how to knit in the hem for those of you who would like to try this.
Then, to knit in the hem as I did, all you need to do is fold it up and knit a stitch from each needle together. Once that’s done, you just keep knitting your pattern as usual.
This shows the front of the hemmed piece after the hem was knit in and I’d knit about 5 more rows. The turned edge is nice and flat because of the turning row (you can also use a picot edge or anything you like). The bottom is thicker and doubled with a nice, sturdy hem that will not unravel, and the two sides are open so you can insert an elastic if you like. If not then the sides will close when you seam the piece, or you can just seam them shut later.
This shows the back. You can see the stockinette section at the bottom which is the folded hem, and then the reverse stockinette section which is the back of the right-side stockinette part. It’s neat and simple!
This method can be used in any instance where an invisible or provisional cast on is required.
I really got this idea because I have no problem picking up one side of each stitch when ripping back, and that helps me often. I thought, “wouldn’t that be easier than picking out a cast on row and trying to find the sts?” For me, this was much easier, I didn’t need directions on how to cast on, nor a crochet hook. Quick, simple and painless. Hope this helps someone like it did me!
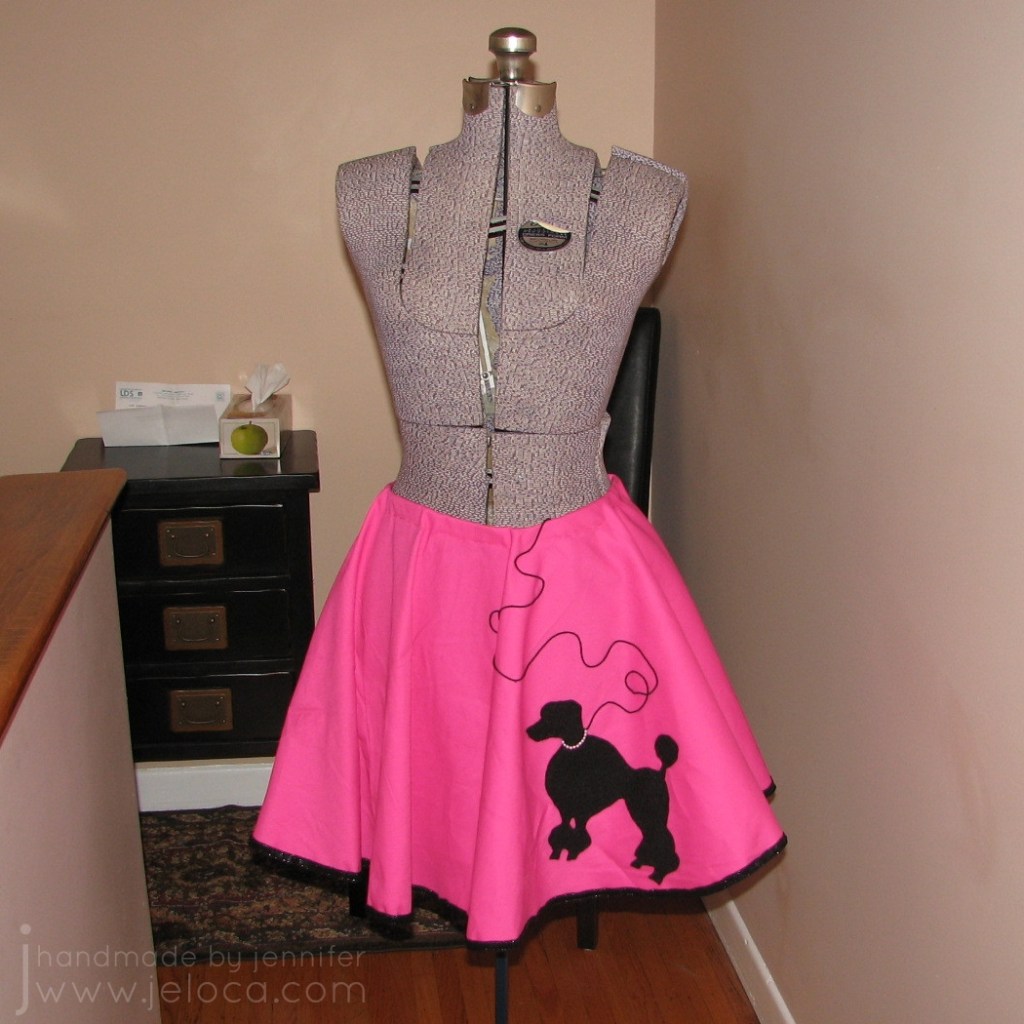
On Tuesday afternoon, my sister Laura called me up out of the blue and asked if I could make her a poodle skirt. No rush or anything…she only needed it by Thursday morning. Being the wonderful, amazing, loving, insane sister I am, I agreed.
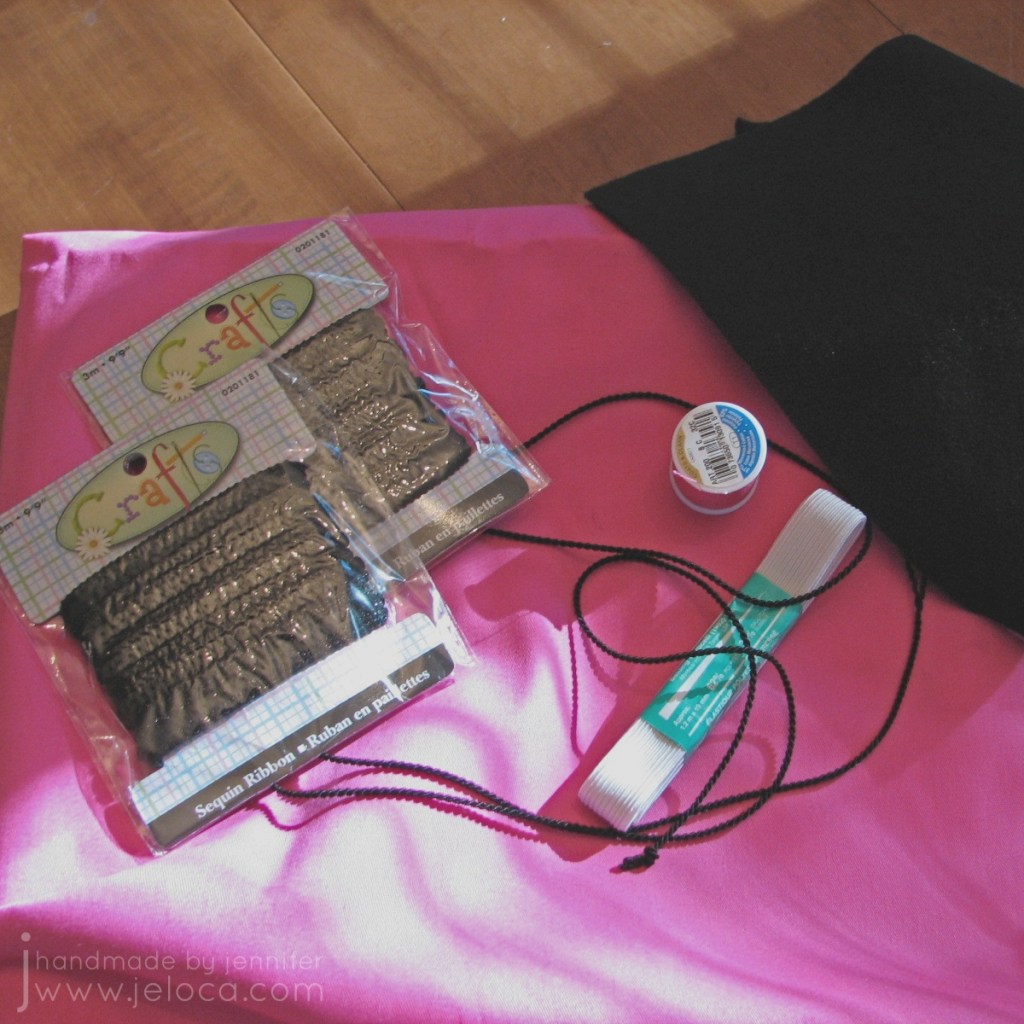
The total cost for this project is minimal, about $8 CAD plus the cost of your fabric. I was lucky and happened to be at my cousin Robyn’s place Tuesday night, and she had a huge bolt of pink fabric and I bought some off of her (to be paid for as soon as she tells me how much she wants for it). Your costs may vary depending on the fabric you buy, but the other supplies were cheap. If you already have them at home, it will be even cheaper.
All sewing was done by hand, and the total time for this project was 3 hours.
MATERIALS
1. Fabric. I like the pink poodle skirts with a black poodle, but you can choose whatever color pleases you. White with blue is a nice combination too. The width of your fabric (not the length) will be the diameter of your skirt. Cost- variable. (Here’s something similar on Amazon).
2. Felt. The felt is for the poodle. Choose a piece that is at least as big as the size of the poodle you would like to make. Cost for 1 piece of felt- $0.25 at Dollarama, or get bulk packs
3. Trim. This is for the edging. You can choose whatever kind of ribbon you want, but the wider it is, the easier it will be to apply (it will be used to hide the cut edges of the fabric). The one I chose is slightly elastic, with sequins. It was perfect. You need to buy enough to outline the outside edge of the skirt. To figure out how much ribbon you need, do this formula: measure the diameter of your skirt. Mine was 56″ wide. Multiply this number by pi, or 3.14. I get 175.84″. Convert this amount (inches) into meters or yards, depending on how your ribbon is sold, plus a little extra for insurance. I needed something like 5.6 yards, and my ribbon is sold in packs of 3 yards each, so I bought 2 packs. Cost for 2 packs of trim- $2.00 at Dollarama, or get by the spool
4. Elastic. This is for the waist band. I didn’t buy the really skinny kinds of elastic because I didn’t want the waist band to flip. Buy whatever kind you like, long enough to go around the intended wearer’s waist. Cost for the elastic- $1.99 at BouClair, or get by the spool
5. Thread. For sewing the waist band. I didn’t buy black because I already had, but I didn’t have a pink to match the fabric. Cost for the thread- $1.78 at BouClair or buy an assortment
6. Cord. This is for the leash. You can find all sorts of funky cords at fabric and notions stores. I chose a cord that is actually two thinner cords twisted around each other like a rope. Cost for the cord- $0.39 at BouClair or get a collection of colors
7. Beads (not shown). I chose to make a beaded collar for the poodle, because I have a stash of beads already. Cost for the beads- n/a but if you don’t have any on hand, you can get started with a beading kit
DIRECTIONS
Step 1- Get a Square: Lay out the fabric and find a square. To do this, fold one corner of the fabric up against the other side in a triangle. Cut away any excess fabric, and you will be left with a perfect square (as perfect as the fabric is, anyways).
Step 2- Find the Center: Fold the square back into a triangle, and in half (as a triangle) again. Find the corner where all the folds have in common. With your scissors, make a very small snip off the end of this corner. When you open up your square again there will be a hole in the center of it. This will help you make your circles centered.
Step 3- Trace your Circles: Using 2 pencils and some string, make a homemade compass to trace your circles on the fabric. There are plenty of tutorials on how to do this (here’s one) but long story short is to tie the string to the ends of both pencils, put one on the center hole, and, keeping the string taut, use the other to draw a big circle on your fabric. You want the length of the string to be the length of the radius for your skirt.
For example, my fabric square was 56″ across, so my skirt could have a radius of a maximum of 28″. You can check the length by swinging the pencil around and making sure it doesn’t go off the fabric anywhere. If it does, shorten the string a bit. Once your length is good, draw your outside edge circle. It helps to have someone help you by holding the center pencil in place while you draw.
Repeat this process for the waist band circle. The intended wearer has a 27″ waist (color me jealous) so I calculated what the diameter would be of a circle that was 28″ around (28/3.14=8.917). I added an inch because I wanted the waist band to have a gather. If I would have had wider fabric, I would have added more than an inch so it would hang in nice folds. Anyways, once I knew that my diameter was roughly 9″, I shortened the string to 4.5″ (the radius, or half of the diameter) and drew another circle in the center. At this stage my fabric looked like this:
Step 4- Cut it Out: Using your scissors, cut out both circles. You will be left with a doughnut of fabric.
Step 5- Sew on Trim: I used black sewing thread, and used a simple running stitch to attach the trim around the outside edge of the skirt. This worked great because I didn’t have to hem the edge. All I did was, working on an inch or so at a time, was line up the ribbon over the edge of the fabric with the ribbon centered over the edge. By centering it, even if the edge flipped up a little, no one would see the jagged cut edge of the pink fabric. Don’t worry if your edge is uneven, causing your ribbon to not make a perfect circle around the edge. No one will ever know. Mine wasn’t even at all, and you really can’t tell.
Step 6- The Waist Band: I cut and sewed my elastic into a 28″ circle. I folded the edge of the inner circle over it and sewed it down with the pink thread. I made perpendicular cuts into the fabric at 2″ intervals to give me some slack in turning the fabric back to sew it over the elastic. It gets tight at the end, but simply gather the fabric away from where you are sewing and it will work fine. Once the band is sewn in, adjust the gathers so they are even around the skirt.
Step 7- Poodle: Find a poodle shape that you like, and adjust it to the correct size on the computer. Print the poodle and cut it out. Use a contrasting color (I used an orange colored pencil) and trace the poodle onto your felt. Cut out the poodle from the felt. Find a nice area of the skirt to place the poodle. I used the black thread and a running stitch again to sew down the poodle. I didn’t pin or baste it down first, but you can if you are afraid it will move. I made sure to tuck the end of the cord under the neck first for where I wanted the leash to attach. This hides the end under the poodle.
Step 8- The Leash: There is no set pattern for how to place your leash. You can make it as curvy or as straight as you like. I laid out the cord in a pattern I found pleasing. I used tiny stitches to catch the cord at various spots to hold it in place.
Step 9-The Collar: The collar can be as fanciful as you like. There can be no collar. If you have glitter pens, you can use them for both the collar and the leash, if you like. I had spare beads so I made a beaded collar the width of the poodle’s neck, and sewed that in place.
Et voila- the finished skirt. You can jazz it up with some music notes if you like, and can wear a crinoline underneath it too. For the complete look, wear your poodle skirt with the following:
-white t-shirt, preferably with a collar -short white socks -tennis sneakers -black wide belt over the skirt and t-shirt -ponytail (you can use some of the excess skirt fabric for a hair bow) -light pink lipstick -pale or no eyeshadow option: tie a short scarf around your neck
Have fun rockin’ around the clock at your next sock hop!
This post may contain affiliate links. This means I might make a small commission on purchases made through the links, at no cost to you.


