Cast-On to Bind Off: I cast on Friday night right before bed and had a finished Sheldon Monday evening. Plus I worked all day Saturday and packed most of Monday.
Was the pattern well written: Yes! Even though some of the techniques used might not be familiar to everyone, the pattern is so well written that I really think anyone can pick this up and knit a Sheldon of their own.
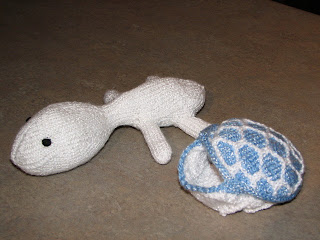
Changes to the pattern: Instead of attaching safety eyes I used a tip I saw on Knit Flix’s blog and made some felt eyes. I used my 3-hole punch and punched out 2 circles out of some leftover black felt from the secondPoodle Skirt I made last year. Once I had the eyes positioned where I wanted them, I sewed over them with black embroidery floss until the felt disks were completely covered. This left me with perfectly round eyes that have a bit of a 3D effect, plus are baby-safe and won’t come off with repeated chewing. 😉
Will I knit it again: Did you not see I called him “Sheldon 01”? I will definately make him some friends.
As usual, these photos and others in my FO gallery on the left. Sheldon’s slideshow is here.
I made the little kiddo a pair of socks using yarn left over from a pair of socks I’d made for Yannick…last year? I used a pattern given to me by Nicole, who had taught the knitting class I’d taken when I first started knitting again. (I know I could technically say “my old knitting teacher” but I wouldn’t want her to ever read this and think I’m calling her “old”!). The baby variation helps the socks stay on better since the entire leg and top of the foot are ribbed. These knit up fast! I cast-on for them on the 21st of this month, but haven’t done much knitting because I’ve been trying to pack in the evenings. I’d guess that each sock takes about 4 hours, MAX. (I’m extending the time in case you are slow doing ribbing). And how cute are they? I’m going to go through my sock yarn stash and see what other leftovers I have from our socks and knit up matching socks for the baby.
The Pocket Pals are from a booklet of the same name by Val Love of Dovetail designs. The patterns themselves are very easy and clearly written- to a point. And that’s what, to me, ruined this project.
Here’s a photo of the back of the booklet (the “Very Easy Boy” is in the bottom corner) and my attempt.
I really enjoyed the knitting part. I used embroidery floss and a 2.5mm needle, and kept thinking- how cool is this? I own every color of Anchor floss (that’s over 450 little bobbins) and was mentally planning to knit not only the 20 pals from the booklet, but designing my own little dolls and toys. It takes less time to knit than a gauge swatch, and before I knew it, I was done.
I was immensely charmed by the little square, and jumped right into the seaming, which went very well and very easy. It was so adorable at that stage that I deliberately didn’t even show it to Yannick because I wanted to save the cuteness for once it was complete. The gathers for the neck, arms and legs went perfectly, and I had this cute little doll in my hands.
Well, this cute little bald doll with no face.
And here’s why I’m not sure I’m going to make any more: the hair instructions. They suck. Does it even count as directions when all it says is “embroider hair using straight stitch”? If I could guarantee that the hair would work out for any future dolls, I’d be making them by the dozen. But I’m afraid of ruining them like I feel I ruined this one.
Yes, I used satin stitch, not straight stitch. But I was working on a peach flesh-toned head and didn’t want the scalp to show through. I might try making one more and working the back of head and scalp with the hair color instead of the skin color, then trying the straight stitch and seeing if I have better luck. Anything is better than the doll-of-shame equivalent of the “bowl cut”.
Cute from far…but far from cute. Look Ma- a bowl cut.
Oh well.
In other news:
I can’t remember if I posted this or not, so forgive if its a duplicate: we have sold our house. Woo hoo! Now we need to buy a new one so we have somewhere to go. (A mild technicality, I know).
Stats: Pattern: Alphabet Blanket Source: Baby Knits by Debbie Bliss Yarn: Bernat Softee Baby, just under 3 full balls Needles: 4mm for blanket, 3.5mm for triangles. The pattern called for thinner yarn and smaller needles, so I adapted for the weight yarn I used. Cast-on to Bind-off: about 2 months, although I spent 2 weeks working on the JCA project and only worked on this when I was home because of the whole chart-following thing. If I add up actual knitting time I’m sure it’s well under a month. Summary: A surprisingly fast and easy knit! The 4 page chart is daunting at first but you quickly fall into a rhythm. There are sections or rows that repeat throughout so you can get through those rows quickly, and it is easy to keep track of where you are. I never even needed a stitch marker. Most (but not all) wrong-side rows are straight purl rows which gives you a break if you get frustrated reading charts.
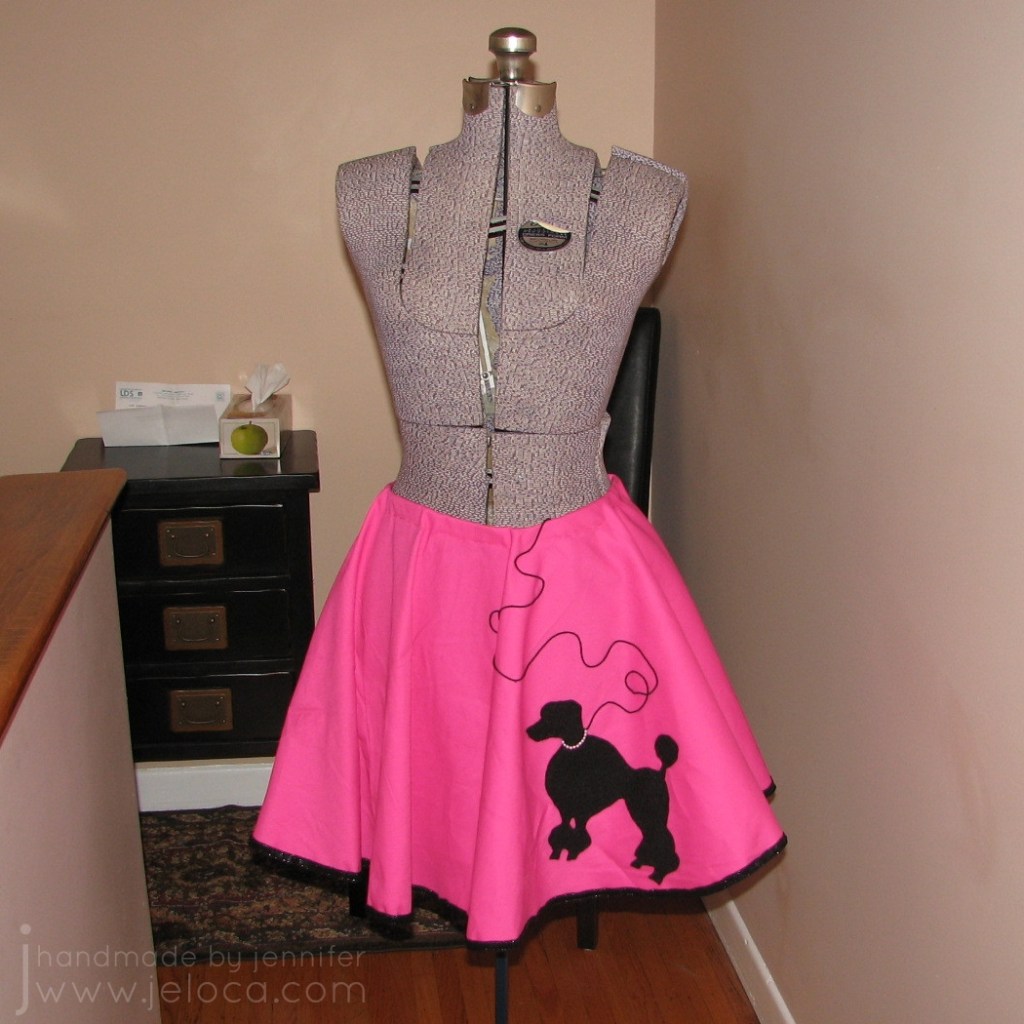
On Tuesday afternoon, my sister Laura called me up out of the blue and asked if I could make her a poodle skirt. No rush or anything…she only needed it by Thursday morning. Being the wonderful, amazing, loving, insane sister I am, I agreed.
The total cost for this project is minimal, about $8 CAD plus the cost of your fabric. I was lucky and happened to be at my cousin Robyn’s place Tuesday night, and she had a huge bolt of pink fabric and I bought some off of her (to be paid for as soon as she tells me how much she wants for it). Your costs may vary depending on the fabric you buy, but the other supplies were cheap. If you already have them at home, it will be even cheaper.
All sewing was done by hand, and the total time for this project was 3 hours.
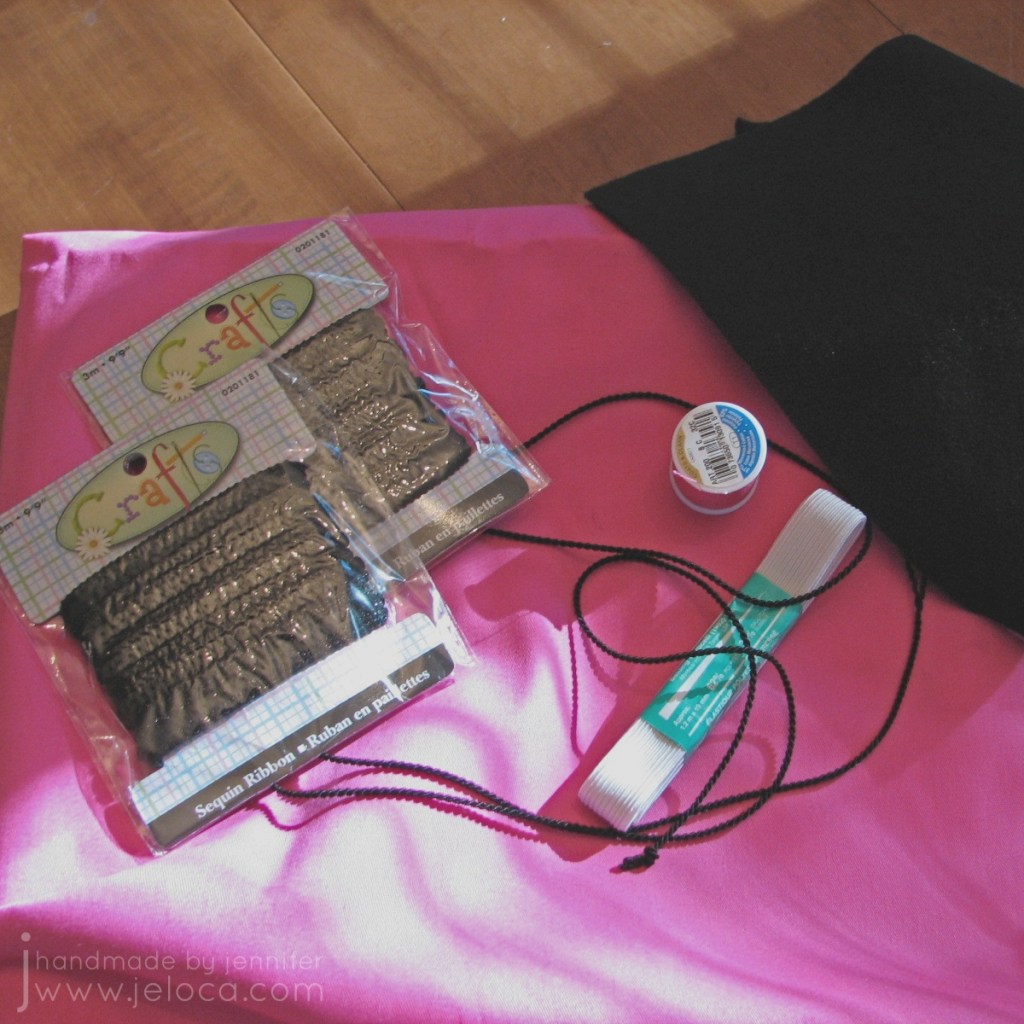
MATERIALS
1. Fabric. I like the pink poodle skirts with a black poodle, but you can choose whatever color pleases you. White with blue is a nice combination too. The width of your fabric (not the length) will be the diameter of your skirt. Cost- variable. (Here’s something similar on Amazon).
2. Felt. The felt is for the poodle. Choose a piece that is at least as big as the size of the poodle you would like to make. Cost for 1 piece of felt- $0.25 at Dollarama, or get bulk packs
3. Trim. This is for the edging. You can choose whatever kind of ribbon you want, but the wider it is, the easier it will be to apply (it will be used to hide the cut edges of the fabric). The one I chose is slightly elastic, with sequins. It was perfect. You need to buy enough to outline the outside edge of the skirt. To figure out how much ribbon you need, do this formula: measure the diameter of your skirt. Mine was 56″ wide. Multiply this number by pi, or 3.14. I get 175.84″. Convert this amount (inches) into meters or yards, depending on how your ribbon is sold, plus a little extra for insurance. I needed something like 5.6 yards, and my ribbon is sold in packs of 3 yards each, so I bought 2 packs. Cost for 2 packs of trim- $2.00 at Dollarama, or get by the spool
4. Elastic. This is for the waist band. I didn’t buy the really skinny kinds of elastic because I didn’t want the waist band to flip. Buy whatever kind you like, long enough to go around the intended wearer’s waist. Cost for the elastic- $1.99 at BouClair, or get by the spool
5. Thread. For sewing the waist band. I didn’t buy black because I already had, but I didn’t have a pink to match the fabric. Cost for the thread- $1.78 at BouClair or buy an assortment
6. Cord. This is for the leash. You can find all sorts of funky cords at fabric and notions stores. I chose a cord that is actually two thinner cords twisted around each other like a rope. Cost for the cord- $0.39 at BouClair or get a collection of colors
7. Beads (not shown). I chose to make a beaded collar for the poodle, because I have a stash of beads already. Cost for the beads- n/a but if you don’t have any on hand, you can get started with a beading kit
DIRECTIONS
Step 1- Get a Square: Lay out the fabric and find a square. To do this, fold one corner of the fabric up against the other side in a triangle. Cut away any excess fabric, and you will be left with a perfect square (as perfect as the fabric is, anyways).
Step 2- Find the Center: Fold the square back into a triangle, and in half (as a triangle) again. Find the corner where all the folds have in common. With your scissors, make a very small snip off the end of this corner. When you open up your square again there will be a hole in the center of it. This will help you make your circles centered.
Step 3- Trace your Circles: Using 2 pencils and some string, make a homemade compass to trace your circles on the fabric. There are plenty of tutorials on how to do this (here’s one) but long story short is to tie the string to the ends of both pencils, put one on the center hole, and, keeping the string taut, use the other to draw a big circle on your fabric. You want the length of the string to be the length of the radius for your skirt.
For example, my fabric square was 56″ across, so my skirt could have a radius of a maximum of 28″. You can check the length by swinging the pencil around and making sure it doesn’t go off the fabric anywhere. If it does, shorten the string a bit. Once your length is good, draw your outside edge circle. It helps to have someone help you by holding the center pencil in place while you draw.
Repeat this process for the waist band circle. The intended wearer has a 27″ waist (color me jealous) so I calculated what the diameter would be of a circle that was 28″ around (28/3.14=8.917). I added an inch because I wanted the waist band to have a gather. If I would have had wider fabric, I would have added more than an inch so it would hang in nice folds. Anyways, once I knew that my diameter was roughly 9″, I shortened the string to 4.5″ (the radius, or half of the diameter) and drew another circle in the center. At this stage my fabric looked like this:
Step 4- Cut it Out: Using your scissors, cut out both circles. You will be left with a doughnut of fabric.
Step 5- Sew on Trim: I used black sewing thread, and used a simple running stitch to attach the trim around the outside edge of the skirt. This worked great because I didn’t have to hem the edge. All I did was, working on an inch or so at a time, was line up the ribbon over the edge of the fabric with the ribbon centered over the edge. By centering it, even if the edge flipped up a little, no one would see the jagged cut edge of the pink fabric. Don’t worry if your edge is uneven, causing your ribbon to not make a perfect circle around the edge. No one will ever know. Mine wasn’t even at all, and you really can’t tell.
Step 6- The Waist Band: I cut and sewed my elastic into a 28″ circle. I folded the edge of the inner circle over it and sewed it down with the pink thread. I made perpendicular cuts into the fabric at 2″ intervals to give me some slack in turning the fabric back to sew it over the elastic. It gets tight at the end, but simply gather the fabric away from where you are sewing and it will work fine. Once the band is sewn in, adjust the gathers so they are even around the skirt.
Step 7- Poodle: Find a poodle shape that you like, and adjust it to the correct size on the computer. Print the poodle and cut it out. Use a contrasting color (I used an orange colored pencil) and trace the poodle onto your felt. Cut out the poodle from the felt. Find a nice area of the skirt to place the poodle. I used the black thread and a running stitch again to sew down the poodle. I didn’t pin or baste it down first, but you can if you are afraid it will move. I made sure to tuck the end of the cord under the neck first for where I wanted the leash to attach. This hides the end under the poodle.
Step 8- The Leash: There is no set pattern for how to place your leash. You can make it as curvy or as straight as you like. I laid out the cord in a pattern I found pleasing. I used tiny stitches to catch the cord at various spots to hold it in place.
Step 9-The Collar: The collar can be as fanciful as you like. There can be no collar. If you have glitter pens, you can use them for both the collar and the leash, if you like. I had spare beads so I made a beaded collar the width of the poodle’s neck, and sewed that in place.
Et voila- the finished skirt. You can jazz it up with some music notes if you like, and can wear a crinoline underneath it too. For the complete look, wear your poodle skirt with the following:
-white t-shirt, preferably with a collar -short white socks -tennis sneakers -black wide belt over the skirt and t-shirt -ponytail (you can use some of the excess skirt fabric for a hair bow) -light pink lipstick -pale or no eyeshadow option: tie a short scarf around your neck
Have fun rockin’ around the clock at your next sock hop!
This post may contain affiliate links. This means I might make a small commission on purchases made through the links, at no cost to you.
Update: see end of post for information about a downloadable pattern pdf
A knitting game, you ask? Is such a thing possible?
“Yes!” I say.
This game evolved from a challenge I was given in my knitting class to knit a “random” scarf- we had to select a bunch of varying yarns in colors we liked and work them in knit and purl rows to form a scarf. It was to be an exercise in the textures you can achieve with those two little stitches.
Ahem. I can’t do “random”. I needed to come up with a way to be random with as much control as possible…and the Knitting Game was born.
It’s so easy to play along! All you need is 6 balls of yarn, 1 die, 1 coin, and a long circular knitting needle that is a bit larger than the average thickness of your chosen yarns. I used a 9 US/5.5mm but if you are using mostly aran weight and thicker, you might want to choose something bigger.
On a piece of paper, assign each of the 6 skeins to a number 1 through 6.
Also assign the “heads” and “tails” of the coin to knit and purl (not necessarily in that order).
You also need to decide how long to make the scarf. I wanted mine about 6′ long including a 4″ fringe at each end, so I cast on enough sts to be about 5′ long.
Now the fun part!
Step 1: Roll the die to get a number. Cast on with the yarn that matches that number. Cut yarn, leaving a 4″ tail.
Step 2: Roll the die to get a number. Toss the coin to get “heads” or “tails”, and depending on what you designated “heads” or “tails” to be, it tells you to knit or purl that row.
Follow the directions of fate across the row using the yarn that matched the number you rolled on the die. Make sure to start with a 4″ tail left loose, and cut the yarn at the end of the row, leaving a 4″ tail.
The 4” of loose yarn at the beginning and end of the row will become your fringe.
Step 3: Repeat step 2 until the scarf reaches your desired width.
Step 4: Once the scarf is the width you would like, roll the die to get a number and bind off with the yarn matching the number you rolled. Don’t forget to leave a 4″ tail when you cut the yarn.
Knot the yarn ends together in groups of 2-5 strands to secure, and trim if necessary.
Voila! A completely random scarf that fulfills any need for control while leaving things totally up to chance! The coolest part is that no two scarves will ever be alike! 😀
This pattern is provided free above, but if you’d prefer an easy-to-print PDF version, I have made it available here for a very small fee. The PDF includes the full instructions in an easy to read layout with full color images.
This pattern was also published in the 2006 Knitting Pattern-A-Day calendar and has been featured in an assortment of guild newsletters as well as been used to run knitting classes/workshops. Future newsletter/class/workshop permissions are granted provided the pattern copies are purchased through me and all credit is given to me as the creator/designer.
I redid the eyes ‘cus both Yannick and Annette (the CLSC nurse who comes by once a week to check how I’m changing Y’s bandages) thought the original had psychotic eyes. Apparently an “evil” stuffed toy is not thought of to be the best choice of gift for a 14 year old. Apparently this will cause severe traumas including sleeplessness, delusions and a paranoia of all things porcine. Who knew?
As a last minute addition I was asked to incorporate the recipient’s name. I made up a knitted scarf and spent this evening trying to duplicate stitch her name. Apparently I don’t do duplicate stitch. I do, however, cross stitch. Voila:
I had to make the scarf tube-like so I could hide the back of the lettering, so this is what I did:
CO 80 sts
Row 1- k
Row 2- k
Row 3- k3, p to last 3 sts, k3
Row 4- k
Repeat rows 3 & 4 twice more
Row 9- k3, p to last 3 sts, k3
Row 10- k3, p to last 3 sts, k3
Row 11- k
Row 12- k
Rows 13-18- repeat rows 3 & 4 three times more
Row 19- k
Rows 9 through 12 gave me a garter border that matched the border of the first 2 rows, then a purl row to fold over, then repeated for the back. Once I finished the lettering I just stitched up the live sts to the CO row and added a fringe.
I hope Trish gives him a good home. Now I can knit! :]


 A turtle moon…


