

I haven’t talked about it much but I’m going to be having surgery in about a week. I’ve actually been off work since mid-August, and this unexpected time at home has given me a lot of time to knit and color, and while I’ve been revisiting old supplies I’ve also been lucky enough to get some new ones.
My watercolor research back in August led me to discover Derwent Inktense and I went on a really long review and YouTube binge, learning everything I could about those amazing ink-pigmented colored pencils. When my birthday rolled around in September I basically only asked for art supplies, and my parents were wonderful enough to oblige.

Topping my list was the Inktense set. I really enjoy the metallic watercolor pencils and the Spectrum Noir Sparkle set is just yummy for anyone who likes glitter (um. yes. me! I like glitter!), but in this post I’m focusing on the Inktense which I’ve been using primarily with the waterbrushes I got with them. I really love this waterbrush set because of the sizes, the tiny #1 tip is perfect for the small areas in coloring books while the larger sizes make doing washes of color or wetting larger areas a breeze. They’re super easy to fill and I haven’t had a single leak, and I’ve been using them on a regular basis since September.
Now then, on to the Inktense! I got the full set of 72 colors but they do come in smaller tins, and the pencils are available open-stock so you can definitely get a smaller set and then add to it as you go.
So what are Inktense pencils? According to their site, “Derwent Inktense pencils are our best watercolour pencil ever! You can use them dry but mix them with water and WOW! the colour turns into vibrant ink. Once it’s dry the colour is fixed and you can work over the top of it, and, because it permanent it’s great for using on fabric such as silk and cotton!” They refer to them as ‘watercolors’ but they’re not, not really. They’re ink pigments in colored pencil format. You can use them as pencils and they’re nice, on the darker end of color ranges, but it’s when you add water that they transform completely. And because they’re ink once they’re dry they’re permanent.
What does this mean for coloring and how does this compare to a watercolor pencil? Let’s say you wanted to color a pink sphere, and you wanted to block in the rounded shading first, then go over it with a wash of pink, leaving a highlight area. With watercolors the paint reactivates any time it gets wet. So even if you let the gray shading dry, once you washed pink over top the gray would bleed out and muddy the pink and if you’re not careful you can make a real mess of your work. Inktense are permanent when dry so you can block in your shadows, wet the pencil strokes and fill your darker areas, and then once that’s dry you can go over it with even the lightest shades and the gray won’t budge. This is a horrible way of explaining that you can go overtop of previous layers without affecting them.
Of course the first thing I did when I got my set was to swatch out the colors so I could see what I’d be working with.

Above are the pencils when dry. The appear quite dark, and there are a lot of greens and browns for those who enjoy coloring books such as Secret Garden and other floral-heavy books. The pencils apply well and it’s very easy to get a lot of color down. Each pencils is marked with it’s color number and name, making it very easy to identify which one I’ve used…which is helpful because the colors on the ends of the barrels aren’t quite identical to the actual color of the pencil itself.
Okay, so they’re really nice when dry. The real magic, however, happens when they are activated.

This image barely shows the bright vibrancy of these colors in real life. The pigments activate instantly with water, and I could have used the lightest of strokes and still had the same color payout as I got here. I was blown away by my swatches and as soon as I’d added them to my swatch book I had to get started on a coloring page.
I’ve been watching a lot of YouTube coloring tutorials featuring Inktense pencils (Peta, Dede, Lindsay and Lisa are four of my favorites) and I know that the pencils are typically used in wet-as-you-go manner, coloring a section and then activating it, and so on. However, making the swatches was so satisfying in a “wait til the end” surprise payoff, that I just had to try coloring an image that way: coloring the whole thing, and then activating the ink at the end to see the before and after.

After testing the paper in the back of the book to make sure it would be safe to use (no bleed-through) I chose this image from Kerby Rosanes’ imagimorphia.

I’ve been having a lot of tummy time (lol) and this is how I’d set myself up in bed. A clipboard helped keep the book open as well as gave me a flat, hard surface to work on. I had a sheet of card stock underneath this page to protect the ones beneath, and I had my swatch book open in front of me so I could accurately choose my colors. My laptop was off to the right playing episode after episode of Welcome to Nightvale (soooooo weird and awesome) and the tin of colors was on my left within easy reach. Finally, my flip-top Ott-Light was balanced on the bed casting accurate light over the picture for me, since lighting in my house is crappy at best.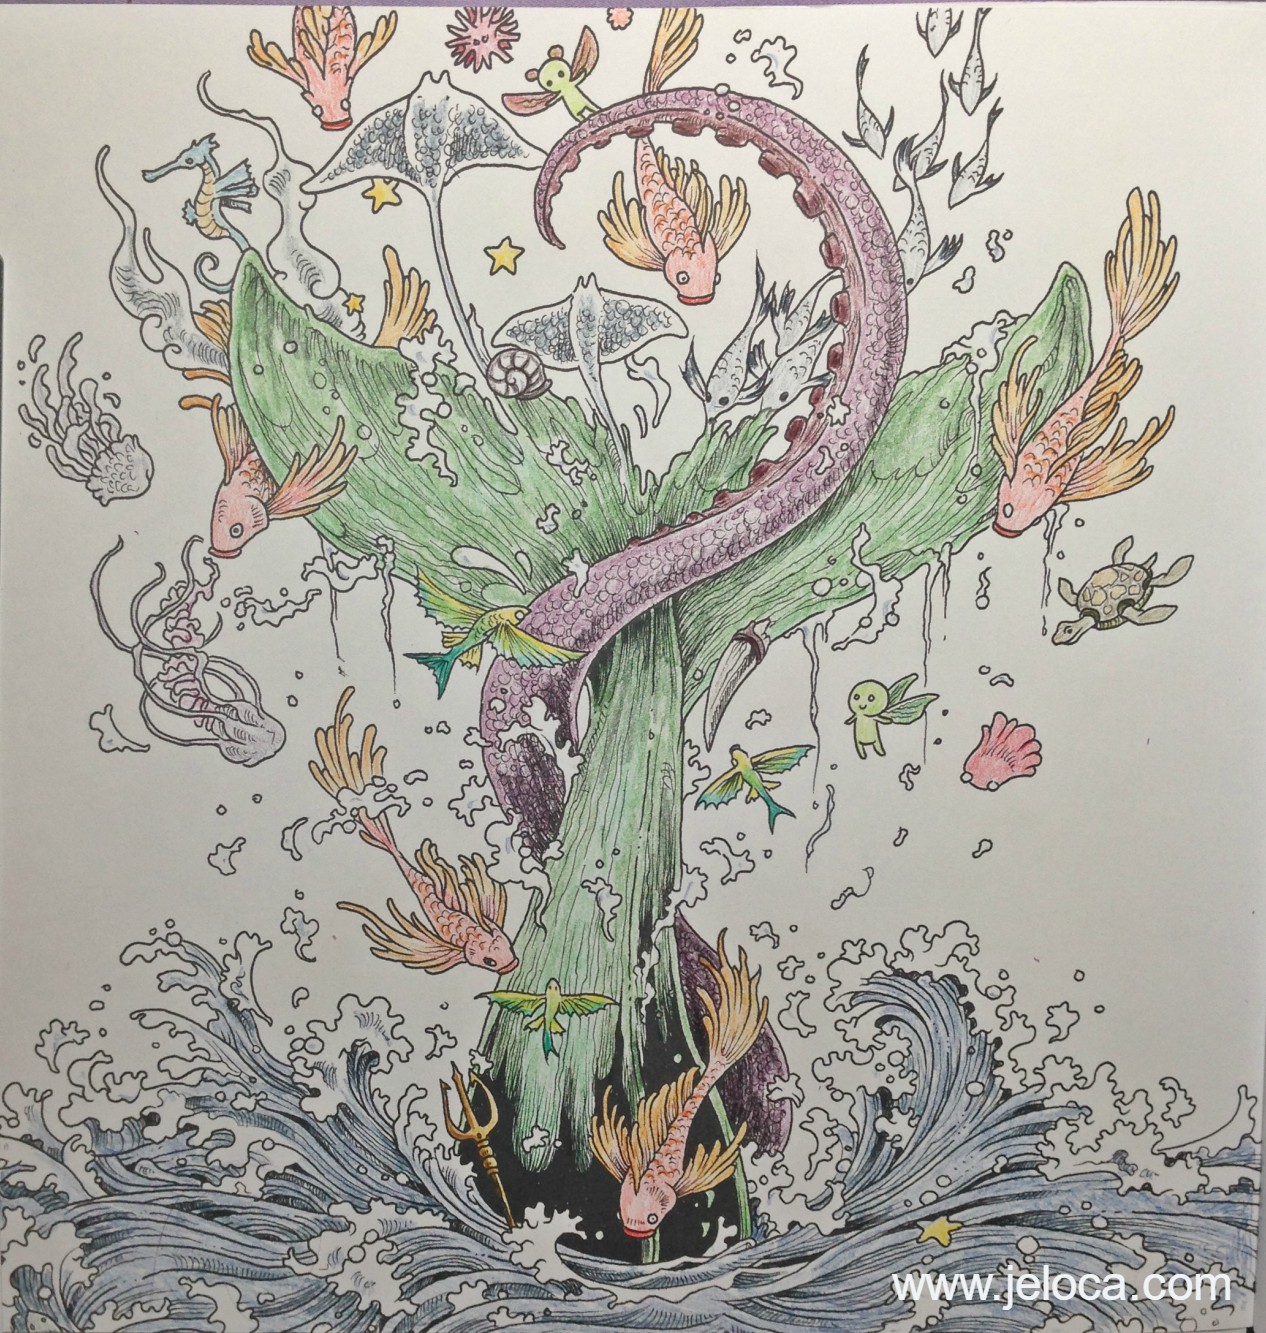
This is my completed painting before activating the Inktense inks. I colored pretty lightly, wanting to see how the pigments did on their own before adding any shading or depth. (PS yes I know that’s supposed to be a whale and whales aren’t green LOL) Coloring with these pencils is like a dream. They apply color beautifully even to paper that doesn’t have a lot of tooth. It is really easy to apply just a hint of color without any pressure on the pencil, which is a good thing because it means you won’t have to waste a lot of the pencil just to get a good color payout. In fact, these colors are so vibrant and juicy when activated that if anything, it’s almost too easy to add TOO MUCH color.
(For example, my son Jakob is addicted to these pencils too and is coloring an image in one of his books. I was showing him how subtle applications of color give pastel-pale results and he tried it out for himself. His three light strokes of Payne’s Gray, applying barely any pressure, provided enough color when activated to light wash a bunny butt around 3″ in diameter.)

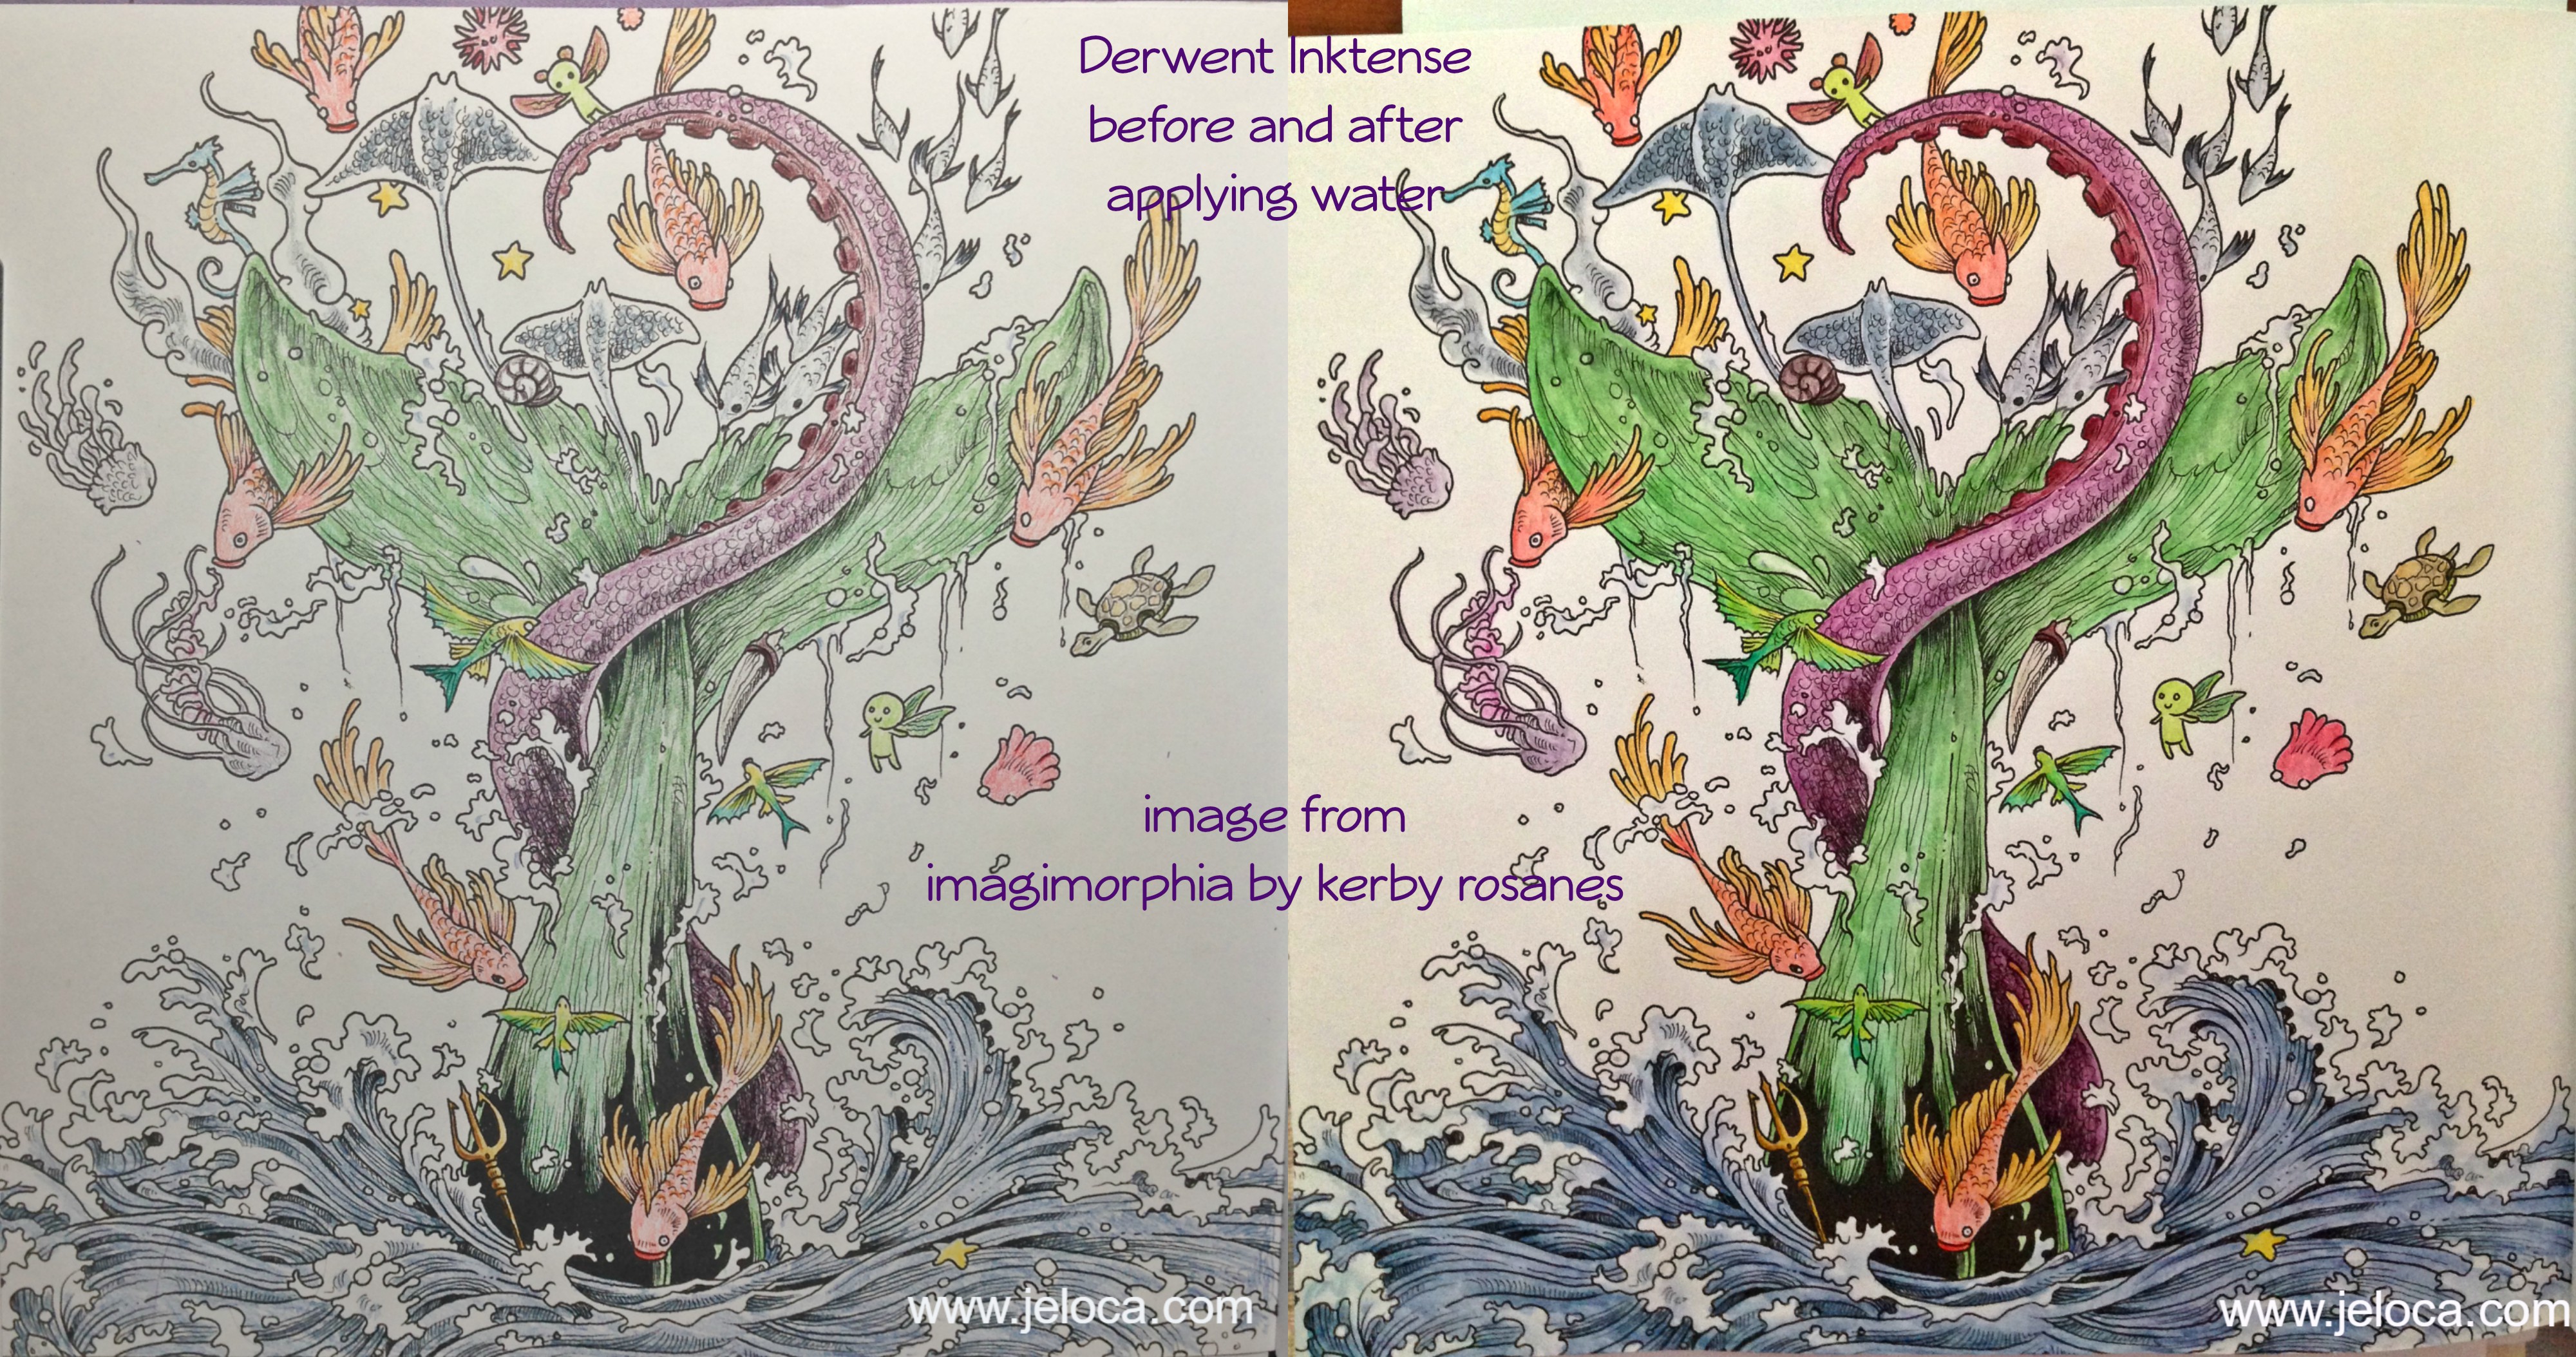
I took this image right when I’d started activating the inks. I went slowly, enjoying watching the colors blossom into vibrant paint. (Seriously, it’s addictive). I activated each like section at a time, brushing off any excess pigment onto a paper towel to keep the tip of my water brush clean. In this image you can begin to see the difference between the activated (water-applied) and pencil-only sections. The orange and yellow fish on the right is still pencil, while there has been water applied to the one on the left. The little fairy creatures have been wetted on both sides. What really shows off some of the color payout, however, is the school of fish that crosses the tentacle. You can see how little color I’d applied, versus how much blooms from the watered inks.

And here is the completed painting. I didn’t use very many colors, but even still the brightness and depth these inks have is amazing. This picture is so much brighter and deeper in real life, showing subtle shading and contouring just from the way the ink moved like paint. It dries faster than watercolor so you do have to go in sections and work quickly if you want to activate a larger area without dry lines showing, but there’s still a decent amount of time to move the paint around before it dries, allowing for things like the softer blues in the water froth being ink I’d swiped from the water sections.
I’ve very quickly developed an Inktense addiction, as have my kids, who have been getting to use Mommy’s special art supplies now that they’re a little older. They don’t replace watercolors if that’s the type of medium you want, rather they’re a medium of their own, and are absolutely gorgeous to use.


Pingback: Crafty Compilation – w/e 01/07/17 |