Update: see end of post for information about a downloadable pattern pdf
Finally! As promised!
The cozies were first shown on the blog here and here.
I designed this pattern last week as part of my cousin’s fiancé’s bridal shower gift basket. I wanted a mug cozy that was removable, machine washable and dryable, and didn’t need ties, snaps or hooks. This is what I came up with.
The cozies have some stretch to them, but were designed to fit standard mugs. If you want to make this cozy for a taller mug, you will need to keep knitting the plain section until you have enough clearance for the top of the mug handle. Likewise, if you want to make it for a wider mug, you will need to add extra stitches.
Unfortunately, I forgot to write down my gauge and the gifts have already been given to the bride (who lives 2 hours away) so I can’t measure them. However, I don’t feel that this will be a big issue with this pattern. The nature of the cozy will forgive a slightly too tight or too loose fit.
Directions
CO 30 sts with 5mm needle and join for working in the round, being careful not to twist
K 1 round
P 1 round
K 1 round
P 1 round
Next round: BO 2 sts, k to end of row – 28 sts
You will now be working flat, turning the work at the end of each row.
Row 1: sl 1 st purlwise, p to end of row
Row 2: sl 1 st purlwise, k to end of row
Repeat the last 2 rows until 14 rows have been knit flat. At the end of the 14th row do not turn.
CO 3 sts then k across the rest of the sts, rejoining the work into the round – 31 sts
This pattern is provided for free above, but if you’d prefer an easy-to-print PDF version, I have made it available here for a very small fee. The PDF includes the full instructions, abbreviation definitions, an easy-to-read layout and full color images.
(size small shown above, size x-large shown below) The Phlox Socks are the pattern I designed for the Robyn’s Nest June Sock Club kit. They feature an optional lace cuff, a flower appliqué with a center bead, a short-row heel and ribbing that flows seamlessly into the lace design. (The ribbing is underneath the lace cuff- so you have the pretty outside and the functional inside).
The pattern is written for sizes small through x-large (7.5″-9″) but due to the stretchability of lace patterns, fits 8.25″-9.75″ and may even fit larger.
The yarn is from Biscotte & Cie (etsy shop here) and is really soft, plus her yardage can’t be beat! I knit one x-large sock and one small, and have enough yarn left over to knit a second x-large sock for a complete pair. The colorway is called Alexandrite in the pattern, but that specific color was exclusive to the sock club.
The pattern calls for a 2.5 mm needle, and is written for both dpns and the Magic Loop method, with specific instructions for each methods when necessary.
(optional flower appliqué with center bead)
Again, the pattern will only be available for sale as of October 1st, but if you email me (or send me a message through Ravelry) I’ll put you on the mailing list with a reminder in October.
Holy cow. My silly little blog jumped from an average of 30 visitors each day to 740(!!!!!!) yesterday! Of those, 693(!!!!!!!!!!!!!!!!!!!!!!!) of you got here by following a link on the Yarn Harlot’s website.
Wow. And she didn’t even post a photo of the full sock! Y’all came on over based on a teaser!
I’m flattered! I’m also guessing that you’re not here for Jakob, or to find out what I’m knitting now. So here is the information you’re probably looking for:
“Phlox Socks” is the pattern I designed for the Robyn’s Nest June Sock Club Kit. I put a little teaser of my own in the left sidebar over there because I need to give international members a chance to receive their kits before I post the full photo. (Any of you who have received your kits can post photos, by the way. It’s only me who needs to wait). 🙂
I’ll be posting photos and full details of the sock here and at the sock’s page on Ravelry on July 1st.
The pattern will be available for purchase on October 1st. (Sock club members have a short exclusivity on the pattern).
I hope it will be worth the wait!
—
In other news, I’m still rushing to finish Eden’s shrug. I don’t have a photo to show you, as my camera is packed. After running around to pack up Jakob’s and my stuff last night, I didn’t have the energy to sit down and do any more knitting. I have finished the front ribbing and only have the narrower back ribbing and cuffs to do. I’m sure I can finish them and the seaming in the car, if necessary.
As an aside- why is it that for every trip, even day trips, *I* end up running around like a chicken with no head ticking stuff off of lists to make sure I’ve packed everything for myself and Jakob, food, clothes, toys, etc… while Yannick calmly watches TV or whatever then last minute throws some of his clothes in a bag and calls himself “packed”?
I’m not complaining, really- I’d much rather know that I did the packing so I know everything is there and nothing is missing…but it does irk me a bit when I’m scrambling like mad, staying up really late to get it all done, but meanwhile he goes to bed early.
I know, it’s almost next weekend. But I finally have a chance to tell you about last weekend, so here goes. Ignore the fact that the date on this post is about 2 days behind the day you’re actually reading this, I’ve been trying to get this post up for a while now.
So, where was I? Oh yeah, last weekend. I worked on Saturday, then spent the night working on the June sock and baking a cake. We were having a birthday party to celebrate Jakob’s first birthday with our family, and I wanted to bake a healthy birthday cake to counter all the sweets my mom would be preparing.
I baked the cake Saturday night so it would have time to cool overnight, and Sunday morning when we got back from Jakob’s swimming lessons, I iced it:
His party “theme” was Superman, and I really wanted to put a big “S” shield on the cake, but no matter how hard I tried I couldn’t get the white icing tinted a vivid red, blue or yellow. The closest I got was cornflower blue, pepto pink and a pale yellow. So I moved on to option “B”:
There’s a local kitchen store who will take a photograph and print it (in edible dyes) on a thinner-than-paper sheet of edible icing. In this photo my printout of the image I made on the computer is on the left, and the icing photo is on the right. Not bad eh? It’s not as creative as icing it myself, but I’m happy with how it looks, and it only cost $12.95 for the icing sheet. It took 10 minutes of waiting at the store, which makes this a great option for a last-minute event.
And here’s how it turned out. The cake was cold from the fridge so the icing sheet didn’t melt into it, and I did have to cut away one side to be able to put his “1” candle in, but all in all, I think his first birthday cake came out ok. I would have rather have done some really cool decoration myself, but it didn’t work out.
Here he is, about to dig in…
…and enjoying his first slice. He spent a good 15 minutes licking up every drop of icing before working his way to the cake. Here’s a photo of Jakob and me. I think this was the only time I actually got to hold him the entire party- between the family who rarely sees him and the family who always sees him, he was a very “in demand” baby! A photo of the bubbies… from left: Sean (Robyn’s son), Carol (Robyn’s and Amy’s mom and my aunt), Jakob, my mom, Marlene (our cousin) and Oliver (also our cousin). Carol is my dad’s sister, and Marlene is my grandfather’s sister’s daughter.
(The last 5 photos were stolen with permission from Amy’s blog).
On Monday I finished the June socks. It felt good to cross something off my deadline list. I photographed them, finalized the pattern and sent it off to Robyn to include in her kits. So if you’ve ordered a Robyn’s Nest June Sock Club kit, they’re gonna be coming soon!
One project down, and on to the next. I’m designing 2 projects for the Mary Maxim 2008 contest. I hadn’t realized until after I’d sent in my entry fee that they get the sole distribution and publication rights to any winning patterns. I’m not thrilled about that, but I will be sending something in anyways. The pattern DOES keep my name as designer, and it can’t hurt to get my name out there.
Here’s my first swatch.
Don’t try and read it- that was just some test duplicate stitch to see what worked best. Also, don’t try and guess what it is…you won’t. Seriously. This is the wip as of a few days ago. The yarn is Patons Shetland Chunky, in white and navy blue.
I’ll leave you with one of my favorite photos lately.
Argh. It’s tough when there’s stuff going on (p.s. I almost typed “it’s tuff when there’s stuff…”) and I can’t blog about it.
I’ve been knitting like mad every night. As I’ve mentioned previously, I’m designing the sock for Robyn’s Robyn’s Nest June Sock Club Kit (that’s a mouthful!) and seeing as how it’s sold out twice, I’m trying very hard to have a sock that people will like.
I’ve finished designing the sock itself, and am in the process of typing up the pattern. I will then be knitting up a second sock following the pattern only, and choosing a different size than my first sample. This way I’m trying to test-knit my own pattern. The only downside to all this is that I can’t show you progress photos or even the yarn itself. But trust me- the yarn is beautiful, and I hope the sock is good too. 🙂
Once the sock is done I will have to rush like mad to design and knit my Mary Maxim contest submissions, since they have to arrive by mail in Ontario no later than June 20th. In other words, I’ve got less than 1 month to design them, knit them and mail them off, plus allow time for shipping. But no pressure, right?
Can you believe I’d actually thought I could squeeze 2 dinosaurs into this schedule? *snort*
On a slightly unrelated note- I’ve just signed up for Secret Pal 12. I haven’t done a secret pal exchange since they were at number 6 or so, so I’m looking forwards to this one.
Oh- and Pete Grimaldi of Skin MD Natural wants me to let you all know that the free samples (like the one I reviewed) are still available, so if you have a blog and want some free skincare to try out, head over to their website! (The links are in my last post).
To start this post off, let me wish a huge HAPPY MOTHER’S DAY! to all the moms, grandmothers, mothers-to-be, foster mothers, and anyone else who raises, takes care of or in any way helps shape the life of a child. We rock!
Here’s Mommy with Jakob at 50 weeks (not this past week’s photo, but the one before).
I still haven’t uploaded the photos from my camera from last week, and my head is still in a fog. Sorry!
I have been knitting like mad, but can’t show any of it. See, I’m designing the sock for Robyn’sRobyn’s Nest June Sock Club Kit, and while it is going very well, it is a surprise. I still like my original design, but I came to realize that while many people might say “hey- that’s cool”, very few would actually want to knit it…or at least they’d want to knit it, but it wouldn’t be the kind of sock they’d want to wear. So I pored over my design books and was inspired by a little stitch pattern in a book by someone you might have heard of. Barbara Walker? Anyone? Anyone? Bueller? I’ve been crunching more numbers than food this week, but things are starting to take shape, and I’m really pleased with the progress so far.
I can’t believe the kit is almost sold out! No pressure, or anything… 🙂
I do have some knitting that I can share, however.
Here’s the finished Marble Cabled Cardigan.
I’m really happy with how it came out. I knit the 1-2 year old size, and since Jakob is slim, I’m sure he’ll get to wear it even until next Fall. Yannick chose the pattern when I told him I wanted to knit something with this particular Marble colorway. He also chose the buttons. They are adorable, but a little heavy for the light sweater. I might have to change them.
Details: (from memory- so forgive any mistakes) The pattern is a pamphlet designed for the actual yarn. Needles are downstairs but I think I used a 4mm for the body and 3.25 for the ribbing.
Modifications: I reversed the cable on one side of the band so they would mirror each other instead of both leaning in the same direction. I didn’t do the hood, and did a simple ribbed collar instead. I did a one-row buttonhole instead of binding off in one row and casting on in the next. I’m pretty sure there was something else I changed but I don’t remember now.
Here’s a photo I’ve been wanting to take for almost a year.
Isn’t that cute??? I’d taken a photo of Yannick’s Mega Sock (Mega Boots Stretch yarn) next to the baby version I made for Jakob, but I always wanted to get a photo of my two boys IN their matching sock. I finally got one, and I LOVE this photo.
I leave you with a question…
My dad is trying to convince me to get these glasses for myself.
What does we thinks?
Does we likes? I really like the sides of the frame, and the side view. I’m scared to commit! I think they’re too wide from my eyeball to my temple, but I do have a large head, and frames that fit nicely around my eye have the frame’s temple stretched sideways to go off to my ear.
So? I’ve taken the lenses out of the frame since these photos were taken, so I can take photos without the glare or designer name on the lenses, if necessary.
I completely forgot about this because I designed it last year and am still waiting for my copy of the calendar. Luckily my cousin Robyn opened hers and went looking for my pattern…and found it! Thanks Robyn! (p.s. I took this photo from you).
Update: see end of post for information about a downloadable pattern pdf
Hey guys! Even with my hands usually full of baby lol I managed to finish and write up a pattern!
After my son Jakob was born I told my husband we had no choice but to buy a new camera. Our existing camera was huge- larger than an 80’s cell phone! It was the kind of camera I couldn’t even bring to social events like a wedding or shower as it would have required its own carrying bag and I would have looked like overdressed paparazzi. Now that we had a child, I insisted, we needed a camera small enough to keep in the diaper bag or in my pocket. There was no way I would miss those special first moments!
Buying the camera didn’t solve all of my problems, however. The camera didn’t come with a case- only a thin tufted slip of paper that it fell out of easily. Friends and family of mine have knitted themselves camera cozies, but all had the same basic design; a tube with one closed end and one ribbed end. While you could knit it as tightly as you’d like, there was nothing to officially stop the camera from falling out.
I was determined to remedy that. Buttons and Velcro were out. I knew the camera would end up in my pocket and with my luck the flap wouldn’t be properly closed and the rough Velcro side would scratch the screen, or the button would cause worse damage. There had to be a better way…
And there is!
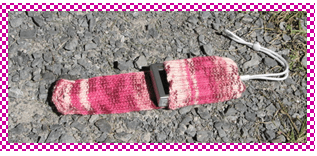
Elphie!
Presenting Elphie– a camera case that will fit any flat camera. Don’t worry about knitting to a particular gauge- this worksheet will accommodate any yarn and any size needles. The case has built-in, double-layer protection over your camera’s exposed screen area and a cover that stays on and CAN’T come off, all without any snaps, ties or Velcro. Oh, and did I mention that it’s seamless? Mine were designed to fit my Canon Digital Elph camera- hence the name.
Want to make one for yourself? Here’s how!
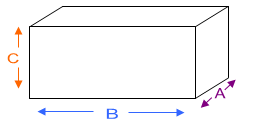
The first thing you’ll need to do is measure your camera, so get a measuring tape and paper and pencil/pen. And the camera of course! On the paper write “A”, “B”, “C”, “S” and “R” with a dash after each. We’ll be filling in those values as we go.
Step 1
Measure your camera and fill in the values for A, B and C on your paper, in inches.
Knit a 4″ x 4″ gauge swatch with your desired yarn and needles. Measure the swatch and figure out the number of stitches (S) and number of rows (R) for 1 (one) inch. Fill in the values on your paper.
Step 2
Multiply your stitch gauge by the width (C) of your case.
S_____ x C_____ = CO_____ sts. (If this results in an even number, add 1 to get an odd number of sts.
Begin knitting:
The case starts at the flap, knitted flat in Moss Stitch, then stitches are cast on for the body of the case which is knit in the round in ribbing.
Cast on the resulting CO value you obtained above.
Multiply your row gauge by the depth (A) of your case.
R_____ x A_____ = D_____ rows.
Work in Moss stitch for half this number of rows (D_____/2).
Next row: work in Moss Stitch until halfway across the row, BO 2 sts, then continue in Moss Stitch (paying attention to the pattern as established) to the end of the row.
Next row: Work in Moss Stitch until the gap created by the bound-off stitches, CO 2 sts, then continue in Moss Stitch (paying attention to the pattern as established) to the end of the row.
Continue working in Moss Stitch until your knitting reaches the length of A+B+A.
A_____ + B_____ + A_____ = _____inches.
Multiply your stitch gauge by the full measurement of your case.
Adjust this new number to the closest lower number that is a multiple of 4. AM=____
(For example, if your M = 28, the closest lower number below that which is divisible by 4 is 24, so your AM would = 24).
Subtract the number of sts you cast on from the adjusted measurement.
AM_____ – CO_____ = _____
Place a marker at the beginning of the next row, work in Moss Stitch across the row, then CO the resulting number of sts you just got after the last equation. Your total stitch count should now equal AM_____
NOTE: if you prefer a snugger case, subtract 4, 8 or 12 from the number of sts to cast on in the previous instruction.
Join in the round, being careful not to twist. Your stitch marker will serve as the beginning of each round.
Work in 2×2 rib until the tube portion of the case measures the length of B and half of A.
B_____ + (A_____/2) = _____ inches.
Make sure your stitches are evenly arranged on 4 needles, with 1/4 of the sts on each needle. (For example, if your AM = 24 sts, then you would have 6 sts on each of the 4 needles).
Decrease round: Ndl 1: ssk, k to 1 st before the end of needle, BO 1 st. Ndl 2: BO 1 st, k to 2 sts before end of needle, k2tog. Ndl 3: ssk, k to end of needle. Ndl 4: k to 2 sts before end of needle, k2tog.
Next round: Ndl 1: k to the end of the needle, CO 2 sts, Ndls 2-4: knit across
Continue in stockinette stitch until, counting from the decrease round, you have knit 2 rows less than D_____/2.
Finishing
Turn your work inside out and work a 3-Needle Bind-Off on the remaining stitches. Weave in all ends.
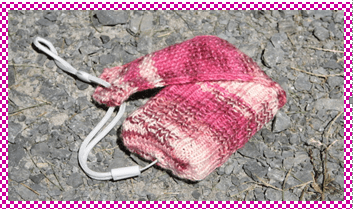
How To Use
To place the camera in the case, pull your camera’s strap through the hole at the bottom. Insert camera fully into case positioned so that the long flap folds over the screen area of your camera, providing it with a double layer of protection. Pull the camera strap through the hole in the flap to secure the flap shut.
And there you have it!
Feel free to knit as many of these as you like, and you can even sell items made from this pattern as long as you credit me as the designer of the pattern.
This pattern is provided free above, but if you’d prefer an easy-to-print PDF version, I have made it available here for a very small fee. The PDF includes the full instructions in an easy-to-follow worksheet, the definition of all abbreviations used in the pattern, yardage requirements, as well as instructions on the Moss Stitch, Ribbing and 3-Needle Bind-Off used in the pattern.
Update: see end of post for information about a downloadable pattern pdf
A knitting game, you ask? Is such a thing possible?
“Yes!” I say.
This game evolved from a challenge I was given in my knitting class to knit a “random” scarf- we had to select a bunch of varying yarns in colors we liked and work them in knit and purl rows to form a scarf. It was to be an exercise in the textures you can achieve with those two little stitches.
Ahem. I can’t do “random”. I needed to come up with a way to be random with as much control as possible…and the Knitting Game was born.
It’s so easy to play along! All you need is 6 balls of yarn, 1 die, 1 coin, and a long circular knitting needle that is a bit larger than the average thickness of your chosen yarns. I used a 9 US/5.5mm but if you are using mostly aran weight and thicker, you might want to choose something bigger.
On a piece of paper, assign each of the 6 skeins to a number 1 through 6.
Also assign the “heads” and “tails” of the coin to knit and purl (not necessarily in that order).
You also need to decide how long to make the scarf. I wanted mine about 6′ long including a 4″ fringe at each end, so I cast on enough sts to be about 5′ long.
Now the fun part!
Step 1: Roll the die to get a number. Cast on with the yarn that matches that number. Cut yarn, leaving a 4″ tail.
Step 2: Roll the die to get a number. Toss the coin to get “heads” or “tails”, and depending on what you designated “heads” or “tails” to be, it tells you to knit or purl that row.
Follow the directions of fate across the row using the yarn that matched the number you rolled on the die. Make sure to start with a 4″ tail left loose, and cut the yarn at the end of the row, leaving a 4″ tail.
The 4” of loose yarn at the beginning and end of the row will become your fringe.
Step 3: Repeat step 2 until the scarf reaches your desired width.
Step 4: Once the scarf is the width you would like, roll the die to get a number and bind off with the yarn matching the number you rolled. Don’t forget to leave a 4″ tail when you cut the yarn.
Knot the yarn ends together in groups of 2-5 strands to secure, and trim if necessary.
Voila! A completely random scarf that fulfills any need for control while leaving things totally up to chance! The coolest part is that no two scarves will ever be alike! 😀
This pattern is provided free above, but if you’d prefer an easy-to-print PDF version, I have made it available here for a very small fee. The PDF includes the full instructions in an easy to read layout with full color images.
This pattern was also published in the 2006 Knitting Pattern-A-Day calendar and has been featured in an assortment of guild newsletters as well as been used to run knitting classes/workshops. Future newsletter/class/workshop permissions are granted provided the pattern copies are purchased through me and all credit is given to me as the creator/designer.