Maaike and I are going to see the Yarn Harlot at WEBS this weekend, and decided to keep up the tradition of knitters bringing her washcloths. We worked up some ideas and I quickly designed a cloth for Montreal and a cloth for Quebec. As a final touch, I also came up with a Habs cloth (the Yarn Harlot is from Toronto…and the Habs are doing better than the Maple Leafs this year). These cloths were designed by me with help/inspiration by Maaike.
I was going to wait to knit up a sample in all sizes before publishing, but in the spirit of last night’s game 7 win by the Canadians, I’m going to offer a rough cut of the pattern here so you can get your Habs fever on, knitting-style!
ETA1- I made a slight change to the pattern (added 2 rows in the red section below the C) for all sizes. The new files were uploaded and the links changed at 9:45am EST on April 23 2008. If you downloaded the files before that date please download the latest version. Thank you!
ETA2- I am aware that there was a problem downloading the files earlier. I have fixed this with the hosting people, and there shouldn’t be any more problems accessing the patterns. If you have any problems, please email me!
Update: see end of post for information about a downloadable pattern pdf
Hey guys! Even with my hands usually full of baby lol I managed to finish and write up a pattern!
After my son Jakob was born I told my husband we had no choice but to buy a new camera. Our existing camera was huge- larger than an 80’s cell phone! It was the kind of camera I couldn’t even bring to social events like a wedding or shower as it would have required its own carrying bag and I would have looked like overdressed paparazzi. Now that we had a child, I insisted, we needed a camera small enough to keep in the diaper bag or in my pocket. There was no way I would miss those special first moments!
Buying the camera didn’t solve all of my problems, however. The camera didn’t come with a case- only a thin tufted slip of paper that it fell out of easily. Friends and family of mine have knitted themselves camera cozies, but all had the same basic design; a tube with one closed end and one ribbed end. While you could knit it as tightly as you’d like, there was nothing to officially stop the camera from falling out.
I was determined to remedy that. Buttons and Velcro were out. I knew the camera would end up in my pocket and with my luck the flap wouldn’t be properly closed and the rough Velcro side would scratch the screen, or the button would cause worse damage. There had to be a better way…
And there is!
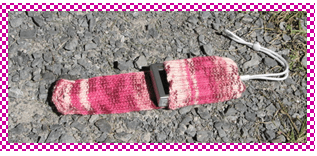
Elphie!
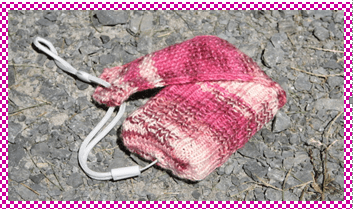
Presenting Elphie– a camera case that will fit any flat camera. Don’t worry about knitting to a particular gauge- this worksheet will accommodate any yarn and any size needles. The case has built-in, double-layer protection over your camera’s exposed screen area and a cover that stays on and CAN’T come off, all without any snaps, ties or Velcro. Oh, and did I mention that it’s seamless? Mine were designed to fit my Canon Digital Elph camera- hence the name.
Want to make one for yourself? Here’s how!
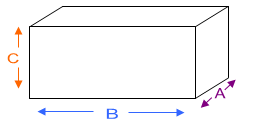
The first thing you’ll need to do is measure your camera, so get a measuring tape and paper and pencil/pen. And the camera of course! On the paper write “A”, “B”, “C”, “S” and “R” with a dash after each. We’ll be filling in those values as we go.
Step 1
Measure your camera and fill in the values for A, B and C on your paper, in inches.
Knit a 4″ x 4″ gauge swatch with your desired yarn and needles. Measure the swatch and figure out the number of stitches (S) and number of rows (R) for 1 (one) inch. Fill in the values on your paper.
Step 2
Multiply your stitch gauge by the width (C) of your case.
S_____ x C_____ = CO_____ sts. (If this results in an even number, add 1 to get an odd number of sts.
Begin knitting:
The case starts at the flap, knitted flat in Moss Stitch, then stitches are cast on for the body of the case which is knit in the round in ribbing.
Cast on the resulting CO value you obtained above.
Multiply your row gauge by the depth (A) of your case.
R_____ x A_____ = D_____ rows.
Work in Moss stitch for half this number of rows (D_____/2).
Next row: work in Moss Stitch until halfway across the row, BO 2 sts, then continue in Moss Stitch (paying attention to the pattern as established) to the end of the row.
Next row: Work in Moss Stitch until the gap created by the bound-off stitches, CO 2 sts, then continue in Moss Stitch (paying attention to the pattern as established) to the end of the row.
Continue working in Moss Stitch until your knitting reaches the length of A+B+A.
A_____ + B_____ + A_____ = _____inches.
Multiply your stitch gauge by the full measurement of your case.
Adjust this new number to the closest lower number that is a multiple of 4. AM=____
(For example, if your M = 28, the closest lower number below that which is divisible by 4 is 24, so your AM would = 24).
Subtract the number of sts you cast on from the adjusted measurement.
AM_____ – CO_____ = _____
Place a marker at the beginning of the next row, work in Moss Stitch across the row, then CO the resulting number of sts you just got after the last equation. Your total stitch count should now equal AM_____
NOTE: if you prefer a snugger case, subtract 4, 8 or 12 from the number of sts to cast on in the previous instruction.
Join in the round, being careful not to twist. Your stitch marker will serve as the beginning of each round.
Work in 2×2 rib until the tube portion of the case measures the length of B and half of A.
B_____ + (A_____/2) = _____ inches.
Make sure your stitches are evenly arranged on 4 needles, with 1/4 of the sts on each needle. (For example, if your AM = 24 sts, then you would have 6 sts on each of the 4 needles).
Decrease round: Ndl 1: ssk, k to 1 st before the end of needle, BO 1 st. Ndl 2: BO 1 st, k to 2 sts before end of needle, k2tog. Ndl 3: ssk, k to end of needle. Ndl 4: k to 2 sts before end of needle, k2tog.
Next round: Ndl 1: k to the end of the needle, CO 2 sts, Ndls 2-4: knit across
Continue in stockinette stitch until, counting from the decrease round, you have knit 2 rows less than D_____/2.
Finishing
Turn your work inside out and work a 3-Needle Bind-Off on the remaining stitches. Weave in all ends.
How To Use
To place the camera in the case, pull your camera’s strap through the hole at the bottom. Insert camera fully into case positioned so that the long flap folds over the screen area of your camera, providing it with a double layer of protection. Pull the camera strap through the hole in the flap to secure the flap shut.
And there you have it!
Feel free to knit as many of these as you like, and you can even sell items made from this pattern as long as you credit me as the designer of the pattern.
This pattern is provided free above, but if you’d prefer an easy-to-print PDF version, I have made it available here for a very small fee. The PDF includes the full instructions in an easy-to-follow worksheet, the definition of all abbreviations used in the pattern, yardage requirements, as well as instructions on the Moss Stitch, Ribbing and 3-Needle Bind-Off used in the pattern.
Update: see end of post for information about a downloadable pattern pdf
A knitting game, you ask? Is such a thing possible?
“Yes!” I say.
This game evolved from a challenge I was given in my knitting class to knit a “random” scarf- we had to select a bunch of varying yarns in colors we liked and work them in knit and purl rows to form a scarf. It was to be an exercise in the textures you can achieve with those two little stitches.
Ahem. I can’t do “random”. I needed to come up with a way to be random with as much control as possible…and the Knitting Game was born.
It’s so easy to play along! All you need is 6 balls of yarn, 1 die, 1 coin, and a long circular knitting needle that is a bit larger than the average thickness of your chosen yarns. I used a 9 US/5.5mm but if you are using mostly aran weight and thicker, you might want to choose something bigger.
On a piece of paper, assign each of the 6 skeins to a number 1 through 6.
Also assign the “heads” and “tails” of the coin to knit and purl (not necessarily in that order).
You also need to decide how long to make the scarf. I wanted mine about 6′ long including a 4″ fringe at each end, so I cast on enough sts to be about 5′ long.
Now the fun part!
Step 1: Roll the die to get a number. Cast on with the yarn that matches that number. Cut yarn, leaving a 4″ tail.
Step 2: Roll the die to get a number. Toss the coin to get “heads” or “tails”, and depending on what you designated “heads” or “tails” to be, it tells you to knit or purl that row.
Follow the directions of fate across the row using the yarn that matched the number you rolled on the die. Make sure to start with a 4″ tail left loose, and cut the yarn at the end of the row, leaving a 4″ tail.
The 4” of loose yarn at the beginning and end of the row will become your fringe.
Step 3: Repeat step 2 until the scarf reaches your desired width.
Step 4: Once the scarf is the width you would like, roll the die to get a number and bind off with the yarn matching the number you rolled. Don’t forget to leave a 4″ tail when you cut the yarn.
Knot the yarn ends together in groups of 2-5 strands to secure, and trim if necessary.
Voila! A completely random scarf that fulfills any need for control while leaving things totally up to chance! The coolest part is that no two scarves will ever be alike! 😀
This pattern is provided free above, but if you’d prefer an easy-to-print PDF version, I have made it available here for a very small fee. The PDF includes the full instructions in an easy to read layout with full color images.
This pattern was also published in the 2006 Knitting Pattern-A-Day calendar and has been featured in an assortment of guild newsletters as well as been used to run knitting classes/workshops. Future newsletter/class/workshop permissions are granted provided the pattern copies are purchased through me and all credit is given to me as the creator/designer.


 ETA1- I made a slight change to the pattern (added 2 rows in the red section below the C) for all sizes. The new files were uploaded and the links changed at 9:45am EST on April 23 2008. If you downloaded the files before that date please download the latest version. Thank you!