

My resurgence into adult coloring began even before I picked up Zentangle. Nope, it was way back in 2013. I don’t remember quite how it started, but I do remember the annoyance of wanting to color, being too lazy to draw my own images, too indecisive to print images off the internet, and the frustration of looking at various stores for coloring books but only finding child-friendly themes. I didn’t want to color Diego or Elmo (though I would have gladly colored My Little Pony had I found one LOL)… One day I’d stopped in at Omer de Serre for something else and took a chance on asking an employee if they had coloring books for adults. He pointed me to a small turning spindle with maaaaybe 9 holders (that’s how NOT popular this was back then). I was delighted, however, and even more so when I discovered the coolest books – the pages were translucent like velum or onion skin paper, but they had black borders that were opaque. They were stained glass coloring books, and I immediately grabbed one. Afraid they’d sell out of the ONE copy they had of the other types of books (again, adult coloring was NOT a thing in 2013!) I also picked up a few others. They were nothing like the thick volumes you find today, rather they’re thin and printed on regular paper, but had cool patterns like geometrics and paisleys, and sparked something creative in me that I couldn’t wait to try out.
So I did.
I remember wanting to try and do ‘cool’ things with my coloring, not just blindly splash color onto the pages.

This one, for example, is from a book called Masterscapes by Mindware. The original image had no black space, but I thought it would be interesting to have the squiggles stand out, so I colored in the entire background with a black Sharpie. I had bought a pack of 50 Crayola fine-tips for the kids, and then kept it for myself, and used the range of colors to fill in the squiggles with a rainbow, beginning with yellow in the top left, and working through the colors until the grays and black in the lower right.

Again trying to be ‘artsy’ with it, I attacked another image from the same book with my black Sharpie. I decided to give it a story in my head (hush, I’m rolling my eyes at myself too haha) and colored the lion/beast things in fire colors, the lower part with water colors, and then the steam was purple and gray, because the fire and water was mixing… blue and red mixing became purple… yeah. I know. Silly. But it was more fun to think it through than merely scribble.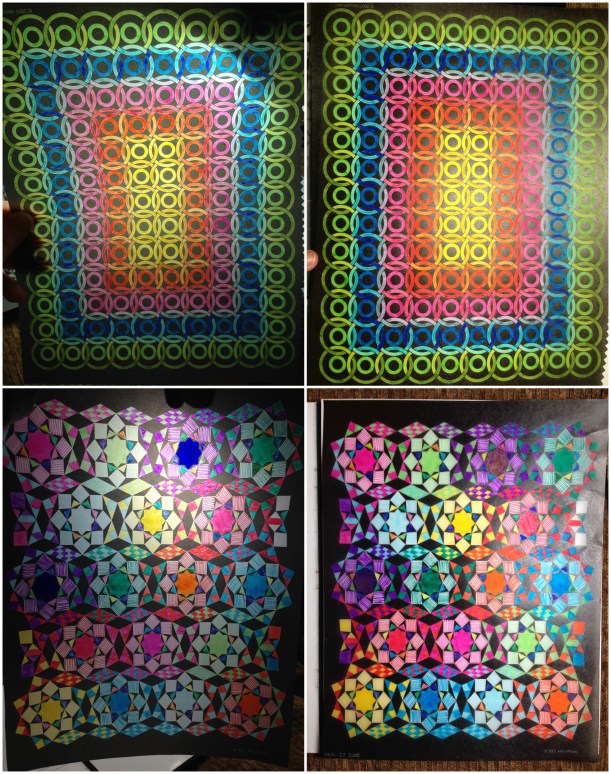
These two are both from the stained-glass book I mentioned above, which is also by Mindware and is called Tesselights. The top image with the rings was colored somewhere between 2013 and 2014, with crayola fine-tipped markers, while the lower one was colored November 22 2015 with fine and ultra-fine tip markers from the dollar store. It’s hard to show how interesting they are when a light shines through in a photograph, however for both, the image on the right is with a light overtop, and the image on the left has the light shining from behind.
This does point out one issue you need to be careful with, if you do intend to display these with illumination, like the ones my kids colored that we’ve taped to the window. I’d missed a spot when filling in one of the purple centers, so the next day, when I noticed, I went back over that section. In normal light it looks fine, however… when lit from behind the double-inked section is INCREDIBLY noticeable (the large splotch near the top of the lower left pic, if you couldn’t tell). 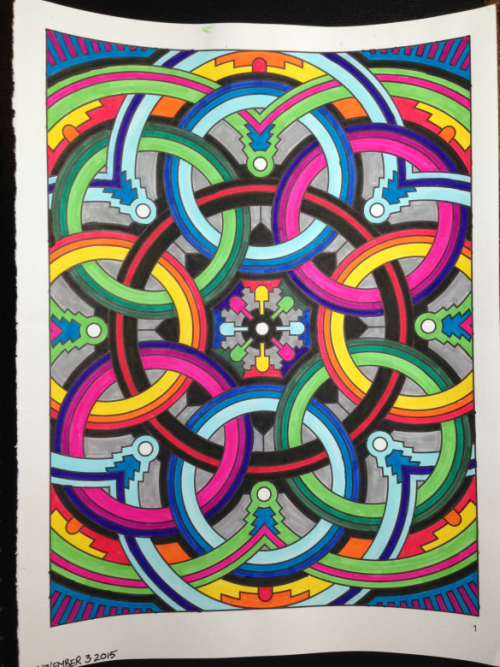
This image, colored on November 3rd, is from a book called Deco Tech. I’d gone back to Omer and bought a small pack of 18 double-ended markers, brush and fine tips, for $9.99, and used this image to try them out. Once again there were no black sections in the original image, it’s just something I like to do when coloring.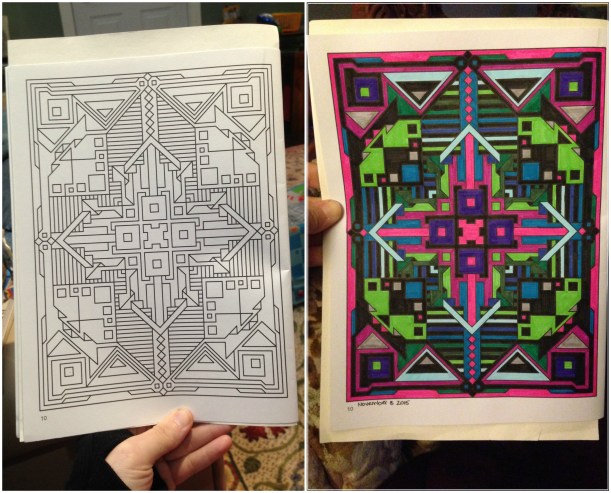
Here’s an example, colored November 8 2015, from the same book. You can see the original image as it’s published, and then my colored version. As you can tell I went through and filled in some sections with black. In some cases, like these two, the black parts were done during the coloring, but other times I go over the entire uncolored image with black first, so when I do sit down to color, I’ve only got what’s left to fill in.
One more note, about Masterscapes and Deco Tech. The images are printed double-sided, and the paper doesn’t seem much thicker than normal. Which means that not only did my Sharpies bleed through, but my water-based markers did as well, especially in areas where I made more than one pass of color. I was lucky in that for most of the images (so far) I had a clear preference for the image on one side of the page over the other, but so as to not lose your money’s worth for half the book, if you intend to use anything other than colored pencils in these books, I strongly suggest photocopying the pages, and coloring those duplicates. Otherwise I think these (and the other books I bought, whose names escape me at the moment) are lovely, inexpensive books with fun, interesting patterns to color.


Pingback: imagimorphia: Egyptian page coloring-in-progress |